Table of Contents
Advertisement
Available languages
Available languages
Advertisement
Chapters
Table of Contents

Related Manuals for Fagor HM-480X


Summary of Contents for Fagor HM-480X
- Page 1 99628993_ML_A.qxd 04/05/04 10:54 Page 1 e guide d’utilisation de votre four anual de utilización de los hornos ebruiksaanwijzing van uw oven N ávod k používání Vaší trouby sing your oven edienungsanleitung Ihres Backofens guia de utilização do seu forno HM-480 X...
-
Page 2: Table Of Contents
99628993_ML_A.qxd 04/05/04 10:54 Page 2 S o m m a i r e Edito Comment se présente votre four ? Descriptif de l’appareil Accessoires Conseils de sécurité Comment installer votre four ? Raccordement électrique P.7-8 Dimensions utiles pour encastrer votre four Comment changer l’ampoule ? - Page 3 à votre nouveau four FAGOR. Bien entendu, dans un souci permanent de satisfaire au mieux vos exi- gences vis à vis de nos produits, notre service consommateurs est à votre disposition et à votre écoute pour répondre à toutes vos questions ou suggestions (coordonnées à...
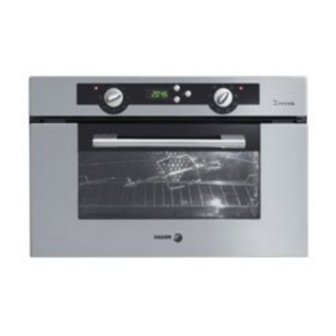
- Page 4 99628993_ML_A.qxd 04/05/04 10:54 Page 4 omment se présente votre four ? DESCRIPTIF APPAREIL Sélecteur de température Lampe Programmateur Indicateur de gradin Sélecteur de fonctions Trou pour tourne broche...
- Page 5 - Ne recouvrez pas l’intérieur du four de papier aluminium pour économiser un net- toyage. En provoquant une surchauffe, vous endommageriez l’émail intérieur du four. - Après une cuisson, ne pas prendre à main nue la casserolerie (grille, tourne broche, lèchefrite, berceau TB, etc...)
- Page 6 10:54 Page 6 C o n s e i l s d e s é c u r i t é Merci de prendre connaissance de ces conseils avant d’installer et d’utiliser votre four. Ce four a été conçu pour être utilisé par des particuliers dans leur lieu d’habitation.
-
Page 7: Comment Installer Votre Four
1,50 m environ • Avant d'effectuer le branchement, s'assurer que les fils de votre installation élec- trique sont d'une section suffisante pour alimenter normalement l'appareil (sec- tion au minimum égale à celle du câble d'alimentation). Le fusible de votre... - Page 8 être installé côté alimentation pour respecter les prescriptions de sécurité. NOTA : Lors de la mise sous tension de votre appareil, l’électronique de votre four s’i- nitialise, neutralisant l’éclairage pendant quelques secondes. Dans le cas d’un branchement avec prise de courant, celle-ci doit rester accessible après l’installation de l’appareil.
-
Page 9: Dimensions Utiles Pour Encastrer Votre Four
• Le four à encastrer ne doit être placé dans la niche que si son alimentation en courant électrique est coupée. • Pour plus de stabilité, fixez le four dans le meuble par 2 vis dans les trous prévus à cet effet sur les montants latéraux (cf schéma). Auparavant, effectuer un trou de Ø 3 mm dans la paroi du meuble pour éviter l’éclatement du bois. -
Page 10: Comment Changer L'ampoule
10:54 Page 10 o m m e n t c h a n g e r l ’ a m p o u l e ? • L'ampoule se situe au fond de la cavité de votre four. Débrancher votre four avant toute intervention sur l'ampoule pour eviter tout risque de choc électrique et laisser refroidir si... -
Page 11: Comment Utiliser Votre Four
04/05/04 10:54 Page 11 o m m e n t u t i l i s e r v o t r e f o u r ? e détail de votre programmateur DESCRIPTIF DU PROGRAMMATEUR Affichage des temps et durées Symbole de durée de cuisson... -
Page 12: C Omment Mettre À L'heure L'horloge Du Four
à l'heure l’horloge du four ? la mise sous tension • L’afficheur clignote. • Réglez l’heure en appuyant sur les touches + ou - (le maintien du doigt sur la touche per- met d’obtenir un défilement rapide) • Appuyez sur la touche pour valider. -
Page 13: C Omment Faire Une Cuisson Immédiate
Tournez le thermostat (sélecteur de température) sur la température recommandée par votre recette. Exemple : repère de température 180°. • Après ces actions, le four chauffe, le voyant de thermostat s’allume. omment programmer une cuisson ? aire une cuisson avec une durée définie : •... - Page 14 - le symbole de durée de cuisson s’éteint, - 0:00 s’affiche - une série de bips sonores est émise durant quelques minutes. L’arrêt définitif des bips sonores se fait en appuyant sur n’importe quelle touche et l’affichage repasse à l’heure.
- Page 15 Il est possible de régler la durée de cuisson jusqu’à 23h59. • Appuyez sur les touches + ou - pour régler le temps souhaité. Exemple : 25 min de cuisson...
- Page 16 L’enregistrement de la fin de cuisson se fait automatiquement au bout de quelques secondes. Après ces actions, le départ de la chauffe du four est différé pour que la cuisson soit finie à l’heure programmée (ex : 13h00). Au démarrage de la cuisson, le symbole de fin de cuisson s’éteint.
-
Page 17: C Omment Utiliser La Minuterie
En fin de décomptage du temps choisi, une série de bips est émise (affichage 0:00). L'arrêt des bips se fait en appuyant une fois sur la touche de votre choix. Il est possible de modifier ou d’annuler à n’importe quel moment... -
Page 18: M Odes De Cuisson Du Four
Symbole Nom de la fonction Description d haleur tournante La cuisson s’effectue par l’élément Montée rapide en températur chauffant situé au fond du four et peuvent être enfournés four f par l’hélice de brassage d’air. uisson combinée Trois sources de chaleur asso La cuisson s’effectue par les élé-... - Page 19 Recommandé poursaisir et cuire à coeur ge sur l’aliment et le viandes rouges et blanches. turbine en attenue Pour cuire doucement les volailles jusqu’à 2 kg Recommandé pour les cuissons lentes et délicates : gibiers moelleux... vant d’enfourner le Saisir les viandes rouges Pour mijoter en cocotte fermée les plats...
-
Page 20: Comment Entretenir Votre Four
10:54 Page 20 C o m m e n t e n t r e t e n i r v o t r e f o u r ? ettoyage de l’enceinte Avant de procéder au nettoyage manuel de votre four, laissez refroidir l'appareil. - Page 21 99628993_ML_A.qxd 04/05/04 10:54 Page 21...
- Page 22 Dimensiones útiles para encastrar el horno P.29 ¿Cómo se cambia la lámpara? P.30 ¿Cómo utilizar el horno? P.31 etalle del programador ¿ ómo poner el reloj del horno en hora? P.32 ¿ ómo efectuar una cocción inmediata? P.33 ¿ ómo programar una cocción? P.33-36 ¿...
-
Page 23: Introducción
Nuestros equipos de investigación han diseñado para usted una nueva generación de aparatos para que cocinar cada día sea un placer. Basado en la pureza de sus líneas y en una estética moderna, su nuevo horno FAGOR se integra de forma armoniosa en su cocina, ofreciéndole una perfecta unión entre facilidad de uso y prestaciones en... -
Page 24: Cómo Se Presenta Su Horno
99628993_ML_A.qxd 04/05/04 10:54 Page 24 ¿ ómo se presenta su horno? DESCRIPCION DEL APARATO Selector de la temperatura Bombilla Programador Indicador de altura Selector de funciones Orificio para el asapollos... -
Page 25: Accesorios
Consejos importantes: - No recubra el interior del horno con papel de aluminio para ahorrarse una limpieza. Al provocar un sobrecalentamiento dañaría el esmalte del interior del horno. - Después de una cocción, no saque los accesorios con las manos desnudas (parrilla,... -
Page 26: Consejos De Seguridad
10:54 Page 26 C o n s e j o s d e s e g u r i d a d Por favor, antes de instalar y utilizar el horno, lea estos consejos. Este horno ha sido diseñado para ser utilizado por particulares en sus hogares. Está... -
Page 27: Cómo Instalar El Horno
1,50 m aproximadamente • Antes de efectuar la conexión, asegúrese de que los cables de su instalación eléctrica tienen una sección suficiente para alimentar normalmente el aparato (sección como mínimo igual a la del cable de alimentación). El fusible de la... - Page 28 10:54 Page 28 ¿ C ó m o i n s t a l a r e l h o r n o ? Conexiones Al ser un especialista, usted es el único con la capacidad de instalar y conectar aparatos Fagor.
-
Page 29: Dimensiones Útiles Para Encastrar El Horno
99628993_ML_A.qxd 04/05/04 10:54 Page 29 ¿ C ó m o i n s t a l a r e l h o r n o ? Dimensiones útiles para encastrar el horno (Regleta) Hueco para Microondas Fagor de 17 litros... -
Page 30: Cómo Se Cambia La Lámpara
Page 30 ¿ ó m o s e c a m b i a l a l á m p a r a ? • La bombilla se sitúa en la parte superior de la cavidad del horno. Desconecte el horno antes de realizar cualquier intervención con la bombilla y si fuere necesario deje que el aparato se enfríe. -
Page 31: Cómo Utilizar El Horno
04/05/04 10:54 Page 31 ¿ ó m o u t i l i z a r e l h o r n o ? etalle del programador DESCRIPCION DEL PROGRAMADOR Visualización del tiempo y la duración Símbolo del tiempo de cocción Símbolo del final de la cocción... -
Page 32: C Ómo Poner El Reloj Del Horno En Hora
99628993_ML_A.qxd 04/05/04 10:54 Page 32 ¿ ó m o u t i l i z a r e l h o r n o ? 2. ¿ ómo poner el reloj del horno en hora? uando se conecte el horno •... -
Page 33: C Ómo Efectuar Una Cocción Inmediata
10:55 Page 33 ¿ ó m o u t i l i z a r e l h o r n o ? 3. ¿ ómo efectuar una cocción inmediata? El programador sólo debe marcar la hora y ésta no debe parpadear. - Page 34 04/05/04 10:55 Page 34 ¿ ó m o u t i l i z a r e l h o r n o ? • Elija el tiempo que debe durar la cocción. Pulse una vez la tecla a duración de la cocción (en 0:00) y el símbolo asociado parpadean indicando...
- Page 35 04/05/04 10:55 Page 35 ¿ ó m o u t i l i z a r e l h o r n o ? b) ¿ ómo diferir una cocción de duración definida? (elegir la hora de finalización) • Ajuste la temperatura y regule el modo de cocción.
- Page 36 10:55 Page 36 ¿ ó m o u t i l i z a r e l h o r n o ? • Ajuste la hora de final de cocción deseada pulsando las teclas + ó -. Ejemplo: final de cocción deseada a las 13:00.
-
Page 37: C Ómo Utilizar El Reloj Minutero
04/05/04 10:55 Page 37 ¿ ó m o u t i l i z a r e l h o r n o ? 5. ¿ ómo utilizar el reloj minutero? Su horno está equipado con un reloj minutero independiente del funcionamiento del funcionamiento del horno que permite ir descontando el tiempo. -
Page 38: M Odos De Cocción Del Horno
La cocción se efectúa mediante el abajo, un poco calor giratorio elemento calefactor inferior y superior, grill. y en el fondo del horno, y mediante la hélice que remueve el aire. urbo grill Este modo combina el efecto grill; el grill irradia el infrarrojo La cocción se efectúa,... - Page 39 Recomendado para cocciones lentas y delicadas: caza tierna… Para asados de carne miento antes de roja. Para cocer a fuego lento, con la olla tapada, platos preparados fuera del horno (pollo al vino, guiso de liebre…). Remendado para asar con el grill las...
-
Page 40: ¿ C Ó M O M A N T E N E R S U H O R N O
04/05/04 10:55 Page 40 ¿ C ó m o m a n t e n e r s u h o r n o ? impieza del recinto Antes de limpiar manualmente su horno, deje que el aparato se enfríe. - Page 41 99628993_ML_A.qxd 04/05/04 10:55 Page 41...
- Page 42 P.44 Oventoebehoren P.45 Veiligheidsaanwijzingen P.46 Installatie van uw oven Elektrische aansluiting P.47-48 Nuttige afmetingen voor de inbouw van uw oven P.49 Vervanging van de ovenlamp P.50 Gebruik van uw oven P.51 e programmaschakelaar nstellen van het uur van de oven P.52...
-
Page 43: Inleiding
Page 43 I n l e i d i n g Geachte klant, U heeft net een oven van FAGOR aangekocht. We willen u hier graag voor bedanken. Onze onderzoeksteams hebben voor u een nieuwe generatie van apparaten ontworpen waarmee koken en bakken dag na dag een waar plezier wordt. -
Page 44: Indeling Van Uw Oven
99628993_ML_A.qxd 04/05/04 10:55 Page 44 ndeling van uw oven BESCHRIJVING VAN DE OVEN Temperatuurknop Lamp Programmaschakelaar Nummer inschuifsleuf Keuzeknop Opening voor draaispit... -
Page 45: Oventoebehoren
99628993_ML_A.qxd 04/05/04 10:55 Page 45 O v e n t o e b e h o r e n Ovenrooster voor ovenschotels Geëmailleerde braadslee Deze braadslee vangt de braadsappen op. Bak of braad nooit vlees rechtstreeks op de braadslee om rookvorming en sterk spatten op de ovenwanden te vermijden. -
Page 46: Veiligheidsaanwijzingen
10:55 Page 46 V e i l i g h e i d s a a n w i j z i n g e n Lees eerst aandachtig de volgende tips alvorens uw oven te installeren en te gebruiken. Dit apparaat is bestemd voor huishoudelijk gebruik. Deze oven is uitsluitend ontworpen voor het bakken van voedingsmiddelen. -
Page 47: Installatie Van Uw Oven
CEI-norm 83 Voedingskabel lengte : ongeveer 1,50 m • Controleer vóór de elektrische aansluiting of de doorsnede van de elektrische installatiedraden groot genoeg is voor de elektrische voeding van het fornuis. De zekering van uw installatie dient 16 Ampère te bedragen. - Page 48 99628993_ML_A.qxd 04/05/04 10:55 Page 48 I n s t a l l a t i e v a n u w o v e n Aansluiting Als specialist bent enkel u bevoegd voor de installatie en aansluiting van Fagor- kookapparaten.
-
Page 49: Nuttige Afmetingen Voor De Inbouw Van Uw Oven
99628993_ML_A.qxd 04/05/04 10:55 Page 49 I n s t a l l a t i e v a n u w o v e n Nuttige afmetingen voor de inbouw van uw oven Opvulstrook (Regleta) Inbouwnis voor de Fagor-magnetronoven van 17 liter... -
Page 50: Vervanging Van De Ovenlamp
10:55 Page 50 e r v a n g i n g v a n d e o v e n l a m p • De ovenlamp bevindt zich bovenaan in de ovenruimte. Trek altijd de stekker van uw oven uit alvorens de ovenlamp te vervangen om elektrische schokken te vermijden. -
Page 51: Gebruik Van Uw Oven
99628993_ML_A.qxd 04/05/04 10:55 Page 51 e b r u i k v a n u w o v e n e programmaschakelaar BESCHRIJVING VAN DE PROGRAMMASCHAKELAAR Tijdsgegevens en bakduur Symbool bakduur Symbool einde bakduur Onafhankelijke schakelklok Toets voor de activering van de verschillende programma's voor... -
Page 52: I Nstellen Van Het Uur Van De Oven
99628993_ML_A.qxd 04/05/04 10:55 Page 52 G e b r u i k v a n u w o v e n nstellen van het uur van de oven ijdens het aansluiten van de oven • De display knippert. • Stel het uur met de toetsen + en - in (hou de toets ingedrukt indien u de cijfers sneller wil doen vorderen). -
Page 53: O Nmiddellijk Bakken
99628993_ML_A.qxd 04/05/04 10:55 Page 53 G e b r u i k v a n u w o v e n nmiddellijk bakken De programmaschakelaar mag enkel het uur vermelden en mag niet knipperen. • Kies de bakwijze : Plaats de keuzeknop in de gewenste stand. - Page 54 99628993_ML_A.qxd 04/05/04 10:55 Page 54 G e b r u i k v a n u w o v e n • Kies de bakduur. Druk éénmaal op de toets De bakduur (0u00) en het bakduursymbool knipperen. U kan nu de bakduur instellen. U kan de bakduur instellen.
- Page 55 99628993_ML_A.qxd 04/05/04 10:55 Page 55 G e b r u i k v a n u w o v e n itgesteld bakken met een bepaalde bakduur : (instelling van einduur) • Stel de baktemperatuur in en kies de bakstand.
- Page 56 04/05/04 10:55 Page 56 G e b r u i k v a n u w o v e n • U kan nu het gewenste einduur van de bakcyclus met de toetsen + en - instellen. Voorbeeld : u wenst dat uw gerecht om 13u00 klaar is.
-
Page 57: G Ebruik Van De Schakelklok
99628993_ML_A.qxd 04/05/04 10:55 Page 57 G e b r u i k v a n u w o v e n ebruik van de schakelkok Uw oven is voorzien van een schakelklok die onafhankelijk van de oven werkt en waarop u een bepaalde baktijd kan instellen. -
Page 58: B Akwijzen Van De Oven
Symbool Functie Beschrijving v etelucht S n e l l e s t i j g i n g va n d e ov Het bakken gebeurt met het onderste Sommige gerechten mogen m verwarmingselement van de oven oven worden geplaatst. - Page 59 Aanbevolen stand voor quiches, taarten beetje grill. en taarten met saphoudend fruit. erking van de Aanbevolen stand om rood en wit vlees te ill maakt het bruinen en te doorbakken. aling goudgeel. De Eveneens aanbevolen om gevogelte tot 2 kg uining af.
-
Page 60: Onderhoud Van Uw Oven
10:56 Page 60 O n d e r h o u d v a n u w o v e n einiging van de binnenkant van de oven Laat de oven eerst afkoelen alvorens met de manuele reiniging van de oven te beginnen. - Page 61 99628993_ML_A.qxd 04/05/04 10:56 Page 61...
- Page 62 Str.69 Jak vyměnit žárovku ? Str.70 Jak používat vaši troubu ? Str.71 etail vašeho programátoru ak nastavit na displeji vaší trouby hodiny ? Str.72 ak naprogramovat troubu, aby začala okamžitě péct ? Str.73 ak naprogramovat pečení ? Str.73-76 ak naprogramovat troubu, aby začala okamžitě péct ? Str.77...
-
Page 63: Úvod
Děkujeme vám, že jste si zakoupili troubu FAGOR. Náš tým výzkumníků pro vás vytvořil novou generaci kuchyňských přístrojů, ktreré vám zpříjemní každodenní vaření. Díky čistým liniím a moderní estetice bude ladit vaše trouba FAGOR s vaší kuchyní. Budete překvapeni jejím jednoduchým užíváním a výkonností. -
Page 64: Jaký Je Všeobecný Popis Vaší Trouby
99628993_ML_A.qxd 04/05/04 10:56 Page 64 aký je všeobecný popis vaší trouby ? POPIS PŘÍSTROJE Volič teploty (termostat) Lampa Programátor Ukazatel vodící lišty Volič funkcí Otvor pro otočný rožeň... -
Page 65: Doplňky
Důležitá upozornění : - Nepokrývejte vnitřek trouby alobalem, abyste se tak vyhnuli čištění. Způsobením přehřátí byste poničili smalt uvnitř trouby. - Po skončení pečení nebrat do holých rukou žádné předměty, které byly v troubě (mřížku, rotační gril, podpěru rotačního grilu, atd...) -
Page 66: Bezečnostní Pokyny
10:56 Page 66 B e z e č n o s t n í p o k y n y Děkujeme, že jste se seznámili z následujícími pokyny před instalací a použitím trouby. Tato trouba je určena veřejnosti pro užití v domácnosti. Je urče- na pouze na zpracovávání... -
Page 67: Jak Instalovat Vaši Troubu
1,50 m • Než provedete zapojení ujistěte se, že dráty vaší elektrické instalace mají dostatečný průřez pro normální přívod energie (průřez se musí rovnat nejméně průřezu přívodního elektrického drátu). Pojistka u vaší instalace musí mít 16 ampérů. - Page 68 99628993_ML_A.qxd 04/05/04 10:56 Page 68 J a k i n s t a l ova t va š i t ro u b u ? Elektrické připojení Jakožto odborník jste jedinou osobou kompetentní k instalaci a připojení přístroje Fagor. Proto se naše záruka vztahuje pouze a výhradně na přístroje, jejichž instalace a připojení...
- Page 69 99628993_ML_A.qxd 04/05/04 10:56 Page 69 J a k i n s t a l ova t va š i t ro u b u ? Důležité rozměry pro vestavění vaší trouby Seřizovací (Regleta) pásek Umístění pro Mikrovlnou troubu Fagor s objemem Hueco para Microondas 17 litrů.
-
Page 70: Jak Vyměnit Žárovku
04/05/04 10:56 Page 70 a k v y m ě n i t ž á r o v k u ? • Žárovka se nachází na horní straně uvnitř vaší trouby. Odpojte vaši troubu před jakoukoli opravou žárovky, abyste se vyhnuli nebezpečí... -
Page 71: Jak Používat Vaši Troubu
99628993_ML_A.qxd 04/05/04 10:56 Page 71 J a k p o u ž í va t va š i t ro u b u ? etail vašeho programátoru PROGRAMÁTORU POPIS Zobrazení časů a dob Symbol doby pečení Symbol konce pečení Nezávislý časový spínač (minutka) Přístupové... -
Page 72: J Ak Nastavit Na Displeji Vaší Trouby Hodiny
99628993_ML_A.qxd 04/05/04 10:56 Page 72 J a k p o u ž í va t va š i t ro u b u ? ak nastavit na displeji vaší trouby hodiny ? ři zapojení trouby do elektrické sítě • Na displeji bliká zobrazení 0:00. -
Page 73: J Ak Naprogramovat Troubu, Aby Začala Okamžitě Péct
04/05/04 10:56 Page 73 J a k p o u ž í va t va š i t ro u b u ? ak naprogramovat troubu, aby začala okamžitě péct ? Na programátoru smí být zobrazeny pouze hodiny, které nesmí blikat. - Page 74 99628993_ML_A.qxd 04/05/04 10:56 Page 74 J a k p o u ž í va t va š i t ro u b u ? • Zvolte dobu pečení. Stiskněte jedenkrát tlačítko Délka pečení (na 0H00) a přidružený symbol blikají, což udává, že nastavení může proběhnout.
- Page 75 99628993_ML_A.qxd 04/05/04 10:56 Page 75 J a k p o u ž í va t va š i t ro u b u ? aprogramovat posunutý začátek pečení s přesně určenou délkou pečení : (hodina konce pečení je zvolena) • Nařiďte teplotu a nastavte způsob pečení.
- Page 76 04/05/04 10:56 Page 76 J a k p o u ž í va t va š i t ro u b u ? • Nastavte požadovanou hodinu konce pečení stisknutím tlačítek + nebo -. Příklad na vedlejším obrázku : požadovaný...
- Page 77 04/05/04 10:56 Page 77 J a k p o u ž í va t va š i t ro u b u ? ak používat časový spínač s funkcí minutky ? Vaše trouba je vybavena časovým spínačem (minutkou) nezávislým na fungování trouby a umožňujícím odpočítávání...
-
Page 78: R Ůzné Způsoby Pečení V Troubě
Page 78 ůzné způsoby pečení v troubě Symbol Název funkce Popis f očivé teplo Ohřev ze zadní stěny trouby je Rychlé stoupání teploty. Někt spojen s rozháněním vzduchu být vloženy do studené troub ventilátorem. ombinované pečení Tři sdružené zdroje tepla : hod Ohřev shora, zespodu a ze zadní... - Page 79 šťavnaté ovocné koláče. uje účinek turbíny a Doporučeno pro prudké opečení a opečení do né teplo na pokrm růžova červeného a bílého masa. Pro pomalé ý turbínou snižuje pečení drůbeže do 2 kg.
-
Page 80: Jak Udržovat Vaši Troubu
Všeobecně platí, že je lepší vyhnout se používání pískových čistících prášků, drátěnek a ostrých předmětů. - Obvody dvířek a vnitřních částí musí být neustále čisté. Jestli se na základě silného znečištění tyto plochy poškodí, obraťte se na odborníka před použitím vašeho přístroje. - Page 81 99628993_ML_A.qxd 04/05/04 10:56 Page 81...
- Page 82 99628993_ML_A.qxd 04/05/04 10:56 Page 82 C o n t e n t s Introduction P.83 Your oven How it works P.84 Accessories P.85 Safety recommendations P.86 How to install your oven Electrical connections P.87-88 Dimensions for installation use P.89 Changing bulb P.90...
- Page 83 Our design staff have produced a new generation of kitchen equipment, to make everyday cooking a pleasure. You will find that the clean lines and modern look of your FAGOR oven blends in perfectly with your kitchen décor. It is easy to use and performs to a high standard.
- Page 84 99628993_ML_A.qxd 04/05/04 10:56 Page 84 our oven OVEN FEATURES Temperature control Light Timer Rail positions Programme selector Hole for rotisserie...
- Page 85 Important recommendations : - Never cover the inside of your oven with aluminium foil in order to avoid cleaning. By causing overheating you will damage the interior enamel of the oven. - After cooking, never pick up hot pans, utensils and accessories using your bare...
- Page 86 10:56 Page 86 S a f e t y r e c o m m e n d a t i o n s Please read these instructions before installing and using your oven. The oven has been designed for domestic use only for cooking food. No asbestos has been used in its construction.
- Page 87 2 -pin with earth Connecting cable approx 1.50 m. long • Before connecting your oven, make sure you are using the correct size cable. The cross-section should be the same as the cable connected to the oven. Use a 16-amp fuse.
- Page 88 04/05/04 10:56 Page 88 H o w t o i n s t a l l y o u r o v e n Connecting up As a specialist, you alone are competent to install and connect up Fagor appliances.
- Page 89 (please see diagram above). • Centre the oven in the unit, and make that it is at least 2 mm from any other unit beside • The unit must be heat-resistant (or covered with heat-resistant material).
- Page 90 - 220-240 V - 300°C - E 14 fitting unscrew cover c) Change the bulb, replace the shade and switch your oven back on at the mains. Using a rubber glove makes it easier to unscrew the cover and the bulb.
- Page 91 99628993_ML_A.qxd 04/05/04 10:56 Page 91 o w t o u s e y o u r o v e n he oven programmer DESCRIPTION OF THE PROGRAMMER Time and duration display Cooking time symbol Cooking complete symbol Independent timer Button providing access to the various time setting programmes...
- Page 92 99628993_ML_A.qxd 04/05/04 10:56 Page 92 o w t o u s e y o u r o v e n ow to set the clock hen the oven is first switched on at the mains • The display blinks. • Press on the + and - buttons until the correct time is shown (Keeping a finger on the button, rather than tapping it, is quicker).
- Page 93 99628993_ML_A.qxd 04/05/04 10:56 Page 93 o w t o u s e y o u r o v e n ow to cook straightaway The timer display only shows the time of day. It should not be blinking. • Choose the cooking method : Turn the dial until it is indicating your choice.
- Page 94 99628993_ML_A.qxd 04/05/04 10:57 Page 94 o w t o u s e y o u r o v e n • Choose the cooking time. Press once on the button. The clock shows 0:00 and the cooking time symbol blinks. You can now instruct the oven how long to cook for.
- Page 95 04/05/04 10:57 Page 95 o w t o u s e y o u r o v e n elayed cooking with a pre-selected cooking time: (you decide when cooking will stop) • Set the temperature and select the cooking method.
- Page 96 - The display shows 0:00 - The oven gives a series of bleep for several minutes. To stop the bleeping, press any of the buttons on the panel. The time of day will then be displayed again. Warning! At this point you must switch the temperature and method controls off;...
- Page 97 99628993_ML_A.qxd 04/05/04 10:57 Page 97 o w t o u s e y o u r o v e n 5. Using the timer ? Your oven is also equipped with a timer which operates fully independently of the oven, making it possible to "count down"...
- Page 98 Feature Descr an oven A heater element at the back of Oven rapidly reaches the sele the oven and the fan help cook the Some dishes can start off in food. ombined Three combined heat sources the bottom of the oven, a littl...
- Page 99 Recommended to prevent meat drying lected temperature. out, and for cooking vegetables and the cold oven. fish and food placed on up to 2 shelves. s: lots of heat at Recommended for juicy quiches, pies tle ambient heat and fruit tarts.
- Page 100 10:57 Page 100 L o o k i n g a f t e r y o u r o v e n leaning the inside the oven area Before cleaning your oven by hand, be sure to allow the appliance to cool down.
- Page 101 99628993_ML_A.qxd 04/05/04 10:57 Page 101...
- Page 102 Beschreibung des Gerätes S.104 Zubehör S.105 Sicherheitshinweise S.106 Backofeninstallation Stromanschluss S.107-108 Nützliche Maße für den Einbau Ihres Backofens S.109 Wie wird eine Birne ausgewechselt S.110 Benutzung Ihres Backofens S.111 hre Programmschaltuhr im Detail tellen der Uhr des Backofens S.112 tarten eines sofortigen Garens S.113...
- Page 103 Unsere Forschungsteams haben für Sie eine neue Gerätegeneration entworfen, damit Kochen ein jeden Tag erneuertes Vergnügen bleibt. Mit klaren Linien und einer modernen Ästhetik, integriert sich Ihr neuer Backofen von FAGOR harmonisch in Ihre Küche und verbindet auf perfekte Weise einfache Benutzung und Kochleistungen.
-
Page 104: Präsentierung Ihres Backofens
99628993_ML_A.qxd 04/05/04 10:57 Page 104 räsentierung Ihres Backofens BESCHREIBUNG DES GERÄTES Temperaturwählschalter Lampe Programmwähler Anzeige der Einschubebene Funktionswählschalter Loch für den Drehspieß... -
Page 105: Zubehör
Halterost, der vorher in die unterste Ebene geschoben wurde. Wichtiger Hinweis : - Legen Sie den Backofeninnenraum nicht mit Alufolie aus, um sich eine Reinigung zu ersparen. Der dadurch entstehende Wärmestau schadet der Emaillierung. - Nach einem Bratvorgang das Bratgeschirr (Rost, Drehspieß, Fettpfanne,... -
Page 106: Sicherheitshinweise
10:57 Page 106 S i c h e r h e i t s h i n w e i s e Bitte nehmen Sie diese Hinweise zur Kenntnis, bevor Sie Ihren Backofen installieren und benutzen. Dieser Backofen wurde zur Benutzung von Privatpersonen in ihrer Wohnung entworfen. -
Page 107: Backofeninstallation
Etwa 1,50 m langes Stromzuführungs kabel • Vergewissern Sie sich vor dem Anschluss, dass die Kabel Ihrer elektrischen Installation einen für die normale Versorgung Ihres Gerätes ausreichenden Querschnitt aufweisen. Ihr Gerät muss mit einer Sicherung von 16 Ampere ausgestattet sein. - Page 108 Page 108 Backofeninstallation Anschluss Nur Sie als Fachmann haben das Recht, die Installation und den Anschluss der Geräte von Fagor durchzufüh-ren. Aus diesem Grund gilt unsere Garantie nur und ausschließlich für jene Geräte, deren Installation und Anschluss von Ihnen gemäß den geltenden Bestimmungen durchgeführt wurde.
-
Page 109: Nützliche Maße Für Den Einbau Ihres Backofens
Öffnung von 50x50mm für die Durchführung des Stromkabels (siehe vorstehendes Schema). • Zentrieren Sie den Backofen so in dem Möbel, dass ein Abstand von mindestens 2 mm zum benachbarten Möbel eingehalten wird. • Das Material des Möbels, in das der Backofen eingebaut wird, muss hitzebeständig sein (oder mit einem hitzebeständigen Material beschichtet sein). -
Page 110: Wie Wird Eine Birne Ausgewechselt
Losschrauben runde Abdeckung - Sockel E 14 c) Schrauben Sie eine neue Birne ein, montieren Sie die Fassung wieder und schließen Sie Ihren Backofen wieder an. Zum Herausdrehen von Glasabdeckung und Lampe sollten Sie einen Gummihandschuh verwenden, dieser erleichtert den... -
Page 111: Benutzung Ihres Backofens
99628993_ML_A.qxd 04/05/04 10:57 Page 111 e n u t z u n g I h r e s B a c k o f e n s hre Programmschaltuhr im Detail BESCHREIBUNG DES PROGRAMMSCHALTERS Anzeige der Zeitangaben und Gardauer Symbol der Gardauer Symbol des Endes der Gardauer Unabhängiger Zeitschalter... -
Page 112: S Tellen Der Uhr Des Backofens
99628993_ML_A.qxd 04/05/04 10:57 Page 112 e n u t z u n g I h r e s B a c k o f e n s tellen der Uhr des Backofens ei der Inbetriebnahme • Die Anzeige blinkt. • Stellen Sie die Uhrzeit mit den Tasten + oder - ein (mit gedrückter Taste kann man die Ziffern... -
Page 113: S Tarten Eines Sofortigen Garens
04/05/04 10:57 Page 113 e n u t z u n g I h r e s B a c k o f e n s tarten eines sofortigen Garens Das Programmschaltfeld darf nur die Uhrzeit angeben; diese darf nicht blinken. - Page 114 04/05/04 10:57 Page 114 e n u t z u n g I h r e s B a c k o f e n s • Die Gardauer einstellen. Einmal auf die Taste Die Gardauer (0:00) und das ihr zugeordnete Symbol blinken, um anzuzeigen, dass die Einstellung jetzt möglich ist.
- Page 115 04/05/04 10:57 Page 115 e n u t z u n g I h r e s B a c k o f e n s erzögertes Garen mit programmierter Dauer: (eingegebenes Ende der Gardauer) • Die Temperatur justieren und die Garart einstellen.
- Page 116 10:57 Page 116 e n u t z u n g I h r e s B a c k o f e n s • Die Uhrzeit am Ende der Gardauer durch Druck auf die Tasten + oder - justieren.
-
Page 117: W Ie Wird Die Unabhängige Schaltuhr Benutzt
04/05/04 10:57 Page 117 e n u t z u n g I h r e s B a c k o f e n s ie wird die unabhängige Schaltuhr benutzt Ihr Herd ist mit einer von der Funktionsweise des Herdes unabhängigen elektronischen... -
Page 118: D Ie Garfunktionen Des Backofens
04/05/04 10:57 Page 118 ie Garfunktionen des Backofens Symbol Funktionsbezeichnung Funktionsbe eissluft Das Garen erfolgt anhand des am Schneller Temperaturanstieg. Be Boden des Backofens vorhandenen können direkt in den kalten B Heizelementes und der werden. Luftumwälzschraube. ombiniertes Garen Drei zusammen arbeitende H... - Page 119 Empfohlen zum Anbraten und Braten von er Grill schickt die rotem und weißem Fleisch. ungsmittel und die Zum langsamen Braten von Geflügel bis 2 kg. e Luftumwälzung Empfohlen für langsame und delikate Garvorgänge: saftiges Wild ... ie Speise in den Zum Anbraten von Braten aus rotem Fleisch.
-
Page 120: Reinigung Des Backofens
04/05/04 10:57 Page 120 R e i n i g u n g d e s B a c k o f e n s einigung des Garraums Den Backofen, bevor Sie ihn von Hand reinigen, abkühlen lassen. Allgemein sind Scheuerpulver und Metallschwämme sowie scharfe Gegenstände untersagt. - Page 121 99628993_ML_A.qxd 04/05/04 10:57 Page 121...
- Page 122 P.129 Como mudar a lâmpada? P.130 Como utilizar o seu forno? P.131 s pormenores do programador omo ajustar a hora do relógio do seu forno P.132 omo efectuar uma cozedura imediata ? P.133 omo programar uma cozedura ? P.133-136 omo utilizar o temporizador? P.137...
- Page 123 Acabou de adquirir um forno FAGOR e estamos-lhe gratos por isso. As nossas equipas de pesquisa conceberam, pensando em si, uma nova geração de aparelhos para que o acto de cozinhar seja um prazer no dia a dia. Com linhas puras e uma estética moderna, o seu novo forno FAGOR integra-se harmoniosamente na sua cozinha e alia perfeitamente facilidade de utilização e performance de cozedura.
- Page 124 99628993_ML_A.qxd 04/05/04 10:58 Page 124 omo se apresenta o seu forno? DESCRIÇÃO DO APARELHO Selector de temperatura Lâmpada Programador Indicador de alheta Selector de funções Orifício para espeto rotativo...
- Page 125 Conselhos importantes: - Não revista o interior do forno com papel de alumínio para poupar uma limpeza. Isto iria provocar um sobreaquecimento, danificando o esmalte do interior do forno. - Após uma cozedura, não tocar os acessórios do forno (grelha, espeto rotativo,...
- Page 126 10:58 Page 126 C o n s e l h o s d e S e g u r a n ç a Agradecemos que tome conhecimento destes conselhos antes de instalar e utilizar o seu forno. Este forno foi concebido para ser utilizado por particulares no seu local de habitação.
-
Page 127: Como Instalar O Seu Forno
1,50 m de comprimento • Antes de efectuar a ligação, assegure-se de que a secção dos fios da instalação eléctrica é suficientemente grande para alimentar normalmente o aparelho (no mínimo, a secção deve ser igual à do cabo eléctrico). O fusível da sua instalação... - Page 128 à ligação de aparelhos eléctricos. Quando não se utiliza uma ficha de tomada de corrente para ligar o aparelho à rede de electricidade pública, é necessário instalar um dispositivo omnipolar de corte (com uma abertura mínima de 3 mm entre os contactos), à...
-
Page 129: Dimensões Úteis Para Encastrar O Seu Forno
50 mm X 50 mm na parte traseira do compartimento, para poder fazer passar o cordão de alimentação (Ver esquema acima). • Coloque o forno no centro do móvel de modo a deixar uma distância mínima de 2 mm de separação entre este e o móvel vizinho. -
Page 130: Como Mudar A Lâmpada
10:58 Page 130 o m o m u d a r a l â m p a d a ? • A lâmpada está situada no tecto da cavidade interna do seu forno. Desligue o seu forno antes de efectuar qualquer tipo de intervenção sobre a lâmpada e deixe arrefecer o aparelho, se... -
Page 131: Como Utilizar O Seu Forno
99628993_ML_A.qxd 04/05/04 10:58 Page 131 o m o u t i l i z a r o s e u f o r n o ? s pormenores do programador DESCRIÇÃO DO PROGRAMADOR Visualização dos tempos e das durações Símbolo do tempo de cozedura Símbolo do final de cozedura... -
Page 132: C Omo Ajustar A Hora Do Relógio Do Seu Forno
04/05/04 10:58 Page 132 o m o u t i l i z a r o s e u f o r n o ? omo ajustar a hora do relógio do seu forno ? colocação sob tensão • O visor acende por intermitência. -
Page 133: C Omo Efectuar Uma Cozedura Imediata
04/05/04 10:58 Page 133 o m o u t i l i z a r o s e u f o r n o ? omo efectuar uma cozedura imediata ? O programador deve apenas visualizar a hora; esta não deve piscar. - Page 134 99628993_ML_A.qxd 04/05/04 10:58 Page 134 o m o u t i l i z a r o s e u f o r n o ? • Escolha a duração de cozedura. Prima uma vez a tecla A duração de cozedura (às 0h00) e o símbolo associado acendem por intermitência para indicar...
- Page 135 04/05/04 10:58 Page 135 o m o u t i l i z a r o s e u f o r n o ? omo diferir uma cozedura com uma duração definida? (hora de fim de cozedura escolhida) • Ajuste a temperatura e regule o modo de cozedura.
- Page 136 04/05/04 10:58 Page 136 o m o u t i l i z a r o s e u f o r n o ? • Ajuste a hora de fim de cozedura desejada premindo as teclas + ou -.
-
Page 137: C Omo Utilizar O Temporizador
04/05/04 10:58 Page 137 o m o u t i l i z a r o s e u f o r n o ? omo utilizar o temporizador ? O seu forno está equipado de um temporizador independente do funcionamento do forno que permite efectuar a contagem de um certo tempo. -
Page 138: M Odos De Cozedura Do Forno
A cozedura efectua-se graças ao Subida rápida da temperatura. elemento aquecedor situado no fundo Alguns pratos podem ser intr do forno e através da hélice equipada forno frio. de um sistema de circulação do ar. ozedura em modo combinado Três fontes de calor associad A cozedura efectua-se graças aos... - Page 139 Recomendado para descongelar as carnes e as aves. Utilize a grelha com a pingadeira por baixo ou a placa para os bolos. Não utilize nunca os sumos da descongelação, pois estes são impróprios para consumo.
-
Page 140: Como Limpar O Seu Forno
04/05/04 10:58 Page 140 C o m o l i m p a r o s e u f o r n o ? impeza do interior Antes de proceder à limpeza manual do seu forno, deixe arrefecer o aparelho.
Need help?
Do you have a question about the HM-480X and is the answer not in the manual?
Questions and answers