
Subscribe to Our Youtube Channel
Related Manuals for Dogtra T&B DUAL


Summary of Contents for Dogtra T&B DUAL
- Page 1 T&B DUAL EXPANDABLE TO 2-DOG SYSTEM Owner's Manual Please read this manual thoroughly before operating the T&B DUAL Training & Beeper Collar.
- Page 2 Dogtra with a Dogtra product. If you think that your Dogtra product or other property.
-
Page 3: Table Of Contents
MAXIMIZING THE DISTANCE ........ LED INDICATOR ............Optional Accessories CHARGING THE BATTERY ........Auto Charger Dogtra’s auto chargers are designed for use with a HANDHELD TRANSMITTER OLED ..... 10 volt car outlet. ATTACHING THE BELT CLIP ........European Charger USING THE TEST LIGHT .......... -
Page 4: Main Features
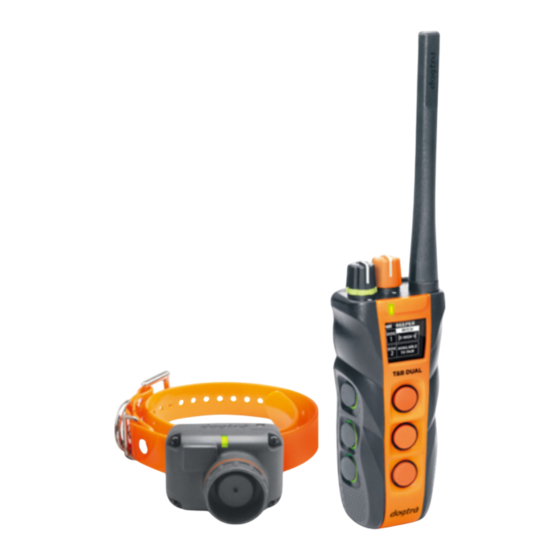
MAIN FEATURES OVERVIEW • Rheostat Dial for gradual adjustments in stimulation intensity with no jumps between levels (0-127) • Two-dog model allows control of two different dogs from one transmitter • 1.5-mile range • Two different stimulation types - Nick & Constant •... - Page 5 Antenna Setting Toggle Collar Strap Switch Contact Points Battery Charging Receptacle & Rubber Plug On/Off OLED Screen Button Battery Charging Receptacle & Rubber Plug LED Indicator Light On/Off Magnetic Red Dot On/Off Magnetic Red Dot T&B DUAL T&B DUAL Transmitter Receiver/Collar...
-
Page 6: Understanding Your Training System
UNDERSTANDING YOUR Receiver On/Off Magnetic Red Dot To turn on the receiver/collar, place the magnetic red TRAINING SYSTEM dot on the back of the transmitter to the red dot on the receiver/collar. Hold the two red dots together for a 1. -
Page 7: Transmitter Button Function
2. Transmitter Button Function Nick/Constant Button There are three buttons each on the front and left side 1) Beeper Setting of the transmitter. The Nick/Constant button is the top The transmitter for the button on each side of the transmitter. When the button T&B DUAL has seven is pressed quickly, the Nick function is activated and the buttons (three on the face... - Page 8 Beeper Mode Button (Run/Point & Point-Only) Initial Beeper Mode Action The middle button is the Beeper Mode button for each Sound side of the transmitter. When you press the Beeper - Dog running/moving: emits Mode button the first time, the collar will beep twice. Press Run/Point double beep every 7 seconds...
-
Page 9: Training Setting
Pitch Setting Button 2) Training Setting You can change the pitch of the beeper by pressing the You can use the Setting Pitch Setting button, the bottom button on each side of Toggle Switch on the back the transmitter. The speaker with one bar will be the low of the transmitter to change pitch, while the speaker with three bars will be the high from B (Beeper Setting) to... - Page 10 Nick/Constant Button HPP Vibration Button There are three buttons each on the front and the left The middle button is the HPP Vibration button for each side of the transmitter. The Nick/Constant button is the side of the transmitter. Pressing it will give a vibration for top button on each side.
-
Page 11: Collar Fitting
Dogtra uses surgical stainless steel contact points and anti-microbial plastic Note: The stimulation intensity can be adjusted even to protect the dog’s skin. -
Page 12: Maximizing The Distance
6. LED Indicator 5. Maximizing the Distance The T&B DUAL has a 1.5-mile range. Depending on the The LED indicator flashes every 5 seconds when the way you use your transmitter, the transmitter range may receiver is on and ready for use. The LED indicator will vary. -
Page 13: Charging The Battery
3. The indicator light on the transmitter or receiver will not come on. Dogtra facility. Upon receipt of the collar, be sure to give it a full 2-hour initial charge before the first use. When a 4. The indicator light on the transmitter or receiver comes on momentarily, but will not stay on when the charger is not in use, disconnect it from the power source. -
Page 14: Handheld Transmitter Oled
8. Handheld Transmitter OLED the auto charger, plug into a cigarette lighter only for lithium polymer batteries (use a 230 volt European charger for Europe). All indicator lights should glow Setting Mode red when properly plugged in and the unit will automatically shut off during the charging process. -
Page 15: Attaching The Belt Clip
Care for OLED Transmitters in Cold Temperature 9. Attaching the Belt Clip In cold temperatures (10°F or below), the Organic Light- Emitting Diode(OLED) on your transmitter may be dim or slow to respond. Wait until the display becomes visible before selecting any training level. Even though the OLED screen might be dim or slow to respond when you push the Nick or Constant button, the transmitter will still function properly. -
Page 16: Using The Test Light
10. Using the Test Light 4. Watch the test light as you push the Nick button on the transmitter. It should light up for just a moment. The higher the intensity, the brighter the test light will 5. Watch the test light as you push the Constant button on the transmitter. -
Page 17: Code Setting Guide
9. Press the Beeper Mode button a second time; you 11. Code Setting Guide should hear 1 rapid beep. This will put you into the Code setting for 1-dog use Point-Only mode. Once again, keep your receiver/ collar steady and wait for a moment until the collar 1. -
Page 18: General Training Tips
GENERAL TRAINING TIPS Code setting for 2-dog use 4. To code the Dogtra T&B DUAL for 2-dog use, repeat Getting Started With Your T&B DUAL steps 1 and 2 above. While the green LED is rapidly Your dog must know some basic obedience commands blinking on the receiver/collar, press the Nick/Constant before beginning training with the T&B DUAL. -
Page 19: Maintenance
For more training information, please visit our website at If the unit is malfunctioning, please refer to the www.dogtra.com. “Troubleshooting Guide” before sending it to Dogtra for service. If you have any questions or concerns, you may email them to info@dogtra.com, or call customer service... -
Page 20: Troubleshooting Guide
(response may be very subtle). at info@dogtra.com or (888) 811-9111. You can send in 2. The test light comes on, but I do not feel any your charging units to have us inspect them. - Page 21 This Except as otherwise provided, Dogtra warrants to the original retail purchaser (“You”) that your Dogtra product shall be free of defects in materials and will be up to the user's discretion. If you are still having workmanship for a period of one (1) year from the date of purchase (“Original...
- Page 22 Limitation of Remedies visit www.dogtra.com/product-registration. If your product is not Dogtra’s liability is limited to the cost of repair or replacement of the registered with Dogtra, You will be required to provide a receipt or other Dogtra product under the Original Warranty or Extended Warranty. Any proof purchase (as provided above) to qualify for warranty service.
Need help?
Do you have a question about the T&B DUAL and is the answer not in the manual?
Questions and answers