
Related Manuals for Dogtra 1900X


Summary of Contents for Dogtra 1900X
- Page 1 Owner's Manual Please read this manual thoroughly before operating the 1900X training e-collar. Visit Gun Dog Supply.com Order a Dogtra 1900x See other Dogtra Products...
-
Page 2: Important Safety And Product Information
Unauthorized use Children and the disabled Dogtra products should only be used in a humane manner to Dogtra products are not toys. Adult supervision and extreme train and educate dogs. caution are required when Dogtra products are used by or Dogtra products are not intended for use in any other way near children. -
Page 3: Table Of Contents
CONTENTS AT A GLANCE ............... BATTERY CHARGE ..........MAIN FEATURES ............ATTACHING THE BELT CLIP ........ OVERVIEW ..............USING THE TEST LIGHT ........GENERAL TRAINING TIPS ......... UNDERSTANDING YOUR TRAINING SYSTEM TURNING THE PRODUCT ON/OFF ....MAINTENANCE ............. DEFAULT BUTTON SETTINGS ......TROUBLESHOOTING GUIDE ........ -
Page 4: At A Glance
Optional Accessories • 2-hour rapid charge batteries for transmitter and Auto Charger receiver The input of the automatic charger for 1900X is 12V ~ 24V and the output is 5V 1000mA. • USB C-TYPE Charging European Charger Dogtra's European chargers are designed for use with 220V AC electrical outlets. -
Page 5: Overview
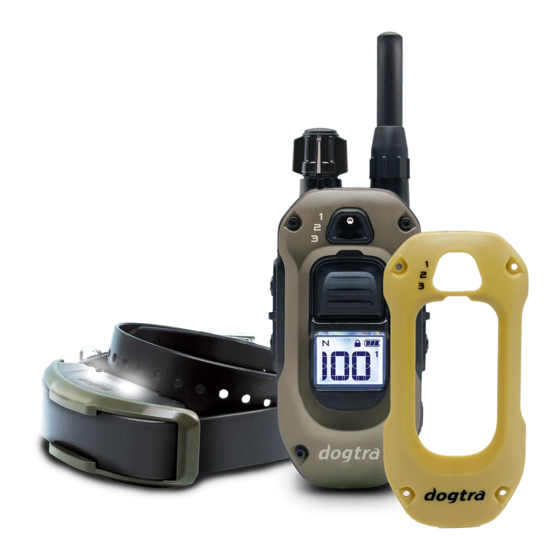
OVERVIEW Lock/Unlock Stimulation Battery Mode Displayed Dog Selection Stimulation Level 3/4 Mile Range Rheostat Dial 1900X Transmitter LCD Screen Safety Stimulation Level Lock Receiver Nick or Constant Selector Toggle (Programmable) (Up to 3-Dogs) USB-C 1000 Lux Charging LED Light Boosted... -
Page 6: Understanding Your Training System
UNDERSTANDING YOUR 2. DEFAULT BUTTON SETTINGS TRAINING SYSTEM Front button (Nick or Constant) The front button can be selected as Nick / Constant. The 1. TURNING THE PRODUCT ON/OFF stimulus type indicated at the top of the display is applied. (Factory set to Nick mode) The remote transmitter’s power button is located on the bottom right. -
Page 7: Side Button
3. SIDE BUTTONS Applies Displayed Base Level. Press Press In this case, level 5 Boosted Tone Constant ‘Nick’ will apply. Locate Light XPP Vibration Boosted Constant Applies ‘Boosted Constant’ Apply Constant boost stimulation for up to 12 seconds at for up to 12 seconds. Press Press a pre-selected boost level. - Page 8 Setting up Boost feature Non-Stimulation Features 1. Set the stimulation level XPP (Extreme Performance Pager) to zero. Vibration Rheostat Provides vibration for up to 12 Dial seconds when held. LCD Screen Tone Provides an audible tone for up to 12 seconds when held.
-
Page 9: Safety Stimulation Level Lock
4. SAFETY LEVEL LOCK 6. HOW TO ADD AN ADDITIONAL RECEIVER DEVICE Stimulation level lock indicator 1. Turn on the transmitter and set the stimulation level to “0”. Use the toggle to select the desired dog (1,2 or 3). To prevent the stimulation level from changing unintentionally, press the switch at the top of the Rheostat dial for more than 2 seconds to lock it. -
Page 10: X-Shield
7. X-SHIELD INSTALLATION 8. HANDSFREE/PLUS SQUARES PAIRING Additional X-SERIES case covers, X-Shields are sold Select the number Dog separately. you want to pair with the HANDSFREE SQUARE Pairing light indicator HANDSFREE SQUARE PAIRING: NICK OR CONSTANT NICK OR CONSTANT 1. Use the included tool to 2. - Page 11 HANDSFREE SQUARE Pairing: LIGHT Hold down the on/off All other Functions button and the Light button. 1. Begin with the remote transmitter turned off. 2. Press and hold the ON/OFF button + your desired func- Light Button tion until you see the rapid light blink. On/Off Button 3.
-
Page 12: How To Use The Receiver
1. Insert the strap by looking at the direction of the arrow corrections to be inconsistent. Dogtra uses medical grade on the receiver. stainless steel contact points and anti-microbial plastic to protect the dog’s skin. -
Page 13: Obtaining Maximum Distance
3. OBTAINING MAXIMUM DISTANCE antenna is covered or in contact with your body. Refer to The operating range of the 1900X is ½ mile. the following carrying methods for optimal range. Depending on how you use the transmitter, the range of your transmitter may vary. -
Page 14: Finding The Right Stimulation Level
4. FINDING THE RIGHT STIMULATION LEVEL 5. NON-STIMULATION CONTACTS 1. Please turn the contact points and remove them. The 1900X has a rheostat dial on the top of the 2. Place non-stimulation transmitter. Always start at the lowest level and work contacts in each place your way up. -
Page 15: Led Indicator
6. LED INDICATOR 7. CARE FOR LCD TRANSMITTERS IN COLD TEMPERATURE In cold temperatures (below 10°F), the transmitter's liquid The LED indicator flashes every 4 seconds when the crystal display (LCD) may appear dim or unresponsive. receiver is on and ready for use. The LED indicator will Wait until you see the display before selecting your blink on both the transmitter and the receiver when the training level. -
Page 16: Battery Charge
4. After charging, cover the battery charging socket with a Dogtra 1900X uses a lithium polymer battery. If the light rubber plug. is red, the device does not turn on, or the system does not Recharging is required in the following cases: stay on when you press the button, recharge the device. -
Page 17: Attaching The Belt Clip
9. USING THE TEST LIGHT 9. ATTACHING THE BELT CLIP To attach the included belt clip, follow the instructions 1. Turn on the receiver by pressing and holding the on/ below. off button in the center of the contact terminal. The 1. -
Page 18: General Training Tips
Your dog must know some basic obedience commands 6. Turn the rheostat dial on the transmitter clockwise and before beginning training with the 1900X. A dog learns then counterclockwise. The test light shines brighter at by first being shown a command, followed by lots of higher stimulus levels and dimmer at lower levels. -
Page 19: Maintenance
Troubleshooting If the unit is malfunctioning, please refer to the “Troubleshooting Guide” before sending it to Dogtra for service. If you have any questions or concerns, you may email them to Info@dogtra.com, or call customer service... -
Page 20: Troubleshooting Guide
(response may be very subtle so pay – If the above does not resolve your issues, contact attention.) Dogtra customer service at info@dogtra.com or (888) 811-9111. 2. The LED indicator light comes on, but I do not feel any stimulation. -
Page 21: Limited Warranty
(“Warranty”). The Warranty covers the cost of repair (parts PART 15.21 and labor) or replacement (if repair is not feasible) of a defective Dogtra Any changes or modifications (including the antennas) to this device product during said one-year period. For such repaired or replaced that are not expressly approved by the manufacturer may void the user’s... -
Page 22: Disclaimer Of Other Warranties
If your product is not Dogtra, is authorized to make any additions, changes, or extensions to the registered with Dogtra, You will be required to provide a receipt or other Warranty. Dogtra, at its sole discretion and at any time, reserves the right proof purchase (as provided above) to qualify for warranty service.
Need help?
Do you have a question about the 1900X and is the answer not in the manual?
Questions and answers
how to increase volume on the tone
The Dogtra 1900X has an audible tone feature, but there is no mention of an option to adjust the tone volume.
This answer is automatically generated
My collar was working fine yesterday, but today its not transmitting the shock, buzz or tone. Everything is charged properly, so I **** confused as to why its not working
Your Dogtra 1900X collar may not be transmitting shock, buzz, or tone due to the following reasons:
1. Receiver and Transmitter Not Turned On – Ensure both devices are powered on.
2. Improper Fit – The prongs may not be touching your dog's skin. Adjust the fit for proper contact.
3. Short Contact Points – If your dog has thick fur, the contact points may be too short. Try using longer prongs or shave the fur for better contact.
4. High Tolerance – If using static stimulation, your dog might have a high tolerance. Try increasing the intensity level.
5. Battery Issue – Even if fully charged, check the LCD for battery life to confirm proper function.
If the issue persists, inspect the device for any physical damage or malfunction.
This answer is automatically generated
I am following the instructions on how to pair the transmitter and receive, but yet when i press the handheld button I still get no stimulation, even if I have it set at 70 on me.