Table of Contents
Advertisement
Advertisement
Table of Contents

Related Manuals for Dogtra IQ PLUS+


Summary of Contents for Dogtra IQ PLUS+
- Page 2 Dogtra Portable Remote Controlled Dog Training Collars Owner’s Manual Please read this manual before operating your system, and keep it for future reference.
- Page 3 Interference with other electronic They are NOT intended for human use or devices use on other animals. iQ Pet and Dogtra iQ Pet’s industry-leading technology Company does not assume any liability for the improper use of an iQ Pet e-collar.
- Page 4 iQ Pet recommends consulting your the skin and cause irritation. If the unit physician if you are going to use the is too loose, the contact points will not e-collar and you have any type of medical make proper contact and your dog will not devices.
- Page 5 If your dog exhibits signs of skin irritation, Training Methods consult with a veterinarian. E-collars can be used with many different methods. If you have any concerns in Reaction to the stimulation the training methods provided by iQ Pet, Every dog has a different tolerance and consult with a dog training professional.
-
Page 6: Table Of Contents
Table of Contents At a Glance Main Features of the iQ Plus Overview Understanding your training system 1. How to turn on/off the unit 2. How the buttons work 4. Finding the right stimulation level for my dog 5. To maximize the distance 6. -
Page 7: At A Glance
At a Glance Included in Package Owner’s manual Receiver/Collar Handheld Transmitter Battery Charger Splitter Cable Owner’s Manual Optional Accessories Field Auto Charger: designed for use with a 5-volt cigarette lighter in your car. European Charger: designed for use with 230V AC electrical outlets in Europe. To purchase optional accessories, please visit www.iqpet.com or call our customer service at 1-888-811-9111. -
Page 8: Main Features Of The Iq Plus
Main Features of the iQ Plus Waterproof receiver/collar Nick/constant/pager Water-resistant Low/medium stimulation handheld transmitter For dogs as small as 10 lbs 400-yard range 2-hour quick charge 100 stimulation levels Expandable to a two-dog system Reduced size receiver/collar Main Features of the iQ Plus... -
Page 9: Overview
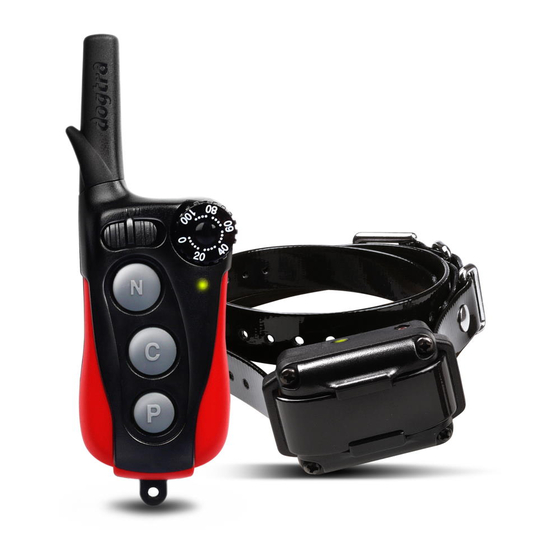
Overview Antenna 1-Dog/2-Dog Selector Switch Stimulation intensity dial On/off activation magnet (red dot) Nick button LED indicator Constant button Pager button Battery charging receptacle/rubber plug Handheld Transmitter Overview... - Page 10 Contact points Receiver/Collar strap Battery charging receptacle/rubber plug On/off magnetic LED indicator switch (red dot) Receiver/Collar Overview...
-
Page 11: Understanding Your Training System
To activate the receiver/collar, place Understanding your training the red dot on the back of the handheld system transmitter to the red dot on the receiver/ collar. Hold the two red dots together 1. How to turn on/off the unit for a moment until the LED light on the receiver/collar comes on. -
Page 12: How The Buttons Work
N - Nick button 2. How the buttons work Nick is a single rapid pulse of electrical stimulation. C - Constant button Constant gives constant stimulation as long as the button is pushed, for up to 12 seconds. The unit has an automatic shut off should the button be depressed for more than 12 seconds. - Page 13 1-Dog switch 2-Dog switch 1-Dog/2-Dog Selector Switch The 1-Dog/2-Dog switch is to the left of the Rheostat Intensity Dial. I - 1-Dog Slide the switch to the left underneath “I”, and press any of the buttons to operate the 1st Receiver/Collar. II - 2-Dog Slide the switch to the right underneath “II”, and press any of the buttons to...
- Page 14 3. How to fit the receiver/collar on the move around on the dog’s neck. When this happens, the contact points may rub the skin and cause irritation. the surgical stainless steel contact points If the receiver/collar is too tight, the dogs contact points and your dog’s skin.
-
Page 15: Finding The Right Stimulation Level For My Dog
Stimulation level is controlled by the 4. Finding the right stimulation level stimulation intensity dial: (0) being the for my dog lowest level and (100) being the highest dog’s temperament and threshold for stimulation. Always start at the lowest level and work your way up. -
Page 16: To Maximize The Distance
* Avoid touching the antenna as the range 5. To maximize the distance may substantially decrease. The iQ Plus has a 400-yard range. Depending on the way you hold your handheld transmitter, the range may vary. Hold the handheld transmitter away from your body to get the greatest range. -
Page 17: Checking The Status Using The Led Indicator
When the receiver/collar is on and ready to 6. Checking the status using the LED indicator The LED will glow steadily on both handheld transmitter and receiver/collar while any buttons are pressed. The LED color indicates battery life level. Green = full charge, Amber = medium, Red = needs charge If you continue to operate the unit when the LED is red (needs charge), it will shut... -
Page 18: Charging The Battery
7. Charging the battery will glow green. Unplug the adapter’s power plug from the AC wall outlet and disconnect the charger from the unit. 4. Place the rubber plug back in the battery charging receptacle. * The receiver/collar is still fully waterproof even if the rubber plug is not 1. -
Page 19: Code Setting
Warning 8. Code Setting 1. Fully charge the unit before using it for 1-Dog code setting 1. Start with the receiver/collar turned off and the Rheostat intensity dial level on 2. Do not charge the batteries near any the handheld transmitter set to “0”. On the handheld transmitter, slide the 3. - Page 20 2. Place the red dot on the back of the 3. With the handheld transmitter, press handheld transmitter to the red dot on the Nick and Constant buttons the receiver/collar. Hold the two red simultaneously. dots together for 5 seconds. The code setting has been successfully Release them when the green LED done if the receiver/collar vibrates...
-
Page 21: General Training Tips
Obedience training on the leash General Training Tips Your dog must fully understand the Getting started with your iQ Plus obedience commands (sit, stay, here, heel Your dog must know some very basic and kennel) before using the e-collar for obedience commands before beginning reinforcement of these commands. - Page 22 Beginning electric collar training the dog complies with the command, When you feel your dog understands we use praise/positive reinforcement. the obedience commands on the leash we can now start with the electric collar which the dog learns that he can avoid training.
- Page 23 How much stimulation to use Always start with low levels of stimulation and work your way up depending on the disposition of your dog and any given situation. By using only enough stimulation to get your point across, you will have a more controllable environment and a dog that is under less stress.
-
Page 24: Maintenance
extended storage. During storage, the unit Maintenance should be charged every one month, and Basic maintenance Be sure the rubber plugs are always try to store your units in room or slightly secured when the receiver/collar is in warmer temperatures. Do not transport use. -
Page 25: Troubleshooting Guide
points, you might need to trim down Troubleshooting Guide the hair on the dog’s neck, so both 1. My dog is not reacting to the receiver/ contact points are touching the skin. collar. - The intensity level may be too low - Make sure the receiver/collar is turned on. - Page 26 touching the antenna as the range may higher and/or increase the stimulation substantially decrease. level. Be sure both contact points are - The range indicated on the unit’s box - The battery may be low, check the LED brush, trees, hills or moisture will affect light for battery life.
- Page 27 4. My units are not holding a charge. may need to be replaced. You can - The charging pin may be damaged. replace them yourself by contacting iQ Pet. Damages incurred to the unit due A metal pin inside the charging port to improper battery installation are not covered under any warranty.
-
Page 28: Warranty And Repair Information
were unable to register your product within 30 days of WARRANTY AND REPAIR purchase, we will accept all products for repair with a proof of purchase. We strongly recommend keeping the INFORMATION original receipt. If your product is not registered and a proof of purchase is not available at the time of service, 1-Year Comprehensive Warranty iQ Pet will estimate the age of the unit by the serial... - Page 29 iQ Pet DOES NOT cover the cost of repairs and does not provide loaner units or any form of compensation replacements due to misuse by the owner or dog, improper during the repair period. maintenance, and/or lost units. Any water damage on the A copy of the sales receipt showing the purchase date may Water Resistant Handheld Transmitters will not be covered.
- Page 30 Dogtra Company 22912 Lockness Avenue, Torrance, CA 90501 U.S.A. Tel: 310-534-0101 Fax: 310-534-9111 Toll free: 1-888-811-9111 Email: info@iqpet.com Website: www.iqpet.com...
- Page 31 Copyright 2013 Dogtra Company All rights reserved. (5)
Need help?
Do you have a question about the IQ PLUS+ and is the answer not in the manual?
Questions and answers