Table of Contents
Advertisement
Quick Links
Advertisement
Table of Contents

Related Manuals for Hanna Instruments iris HI802


Summary of Contents for Hanna Instruments iris HI802
- Page 1 INSTRUCTION MANUAL HI802 Visible Spectrophotometer with Barcode Identification Hanna Instruments Inc., 584 Park East Drive, Woonsocket, RI 02895 USA Hanna Instruments Inc., 584 Park East Drive, Woonsocket, RI 02895 USA www.hannainst.com www.hannainst.com...
- Page 2 Hanna Instruments and our products. All rights are reserved. Reproduction in whole or in part is prohibited without the copyright owner's written consent, Hanna Instruments Inc., Woonsocket, Rhode Island, 02895, USA. Hanna Instruments reserves the right to modify the design, construction, or appearance of its products without advance notice.
- Page 3 PART I. INSTRUCTION MANUAL Provides a comprehensive description of the operating principles, user interface, and general options. PART II. FACTORY METHODS Contains complete instructions for commonly‑used analyses. Additional methods and method packs are available, contact your local Hanna Instruments office for more details.
-
Page 4: Table Of Contents
TABLE OF CONTENTS TABLE OF CONTENTS PART I. INSTRUCTION MANUAL 1. Preliminary Examination ..........1-1 7.1.7. Scroll ..............1‑20 7.1.8. CSV Field Separator ..........1‑20 2. Safety Measures ............1-1 7.1.9. Date & Time Setting ..........1‑21 3. Specifications..............1-2 7.1.10. Cuvette Detection ..........1‑22 4. - Page 5 TABLE OF CONTENTS PART II. FACTORY METHODS 1. Collecting & Measuring Samples and Reagents .... 2-1 Chlorine, Total Ultra High Range ...........2‑53 1.1. Proper Use of Automatic Fixed‑Volume Pipettes ....2‑1 Chromium (VI) Low Range ............2‑55 1.2. Proper Use of Syringe ............2‑1 Chromium (VI) High Range ..........2‑57 1.3.
- Page 6 TABLE OF CONTENTS Magnesium ...............2‑123 Phosphate High Range ............2‑185 Magnesium, Marine ............2‑125 Phosphorus, Acid Hydrolyzable (13 mm Vial) .......2‑187 Manganese Low Range ............2‑127 Phosphorus, Reactive Low Range (13 mm Vial) ....2‑190 Manganese High Range .............2‑129 Phosphorus, Reactive High Range (13 mm Vial) ....2‑192 Maple Syrup ..............2‑131 Phosphorus, Total Low Range (13 mm Vial) ......2‑194 Molybdenum ..............2‑133...
-
Page 7: Preliminary Examination
PART I. INSTRUCTION MANUAL / Preliminary Examination PART I. INSTRUCTION MANUAL 1. PRELIMINARY EXAMINATION Remove the instrument and accessories from the packaging and examine it carefully. For further assistance, please contact your ® local Hanna Instruments office or email us at tech@hannainst.com. ® Each HI802... -
Page 8: Specifications
1-2 PART I. INSTRUCTION MANUAL / Specifications 3. SPECIFICATIONS Wavelength range 340 to 900 nm Wavelength resolution 1 nm Wavelength accuracy ±1.5 nm Photometric range 0.000 to 3.000 Abs 5 mAbs at 0.000 to 0.500 Abs Photometric accuracy 1 % at 0.500 to 3.000 Abs Transmittance (%) Measurement mode Absorbance... -
Page 9: Abbreviations
PART I. INSTRUCTION MANUAL / Abbreviations 4. ABBREVIATIONS Absorbance EDTA Ethylene Diamine Triacetic Acid ADMI American Dye Manufacturer’s Institute US Environmental Protection Agency ASTM American Society for Testing Materials HDPE High‑Density Polyethylene Chemical Oxygen Demand International Organization for Standardization N,N‑diethyl‑p‑phenylenediamine TBPE Tetrabromophenolphthalein Ethyl Ester degrees of carbonate hardness Platinum Cobalt Unit °dH... -
Page 10: Precision & Accuracy
1-4 PART I. INSTRUCTION MANUAL / Description If pure absorption occurs, the fraction of light absorbed depends both on the optical path length through the matter and on the physical‑chemical characteristics of the substance according to the Beer‑Lambert Law: T = transmittance A = absorbance T= I/I = intensity of incident light beam –... -
Page 11: Functional Description & Lcd Display
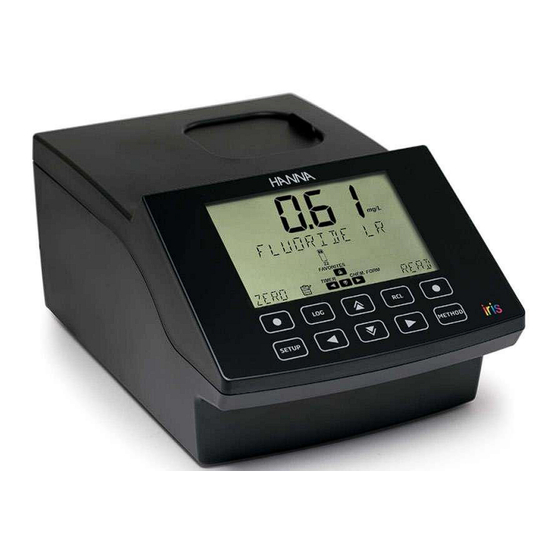
PART I. INSTRUCTION MANUAL / Description 5.3. FUNCTIONAL DESCRIPTION & LCD DISPLAY Sample compartment Liquid Cristal Display (LCD) USB socket (PC) Keypad Power socket ON/OFF button Battery USB socket (flash drive) Battery cover 5.3.1. KEYPAD DESCRIPTION The keypad contains 8 direct keys and 2 functional keys with the following functions: Press the functional key to perform the function displayed above it on the LCD Press to access the METHOD menu Press to move up in a menu, to increment a value or to access the FAVORITE METHODS from the MAIN SCREEN... -
Page 12: Lcd Description
1-6 PART I. INSTRUCTION MANUAL / Description 5.3.2. LCD DESCRIPTION ° dH meq/kg 18. 8 . 8 . 8 ASTM ADMI μg/L meq/L ° f ° e mg/L œ œ œ œ œ œ œ œ œ œ œ œ METHOD LOGS 88: 8 8 SAMPLE ID FAVORITES SETUP... -
Page 13: Optical System
PART I. INSTRUCTION MANUAL / Description 5.4. OPTICAL SYSTEM Optical System Block Diagram A tungsten halogen lamp is used as the light source for the entire working range of the meter (340 nm to 900 nm). The tungsten halogen lamp produces a white light that is passed through a diffraction grating. The diffraction grating splits the polychromatic white light into the visible color spectrum, allowing for specific wavelengths to be selected. -
Page 14: Operating Mode
PART I. INSTRUCTION MANUAL / Operating Mode 6. OPERATING MODE 6.1. START UP When the instrument is powered on, all the LCD tags will be visible for several seconds before the auto‑diagnostic tests run. This process will take several seconds, during this time the progress will be displayed on the screen. Once these tests are completed the main screen will be displayed. -
Page 15: Cuvette & Vial Adapters
PART I. INSTRUCTION MANUAL / Operating Mode 6.3. CUVETTE & VIAL ADAPTERS The meter is supplied with two cuvette adapters and one vial adapter: Note: HI802 accepts supplied 13 mm vial adapter only. Warning: Do not attempt to insert HI801 vial adapter as it risks damaging the meter holder. for 16 mm cuvette for 10 mm square cuvette for 13 mm barcoded vials... -
Page 16: Methods
1-10 PART I. INSTRUCTION MANUAL / Operating Mode 6.4. METHODS Option: Favorite methods (if enabled), Barcode methods, Factory methods, User methods, Create new In order to run an analysis, a method needs to be loaded. Press the key to scroll through the available options. The number of methods will be displayed on the lower left side of the screen. - Page 17 PART I. INSTRUCTION MANUAL / Operating Mode 1-11 6.4.2. BARCODE METHODS ® iris spectrophotometer supports Barcode Methods option that permits quick access to 13 mm vial methods. The vials for different methods can be distinguished by a barcode printed on the vial (and cap color). The barcode has four digits: the first two digits for parameter identification and the second two digits for reagent lot ID.
-
Page 18: Barcode Methods
1-12 PART I. INSTRUCTION MANUAL / Operating Mode • If the meter already has a stored zero for the barcoded reagent vial, press READ to measure the reagent vial. mg/L C O D L R E P A CHECK CHEM. FORM Z E R O R E A D When reading multiple barcoded reagent vials with different methods, insert the vial into the adapter and press either ZERO,... -
Page 19: Factory Methods
Ammonia Low Range ISO 6.4.3. FACTORY METHODS ® Factory methods were developed by Hanna Instruments and are pre‑programmed with all of the information needed to run an analysis. These methods are calibrated for the selected wavelength, vial type, and reagent set. -
Page 20: User Methods
1-14 PART I. INSTRUCTION MANUAL / Operating Mode 6.4.4. USER METHODS User methods are developed by the user. These methods can be customized based on the analysis. Options include multiple wavelengths, vial type, reaction timers and calibration curves. Up to 100 user methods can be stored on the instrument. Press the key to scroll through the methods. -
Page 21: Create New
PART I. INSTRUCTION MANUAL / Operating Mode 1-15 6.4.5. CREATE NEW See User Methods for additional information on creating a new user method. < Press the key to return to the previous setting. Method Name Option: Up to 12 alphanumeric characters < > Press the key to select the desired character. -
Page 22: Chemical Formula / Unit Conversion
1-16 PART I. INSTRUCTION MANUAL / Operating Mode When the timer has expired press ZERO or READ to continue. Note: A zero measurement must be done before a read measurement. Follow the instructions in the method procedure for preparation of the zero cuvette. 6.6. -
Page 23: Log Recall
PART I. INSTRUCTION MANUAL / Operating Mode 1-17 6.7.2. LOG RECALL Data saved on the instrument can be viewed by pressing the RCL key. Logs are displayed in order by date and time, the newest log is shown first. • Press the key to scroll through the available logs. mg/L C O D M R EPA C L R... -
Page 24: Setup
1-18 PART I. INSTRUCTION MANUAL / Setup 7. SETUP Option: Method settings (user methods only), Meter setup, System check, USB To return to the main screen press the SETUP key. 7.1. METER SETUP > Press the key to select METER SETUP, press the key to enter the menu. -
Page 25: Sample Id
PART I. INSTRUCTION MANUAL / Setup 1-19 < > Press the key to highlight the digit to be modified. Press the key to set the desired value. Press CFM to confirm the meter ID or CLR to return to the setup menu without saving. 7.1.4. -
Page 26: Lcd Contrast
1-20 PART I. INSTRUCTION MANUAL / Setup Timers Option: On or Off If this option is On, a long beep is heard when a timer reaches “00:00”. 7.1.6. LCD CONTRAST Option: 0 to 7 Press EDIT to change the display’s contrast. Press the key to increase or decrease the value. -
Page 27: Date & Time Setting
PART I. INSTRUCTION MANUAL / Setup 1-21 7.1.9. DATE & TIME SETTING Option: Time format, Date format, Set date, Set time > Press the key to access the date and time submenu. Time Format Option: 24 h or 12 h Press EDIT to change the time format. -
Page 28: Cuvette Detection
1-22 PART I. INSTRUCTION MANUAL / Setup Set Time Press EDIT to modify the time. < > Press the key to highlight the digit to be modified. Press the key to set the desired value. Press CFM to save the time or CLR to return to the previous screen without saving. 7.1.10. -
Page 29: Cod Preference
PART I. INSTRUCTION MANUAL / Setup 1-23 7.1.13. COD PREFERENCE Option: EPA, ISO, Hg Free This option allows automatic selection of the preferred method type for Chemical Oxygen Demand. This is necessary if using previous‑generation barcode reagents in the HI94754x‑25 family. All HI93754x‑25 reagents for Chemical Oxygen Demand will select the correct method without additional user input. -
Page 30: Reset Configuration
1-24 PART I. INSTRUCTION MANUAL / Setup 7.1.16. RESET CONFIGURATION Press CFM to reset all modifications made to the meter’s configuration. Press YES to continue or NO to return to the meter setup menu. RESET DEFAULT OPTIONS Setup Item Deafult Option Favorite methods Automatic log Meter ID... -
Page 31: Upgrade
PART I. INSTRUCTION MANUAL / Setup 1-25 7.2.2. UPGRADE Firmware Upgrade Steps 1. Press the SETUP key. 2. Press the key to go to SYSTEM CHECK. > 3. Press the key to enter configurable meter Setup. 4. Press the or key to navigate to UPGRADE. 5. -
Page 32: Lamp Check
1-26 PART I. INSTRUCTION MANUAL / Setup 7.2.3. LAMP CHECK To perform a diagnostic check on the lamp, press CFM. If the lamp passes, the “PASS” message is displayed on the lower left side of the display. < Press the key to return to the system check menu. -
Page 33: Methods
PART I. INSTRUCTION MANUAL / Setup 1-27 7.3.1. METHODS Option: Factory methods, User methods > Press the key to access the methods submenu. Press the key to scroll through the options. Factory Methods Option: Import all > Press the key, “IMPORT ALL” will be displayed. Insert a USB flash drive containing the factory methods and press CFM. The process will start automatically, the display will show the progress. -
Page 34: Reports
1-28 PART I. INSTRUCTION MANUAL / Setup 7.3.2. REPORTS Option: By sample ID (if enabled), By method ID, By date > Press the key to access the reports submenu. By Sample ID (if enabled) > Press the key. The select Sample ID screen is shown. <... - Page 35 PART I. INSTRUCTION MANUAL / Setup 1-29 By Method ID > Press the key. The select Method ID screen is shown. < > Press EDIT to edit the method ID. Press the key to highlight the digit to be modified. Press the key to set the desired value.
-
Page 36: Connect To Pc
1-30 PART I. INSTRUCTION MANUAL / Setup Press CFM to confirm the value end date or CLR to return to the previous screen without saving. E N D D A T E 0 9 / 0 5 / 2 0 2 4 SETUP SETUP E D I T C L R... -
Page 37: Measurement Unit
PART I. INSTRUCTION MANUAL / Setup 1-31 7.4.1. MEASUREMENT UNIT Option: None, %T, ABS, ppm, mg/L, ppt, °f, °e, ppb, meq/L, μg/L, PCU, ADMI, pH, ASTM, dKH, °dH, meq/kg Press EDIT to select the measurement unit. Press the key to select the unit. Press CFM to confirm the unit or CLR to return to the method settings menu without saving. -
Page 38: Dilution Factor
1-32 PART I. INSTRUCTION MANUAL / Setup 7.4.5. DILUTION FACTOR Option: 001 to 100 This allows samples with high concentrations that are outside the measurement range to be measured. If the sample is not diluted enter a factor of 001. Press EDIT to modify the dilution factor. <... -
Page 39: Multi Wavelength Formula
PART I. INSTRUCTION MANUAL / Setup 1-33 Press CFM to confirm the timer name or CLR to return to the method settings menu without saving. Press EXIT to return to the timer screen. Note: Press the key to view additional timers (if enabled). 7.4.9. -
Page 40: Calibration
1-34 PART I. INSTRUCTION MANUAL / Setup Factors The meter will only display and use the factor needed for the selected equation. Press the key to select the factor. Press EDIT to modify the value. < > Press the key to highlight the digit to be modified. Press the key to set the desired value. - Page 41 PART I. INSTRUCTION MANUAL / Setup 1-35 Measure Standards This allows users to measure the absorbance of standards with a known concentration. Up to 10 points can be used to calibrate the method. Press CFM to start the calibration. Press EDIT to modify the concentration for the first standard. <...
- Page 42 1-36 PART I. INSTRUCTION MANUAL / Setup < Press the key or the SETUP key to abort the calibration. Press DONE to save and exit the calibration or MORE to add additional points. When wrong slope or offset occurred the meter will display an error message: This procedure can be repeated until 10 calibration points have been added.
- Page 43 PART I. INSTRUCTION MANUAL / Setup 1-37 Press CFM to continue. Press EDIT to modify the absorbance for the first standard. < > Press the key to highlight the digit to be modified. Press the key to set the desired value. Press CFM to confirm the value or CLR to return to the method settings menu without saving. To set a negative abs value, highlight the first digit and use the key to select designed value.
- Page 44 1-38 PART I. INSTRUCTION MANUAL / Setup View Calibration Option: Slope, Offset, R-squared value After a calibration has been completed, the calibration data can be viewed using View Calibration. A linear regression is done by the instrument for the saved calibration points, the meter will apply the best straight‑line fit to the calibration points. Press CFM to view the calibration information.
-
Page 45: Spare Parts
PART I. INSTRUCTION MANUAL / Spare Parts 1-39 8. SPARE PARTS 8.1. BATTERY REPLACEMENT 1. Loosen the battery cover screw using a Phillips head screwdriver. 2. Remove the cover. 3. Pull the battery out. 4. Insert the new battery with the (+) sign up. 8.2. - Page 46 1-40 PART I. INSTRUCTION MANUAL / Spare Parts 2. Remove the two bottom screws of the lamp holder. 3. Slowly pull out the lamp cover. 4. Disconnect the lamp cable. Loosen the screw. 5. Slide down the metal support. Remove the lamp. To replace the tungsten halogen lamp follow the steps below: 1.
- Page 47 PART I. INSTRUCTION MANUAL / Spare Parts 1-41 3. Connect the lamp cable. 4. Align the lamp with the screw holes into the optical system, making sure the cable is not pinned between the optical system and holder. 5. Tighten the two screws in the base of the lamp holder and push the power cable back into the instrument. 6.
-
Page 48: Warning & Error Messages
1-42 PART I. INSTRUCTION MANUAL / Warning & Error Messages 9. WARNING & ERROR MESSAGES 9.1. WARNING MESSAGES FACTORY METHODS FULL The maximum number of factory methods has been reached. The maximum number of user methods has been reached. USER METHODS FULL At least 1 user method needs to be deleted before a new one can be created. FAVORITE METHODS FULL The maximum number of favorite methods has been reached. - Page 49 For adding the exact amount of sample or liquid reagent to the cuvette or vial it is recommended to use automatic or a class A ® volumetric pipette. Hanna Instruments offers a variety of fixed volume pipettes (see Accessories section for more information).
- Page 50 PART II. FACTORY METHODS / Cuvette Preparation 2. CUVETTE PREPARATION Proper mixing is very important for reproducibility of the measurements. The proper mixing technique for each method is listed in the method procedure. (a) Invert the cuvette a couple of times or for a specified time: hold the cuvette in the vertical position. Turn the cuvette upside‑ down and wait for all of the solution to flow to the cap end, then return the cuvette to the upright vertical position and wait for all of the solution to flow to the bottom.
- Page 51 PART II. FACTORY METHODS / Blank Measurements 3. BLANK MEASUREMENTS Blank measurements are important steps required for accurate analytical measurements of samples. These measurements adjust the calculated analytical value to correct for contamination or non‑analyte sources of signal. HI802 contains Factory Methods with pre‑defined working procedures. The pre‑defined procedures can be categorized into two types: •...
- Page 52 2-4 PART II. FACTORY METHODS / Method List by ID 4. METHOD LIST BY ID ID Method Name ID Method Name 001 Alkalinity 052 Molybdenum 002 Alkalinity, Marine 053 Nickel Low Range 003 Aluminum 054 Nickel High Range 004 Ammonia Low Range 055 Nitrate 005 Ammonia Low Range (13 mm Vial) 056 Nitrate Chromotropic Acid (13 mm Vial) 006 Ammonia Medium Range 057 Nitrite, Marine Ultra Low Range...
- Page 53 2-234 PART II. FACTORY METHODS / Accessories 7. ACCESSORIES 7.1. REAGENT SETS Ordering Information Product Description HI736-25 25 phosphorus marine ULR tests HI755-26 25 alkalinity marine tests HI758-26 25 calcium marine tests HI764-25 25 nitrite marine ULR tests HI775-26 25 alkalinity fresh water tests HI782-25 25 nitrate marine HR tests HI783-25...
- Page 54 PART II. FACTORY METHODS / Accessories 2-235 Ordering Information Product Description HI93714-03 300 cyanide tests HI93715-01 100 ammonia MR tests HI93715-03 300 ammonia MR tests HI93716-01 100 bromine tests HI93716-03 300 bromine tests HI93717-01 100 phosphate HR tests HI93717-03 300 phosphate HR tests HI93718-01 100 iodine tests HI93718-03...
- Page 55 2-236 PART II. FACTORY METHODS / Accessories Ordering Information Product Description HI93735-00 100 hardness total LR tests (0 to 250 mg/L) HI93737-01 50 silver tests HI93737-03 150 silver tests HI93738-01 100 chlorine dioxide tests HI93738-03 300 chlorine dioxide tests HI93739-01 100 fluoride HR tests HI93739-03 300 fluoride HR tests HI93740-01...
- Page 56 PART II. FACTORY METHODS / Accessories 2-237 Ordering Information Product Description HI93763A-50 49 phosphorus reactive HR tests (Vial) HI93763B-50 49 phosphorus total HR tests (Vial) HI93764A-25 25 ammonia LR tests (Vial) HI93764B-25 25 ammonia HR tests (Vial) HI93766-50 50 nitrate tests (Vial) HI93767A-50 49 nitrogen total LR tests (Vial) HI93767B-50 49 nitrogen total HR tests (Vial)
- Page 57 2-238 PART II. FACTORY METHODS / Accessories 7.2. OTHER ACCESSORIES Ordering Information Product Description HI731311 Vial 13 mm diam (5 pcs.) HI731318 Cloth for wiping cuvettes (4 pcs.) HI731321 Glass cuvettes 16 mm diam (4 pcs.) HI731225 Cap for 16 mm cuvette (4 pcs.) HI731331 Glass cuvettes 22 mm diam (4 pcs.) HI731335N...
- Page 58 PART II. FACTORY METHODS / Accessories 2-239 Ordering Information Product Description ® HI7408014 Replacement tungsten halogen lamp for HI801 HI802 iris spectrophotometers ® HI7408015 Replacement battery for HI801 HI802 iris spectrophotometers HI7408018 Cuvette adapter with barcode scanner for HI802 HI801-11 Holmium Oxide Filter for wavelength accuracy verification, with certificate Sample preparation kit consisting of activated carbon for 50 tests, demineralizer bottle for 10 L HI83300-100 of water, 100 mL graduated beaker with cap, 170 mL graduated beaker with cap, 3 mL pipette,...
- Page 59 (engraved on the bottom of the meter), and the nature of the problem. If the repair is not covered by the warranty, you will be notified of the charges incurred. If the instrument is to be returned to Hanna Instruments, first obtain a Returned Goods Authorization (RGA) number from the Technical Service department and then send it with shipping costs prepaid.
Need help?
Do you have a question about the iris HI802 and is the answer not in the manual?
Questions and answers