
Subscribe to Our Youtube Channel
Related Manuals for Bertazzoni Professional MAST365IRTXT


Summary of Contents for Bertazzoni Professional MAST365IRTXT
- Page 1 INSTALLATION MANUAL USER AND MAINTENANCE MANUAL INDUCTION RANGETOP MANUEL D’INSTALLATION MANUEL D’UTILISATION ET D’ENTRETIEN PLAQUE À INDUCTION www.bertazzoni.com...
- Page 3 Bertazzoni becomes a real pleasure. This manual will help you learn to use and care for your Bertazzoni appliance in the safest and most effective way, so that it can give you the highest satisfaction for years to come.
- Page 5 USER MANUAL VALIDITY The following manual is valid for all the product codes mentioned below: • MAST365IRTXT • PROF365IRTXT...
-
Page 6: Table Of Contents
..............KEEPING YOUR BERTAZZONI CLEAN . -
Page 7: Installation Manual
FOR THE INSTALLER: Before installing the Bertazzoni damage. personal injury, or death. appliance, please read these instructions carefully. This • If a fire should occur, keep away from appliance shall be installed in accordance with the the appliance and immediately call your manufacturer’s installation instructions. -
Page 8: Before Installation
BEFORE INSTALLATION • This appliance shall only be installed by an authorized professional. • This appliance shall be installed in accordance with the manufacturer’s installation instructions. • This appliance must be installed in accordance with the norms & standards of the country where it will be installed. -
Page 9: Ventilation Preparation
This rangetop will best perform when installed with Bertazzoni exhaust hoods. These hoods have been designed to work in conjunction with the Bertazzoni range and have the same finish for a perfect look. Before installation of the exhaust hood, consult local or regional building and installation codes for additional specific clearance requirements. -
Page 10: Specifications
SPECIFICATIONS Fig. 2 • A 35 3/4″ • F 22 3/4″ • B 25 1/4″ • G 1″ • C 7 5/8″ • H 1 3/4″ • E 5″ • I 10 1/8″ CABINET PREPARATION BASE SUPPORT MIN 1) To ensure professional results, the cabinet and 36″... -
Page 11: Clearence Dimensions
CLEARENCE DIMENSIONS INSTALLATION ADJACENT TO KITCHEN CABINET CABINETS 36″(91,5 cm) or 48″(122 cm) This range may be installed directly adjacent to existing 30″ (76,3 cm) hood with compustible countertop high cabinets (36″ or 91.5 cm from the floor). materials For the best look, the worktop should be level with the 25″... -
Page 12: Installation Requirements
INSTALLATION REQUIREMENTS installation area for the connection Fig. 4 A min 3″ 7/16 max 3″ 3/16 e’ Fig. 5 • A 27″ • B 15″ • e’ Electrical ELECTRICAL A properly-grounded horizontally- mounted electrical receptacle should be installed no higher than 27″ (68.6 cm) above the floor, no less than 2″... -
Page 13: Electrical Connection
ELECTRICAL CONNECTION WARNING ELECTRICAL SHOCK HAZARD Disconnect electrical power at the circuit breaker box or fuse box before installing the appliance. Provide appropriate ground for the appliance. Use copper conductors only. Failure to follow these instructions could result in serious injury or death. ELECTRICAL GROUNDING This appliance is equipped with a 4 ft (1.2 m) flexible metal cable with 3 wires ready for connection to a dedicated 2... -
Page 14: Wiring Diagram
WIRING DIAGRAM The electric wiring diagrams and schematics are attached behind the rangetop, and should not be removed except by a service technician, then replaced after service. Fig. 6... -
Page 15: Installation
INSTALLATION APPLIANCE INSTALLATION UNPACKING THE RANGETOP • Remove all packing materials from the shipping pallet but leave the adhesive-backed foam layer over brushed- metal surfaces to protect it from scratches until the range is installed in its final position. Only the film on the side panels should be removed before inserting the range between the cabinets. -
Page 16: Installing The Island Trim
INSTALLATION INSTALLING THE ISLAND TRIM The island trim is only placed on the cooktop, remove all tape and packaging before installing it. Fig. 8 Fig. 7... -
Page 17: Installation Checklist
INSTALLATION CHECKLIST A qualified installer should carry out the following checks: Island trim or Backguard attached according to instruction Clearance to cabinet surfaces as manufacturer’s guideline Proper ground connection... -
Page 18: Final Preparation
FINAL PREPARATION • Before using the rangetop, remove any protective wrap from the stainless steel. • All stainless steel body parts should be wiped with hot, soapy water and with a liquid stainless steel cleanser. • If buildup occurs, do not use steel wool, abrasive cloths, cleaners, or powders! •... -
Page 19: Bertazzoni Service
Bertazzoni is committed to providing the best customer and product service. We have a dedicated team of trained professionals to answer your needs. If you own a Bertazzoni appliance and need service in the US or Canada please use the following contact information: If located in the USA: 866 905 0010 https://us.bertazzoni.com/more/support... -
Page 20: User Manual
WARNINGS IN CASE OF FIRE Warning and Important Safety Instructions appearing in this manual are not meant to cover all possible conditions and situations that may occur. Common sense, caution, and Turn off appliance and ventilation hood to avoid spreading care must be exercised when installing, maintaining, or the flame. -
Page 21: Cooking Safety
WARNINGS COOKING SAFETY • DO NOT TOUCH SURFACE UNITS OR AREAS NEAR UNITS - Surface units may be hot even though they are dark in color. Areas near surface units may become hot • Ensure that the kitchen is well-ventilated. Keep natural enough to cause burns. -
Page 22: Cleaning Safety
WARNINGS CLEANING SAFETY • Turn off all controls and wait for appliance parts to cool before touching or cleaning them. DO NOT touch the induction areas until they have had sufficient time to cool. • Clean the range with caution. Avoid steam burns; DO NOT use a wet sponge or cloth to clean the range while it is hot. -
Page 23: Worktop And Knobs Layout
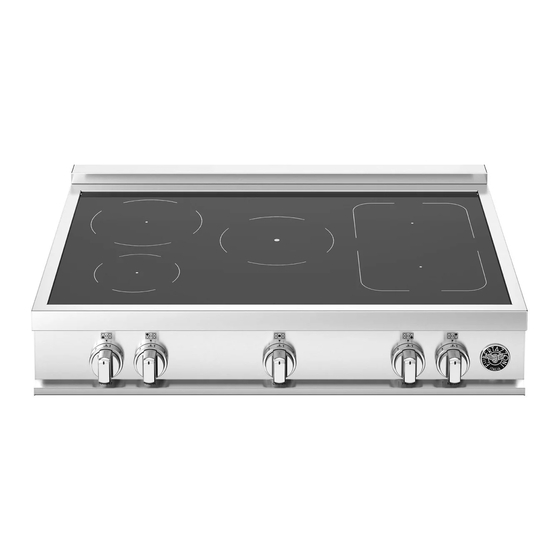
WORKTOP AND KNOBS LAYOUT HEATING ELEMENT Fig. 9 HEATING ELEMENT Left front induction element Left rear induction element Central induction element Right front induction element Right rear induction element... -
Page 24: Induction Cooktop
INDUCTION COOKTOP COOKING WITH INDUCTION USING SPECIAL FUNCTIONS HEATING ACCELERATOR MODE Underneath each cooking zone there is a coil called an inductor. The inductor generates a variable magnetic field The Heating Accelerator mode allows each zone to be using electric power. When a pan is placed inside this operated at peak power for a time proportional to the magnetic field, the high frequency current radiates directly heating power selected. -
Page 25: Suitable Induction Cookware
INDUCTION COOKTOP SUITABLE INDUCTION COOKWARE BRIDGE MODE The bridge mode allows to use the 2 right-side cooking Induction technology requires iron or magnetic steel zones as a single cooking zone. Power Mode is not allowed cookware in order to generate the magnetic field necessary when the zones are operated in Bridge mode. -
Page 26: Noise During Operation
INDUCTION COOKTOP NOISE DURING OPERATION A pulsating humming or buzzing sound during operation is normal, and can vary in intensity with different types of cookware. It is normal to hear a fan noise after switching the induction hob off. INDUCTION DIMENSION BURNER DIAM. -
Page 27: Keeping Your Bertazzoni Clean
KEEPING YOUR BERTAZZONI CLEAN BURN HAZARD Make sure the heating elements are turned off and allowed to cool completely before any cleaning and/or maintenance operation. THINGS TO AVOID • Do not use a steam cleaner to clean the range: the steam could reach electrical components and cause a short. -
Page 28: Troubleshooting
TROUBLESHOOTING Here are answer to common problems you may experience. You are also welcome to call our toll free Customer Service line to troubleshoot any issue with your Bertazzoni. If located in the USA 866 905 0010 https://us.bertazzoni.com/more/support If located in CANADA 800 561 7265 https://ca.bertazzoni.com/more/support... -
Page 29: Warranty
CUSTOMER CARE For any warranty information and service request, contact us: In USA: https://us.bertazzoni.com/more/support In CANADA: https://ca.bertazzoni.com/more/support... - Page 31 Ce manuel vous aidera à apprendre à utiliser et à entretenir votre appareil Bertazzoni de la manière la plus sûre et la plus efficace, afin qu’il puisse vous donner la plus grande satisfaction pour les années à venir.
- Page 33 VALIDITÉ DU MANUEL D’UTILISATION Le manuel suivant est valable pour tous les codes produits mentionnés ci-dessous : • MAST365IRTXT • PROF365IRTXT...
- Page 34 ..............NETTOYAGE DE VOTRE CUISINIÈRE BERTAZZONI .
-
Page 35: Manuel D'installation
POUR L’INSTALLATEUR : Avant d’installer l’appareil pourrait causer dommages Bertazzoni, veuillez lire attentivement ces instructions. Cet matériels. blessures corporelles ou la appareil doit être installé conformément aux instructions mort. d’installation du fabricant. •... -
Page 36: Avant D'installer L'appareil
AVANT D’INSTALLER L’APPAREIL • L'appareil doit être installé uniquement professionnel autorisé. • Cet appareil doit être installé conformément aux instructions d’installation du fabricant. • L'appareil doit être installé conformément aux normes et aux règlementations du pays d'installation. • Une fois installé, l’appareil doit être raccordé à la terre conformément aux règlementations locales ou, en leur absence, à... -
Page 37: Préparation De La Ventilation
PRÉPARATION DE LA VENTILATION Cette plaque de cuisson fonctionnera mieux lorsqu’elle sera installée avec les hottes d’extraction Bertazzoni. Ces hottes, conçues pour être associées à la gamme Bertazzoni, offrent un aspect impeccable grâce à leur finition identique. Avant d’installer la hotte d’extraction, consulter les réglementations locales ou régionales en matière de... -
Page 38: Spécifications
SPÉCIFICATIONS Fig. 2 • A 35 3/4″ • F 22 3/4″ • B 25 1/4″ • G 1″ • C 7 5/8″ • H 1 3/4″ • E 5″ • I 10 1/8″ BASE SUPPORT MIN PRÉPARATION DU MEUBLE DE CUISINE Pour assurer résultats... -
Page 39: Espace De Dégagement
ESPACE DE DÉGAGEMENT MEUBLE DE CUISINE INSTALLATION ADJACENTE À DES MEUBLES DE CUISINE 36″(91,5 cm) ou 48″(122 cm) Cette cuisinière peut être installée à proximité directe de 30″ (76,3 cm) hotte avec matériaux plans de travail avec meubles intégrés (36″ ou 91,5 cm par combustibles rapport au sol). -
Page 40: Conditions D'installation
CONDITIONS D’INSTALLATION zone réservée au branchement Fig. 4 A min 3″ 7/16 max 3″ 3/16 e’ Fig. 5 • A 27″ • B 15″ • e’ Électrique ÉLECTRICITÉ prise électrique montée horizontalement correctement mise à la terre doit être installée à une hauteur maximale de 27″... -
Page 41: Raccordement Électrique
RACCORDEMENT ÉLECTRIQUE MISE EN GARDE RISQUE DE DÉCHARGE ÉLECTRIQUE Couper l’alimentation électrique niveau du disjoncteur ou du tableau à fusibles avant d’installer l’appareil. L’appareil doit être correctement mis à terre. Utiliser uniquement conducteurs en cuivre. Le non-respect de ces instructions pourrait entraîner de graves blessures, voire la mort. -
Page 42: Schéma De Câblage
SCHÉMA DE CÂBLAGE Les schémas de câblage électrique figurent à l’arrière de la plaque de cuisson et ne peuvent être retirés que par un technicien de maintenance, qui doit les remettre en place une fois l’entretien réalisé. Fig. 6... -
Page 43: Installation
INSTALLATION INSTALLATION DE L’APPAREIL DÉBALLAGE DE LA TABLE DE CUISSON • Retirer tous les matériaux d’emballage de la palette d’expédition sans toucher à la mousse à endos adhésif sur les surfaces en métal brossé, afin de protéger la cuisinière des rayures jusqu’à son installation à son emplacement final. -
Page 44: Installation De La Garniture
INSTALLATION INSTALLATION DE LA GARNITURE La garniture est uniquement positionnée sur la surface de cuisson. Retirer tous les rubans et matériaux d’emballage avant son installation. Fig. 8 Fig. 7... -
Page 45: Liste De Contrôle Pour L'installation
LISTE DE CONTRÔLE POUR L’INSTALLATION Un installateur qualifié devra réaliser les contrôles suivants : La garniture ou la protection arrière est-elle fixée conformément aux instructions fournies ? Le dégagement par rapport aux surfaces des meubles est-il conforme aux consignes du fabricant ? Le raccordement à... -
Page 46: Préparation Finale
PRÉPARATION FINALE • Avant d’utiliser la plaque de cuisson, retirez tout film protecteur éventuellement présent sur les surfaces en acier inoxydable. • Toutes les parties du corps en acier inoxydable doivent être nettoyées avec de l’eau chaude savonneuse et un détergent liquide adapté... -
Page 47: Assistance Bertazzoni
ASSISTANCE BERTAZZONI Bertazzoni s’engage à fournir le meilleur service clients et la meilleure assistance produits possibles. Notre équipe de professionnels dévoués et formés répondra à vos besoins. Si vous disposez d’un appareil Bertazzoni et souhaitez bénéficier d’une assistance aux États-Unis ou au Canada, utilisez les coordonnées suivantes :... -
Page 48: Manuel De L'utilisateur
AVERTISSEMENTS POUR PRÉVENIR LES INCENDIES OU LES Les avertissements et les consignes de sécurité contenus dans ce manuel ne couvrent pas toutes les situations et DOMMAGES LIÉS À LA FUMÉE : conditions susceptibles de survenir. Procéder avec bon sens et attention et avec le plus grand soin lors de •... -
Page 49: Sécurité En Cuisine
AVERTISSEMENTS SÉCURITÉ EN CUISINE • Les poignées des ustensiles doivent être tournées vers l’intérieur et ne pas s’étendre sur les éléments de surface adjacents - Pour réduire le risque de brûlures, • S'assurer que la cuisine est correctement ventilée. d’inflammation de matériaux inflammables et de Veiller à... -
Page 50: Ustensiles Recommandés
AVERTISSEMENTS USTENSILES RECOMMANDÉS SÉCURITÉ LORS DU NETTOYAGE • Utiliser des récipients de cuisson à fond plat, dotés de • Éteindre l’appareil et attendre que toutes ses parties poignées faciles à manipuler et non conductrices de aient refroidi avant de les toucher ou de les nettoyer. NE PAS toucher les zones à... -
Page 51: Surface De Cuisson Et Boutons
SURFACE DE CUISSON ET BOUTONS ÉLÉMENT CHAUFFANT Fig. 9 ÉLÉMENT CHAUFFANT Élément à induction avant gauche Élément à induction arrière gauche Élément à induction central Élément à induction avant droit Élément à induction arrière droit... -
Page 52: Surface De Cuisson À Induction
SURFACE DE CUISSON À INDUCTION LA CUISSON À INDUCTION UTILISATION DES FONCTIONS SPÉCIALES MODE ACCÉLÉRATEUR DE CHAUFFAGE Sous chaque zone de cuisson se trouve une bobine, appelée inducteur. L'inducteur génère champ L'accélérateur de chauffe permet à chaque zone d'être magnétique variable qui utilise de l'électricité. Lorsqu'un chauffée à... -
Page 53: Récipients De Cuisson Adaptés À L'induction
SURFACE DE CUISSON À INDUCTION RÉCIPIENTS DE CUISSON ADAPTÉS À MODE PONT (Bridge mode) L'INDUCTION Le mode « Bridge » permet d'utiliser les 2 zones de cuisson du côté droit comme une seule et même zone de cuisson. La technologie à induction nécessite des batteries de Le mode «... -
Page 54: Bruit Pendant Le Fonctionnement
SURFACE DE CUISSON À INDUCTION BRUIT PENDANT LE FONCTIONNEMENT RECOMMANDATIONS • Toujours positionner le récipient de cuisson de sorte qu'il Un bourdonnement ou un bourdonnement pendant le soit centré sur l'élément chauffant. fonctionnement est normal et son intensité peut varier selon les types de batterie de cuisine. -
Page 55: Nettoyage De Votre Cuisinière Bertazzoni
NETTOYAGE DE VOTRE CUISINIÈRE BERTAZZONI RISQUE DE BRÛLURE NETTOYAGE DE LA SURFACE DE CUISSON À INDUCTION S'assurer que les éléments chauffants sont éteints et ont complètement refroidi avant d'effectuer toute opération de Avant le nettoyage, laisser refroidir la surface jusqu'à ce nettoyage et/ou d'entretien. -
Page 56: Remèdes
REMÈDES Vous trouverez ci-après des solutions aux problèmes les plus fréquents. Vous pouvez aussi appeler le numéro vert de notre Service clients pour résoudre tout problème lié à votre cuisinière Bertazzoni. En cas d’utilisation aux États-Unis 866 905 0010 https://us.bertazzoni.com/more/support Si situé... -
Page 57: Garantie
SERVICE CLIENTÈLE Pour toute information sur la garantie et demande de service, contactez-nous: Aux États-Unis: https://us.bertazzoni.com/more/support Au Canada: https://ca.bertazzoni.com/more/support... - Page 60 Via Palazzina, 8, 42016 Guastalla RE © 2024 BERTAZZONI. All rights reserved. 3100768_v.02...
Need help?
Do you have a question about the Professional MAST365IRTXT and is the answer not in the manual?
Questions and answers