
Related Manuals for WaterLogic WL30-RO


Summary of Contents for WaterLogic WL30-RO
- Page 1 WL30-RO MANUAL Quench USA Inc. 630 Allendale Road, Ste 200 King of Prussia, PA 19406 (855) 558-9796 www.Waterlogicwater.com...
- Page 2 Products manufactured and marketed by Waterlogic and its affiliates are protected by patents issued or pending in the United States and other countries. Waterlogic reserves the right to change the specifications referred to in this literature at any time, without prior notice. Changes or modifications not expressly approved by Waterlogic could void the warranty and user’s authority to operate the equipment.
-
Page 3: Table Of Contents
• Settings Using the User Interface .......... 12 • Warranty ................13 SERVICE GUIDE • Service Requirements ............14 • WL30-RO Parts Diagram ............15 • Flow Diagram ................. 21 • Electrical Diagram ..............22 • Dipswitch Settings ..............23 INSTALLATION GUIDE •... -
Page 4: Safety Alert Symbols
(RCD) having a rated residual operating current not exceeding 30mA. Use only Waterlogic supplied power cord. Never use extension cords or power strips to connect unit. Do not use if the power supply cord is damaged. Always unplug from power supply prior to servicing. - Page 5 CAUTION! USE A WATER PRESSURE REGULATOR. Waterlogic will not be responsible for injury or damage caused by excessive water pressure. Input or feed pressure must be 40 psi to 80 psi. Be aware of any potential pressure surges caused by building/municipal pumping stations.
-
Page 6: Features And Benefits
11-inch dispense height with recessed faucet to protect from cross-contamination. Leak Prevention WL30-RO Water Dispensers are supplied with a leak stop device to cut off the water supply in the case of a water leak or overfill. Touch Sensor Dispense Touch Sensors are used to activate dispense and select functions. -
Page 7: Certifications
CERTIFICATIONS WL30-RO Water Dispensers have been tested and certified to rigorous NSF and UL Standards. We believe that performance testing and certifications validate Waterlogic as a world-leader in Water Dispensers. Waterlogic WL30-RO Component Certifications Include: The Waterlogic WL30-RO with WLPC-12 is certified by IAPMO R&T against NSF/ANSI/CAN 61: Q≤1, NSF/ANSI 372, NSF/ANSI 58, and CSA B483.1 for the... -
Page 8: Model Designations, Consumables, & General Specs
MODEL/PART DESIGNATIONS MODEL - BRAND NAME DESCRIPTION PART NUMBER WL30-RO – Hot & Cold Tower WL30-RO WL30-RO Serial#: WL030FMB0E0XXXXX CONSUMABLES FILTER REPLACEMENT FREQUENCY PART NUMBER WL-QC1 SEDIMENT FILTER 6-12 MONTHS WL-QC5 POST-CARBON FILTER 6-12 MONTHS WL-QC3R RO MEMBRANE TEST TDS REDUCTION AT 12 MONTHS... -
Page 9: Shipping Specifications
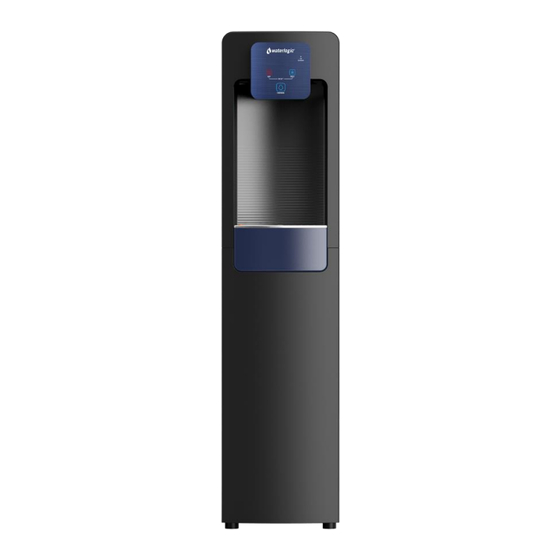
SHIPPING SPECIFICATIONS ITEM WL30-RO Width/Depth/Height 11.8”W x 17.2”D x 50.3”H Dispense area Height 11” Weight (dry) 58lbs 11” 50.3” 17.2” 11.8” WL30-RO Manual Page 9 - Revision: 07-08-2024... -
Page 10: Receiving Your Equipment
(800) 288-1891 to report the damage. Photograph all damages to be submitted with the claim. THIS MUST BE DONE WITHIN FIVE BUSINESS DAYS OF DELIVERY. If not reported within 3 business days, Waterlogic and/or carrier will not be responsible for replacement or repair. WL30-RO Manual... -
Page 11: Control Panel & Operating Instructions
• Drip Tray “Full” Indicator: This small float protrudes from the drip tray grill if the water level rises too high. An indication that the tray needs to be emptied. WL30-RO Manual Page 11 - Revision: 07-08-2024... -
Page 12: Settings Using The User Interface
SETTINGS USING THE USER INTERFACE Several settings and functions can be accessed through the User Interface (UI) of the Waterlogic WL30-RO. This section will detail what those settings are and how they can be accessed. Filter Reset To reset the internal filter timer, perform the following sequence: 1. -
Page 13: Warranty
WATERLOGIC MANUFACTURED WATER DISPENSER LIMITED WARRANTY The Waterlogic WL30-RO is covered by the Waterlogic Warranty for a period of 3 years from the date of purchase against manufacturer defects given the filtration is changed with Waterlogic branded filters on the recommended schedule. -
Page 14: Service Requirements
4. Clean and sanitize external surfaces of the WL30-RO Water Dispenser. Use soap and water or chemicals that are compatible with ABS plastic and will not damage or degrade the product surfaces. -
Page 15: Wl30-Ro Parts Diagram
WL30-RO PARTS DIAGRAM PA018A01 Top Lid PH044A01 Face Plate WL30 EB083A01 Front LED PCB PB036A01 Upper Front Panel PK128A01 Dispense Cover WL30-RO Manual Page 15 - Revision: 07-08-2024... - Page 16 PD021A01 Drip Tray Float Cover PD046A01 Drip Tray Grill PD022A01 Drip Tray Float PD047A01 Drip Tray PC013A01 Lower Front Panel PE001C02 Rear Panel ED002A01 Hot Switch EJ003A01 Fuse Housing & Cap WL30-RO Manual Page 16 - Revision: 07-08-2024...
- Page 17 IA001D01 Side Panel PK063A01 Drain Valve Body PK063B01 Drain Valve Cap PK071A01 PCB Case Top EB085A01 Main PCB PK070A01 PCB Case Bottom PF003A01 Bulkhead Fitting 14 EE011A01 Hot Water Pump WL30-RO Manual Page 17 - Revision: 07-08-2024...
- Page 18 Sediment Filter WL-QC2 Pre-Carbon Filter WL-QC3R RO(80gpd) Filter WT-QC5 Post Carbon Filter WL-QC4R Mineral Add-Back Filter EF014A01 Cold Tank Thermostat PG035A01 Cold Tank Lid PF074A01 Micro Float Air Filter EH005A01 UV LED PF073A01 Float WL30-RO Manual Page 18 - Revision: 07-08-2024...
- Page 19 Pump to Hot Silicone RC039K01 Hot Pump Silicone RC037A01 Cold to Hot Silicone EC011A01 Dispense Solenoid RC049K01 Hot Valve Silicone RC048K01 Cold Valve Silicone EE011A01 Cold Water Pump RC033K01 Cold Water Outlet Silicone WL30-RO Manual Page 19 - Revision: 07-08-2024...
- Page 20 11-1546-1 Leak Stop PK113A01 Foot RC043K01 Leak Tray Plug WL30-RO Manual Page 20 - Revision: 07-08-2024...
-
Page 21: Flow Diagram
WL30-RO WATER FLOW DIAGRAM (RO CONFIG) WL30-RO Manual Page 21 - Revision: 07-08-2024... -
Page 22: Electrical Diagram
WL30-RO ELECTRICAL DIAGRAM DANGER! HIGH VOLTAGE ELECTRICAL HAZARD. PCB (Printed Circuit Board) contains High Voltage. Only trained and qualified technicians should attempt live testing. WL30-RO Manual Page 22 - Revision: 07-08-2024... -
Page 23: Dipswitch Settings
DIPSWITCH SETTINGS On the PCB of the WL30-RO, there is a set of dipswitches that can be used to control several different settings on the unit. See the chart and photos below for an explanation of the switches. A quick-reference guide is also on the inside of the PCB cover. -
Page 24: Pre-Installation Procedures
Only qualified personnel who have read and understand this entire manual should attempt to install, or service this WL30-RO Water Dispenser, failure to do so could result in death or serious injury. DO NOT plug into an electrical supply until specifically instructed. -
Page 25: Notes On Installation
*If either are blocked, the water will not flow smoothly to and from the unit, and may cause performance degradation. 8. Do not place any heating system near the rear of the unit. 9. The power supply, source water, and drain must be directly connected to the unit. WL30-RO Manual Page 25 - Revision: 07-08-2024... -
Page 26: Filter Flushing Procedure
4. Remove the lower front panel of the unit. Press down on the top of the lower panel, then pull away. The panel should hinge outward, and then come away from the unit completely. Set this panel aside. WL30-RO Manual Page 26 - Revision: 07-08-2024... - Page 27 #1, as shown. Next, remove the supply line from the left port of the filter bank. Replace it with the drain line. Install the supply line into the port the drain line was removed from, as shown. Drain Line to Supply Line Bucket or Sink Post-Carbon Sediment WL30-RO Manual Page 27 - Revision: 07-08-2024...
- Page 28 LLDPE tubing to a drain or to the same bucket as the flush water. Drain Line to Bucket or Sink 11. Disconnect the black tube shown, coming out of the product port of the membrane, and replace it with the drain line used for flushing. WL30-RO Manual Page 28 - Revision: 07-08-2024...
- Page 29 RO to the inlet of the mineral filter that was disconnected in the previous step. 13. The filtration system is now ready to use. The water supply valve can be turned on, and the unit can move forward to the next installation step. WL30-RO Manual Page 29 - Revision: 07-08-2024...
-
Page 30: Installation
Once the filters have been flushed or “rinsed”, installation can begin. Listed below are the steps to properly install and begin use of the Waterlogic WL30-RO Water Dispenser. 1. To begin, you will need a ¼” LLDPE tube connecting the unit to a water supply, connected to the “Water In”... - Page 31 Once the tanks are full, and using the touch sensors on the front panel, dispense both hot and cold water to ensure flow from tanks. WL30-RO Manual Page 31 - Revision: 07-08-2024...
- Page 32 ((TDS Supply – TDS Product)/TDS Supply x 100 = % Reduction) There is no significant drop in TDS for Micro filtration. If, reduction is significantly less than 95%, the RO filtration system should be inspected for proper function. WL30-RO Manual Page 32 - Revision: 07-08-2024...
-
Page 33: Pm Guide
AIR FILTER 3 Years It is imperative to regularly change the filters on the Waterlogic WL30-RO unit. Changing the filters keeps the tanks clean and the water tasting fresh. Failing to change filters regularly can also cause premature degradation of RO filters, which can increase maintenance costs. - Page 34 7. Turn the hot tank switch on the back of the unit to ON. Return the front lower panel and top panel to the unit and reinstall all fasteners. The unit is now ready for use, and the hot water will be up to temp within 15min. WL30-RO Manual Page 34 - Revision: 07-08-2024...
-
Page 35: Resetting The Hot Tank Overload Thermostat
If water flows from the hot tank, the tank is primed and full of water. Disconnect power and continue with resetting the thermostat. Once done, restore power and the water will begin heating, and hot water should be available within 5-10 minutes. WL30-RO Manual Page 35 - Revision: 07-08-2024... -
Page 36: Final Inspection
Leaving water in the hot tank will allow you to turn the hot tank on immediately after installation of the system but if left overnight may result in a taste complaint. 3. Never lay the system on its side. WL30-RO Manual Page 36 - Revision: 07-08-2024... -
Page 37: Preventative Maintenance
4. Check solenoids for proper function. Dripping solenoids should be replaced immediately. Every 5 years, in addition to the above, perform the following: • Replace all internal fittings and tubing. • Replace solenoids. WL30-RO Manual Page 37 - Revision: 07-08-2024... -
Page 38: System Inspection
Tap TDS TDS out of the cold and hot tanks Pictures Depending on the situation, technical support may request more information. Upon approval, WATERLOGIC will process warranty credit or replacement part to be fulfilled WL30-RO Manual Page 38 - Revision: 07-08-2024... - Page 39 Check flow individually from each filter to ensure flow. Replace any filter Clogged Filter with reduced flow. Check dispense solenoids for proper function. May need to be disassembled Solenoid Clog or Failure to remove blockage, or replaced if failed. WL30-RO Manual Page 39 - Revision: 07-08-2024...
- Page 40 When using a bladder, this is much more susceptible to manifesting itself as a problem. ▪ As the bladder pressure pushes back on the filter, lower pressure will reduce recovery even beyond the above stated levels and will be unable to properly fill the bladder. WL30-RO Manual Page 40 - Revision: 07-08-2024...
- Page 41 Failure to take this into consideration may cause the bladder to ineffectively fill due to pressure drop with multiple units in line which mainly manifests itself as the larger bladder tanks get closer to filling WL30-RO Manual Page 41 - Revision: 07-08-2024...
- Page 42 This will also result in burning through pre filters and using a lot of water that will ultimately be just sent down the drain Please see below for recommended air pressure that should be in the bladder depending on size of the bladder. WL30-RO Manual Page 42 - Revision: 07-08-2024...
Need help?
Do you have a question about the WL30-RO and is the answer not in the manual?
Questions and answers