Advertisement
Quick Links
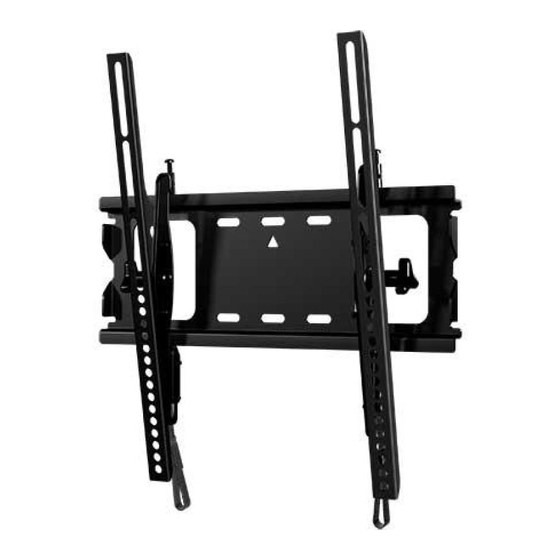
SAN25BB
INSTRUCTION MANUAL
Texto en español, página 16
Want to watch a
Want to watch a
video that shows
video that shows
how easy this DIY
how easy this DIY
project will be?
project will be?
Watch it now at:
Watch it now at:
SANUS.com/366
SANUS.com/366
WE'RE HERE TO HELP
WE'RE HERE TO HELP
Get it right the
Get it right the
first time.
first time.
HeightFinder™
HeightFinder™
shows you
shows you
where to drill.
where to drill.
Check it out at:
Check it out at:
SANUS.com/1170
SANUS.com/1170
Our US-based
Our US-based
install experts
install experts
are standing by
are standing by
to help.
to help.
Call us at:
Call us at:
Or, chat at:
Or, chat at:
Or, chat at:
Or
800-359-5520
800-359-5520
SANUS.com/chatSA
SANUS.com/chatSA
Advertisement

Related Manuals for LEGRAND SANUS ACCENTS SAN25BB


Summary of Contents for LEGRAND SANUS ACCENTS SAN25BB
- Page 1 SAN25BB INSTRUCTION MANUAL Texto en español, página 16 WE’RE HERE TO HELP WE’RE HERE TO HELP Want to watch a Want to watch a Get it right the Get it right the Our US-based Our US-based video that shows video that shows first time.
- Page 2 IMPORTANT SAFETY INSTRUCTIONS – SAVE THESE INSTRUCTIONS – PLEASE READ ENTIRE MANUAL PRIOR TO USE Before getting started, let’s make sure this mount is perfect for you! Does your TV weigh No — Perfect! more than 80 lbs 80 lbs (36.2 kg) including Yes —...
- Page 3 Supplied Parts and Hardware WARNING: This product contains small items that could be a choking hazard if swallowed. Before starting assembly, verify all parts are included and undamaged. If any parts are missing or damaged, do not return the damaged item to your dealer; contact Customer Service.
- Page 4 STEP 2 Parts and Hardware Wall Plate Template Wall Plate Lag Bolt Anchor Washer ⁄ x 2¾ in. ⁄ in. ⁄ x 2¾ in. ⁄ in. ⁄ x 2¾ in. ⁄ in.
- Page 5 STEP 1 Attach TV Bracket to TV 1-2 Select TV Screw Length 1-1 Select TV Screw Diameter Hand thread screws into the threaded inserts on the If your TV has a flat back AND you want the TV closer back of your TV to determine which screw diameter to the wall, use the shorter screws.
- Page 6 1-3 Attach TV Bracket Ensure the brackets are level on the back of the TV. Install using either the short screw and washer, or long screw, spacer, and washer combination you selected for your TV. Short Screw and Washer Long Screw, Spacer and Washer Spacer Options...
- Page 7 1-4 Adjust Straps For ease of access, straps should be level with the bottom of the TV.
- Page 8 STEP 2A Attach Wall Plate Wood Stud Option CAUTION: Avoid potential personal injuries and property damage! ● Drywall covering the wall must not exceed 5/8 in. (16 mm). ● Minimum wood stud size: common 2 x 4 in. (51 x 102 mm) nominal 1 x 3 in. (38 x 89 mm). ●...
- Page 9 Drill pilot holes using a 7/32 in. (5.5 mm) diameter drill bit. Remove wall plate template. IMPORTANT: Be sure to drill into the center of the stud. IMPORTANT: Pilot holes must be drilled to a depth of 3 in. (75 mm). Install the wall plate using lag bolt and washers...
- Page 10 STEP 2B Attach Wall Plate Solid Concrete or Concrete Block Option CAUTION: Avoid potential personal injuries and property damage! ● Mount the wall plate directly onto the concrete surface ● Minimum solid concrete thickness: 8 in. (203 mm) ● Minimum concrete block size: 8 x 8 x 16 in. (203 x 203 x 406 mm) ●...
- Page 11 Remove wall plate template and insert concrete anchors CAUTION: Be sure the anchors are seated flush with the concrete surface. Install the wall plate using lag bolts and washers Tighten the lag bolts and washers only until they are pulled firmly against the wall plate. CAUTION: Avoid potential personal injury or property damage! All three lag bolts MUST BE firmly tightened to prevent unwanted movement of the wall...
- Page 12 STEP 3 Hang TV onto Wall Plate HEAVY! You may need assistance with this step. IMPORTANT: There is an audible click when the brackets are securely latched to the wall plate CAUTION: Avoid potential personal injury or property damage! Always make sure your TV brackets are in the locked position so the TV is securely fastened to the wall plate...
- Page 13 10° 5° Adjust Tilt and Level Loosen the knobs on the TV brackets to adjust the tilt If needed, adjust the screws on the TV brackets to level of your TV. Tighten the knobs when your TV is set to the TV.
- Page 14 Removing the TV HEAVY! You may need assistance with this step. To remove the TV from the wall plate, simultaneously pull release cords down and TV out, and then lift the TV up and out away from the wall.
- Page 15 Dimensions UP TO 15.75 400.0 UP TO 15.75 [mm] 400.0 4.75 120.7 4.75 10° 5° 120.7 10° 5° 16.93 15.94 430.0 6.00 3.75 405.0 16.93 15.94 152.4 95.3 430.0 6.00 3.75 405.0 152.4 95.3 1.95 49.6 1.95 49.6 15.50 15.50 393.7 393.7...
- Page 16 ESPAÑOL INSTRUCCIONES DE SEGURIDAD IMPORTANTES. CONSÉRVELAS. LEA TODO EL MANUAL ANTES DE UTILIZAR ESTE PRODUCTO. Antes de comenzar, verifiquemos que este producto sea el ideal para sus necesidades. Ver página 2 ¿Su televisor pesa más de 36,2 kg (80 libras) incluyendo los accesorios? No —...
- Page 17 ESPAÑOL 1-3 Fijar la placa de sujeción del televisor Ver página 6 Asegúrese de que las placas de sujeción queden niveladas en la parte posterior del televisor. Instale la placa de sujeción usando la combinación que haya seleccionado para su televisor: tornillo corto y arandela o bien tornillo largo, separador y arandela. 1-4 Ajustar las correas Ver página 7 Para facilitar el acceso, las correas deben estar niveladas con la parte inferior del televisor.
- Page 18 ESPAÑOL PASO 2B Fijar la placa mural Opción para bloque de hormigón Ver página 10 PRECAUCIÓN: Evite lesiones y daños materiales. ● Instale la placa mural directamente sobre la superficie de hormigón. ● Espesor mínimo del hormigón: 203 mm (8''). ●...
- Page 19 ESPAÑOL Paso 3 Colgar el televisor en la placa mural Ver página 12 ¡ELEMENTO PESADO! Es posible que necesite ayuda en este paso. Fije las placas de sujeción del televisor a la placa mural IMPORTANTE: Cuando las placas de sujeción enganchen en la placa mural, se escuchará un clic. PRECAUCIÓN: Evite el riesgo de lesiones y daños materiales.
- Page 20 Leave a review: accents.sanus.com Legrand AV Inc. and its a iliated corporations and subsidiaries (collectively, “Legrand”), intend to make this manual accurate and complete. However, Legrand makes no claim that the information contained herein covers all details, conditions, or variations. Nor does it provide for every possible contingency in connection with the installation or use of this product. The information contained in this document is subject to change without notice or obligation of any kind.
Need help?
Do you have a question about the SANUS ACCENTS SAN25BB and is the answer not in the manual?
Questions and answers