AFi FR-BRC-STP Assembly Instructions Manual
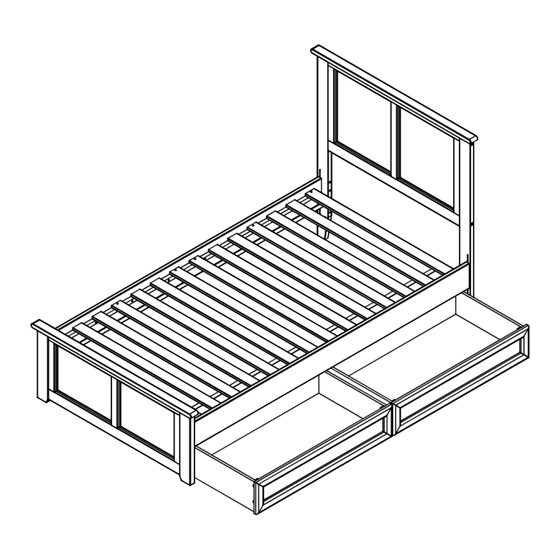
1fb panel bed frame
Hide thumbs
Also See for FR-BRC-STP:
- Assembly instructions manual (8 pages) ,
- Assembly instructions manual (10 pages) ,
- Assembly instructions manual (9 pages)
Advertisement
Quick Links
please contact afifurnishings at customerservice@afifurnishings.com or 1-800-955-3726
PARTS LIST
1
LEFT LEG
2
RIGHT LEG
3
TOP/BOTTOM RAIL
4
FB PANEL
5
LEFT SIDE RAIL
6
RIGHT SIDE RAIL
7
SLAT KIT
8
SUPPORT RAIL
NOTE: WE INCLUDE SPARE HARDWARE IN CASE DAMAGE OCCURS DURING ASSEMBLY.
Attach right leg (2) to top/bottom rail (3), using JCB (A) and barrel nut (B). Tighten with the
Step 1
Allen wrench (G).
Step 2
Guide the FB panel (4) in carefully so that
it won't jump out of its grooves.
Be sure it fits fully into its groove
at the leg before fitting the
left leg (1).
Step 3
Attach left leg (1) to the footboard assemblies
as shown bellow. Using JCB (A) and barrel nut (B).
Tighten with allen wrench (G).
PO:
1FB PANEL BED FRAME
ASSEMBLY INSTRUCTIONS
Before assembling your bed frame, please read through these
instructions carefully and familiarize yourself with the different parts.
ATTENTION! If you receive a damaged or defective item,
1 PC
A
1 PC
2 PCS
B
1 PC
1 PC
C
1 PC
2 SET
D
2 PCS
FULL
JCB M6 X 80mm (3 1/8") - 8 pcs
Spare - 1 pc
Barrel nut - 8 pcs
Wood screw(1 1/4") - 12 pcs
Spare - 1 pc
Wood button - 8 pcs
Spare - 1 pc
3
3
B
HARDWARE
E
JCB M6 X 30mm (1 1/4") - 6 pcs
F
Cap nut - 6 pcs
G
Allen wrench M4 - 1pc
B
2
B
A
4
B
1
A
A
CODE
ITEM
FR-BRC-STP
R-20333X
READY
TO
ASSEMBLE
Spare - 1 pc
Spare - 1pc
Adult assembly
A
JCB M6 X 80mm
B
Barrel nut
G
Allen wrench
Page 1 of 3
Advertisement

Related Manuals for AFi FR-BRC-STP


Summary of Contents for AFi FR-BRC-STP
- Page 1 JCB M6 X 80mm Step 3 Attach left leg (1) to the footboard assemblies as shown bellow. Using JCB (A) and barrel nut (B). Tighten with allen wrench (G). Barrel nut Allen wrench CODE ITEM FR-BRC-STP R-20333X Page 1 of 3...
- Page 2 FULL Attach left & right side rails (5)(6) to the footboard as shown below. Using JCB (A) and barrel Step 4 nut (B) tighten with Allen wrench (G). Step 5 Attach the side rails to the headboard as shown using the bed hooks and middle set of pins on headboard.
- Page 3 FULL Attach slat kit (7) onto the bed. Using wood screw (C) tighten with Phillips head screwdriver. Step 7 (Customer supplied) Adult assembly Step 8 Wood screw 1 1/4" Lastly, cover holes with wood button (D). Wood button Congratulations! Your bed is now ready for use. We recommend that you periodically recheck that all screws are tight to ensure lasting safety.
- Page 4 HEADBOARD ASSEMBLY INSTRUCTIONS READY Before assembling your headboard, please read through these instructions carefully and familiarize yourself with the different parts. ASSEMBLE ATTENTION! If you receive a damaged or defective item, please contact afifurnishings at customerservice@afifurnishings.com or 1-800-955-3726 Instructions apply for bed sizes PARTS LIST HARDWARE TWIN >...
- Page 5 ATTACHING HEADBOARD TO METAL BED FRAME ASSEMBLY INSTRUCTIONS Before assembling your bed, please read through these instructions carefully and familiarize yourself with the different parts. Instructions apply for bed sizes TWIN > FULL > QUEEN > KING Adult assembly Metal bed frames are sold separately from wood headboards. The hardware shown on this page is supplied with your wood headboard for attaching the bed frame to the headboard.
- Page 6 TRUNDLE BED TWIN ASSEMBLY INSTRUCTIONS READY Before assembling your Trundle bed, please read through these instructions carefully. Familiarize yourself with the different parts. Adult assembly ATTENTION! If you receive a damaged or defective item, please contact afifurnishings at customerservice@afifurnishings.com or 1-800-955-3726 Phillips screwdriver Customer supplied CODE...
-
Page 7: Parts List
TWIN PARTS LIST HARDWARE 1 BOX LEFT RAIL 1 PC RIGHT RAIL 1 PC FRONT PANEL 1 PC BACK RAIL SLAT KIT WITH WEBBING 2 SETS 1 PC MID RAIL 1 PC Step 1 Attach L bracket (C) to the front panel (02) using JCB M6 X 5/8”(B). Tighten with the Allen wrench (E). Adult assembly JCB M6 X 5/8”... - Page 8 TWIN Step 2 Attach the left, right and mid rail (05)(06)(04) to the front panel (02) and back rail (03) as shown, using JCB M6 X 5/8" (B) M6 X 1 1/4" (A). Tighten with the Allen wrench (E). Using wood screw 1 1/4" (D) tighteen with Phillips head screwdriver. (customer supplied) Dowel hole for mid rail Adult assembly JCB M6 X 1 1/4”...
- Page 9 TWIN Congratulations! Your Trundle bed is now ready for use. We recommend that you periodically check that all screws are tight and all parts are secure to ensure lasting safety. Step 4 Lastly, Insert Trundle bed to the bed as shown below. Adult assembly Page 4 of 4...
Need help?
Do you have a question about the FR-BRC-STP and is the answer not in the manual?
Questions and answers