Advertisement
Advertisement
Table of Contents

Related Manuals for Flamerite Fires E-FX FIRES PAYTON 1000


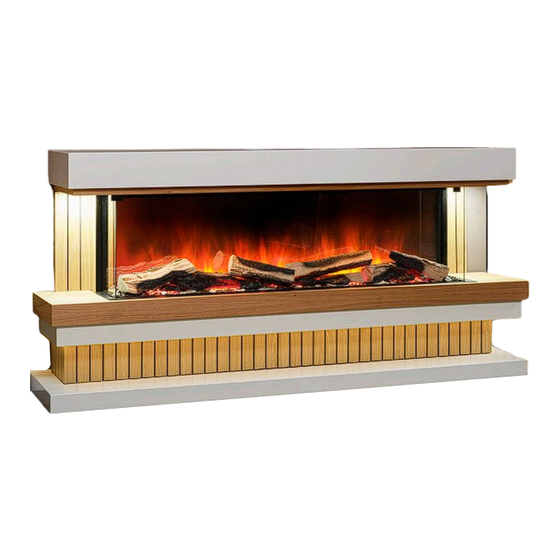
Summary of Contents for Flamerite Fires E-FX FIRES PAYTON 1000
- Page 1 SUITE INSTALLATION, PRECAUTIONS & SERVICING JULY 2024...
-
Page 2: Table Of Contents
IMPORTANT CONTENTS • • Please make sure that the fire We recommend fully installing Recycling & Safety Warnings ............................. 4 is fitted at the correct height for and setting up the fire prior Technical Specifications ............................. 6 the suite purchased. There are to suite installation to prevent different heights required for the unnecessary damage to the... -
Page 3: Recycling & Safety Warnings
RECYCLING & SAFETY WARNINGS RECYCLING & SAFETY WARNINGS • Cleaning and user maintenance shall NOT keep them away from the sides and rear be made by children without supervision. (sides and rear restrictions apply to location dedicated heaters only) • Children of less than 3 years should be IMPORTANT •... -
Page 4: Technical Specifications
TECHNICAL SPECIFICATIONS TECHNICAL SPECIFICATIONS SUITE MODEL PAYTON 1000 PAYTON 1300 ELARA 1000 ELARA 1300 1340mm / 52 3/4” 1640mm / 64 9/16” 1340mm / 52 3/4” 1640mm / 64 9/16” 140mm / 5 1/2” 140mm / 5 1/2” 140mm / 5 1/2” 140mm / 5 1/2”... -
Page 5: Fitting The Suite
FITTING THE SUITE FITTING THE SUITE Using a screwdriver, bend out the tabs located around the top and bottom lips to 90 degrees. To fit the top section of the suite, slide the top on with the cut-out sliding in-between the tabs you They are used to help locate the suite in position. - Page 6 FITTING THE SUITE FITTING THE SUITE Place the bottom of the suite in front of the fire and plug the down lights into the sockets. Make Slide the bottom onto the fire making sure that the cut-out slides between the tabs you folded sure that you turn the switches on before fitting the suite fully.
-
Page 7: Installing The Trims
INSTALLING THE TRIMS INSTALLING THE TRIMS Unwrap and install the fire side cheeks. These are magnetic and come with a cut-out for the Unwrap the wall panels and wipe the wall using the alcohol wipes provided in the accessory pack, down lighting cable. -
Page 8: Faqs
INSTALLING THE TRIMS FAQS Unwrap the metal suite trims and make sure you have two side trims, and one front trim. The Q How do I pair and work my down lights? side trims should have 2 magnets spaced on the under side of each, and the front trim should A Please refer to the Cloud eControl App Instruction manual. -
Page 9: Warranty
WIRING DIAGRAM WARRANTY 3 YEAR WARRANTY European Home warrants all Flamerite electric fireplaces against defects in materials and workmanship for a period of THREE (3) YEARS from the date of original retail purchase. If a defect exists, European Home will, at its option, either (1) repair the product at no charge, using new or refurbished replacement parts or (2) exchange the product with one which is new or which has been manufactured from new or serviceable used parts and is at least functionally equivalent to the original product. -
Page 10: Notes
NOTES NOTES E L E C T R I C F I R E S M A D E I N E U R O P E E L E C T R I C F I R E S M A D E I N E U R O P E... - Page 11 These products are only suitable for well insulated spaces or occasional use. Manufactured in the United Kingdom. All products are protected by patents, registered design and intellectual property rights. Flamerite Fires Ltd. will protect these rights. All specifications are correct at the time of publishing but are subject to change.
Need help?
Do you have a question about the E-FX FIRES PAYTON 1000 and is the answer not in the manual?
Questions and answers