Table of Contents
Advertisement
Quick Links
www.exaco.com
877-760-8500
customerservice@exaco.com
One Kit - TWO OPTIONS!
Ground mount or place on
15.75" (40cm) high stem wall
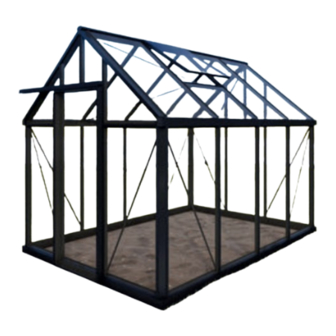
Junior Victorian
Ground/Wall
Assembly Manual
VERSION 2023.1
01.01.2024
Or find the link to our YouTube page at
www.exaco.com.
Go to the Victorian Greenhouse Playlist for all videos.
HTTPS://JANSSENS-ALUSYSTEMS.BE/EN/DOWNLOADS
+
Advertisement
Table of Contents

Related Manuals for Exaco Janssens Junior Victorian


Summary of Contents for Exaco Janssens Junior Victorian
- Page 1 877-760-8500 customerservice@exaco.com One Kit - TWO OPTIONS! Ground mount or place on 15.75" (40cm) high stem wall Junior Victorian Ground/Wall Assembly Manual VERSION 2023.1 01.01.2024 Or find the link to our YouTube page at www.exaco.com. Go to the Victorian Greenhouse Playlist for all videos.
-
Page 2: Table Of Contents
Table of Contents Introduction & General Information……………………………………………………...……..…1-10 Basic Assembly Order of Greenhouse………………………………………………………1-2 Required Tools……………………………………………………………………………………2 Safety Considerations……………………………………………………………………………2 Helpful Suggestions……………………………………………………………………………...2 Greenhouse Layout and Diagram………………………………………..…....…..3-5 Doors and Door Optional Upgrades……………………………………………….…...…..3-5 Windows and Window Options…………………………………………...…...…………..3-5 Optional Accessories and Upgrades……………………………………………….……..6 Placement of Greenhouse……………………………………………………………….……...7 Foundation and Anchoring………………………………………………………...………..7 Greenhouse Floor…………………………………………………………………………...…...7 Water and Electricity……………………………………………………..…………...……..…8-9 Ventilation and Cooling………………………………………………………………….……..8-9... - Page 3 Installing the Glazing………………………………………………………………………………...47-51 Glazing and Gasket Installation……………………………………………………………48-51 Door Assembly and Installation……………………………………………………………….……44-63 UPGRADE OPTION: Sliding Door Low Threshold Installation…………………………53-55 Sliding Door on a Wall with Drop Door Kit………….…………....……………..…50 Standard Kit Sliding Door Assembly and Information………………………………..42-49 UPGRADE OPTION: Hinged Door Installation………..…………………………………54-63 Window and Vents…………………………………………………………………………………..64-85 Roof Window/Vent Assembly/Installation……………………………………………....64 Roof Vent Openers………………………………………………………………………..65-67 UPGRADE OPTION: Roof Vent Fly Screen…………………………………………………68...
-
Page 4: Introduction & General Information
Thank you for purchasing a Janssens’ Junior Victorian Greenhouse, imported and distributed in North America by Exaco in Austin, TX. Exaco will provide all the North American based customer support for you greenhouse. Please feel free to reach to Exaco customer service with any questions you may have during assembly! Questions? Need Assembly Support? Please call Exaco at 877-760-8500 or email customerservice@exaco.com. -
Page 5: Required Tools
Important! Please follow glazing removal instructions on the pallet for steps to safely remove glass panes from the pallet. Contact Exaco if you have not seen these steps! o Tempered glass is surprisingly strong. The corners are the most vulnerable – please be aware of the corners when handling and installing glass. -
Page 6: Greenhouse Layout And Diagram
Please thoroughly read the email that was sent to you from Exaco customer service for additional addendums to the manual and other important information. Refer to the Exaco YouTube Playlist for the Victorian Greenhouse for animated assembly videos as well as specific installation videos regarding your greenhouse. - Page 7 Junior Victorian 24 (7'9" x 12'7") - includes the following: foundation frame/ base, single sliding door, and two roof v ents with automatic openers. **Please note that beginning spring of 2023, the Junior Victorian Greenhouse Kit with include additional parts and glass that will allow you to place this kit on a 15.75”...
- Page 8 Door Options: ● Sliding Door: The sliding door of the greenhouse hang/slide along the outside of the greenhouse and feature brush weatherstripping. A keyed lock attaches at the bottom of the door. For standard kits, the sliding door threshold will be the 4 ½” high base frame unless a low threshold kit (see below) is purchased.
-
Page 9: Optional Accessories And Upgrades
○ Placed in a sidewall bay, often opposite the door for a cross breeze. If you order a louvered window for your Junior greenhouse, we send a lexan panel for the space underneath as it is not a standard glass size for us. ○... -
Page 10: Placement Of Greenhouse
Placement of the Greenhouse The placement of the greenhouse varies by intended usage, climate, location, and space available. There is a wealth of information to be found online on this subject, here are some considerations: ● Will your greenhouse be in full sun or get afternoon shade? Glass greenhouses do what they are intended to do - heat up quickly on sunny days. -
Page 11: Water And Electricity
They are Texas stamped. We may be able to obtain other state stamped documents, however if you need them specific to your state, we do not cover this expense. Please contact Exaco if structural documents are needed. Flooring The greenhouse does not include flooring material, allowing it to be customized to your needs and use. -
Page 12: Heating The Greenhouse
exhaust fans will use an external thermostat to control at what temperature it turns on and off. Place the exhaust fan opposite your louver window to create a cross breeze. For the most effective cross breeze, it is often recommended to close window vents to force airflow through your louver window. -
Page 13: Maintenance
○ Replacement Glass - if you need to replace a piece of broken glass, please refer to the glass spec sheet in this manual. Replacement panes of 3/16” standard tempered safety glass should be ordered from a local glass shop. Exaco will not ship large pieces of glass, locally ordered replacement panes of standard tempered safety glass will match the original panes. -
Page 14: Foundation Measurements And Planning
JUNIOR VICTORIAN - Ground Mount JVIC23-3098mm/122" 2360mm JVIC24-3836mm/151" or 93" JVIC25-4574mm/180" Notes: - It is recommended to build your foundation down to the frost line in your area and/or consult a local contractor for recommedations. - Greenhouse base frame is 2 1/4" wide - Corner anchor posts are 1.5"... -
Page 15: Upgrade Option: Planning/Building A Stem Wall
Junior Victorian - Wall Mount 2 5/16" = 93" = 122" / 151" / 180" C = 829mm ~ 32.6" D = 703mm ~ 27 2/3" E = 829mm ~ 32.6" = C + D + E !!! 400 mm~15 3/4" - Read notes on previous and following pages to understand anchoring options, and measurements of frame... -
Page 16: Packing List
(Roof window) (Hardware pack) (silicone/shims) corner anchors) (single sliding door) SEE NEXT PAGE FOR GLASS ILLUSTRATION /COUNT IN INCHES Sapak_EOS contains: (black PVC gable/ridge covers, long bolts & nuts for corner anchors, small L brackets for gable assembly (L2G) Main hardware for assembling the greenhouse will be found in the longest box - INSIDE the gutter profiles. -
Page 17: Glazing Specs
All Glass is 4mm / 3/16" thick tempered safety glass and replacments may be ordered from a local glass shop. 2 3/4" Gable End Pieces: Roof window 2 3/4" Side wall Door & Roof 28 3/4" 3 5/16" 28 3/4" 14 3/16"... -
Page 18: Diagram Of Greenhouse Extrusions/Profiles
PRO40091 PRO1456 Ridge Beam Roof Glazing Stud PRO20229 PRO6918 Horizontal Gable End Roof Endbar PRO20779 PRO6578 Corner Post Gutter Profile PRO1456 Vertical Glazing Stud PRO6120 Wind Brace/Strap Foundation/base JUNIOR Corner Anchors (Extend 12" PRO210 below ground level) -
Page 19: Foundation Frame And Side Walls
M6x12 IMPORTANT! Before attaching, insert 3 M6x12 bolts as shown for the sliding door guide. You will use 6 bolts for a double sliding door. Note: When assembling the foundation in this step, only hand-tighten the nuts. The corners may need to be slightly loose to attach the corner uprights (PRO6578). - Page 20 M6x12 If the channels on the corner post do not line up with the holes on the foundation frame, use a drill to extend the holes so that the channel will line up. IMPORTANT!
- Page 21 M6x12 - You will have (4) 15 3/4” long L brackets. - Cut off 4" of the L bracket to connect the foundation frame pieces together. - Cut the remaining 11 3/4" into thirds and flip horizontally to mount the top half into the foundation frame and the bottom half into the concrete or other foundation.
- Page 22 M6x12...
- Page 23 IMPORTANT! M6x12...
- Page 24 IMPORTANT! M6x12 M6x12 M6x12 M6x12 M6x12 M6x12...
- Page 25 M6x12 M6x12 M6x12 M6x12 IMPORTANT!
- Page 26 M6x12 IMPORTANT! Before securing vertical profiles insert bolts for: - Louvered Window - Optional Top Shelf - Optional Seed Tray See table of contents for corresponding pages.
- Page 27 M6x12 IMPORTANT! Before securing vertical profiles insert bolts for: - Louvered Window - Optional Top Shelf - Optional Seed Tray See table of contents for corresponding pages.
- Page 28 M6x12 NOT SQUARE...
- Page 29 M6x12 NOT SQUARE...
- Page 30 M6x12...
- Page 31 M6x12...
-
Page 32: Building The Roof
Insert bolts to connect short uprights to the PRO6918. You will M6x12 need as many bolts as you have short uprights. - Page 33 Insert bolts to connect short uprights to the PRO6918. You will M6x12 need as many bolts as you have short uprights.
- Page 34 IMPORTANT M6x12 If you purchased the shade cloth and misting system: - Add sliders for the shade cloth before attaching the ridge beam. -Add (2) bolts for the misting system, (1) on each end.
- Page 35 IMPORTANT M6x12 If you purchased the shade cloth and misting system: - Add sliders for the shade cloth before attaching the ridge beam. -Add (2) bolts for the misting system, (1) on each end.
- Page 36 M6x12...
- Page 37 M6x12...
- Page 38 Important You will need to add bolts in the rafters for the roof vent crossbar. M6x12 J-Vic23 will have (1) roof window. J-Vic 24 & 25 will have (2) roof M6x12 windows. Add (2) bolts per rafter. Roof vents may be installed in any bay.
- Page 39 Important You will need to add bolts in the rafters for the roof vent crossbar. J-Vic23 will have (1) roof window. J-Vic 24 M6x12 & 25 will have (2) roof windows. Add (2) bolts M6x12 per rafter. Roof vents may be installed in any bay.
- Page 40 For additional support in heavy snow area, you may add stainless self-tapping screws (Not included) next to the bolts where the M6x12 bolt rafter meets the ridge and gutter. used to connect rafters to the ridge beam Another screw may be added here...
- Page 41 For additional support in heavy snow area, you may add stainless self-tapping screws (Not included) next to the bolts where the rafter meets the ridge and gutter. M6x12 bolt used to connect rafters to the ridge beam Another screw may be added here...
- Page 42 J-Vic23 J-Vic24 TOPVIEW J-Vic25 Placement of Roof Wind Braces (TRE) - View from above Attach at ridge beam first with 12mm bolts. Use 12mm bolts on the gutter for the J-Vic 23 & 24. Use a 16 or 20mm bolt for the J-Vic 25.
- Page 43 J-Vic23 J-Vic24 TOPVIEW J-Vic25 Placement of Roof Wind Braces (TRE) - View from above Attach at ridge beam first with 12mm bolts. Use 12mm bolts on the gutter for the J-Vic 23 & 24. Use a 16 or 20mm bolt for the J-Vic 25. Secure wind strap with screws where it crosses the rafters.
- Page 44 J-Vic23 J-Vic24 TOPVIEW J-Vic25 Placement of Roof Wind Braces (TRE) - View from above Attach at ridge beam first with 12mm bolts. Use 12mm bolts on the gutter for the J-Vic 23 & 24. Use a 16 or 20mm bolt for the J-Vic 25.
- Page 45 J-Vic23 J-Vic24 TOPVIEW J-Vic25 Placement of Roof Wind Braces (TRE) - View from above Attach at ridge beam first with 12mm bolts. Use 12mm bolts on the gutter for the J-Vic 23 & 24. Use a 16 or 20mm bolt for the J-Vic 25. Secure wind strap with screws where it crosses the rafters.
- Page 47 OPTION ! Roof decorations may be installed at this point or after glazing is installed if desired.It may be easier to install glazing gaskets if the roof decoration is installed at the very end. Roof decorations are optional and may be omitted if desired.
-
Page 48: Framing For Roof Window/Vent
Crossbar for framing roof vent opening will be found in each Roof Window bag/package. Roof vents may be installed in any bay. They may not be placed side by side. M6x12 Insert bolts to attach connecting plate. M6x12... - Page 49 Crossbar for framing roof vent opening will be found in each Roof Window bag/package. Roof vents may be installed in any bay. They may not be placed side by side. M6x12 Insert bolts to attach connecting plate.
- Page 50 10mm GLASS POLYCARBONATE...
- Page 51 PRO1748...
- Page 53 PRO6918 E400330 PRO20229 PRO20779...
- Page 54 E400330 PRO6918 PRO1456 PRO40091...
- Page 55 Scan the QR codes below to take you to our accessories installation video on YouTube and to our accessories page on our website. QR Code for Accessories QR Code for Website Video on YouTube...
- Page 56 OPTIONAL UPGRADE: Low Threshold for Sliding Door/s Cut foundation KSD_70 KSD_144 frame 17mm from bolt hole Single sliding door opening Double sliding door opening should be 703mm should be 1441mm Cut foundation frame 17mm from bolt hole KSD_1...
- Page 58 Optional Upgrade: Lock (cross section view installation with Low Threshold from above) KSD_70 4,2 x 19 4,2 x 19 KSD_3...
- Page 59 Sliding Door (Standard for most models). VI36 and 46 come with a double sliding door. Additional doors may be added to your greenhouse. Note: Rollers may be adjusted front to M 4,8 x 32mm back to hold door closer to greenhouse frame.
- Page 60 Insert 2 bolts in the PRO20229 to attach to the PRO7545 horizontal pieces. You will need to drill a hole where the PRO7545 attaches to the eave of the greenhouse (PRO6918). The existing hole in PRO7545 will not align correctly.
- Page 61 STOP STOP M16x15...
- Page 62 STOP STOP M16x15...
- Page 63 Roof Window /Vent - all hardware will be included in roof vent package - including crossbar to frame opening GLASS E400330 Note: Rubber seal is only installed on the sides of the roof window. Rubber gasket is not used on polycarbonate models.
- Page 64 Roof Window Installation Note: Inserting a bolt/ nut on both sides of the roof window will prevent it from moving side to side once it is in place. Standard manual opener shown (generally not installed). However, it may be used to secure the window in the closed position - auto opener MUST be detached.
- Page 65 OPTIONAL OPTIONAL...
- Page 66 OPTION: Auto Opener (Ventomax) IMPORTANT! Read installation instructions included in your Ventomax auto opener box to ensure proper installation. There is also information to fully understand the functioning and maintenance of these unique openers. Installing the automatic opener requires 2 bolts to be inserted into the roof The Ventomax openers work with an oil filled crossbar for the lower mount.
- Page 67 OPTION: Spindle Manual Opener Installation Option 1: Mount top of opener to window with a screw Next, hold the lower U-shaped mount up to the crossbar and mark the center of one Installation Option 2: Insert a 1 inch long bolt into hole.
- Page 68 IMPORTANT! You may offset your auto openers slightly if the wind braces are interfering. HOWEVER, if you have purchased flyscreens, your opener must be centered. Either move your roof window to a different location or shorten your wind strap slightly to install it at a tigher angle on the gutter flange.
- Page 69 OPTIONAL UPGRADE: Louvered Window Fly Screen Installed on exterior of the greenhouse...
- Page 70 OPTION: Narrow Top Shelf - please check your order to see if this is included STANDARD M6x15 Insert bolts into SCREW channel of PRO1456 ALTERNATIVE and secure with nuts. Drill screws into PRO 1456 to secure...
- Page 71 OPTION: SEEDBED/SEEDTRAY (ST) Please check your order to see if this was included Diagonal Support only for seedtrays longer than 11 1/2' ft STANDARD Secure back wall of seedtray with screws into PRO1456 SCREW M6x12 Attach L bracket to bolts inserted ALTERNATIVE into corner post and PRO1456...
- Page 72 OPTION: 2 Slat Shelf (TAB2) Note: Shelves do not meet the end of the bracket - allowing you to run these shelves end to end if desired. TAB2...
- Page 73 OPTION: 5 Slat Shelf (TAB5) Note: Shelves do not meet the end of the bracket - allowing you to run these shelves end TAB5 to end if desired.
- Page 74 Misting System Vi23 Vi34/36 (If Equipped) Note: If curtains are going to be installed, the misting system should be hung with bolts as shown to the left. The hangers will need top be bent into position. If there are no curtains it can be hung by drilling holes and hooking the hangers through them.
- Page 75 INSTALLING AN EXHAUST FAN IN A VICTORIAN GREENHOUSE The exhaust fan in a Victorian Greenhouse should be installed up high in one of the gable ends of the greenhouse. If you happen to have polycarbonate walls on your Victorian, you may cut an opening in the polycarbonate to accommodate the fan.
- Page 77 May be added after assembly - you will need to notch the ridge and gutter profile channels with a OPTION: Shadecloth 1/2" drill bit. See next page for curtain sliders insertion instructions specific to your model. TYPE SUN236_73 SUN310_73 SUN236_300 SUN310_300 24 pcs 24 pcs...
- Page 78 OPTIONAL ACCESSORY: SHADECLOTH Inserting the curlicue hooks into the curtain: The curlicue hooks that insert into the curtain will go in every 6 loop in the white ribbon– look at the picture diagram to ensure you are inserting them in the correct direction so the curtain hangs well. Your curtains will have one looped ribbon running across the center (for the ridge) and 3 white looped ribbons on either side.
- Page 79 Janssens NV Mechelsesteenweg 388, B-2500 Lier Belgium (T) +32 15 30 67 80 (W) www.janssens-alusystems.be (E) info@janssens- alusystems.be...
Need help?
Do you have a question about the Janssens Junior Victorian and is the answer not in the manual?
Questions and answers