
Subscribe to Our Youtube Channel
Related Manuals for Nexigo Gripcon


Summary of Contents for Nexigo Gripcon
- Page 1 Gripcon For Switch / Switch OLED User Manual Scan the QR code or visit our link to download the latest manual or watch the installation video. nexigo.com/manuals...
-
Page 2: Contact Information
From all of us here at NexiGo, we want to thank you for your trust in us. We look forward to serving you again in the near future. -
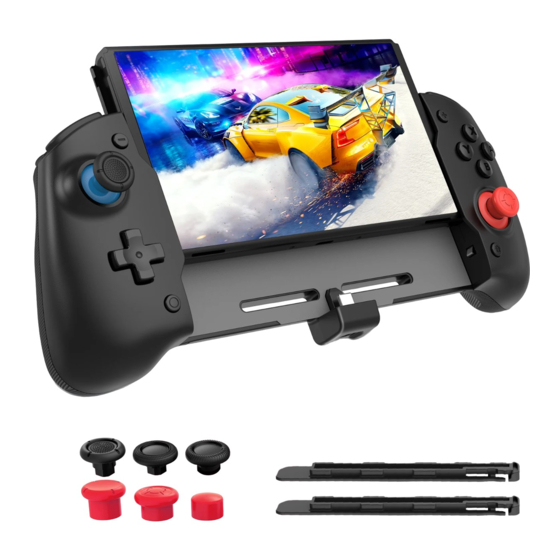
Page 3: Product Overview
PRODUCT OVERVIEW 1. - Button 7. Turbo Button 2. + Button 8. Lighting Button 3. Left Joystick / L3 Button 9. Screenshot Button 4. Right Joystick / R3 Button 10. Home Button 5. D-pad 11. Type-C Connector 6. X / Y / A / B Buttons 12. -
Page 4: Package Includes
18 20 16. Right M Button (Mapping the MR button) 17. Left M Button (Mapping the ML button) 18. Haptic Feedback Strength + 19. Haptic Feedback Strength - 20. MR Button 21. ML Button 22. Type-C Charging Port PACKAGE INCLUDES 1 x Controller for Switch / Switch OLED 1 x Type-C to Type-A Cable 1 x User Manual... - Page 5 HOW DO I CONNECT THE NEXIGO CONTROLLER TO MY SWITCH CONSOLE? 1. Please enable the Pro Controller Wired Communication setting in the Switch / Switch OLED console itself. You can do this by going to System Settings > Controller and Sensors > Pro Controller Wired Communication.
- Page 6 2. Slide the Switch / Switch OLED console into the controller and plug it into the USB-C port at the bottom. After you have done so, press the button on the controller to connect it to the console. Switch OLED / Switch Console Switch OLED / Switch Console...
- Page 7 HAPTIC FEEDBACK STRENGTH ADJUSTMENT 1. Press the Haptic Feedback Strength - button to decrease the haptic feedback vibration strength. 2. Press the Haptic Feedback Strength + button to increase the haptic feedback vibration strength. 3. After choosing a vibration level, the controller will vibrate at the chosen level for half a second to indicate that choice.
- Page 8 HOW DO I ADJUST THE RGB LIGHTING? ADJUSTING THE LIGHT COLOR Press the Lighting button to change the RGB light color between blue, red, green, yellow, cyan, orange purple, and pink, or shift through an array of different colors with RGB Cycling Mode. Switch OLED / Switch Console Press Once...
- Page 9 ADJUSTING THE BRIGHTNESS Hold the Lighting button and press Up / Down button (on D-pad) at the same time to change the light brightness between: 25% / 50% / 75% / 100%. Switch OLED / Switch Console HOW TO USE THE TURBO FUNCTION Many of the buttons on this controller can be set to turbo functionality.
- Page 10 Switch OLED / Switch Console Full-auto Turbo Mode Repeat the above step again to enable full-auto mode. Once the full-auto mode is activated, the button you assign will be fully automatic, meaning it will trigger repeatedly much faster than in semi-auto mode.
- Page 11 TURBO SPEED ADJUSTMENT Hold the Turbo button and press the - / + button at the same time to decrease or increase the turbo speed. There are three adjustment levels for the turbo speed: 5 times/second, 12 times/second, and 20 times/second.
- Page 12 MAPPING THE REAR BUTTONS: 1. Many of the buttons on this controller can be mapped to the rear buttons. The mappable buttons are: A / B / X / Y / L / R / ZL / ZR / + / - / Left Joystick / Right Joystick / L3 / 2.
- Page 13 Mapping Button Combinations ML / MR buttons support mapping up to 20 inputs (including time intervals) under a single button press. This means you can save entire button combos (such as a special move in a fighting game) to each of these buttons and execute them exactly as you input them, all with a single press.
-
Page 14: Safety Notes
SAFETY NOTES Only use the original Switch / Switch OLED power adapter to power the unit. Using any other power adapter or cable may cause damage to the product. To ensure the longevity and lifespan of the controller, please keep it clean and do not stack heavy objects on top of it. -
Page 15: Fcc Requirement
FCC REQUIREMENT Any changes or modifications not expressly approved by the party responsible for compliance could void the user's authority to operate the equipment. This device complies with Part 15 of the FCC Rules. Operation is subject to the following two conditions: (1) this device may not cause harmful interference, (2) this device must accept any interference received, including interference that may cause undesired... - Page 16 Get in touch with FREE online services. facebook.com/letsnexigo Register to get EXTRA ONE YEAR warranty. Only valid in registering within 14 days of product delivery. nexigo.com/warranty...
Need help?
Do you have a question about the Gripcon and is the answer not in the manual?
Questions and answers