Table of Contents
Advertisement
Quick Links
REX Regulator and Oral Nasal
REX-1
1.1 Regulator Performance
REX-1
REX-1
1.1.2 Kirby Morgan Tools for the
REX
REX-2
1.2 REX
REX-2
1.2.1 REX
REX-3
1.2.2 Demand Regulator &
Exhaust System Post Dive
Cleaning & Sanitizing
REX-3
1.2.3 Post Dive Disassembly
REX-3
REX-4
REX-6
1.3 Cleaning REX
Parts
1.1 Regulator Performance
1.1.1 REX
Regulator
®
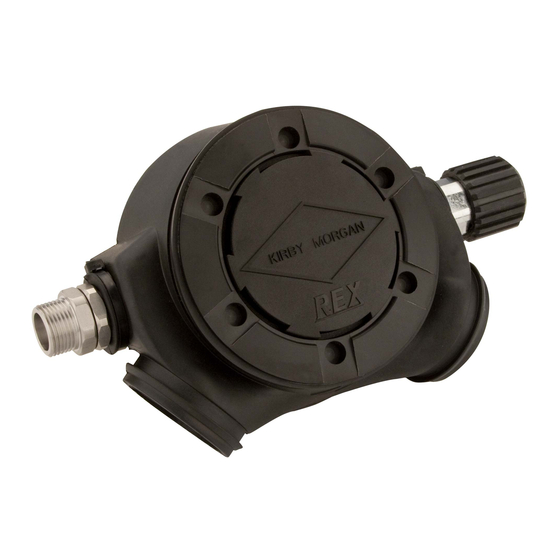
The Kirby Morgan REX
high performance. This regulator has been tested
at Dive Lab in Panama City, Florida. It meets or
exceeds all current U.S. Navy and European div-
ing standards.
© MMXXIV Kirby Morgan Dive Systems, Inc. All rights reserved. Document # 240701026
REX Regulator and Oral Nasal
Contents
Regulator
®
Regulator
®
Demand Regulator
®
Exhaust
®
Regulator
®
regulator offers extremely
®
REX-6
REX-6
REX-7
REX-12
REX-13
REX-14
REX-15
REX-15
REX-16
REX-16
1.1.2 Kirby Morgan Tools for the REX
Regulator
A Kirby Morgan tool kit, Part #525-768 is
available that will assist you in removing
and adjusting the REX
ships with every KM 77 and 47 helmet.
Use a brush with a soft handle, made from brass
Regulator Performance
®
Demand
®
Adjustment
®
®
regulator. This kit
®
REX-1
Advertisement
Table of Contents

Related Manuals for Kirby Morgan REX


Summary of Contents for Kirby Morgan REX
-
Page 1: Table Of Contents
REX regulator. This kit ® ships with every KM 77 and 47 helmet. Use a brush with a soft handle, made from brass REX-1 © MMXXIV Kirby Morgan Dive Systems, Inc. All rights reserved. Document # 240701026... -
Page 2: Rex
6. Tighten the retaining ring until snug. The lip of the main whisker body should completely cover the retaining ring, holding it in place. Start removal of the cover by unscrewing the retainer ring. REX-2 © MMXXIV Kirby Morgan Dive Systems, Inc. All rights reserved. Document # 240701026... -
Page 3: Sanitizing
Remove the regulator cover to inspect the diaphragm. 3. Remove the microphone from the oral nasal mask then remove the oral nasal mask from the helmet. REX-3 © MMXXIV Kirby Morgan Dive Systems, Inc. All rights reserved. Document # 240701026... -
Page 4: Post Dive Reassembly
VALVE SEAT EXHAUST VALVE TIE WRAP DIAPHRAGM NIPPLE TUBE, REX ROLLER LEVER WASHER INLET VALVE COVER, REX STARBOARD WHISKER WING, REX (AKA WHISKER) COVER RETAINING RING REX-4 © MMXXIV Kirby Morgan Dive Systems, Inc. All rights reserved. Document # 240701026... - Page 5 When the retaining ring is properly installed, the cover should be oriented so that the Kirby Morgan name is level on the cover. If an imaginary line is drawn through the Kirby Morgan name, it will bisect the holes on opposite sides of the retaining ring. Note the alignment of the other holes on the ring relative to the slots in the regulator cover.
-
Page 6: Precautions For Cleaning
In- silicone sealant. spect the inlet valve for excess wear or damage. REX-6 © MMXXIV Kirby Morgan Dive Systems, Inc. All rights reserved. Document # 240701026... -
Page 7: Rex Regulator Re-Assembly
MSDS before using this material. • 3/8 inch Drive Extension—Minimum 3" in Length • Regulator Mount Nut Tool P/N 325-640 • Regulator Cover Spanner Wrench P/N 540-551 REX-7 © MMXXIV Kirby Morgan Dive Systems, Inc. All rights reserved. Document # 240701026... - Page 8 You may use a toothbrush to body and the pod mount area. clean the threads as necessary. Stainless & KM 47: Make sure the cross hole REX-8 © MMXXIV Kirby Morgan Dive Systems, Inc. All rights reserved. Document # 240701026...
- Page 9 O-ring over the threads onto the shaft. The roller lever is installed after the horseshoe is installed. REX-9 © MMXXIV Kirby Morgan Dive Systems, Inc. All rights reserved. Document # 240701026...
- Page 10 You can also make marks on the whiskers with a felt tip pen. REX-10 © MMXXIV Kirby Morgan Dive Systems, Inc. All rights reserved. Document # 240701026...
- Page 11 29. Lightly lubricate the male threads on the side wings, then inspect and install the tie wraps. block and swing the bent tube up into place and REX-11 © MMXXIV Kirby Morgan Dive Systems, Inc. All rights reserved. Document # 240701026...
-
Page 12: Testing The Rex Regulator For Proper Adjustment
Tools Required: The regulator can be adjusted • REX Regulator Adjustment Tools (Tool Kit P/N ® when it is on the helmet. 525-768) • Low Pressure Air Source REX-12 © MMXXIV Kirby Morgan Dive Systems, Inc. All rights reserved. Document # 240701026... -
Page 13: Troubleshooting
The gaps on the edge of regulator cover must be centered between the holes on the regulator cover retainer ring. REX-13 © MMXXIV Kirby Morgan Dive Systems, Inc. All rights reserved. Document # 240701026... -
Page 14: Reinstalling The Regulator Onto The Helmet
5. Lightly lubricate the male threads on the side block and swing the bent tube up into place and torque the bent tube to the side block. REX-14 © MMXXIV Kirby Morgan Dive Systems, Inc. All rights reserved. Document # 240701026... -
Page 15: Oral Nasal Mask
10. Install the nose block device per “1.2.2 Nose 1. Remove the nose block device first. See “1.2 Block Device Replacement” on page FCPRT-6. Nose Block Assembly” on page FCPRT-6 for this procedure. REX-15 © MMXXIV Kirby Morgan Dive Systems, Inc. All rights reserved. Document # 240701026... -
Page 16: Inspection Of Oral Nasal Mask And Valve
1. Install the oral nasal valve body and valve into the oral nasal mask. This valve helps to reduce INCORRECT Correct Correct installation of the oral nasal valve is extremely important to your safety. REX-16 © MMXXIV Kirby Morgan Dive Systems, Inc. All rights reserved. Document # 240701026...
Need help?
Do you have a question about the REX and is the answer not in the manual?
Questions and answers