Hologic Selenia Dimensions User Manual
Digital mammography system, digital tomosynthesis system
Hide thumbs
Also See for Selenia Dimensions:
- User manual (152 pages) ,
- Instructions for use manual (146 pages) ,
- Site planning & installation manual (56 pages)
Table of Contents
Advertisement
Advertisement
Chapters
Table of Contents

Related Manuals for Hologic Selenia Dimensions


Summary of Contents for Hologic Selenia Dimensions
- Page 1 User Guide MAN-10622 Revision 001...
- Page 3 Selenia Dimensions ® ® Digital Mammography System Digital Tomosynthesis System User Guide For Software Version 1.8 with C-View Part Number MAN-10622 Revision 001 February 2024...
- Page 4 Hologic, Affirm, C-View, FAST Paddle, I-View, Selenia, Dimensions and associated logos are trademarks and/or registered trademarks of Hologic, Inc., and/or its subsidiaries in the United States and/or other countries. All other trademarks, registered trademarks, and product names are the property of their respective owners.
-
Page 5: Table Of Contents
Selenia Dimensions System User Guide Table of Contents Table of Contents List of Figures _________________________________________________________________ xi List of Tables _________________________________________________________________ xv 1: Introduction __________________________________________________________________1 Intended Use................................1 Potential Adverse Effects of Mammography Systems on Health ..............1 Contraindications ..............................2 Intended Use for the User Guide .......................... - Page 6 3.3.2 Compression Device Controls and Displays ..................31 3.3.3 Tubehead Display ............................. 32 3.3.4 Dual Function Footswitches ........................32 How to Turn On the Selenia Dimensions System .................... 33 3.4.1 Preparation..............................33 3.4.2 Startup ................................ 33 3.4.3 Log In ................................35 How to Change the Language ..........................
- Page 7 Selenia Dimensions System User Guide Table of Contents The Procedure Screen ............................57 4.5.1 How to Set the Exposure Parameters ..................... 58 4.5.2 How to Use the Implant Present Button ....................59 4.5.3 How to Use the Paddle Shift Feature ..................... 59 4.5.4 How to Acquire an Image ........................
- Page 8 Selenia Dimensions System User Guide Table of Contents 6.4.3 Magnification Paddles ..........................92 6.4.4 Localization Paddles ..........................93 6.4.5 Large Ultrasound Paddle ......................... 93 6.4.6 How to Install or Remove a Compression Paddle ................94 6.4.7 Maintenance and Cleaning ........................94 6.4.8 Paddle Shift ..............................
- Page 9 C.4.2 Acquisition Workstation ........................141 Prepare the System for Travel ........................... 141 Prepare the System for Use..........................143 Test the System after Travel ..........................144 C.7.1 Selenia Dimensions Controls and Functional Tests ................144 Quality Control Tests ............................144 MAN-10622 Revision 001...
- Page 10 Selenia Dimensions System User Guide Table of Contents Appendix D Dose Information _________________________________________________145 EUREF Dose Tables ............................145 Index ________________________________________________________________________147 MAN-10622 Revision 001...
-
Page 11: List Of Figures
Selenia Dimensions System User Guide Table of Contents List of Figures Figure 1: Selenia Dimensions System Tubestand ....................11 ® ® Figure 2: Acquisition Workstation ..........................12 Figure 3: Label Locations ..............................21 Figure 4: System Power Controls ..........................25 Figure 5: Universal Acquisition Workstation Controls and Displays .............. - Page 12 Selenia Dimensions System User Guide Table of Contents Figure 43: I-View 2D Contrast Settings ......................... 70 Figure 44: I-View 2D Contrast Settings, Admin screen ....................71 Figure 45: Output Groups Field ............................. 72 Figure 46: An Example Custom Output Group ......................73 Figure 47: Select the Images for Export .........................
- Page 13 Selenia Dimensions System User Guide Table of Contents Figure 88: Mobile Universal Acquisition Workstation Dimensions system ............127 Figure 89: Mobile (non-Universal) Acquisition Workstation Dimensions system ..........128 Figure 90: UPS LCD Display ............................138 Figure 91: Keyboard Tray Lock Knob ......................... 141 Figure 92: Keyboard Tray Lock Knob .........................
-
Page 15: List Of Tables
Selenia Dimensions System User Guide Table of Contents List of Tables Table 1: List of Labels ..............................22 Table 2: Compression Tests ............................37 Table 3: C-arm Up and Down Movement ........................38 Table 4: C-arm Counterclockwise Rotation ........................40 Table 5: C-arm Clockwise Rotation .......................... -
Page 17: 1: Introduction
® ® can be used for screening and diagnosis of breast cancer. The Selenia Dimensions (2D or 3D) system is intended for use in the same clinical applications as a 2D mammography system for screening mammograms. Specifically, the Selenia Dimensions system can be used to generate 2D digital mammograms and 3D mammograms. -
Page 18: Contraindications
FDA website at http://www.fda.gov/medicaldevices/productsandmedicalprocedures/deviceapprovalsandclearances/ recently-approveddevices/ucm353734.htm. A list of scientific publications about Breast Tomosynthesis is available from the Hologic website. The majority of the studies were done with the commercially released Hologic Selenia Dimensions Tomosynthesis system. See the publication at http://www.hologic.com/sites/default/files/Tomo-Bibliography-Rev-13.pdf. - Page 19 JAMA. 2014;311(24):2499-2507. doi:10.1001/jama.2014.6095 http://jama.jamanetwork.com/article.aspx?articleid=1883018 IMPORTANT: Hologic strongly recommends that users make themselves familiar with local or regional regulations. These regulations could impose restrictions on the different types of clinical use. Because the regulations could evolve and change over time, periodic review is recommended.
-
Page 20: About C-View
Overview The C-View software is an image processing application for post-processing the pixel data from tomosynthesis data, captured on a Selenia Dimensions tomosynthesis imaging system, into a digital mammography (2D) image. The C-View 2D image can be used in place of a digital mammogram (2D) as part of a screening study employing tomosynthesis. -
Page 21: Product Complaints
Report any complaints or problems in the quality, reliability, safety, or performance of this product to Hologic. If the device has caused or added to patient injury, immediately report the incident to Hologic. (See the title page for contact information.) Technical Support Refer to the title page of this manual for contact information for product support. -
Page 22: Hologic Cybersecurity Statement
Chapter 1: Introduction 1.11 Hologic Cybersecurity Statement Hologic continuously tests the current state of computer and network security to examine possible security problems. When necessary, Hologic provides the updates to the product. For Cybersecurity Best Practices documents for Hologic products, refer to the Hologic Internet site. -
Page 23: Training Requirements
Additionally, the user manual is a guide for directions on how to use the system. All users must make sure that they receive training on correct operation of the system before use on patients. Hologic does not accept the responsibility for injury or damage from wrong system operation. 1.16... -
Page 24: Symbols
Selenia Dimensions System User Guide Chapter 1: Introduction Grid Element within the Digital Image Receptor that reduces scatter radiation during the exposure Hospital Information System I-View™ A licensed feature for 2D Contrast Enhanced Digital Mammography Image Receptor Assembly of x-ray detector, x-ray scatter reduction grid, and... - Page 25 "OFF" (power) "ON" (power) "OFF" for part of the equipment "ON" for part of the equipment Discard electrical and electronic equipment separately from standard waste. Send decommissioned material to Hologic or contact your service representative. Dangerous Voltage Manufacturer Date of Manufacture...
-
Page 26: Descriptions Of Warnings, Cautions, And Notes
Selenia Dimensions System User Guide Chapter 1: Introduction 1.18 Descriptions of Warnings, Cautions, and Notes Descriptions of Warnings, Cautions, and Notes used in this manual: WARNING! The procedures that you must follow accurately to prevent possible dangerous or fatal injury. -
Page 27: 2: General Information
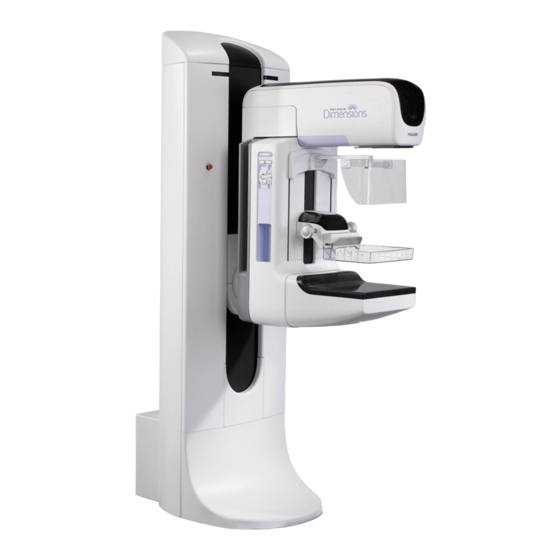
Selenia Dimensions System User Guide Chapter 2: General Information Chapter 2 General Information System Description 2.1.1 Tubestand Figure 1: Selenia Dimensions System Tubestand ® ® Figure Legend Tubestand (Gantry and C-arm) Gantry C-arm (Tube Arm and Compression Arm) Tube Arm... -
Page 28: Acquisition Workstation
Selenia Dimensions System User Guide Chapter 2: General Information 2.1.2 Acquisition Workstation Figure 2: Acquisition Workstation Figure Legend Universal Acquisition Workstation Premium Acquisition Workstation Mobile Acquisition Workstation Standard Acquisition Workstation Page 12 MAN-10622 Revision 001... -
Page 29: Safety Information
Read and understand this manual before you use the system. Keep the manual available during the patient procedures. Always follow all the instructions in this manual. Hologic does not accept the responsibility for injury or damage from incorrect system operation. Hologic can schedule training at your facility. - Page 30 Manager, a diagnostic review workstation, or a hard copy printer) in the Patient Area. WARNING! Only trained Service Engineers authorized through Hologic can open any of the panels. This system contains lethal voltages. WARNING! The user must correct problems before the system is used. Contact an approved service representative for preventive maintenance.
- Page 31 Selenia Dimensions System User Guide Chapter 2: General Information Warning: The disk drives installed in this system are a Class I Laser Product. Prevent direct exposure to the beam. Hidden laser radiation exists if the case to a disk drive is open.
- Page 32 Selenia Dimensions System User Guide Chapter 2: General Information Warning: This system can be dangerous to the patient and the user. Always follow the safety precautions for x-ray exposures. Warning: For exposures except magnification case studies, always use the Face Shield.
-
Page 33: Emergency Off Switches
Note: Hologic does not supply the Gantry power cable for some countries. If the power cable is not supplied, the installed cable must meet the following requirements and all local codes that apply: 3 conductor, 8 AWG (10 mm ) copper not more than 25 feet (7.62... -
Page 34: Compliance
• The network and communication equipment is installed to meet IEC Standards. The complete system (network and communications equipment and Selenia Dimensions Mammography System) must be in compliance with IEC 60601-1 and IEC 60601-1-1. Caution: Medical Electrical Equipment needs special precautions about EMC and must be installed, put into service and used according to the EMC information provided. -
Page 35: Compliance Statements
Selenia Dimensions System User Guide Chapter 2: General Information Caution: Changes or modifications not expressly approved by Hologic could void your authority to operate the equipment. Caution: This equipment has been tested and found to comply with the limits for a Class A digital device, pursuant to part 15 of the FCC Rules. - Page 36 Selenia Dimensions System User Guide Chapter 2: General Information • IEC 60601-1-1Ed. 2.0:2000 Medical Electrical Equipment - Part 1-1: General Requirements for Safety - Collateral Standard: Safety Requirements for Medical Electrical Systems • IEC 60601-1-2 Ed. 3.0:2007 Medical Electrical Equipment – Part 1-2: General Requirements for Basic Safety and Essential Performance - Collateral Standard: Electromagnetic Compatibility –...
-
Page 37: Label Locations
Selenia Dimensions System User Guide Chapter 2: General Information Label Locations Figure 3: Label Locations MAN-10622 Revision 001 Page 21... -
Page 38: Table 1: List Of Labels
Selenia Dimensions System User Guide Chapter 2: General Information Table 1: List of Labels Label Identification Description Serialized Device Label System Nameplate Label Patent Label Tomographic Mammography Detector Label X-ray Device Warning Electrical Shock Warning Potential Equalization Terminal Wheelchair Warning for Footswitch... - Page 39 Selenia Dimensions System User Guide Chapter 2: General Information Table 1: List of Labels Label Identification Description X-ray Tube Serial Number Technical Support Contact Label CE Marking Acquisition Workstation Nameplate Label Gantry and Acquisition Workstation Certification Acquisition Workstation Lift Limit Label*...
-
Page 41: 3: System Controls And Indicators
Selenia Dimensions System User Guide Chapter 3: System Controls and Indicators Chapter 3 System Controls and Indicators System Power Controls Figure 4: System Power Controls Figure Legend Gantry Power Circuit Breaker Emergency Off Switch (two on the Gantry, one on the Acquisition Workstation) -
Page 42: Acquisition Workstation Controls And Indicators
Selenia Dimensions System User Guide Chapter 3: System Controls and Indicators Acquisition Workstation Controls and Indicators 3.2.1 Universal Acquisition Workstation Controls and Displays Figure Legend Height Adjustment Switch (optional) Keyboard (in drawer) Bar Code Scanner (optional) Control Display Monitor Fingerprint Scanner (optional) -
Page 43: Premium Acquisition Workstation Controls And Displays
Selenia Dimensions System User Guide Chapter 3: System Controls and Indicators 3.2.2 Premium Acquisition Workstation Controls and Displays Figure Legend Trackball Scroll Wheel Compression Release Emergency Off Switch Fingerprint Scanner X-ray Button (one on each side) Touchscreen Display Keyboard (in drawer) CD/DVD Drive 10. -
Page 44: Standard Acquisition Workstation Controls And Displays
Selenia Dimensions System User Guide Chapter 3: System Controls and Indicators 3.2.3 Standard Acquisition Workstation Controls and Displays Figure Legend Keyboard Control Display Left X-Ray Switch Emergency Off Switch Bar Code Scanner (optional) Preview Display CPU Power On/Reset Button Circuit Breaker Power On Switch Mouse 10. -
Page 45: Keyboard
Selenia Dimensions System User Guide Chapter 3: System Controls and Indicators 3.2.4 Keyboard Use the keyboard in the front drawer of the Acquisition Workstation for data entry. 3.2.5 Bar Code Scanner Use this device for data entry from bar codes for patient or procedure records. -
Page 46: Tubestand Controls And Indicators
Selenia Dimensions System User Guide Chapter 3: System Controls and Indicators Tubestand Controls and Indicators Figure Legend Rotation Angle Displays (each side) C-arm Controls (each side) Compression Device Patient Handles (each side) Emergency Off Switches (each side) Compression Handwheels Patient Face Shield... -
Page 47: C-Arm Controls
Selenia Dimensions System User Guide Chapter 3: System Controls and Indicators 3.3.1 C-Arm Controls The C-arm Controls provide the Collimator and C-arm functions. See Perform the Functional Tests on page 36. Figure 9: C-arm Controls 3.3.2 Compression Device Controls and Displays... -
Page 48: Tubehead Display
Selenia Dimensions System User Guide Chapter 3: System Controls and Indicators 3.3.3 Tubehead Display The Tubehead Display shows: • Filter Type • Collimator Setting • Paddle Position • Figure 12: Tubehead Display 3.3.4 Dual Function Footswitches Warning: Place each footswitch in a position where, when used, they remain in reach of the Emergency Off Switches. -
Page 49: How To Turn On The Selenia Dimensions System
Selenia Dimensions System User Guide Chapter 3: System Controls and Indicators How to Turn On the Selenia Dimensions System Note If the system remains on overnight, restart the system daily to guarantee best performance. 3.4.1 Preparation Reset all three Emergency Off switches by turning each switch about one-quarter turn clockwise until it springs back up. -
Page 50: Figure 18: Startup Screen
Selenia Dimensions System User Guide Chapter 3: System Controls and Indicators Select the Log In button on the control display user interface (see the following figure). Figure 18: Startup Screen Note The Startup screen includes a Shutdown button that turns off the system, and a Reboot button that restarts the system. -
Page 51: Log In
Selenia Dimensions System User Guide Chapter 3: System Controls and Indicators 3.4.3 Log In Figure 19: Log In Screen When the user Log In screen displays, all Managers and Technologists show in the list of Operators. To display the Service, Applications, and Physicists user names, select the Show All button. -
Page 52: How To Change The Language
Selenia Dimensions System User Guide Chapter 3: System Controls and Indicators How to Change the Language Select the Admin button. Select the My Settings option. From the Locale field, select a language from the drop-down menu. Select the Save button, then select the OK button to the Update Successful message. -
Page 53: Compression Functional Tests
Selenia Dimensions System User Guide Chapter 3: System Controls and Indicators 3.6.1 Compression Functional Tests Table 2: Compression Tests Function Functional Test Compression Down Press a Compression Down button: The compression brake engages. • The light field lamp illuminates. •... -
Page 54: C-Arm Movement Functional Tests
Selenia Dimensions System User Guide Chapter 3: System Controls and Indicators 3.6.2 C-Arm Movement Functional Tests C-Arm Up and Down Movement Table 3: C-arm Up and Down Movement Function Functional Test C-arm Up Press the C-arm Up button: The C-arm movement automatically stops when the •... - Page 55 Selenia Dimensions System User Guide Chapter 3: System Controls and Indicators Table 3: C-arm Up and Down Movement Function Functional Test C-arm Down Press the C-arm Down button: The C-arm movement automatically stops when the • button is released. The C-arm movement automatically stops when the •...
-
Page 56: Table 4: C-Arm Counterclockwise Rotation
Selenia Dimensions System User Guide Chapter 3: System Controls and Indicators C-Arm Rotation Table 4: C-arm Counterclockwise Rotation Function Functional Test Counterclockwise C-arm Press the Counterclockwise C-arm Rotation button (1) to Rotation start counterclockwise C-arm rotation. To fine-tune the C- arm rotation in one degree segments, hold the button down for a second, then let go quickly. -
Page 57: Table 6: C-Arm Rotation Switch
Selenia Dimensions System User Guide Chapter 3: System Controls and Indicators Table 6: C-arm Rotation Switch Function Functional Test C-arm Rotation Switch Push the C-arm Rotation switch away from you to move the C-arm toward you. Pull the C-arm Rotation switch toward you to move the C-arm away. -
Page 58: Table 7: Automatic C-Arm Counterclockwise Rotation
Selenia Dimensions System User Guide Chapter 3: System Controls and Indicators C-Arm Automatic Rotation (Auto-Rotate) Warning: Risk of entrapment. Make sure that the C-arm has 50 cm (20 inches) of clearance to any object during C-arm rotation. Do not use Auto Rotation when C-arm clearance is less than 50 cm (20 inches). -
Page 59: Table 8: Automatic C-Arm Clockwise Rotation
Selenia Dimensions System User Guide Chapter 3: System Controls and Indicators Table 8: Automatic C-arm Clockwise Rotation Function Functional Test Automatic Clockwise C- Press and hold the Motor Enable button (2) and the arm Rotation Clockwise C-arm Rotation button (3 or 4, based on Panel). -
Page 60: Emergency Off Switches Functionality
Selenia Dimensions System User Guide Chapter 3: System Controls and Indicators Shifting Paddle Table 11: Shifting Paddle Function Functional Test Shifting Paddle System The 18 x 24 cm Screening Paddle moves approximately 2.5 cm into the left, center, or right position. While compression is applied, you cannot move the paddle. -
Page 61: How To Turn Off The System
Selenia Dimensions System User Guide Chapter 3: System Controls and Indicators How to Turn Off the System Close any open patient procedures. See How to Close a Procedure on page 66. From the Select Patient screen, select the Log Out button. -
Page 63: 4: The User Interface
Selenia Dimensions System User Guide Chapter 4: The User Interface Chapter 4 The User Interface Select the Function to Perform After you log in, the Select Function to Perform screen displays. Note The Select Patient screen appears if you are not scheduled to perform any Quality Control tasks. -
Page 64: About The Taskbar
Selenia Dimensions System User Guide Chapter 4: The User Interface About the Taskbar The taskbar at the bottom of the screen displays additional icons, which you can select to access information or perform system tasks. Figure 26: The Taskbar Table 12: Taskbar Menus... - Page 65 Selenia Dimensions System User Guide Chapter 4: The User Interface Table 12: Taskbar Menus Description Menu System Status Icons Select the tubehead icon to display a menu. When the detector and generator are ready for use, a green checkmark appears next to the tubehead icon. If the tubehead icon is red...
-
Page 67: How To Perform The Quality Control Tasks
Selenia Dimensions System User Guide Chapter 4: The User Interface How to Perform the Quality Control Tasks Select a Quality Control task from the Select Function to Perform screen. Select the Start button. Follow the on-screen prompts to complete the procedure. -
Page 68: The Select Patient Screen
Selenia Dimensions System User Guide Chapter 4: The User Interface The Select Patient Screen Figure 28: The Select Patient Screen Table 13: The Select Patient Screen Item Description 1. Quick Search Search the local database for the Patient Name, Patient ID, or Accession #. -
Page 69: About The Notices Tab
Selenia Dimensions System User Guide Chapter 4: The User Interface Table 13: The Select Patient Screen Item Description 3. Other Many functions are accessed from this screen by selecting a particular button: Functions Add a new Patient (New)—see How to Add a New Patient on page 54. -
Page 70: 4.4.2.1 How To Add A New Patient
Selenia Dimensions System User Guide Chapter 4: The User Interface 4.4.2.1 How to Add a New Patient In the Select Patient screen, select the New button. Enter new patient information and select a procedure. Select the Open button. A screen for the new patient appears. -
Page 71: The Patient Filter Screen
Selenia Dimensions System User Guide Chapter 4: The User Interface 4.4.5 The Patient Filter Screen After selecting the Filter button in the Select Patient screen, the Patient Filter screen for the selected tab appears. Figure 31: The Filter Tab in the Patient Filter Screen The Filter and Column Tabs in the Patient Filter Screen Use the Filter tab to change the filter options for the patient list. -
Page 72: How To Refresh The Worklist
Selenia Dimensions System User Guide Chapter 4: The User Interface Other Functions of the Filter Tab The Filter tab allows users with access privileges to add, change, or delete tabs in the Select Patient screen. Refer to the following table. -
Page 73: About The Admin Button
Selenia Dimensions systems that are linked to it. In addition, the Advanced Workflow Manager synchronizes notices and provides prior images to all Selenia Dimensions systems that are linked to it. Selenia Dimensions systems linked to the Advanced Workflow Manager show the... -
Page 74: How To Set The Exposure Parameters
Selenia Dimensions System User Guide Chapter 4: The User Interface 4.5.1 How to Set the Exposure Parameters Select the Image Acquisition Mode (Tomosynthesis Option) For routine Tomosynthesis screening procedures Standard • For diagnostic Tomosynthesis views. Enhanced • Warning: Enhanced acquisition mode with combo mode imaging (DM + BT) can produce radiation dose that is higher than the MQSA screening limit of 3.0... -
Page 75: How To Use The Implant Present Button
Selenia Dimensions System User Guide Chapter 4: The User Interface 4.5.2 How to Use the Implant Present Button The Implant Present button is above the Accept button on the Procedure screen. This button applies special implant processing to the implant and implant displaced views, and changes the "Implant Present"... -
Page 76: How To Acquire An Image
Selenia Dimensions System User Guide Chapter 4: The User Interface 4.5.4 How to Acquire an Image Clinical Procedures on page 101, for information about clinical procedures. Select a view from the thumbnail images at the bottom of the screen. Press and hold the x-ray button and/or footswitch for the full exposure. -
Page 77: Figure 35: Exposure Complete
Selenia Dimensions System User Guide Chapter 4: The User Interface When the tone stops and the System Message shows Standby (see the following figure), you can release the x-ray button and/or footswitch. Figure 35: Exposure Complete The image appears when the x-ray is finished. -
Page 78: How To Add Or Remove A View
Selenia Dimensions System User Guide Chapter 4: The User Interface 4.5.5 How to Add or Remove a View To Add a View Select the Add View button to access the Add View screen. Note Depending on the license settings for your system, you may see different tabs. -
Page 79: Procedure Information Dialog Box
Selenia Dimensions System User Guide Chapter 4: The User Interface 4.5.6 Procedure Information Dialog Box To show procedure information, select the Procedure Information button located beneath the Delete View (trash can) button. The Procedure Info window displays with the following information: •... -
Page 80: How To Add A Procedure
Selenia Dimensions System User Guide Chapter 4: The User Interface 4.5.7 How to Add a Procedure To add another procedure, select the Add Procedure button on the Procedure screen to access the Add Procedure dialog box. Figure 38: Add Procedure Dialog Box Use the drop-down menus to select the type of procedure to add. -
Page 81: How To Edit A View
Selenia Dimensions System User Guide Chapter 4: The User Interface 4.5.8 How to Edit a View Use the Edit View screen to assign a different view to an image. Figure 39: The Edit View Screen To edit a view: Select an exposed thumbnail image view in the Procedure screen. -
Page 82: How To Close A Procedure
Selenia Dimensions System User Guide Chapter 4: The User Interface 4.5.9 How to Close a Procedure Select the Close Patient button. If images were acquired, a Close Procedure dialog box displays. Select one of the following options: Close Procedure Complete Closes the procedure and puts the procedure in the Complete tab. -
Page 83: How To Use I-View 2D Contrast
Selenia Dimensions System User Guide Chapter 4: The User Interface How to Use I-View 2D Contrast Select the Contrast tab to access the I-View 2D Contrast (CE2D) functionality. ™ Figure 40: I-View 2D Contrast Screen Set contrast settings. For more information, refer to How to Define Contrast Settings page 70. -
Page 84: Figure 41: I-View 2D Contrast Screen, Waiting Period
Selenia Dimensions System User Guide Chapter 4: The User Interface To begin the contrast dose and start the timer, click Start. The timer begins in the Waiting Period, which appears with a yellow background. Note You can adjust the default length of time for the Waiting Period and Optimal Imaging Period phases of the timer. -
Page 85: Figure 42: I-View 2D Contrast Screen, Optimal Imaging Period
Selenia Dimensions System User Guide Chapter 4: The User Interface Capture the images during the Optimal Imaging Period. After you capture an image, a marker will appear below the timer. Figure 42: I-View 2D Contrast Screen, Optimal Imaging Period Select the low and high exposure buttons to acquire both low and high energy images. -
Page 86: How To Define Contrast Settings
Selenia Dimensions System User Guide Chapter 4: The User Interface 4.7.1 How to Define Contrast Settings Select the Conf button to edit contrast settings. The Contrast Information dialog box appears. Figure 43: I-View 2D Contrast Settings Use the drop-down menus to select the appropriate settings. - Page 87 Selenia Dimensions System User Guide Chapter 4: The User Interface Set the Default Timer Period From the Admin screen, select the Contrast button. Figure 44: I-View 2D Contrast Settings, Admin screen Choose the plus (+) or minus (-) buttons to change the Minutes and Seconds for Waiting Period and Optimal Imaging Period.
-
Page 88: How To Use The Output Groups
Selenia Dimensions System User Guide Chapter 4: The User Interface How to Use the Output Groups The accepted images are sent automatically to the output devices in the selected Output Group. The system configuration controls if the images are sent after a patient is closed or after the image is accepted. -
Page 89: How To Use The Custom Output
Selenia Dimensions System User Guide Chapter 4: The User Interface 4.8.3 How to Use the Custom Output The Custom Output option lets you make an output group from the Procedure screen. The custom group that you make stays as the Custom option until another custom group is made. -
Page 90: How To Export
Selenia Dimensions System User Guide Chapter 4: The User Interface 4.9.2 How to Export Select the Archive/Export button (on the right side of the Procedure screen). Select the images to export, then select the Export button. Figure 47: Select the Images for Export In the Export screen, select the target from the drop-down menu of media devices. -
Page 91: How To Print
Selenia Dimensions System User Guide Chapter 4: The User Interface 4.9.3 How to Print From the Procedure screen, select the Print button to show the Print screen. See the figure The Print Screen on page 76 to prepare your print data. - Page 92 Selenia Dimensions System User Guide Chapter 4: The User Interface Figure 49: The Print Screen Figure Legend Show or hide patient data. 13. Delete a film. Show or hide markings and annotations. 14. Delete an image from a film. Show or hide targets in images from a biopsy.
-
Page 93: 5: The Images
Selenia Dimensions System User Guide Chapter 5: The Images The Images Chapter 5 Introduction After you make an exposure, the acquired image displays on the Preview screen. Figure 50: The Preview Screen Figure Legend Patient information and exam date Exposure information, including: Exposure techniques •... -
Page 94: Conventional Imaging Sequence Of Events
Selenia Dimensions System User Guide Chapter 5: The Images 5.1.1 Conventional Imaging Sequence of Events • Review the image after the exposure and add a comment, if necessary. • Accept, Reject, or Pend the image. A thumbnail image appears in the Case Study area of the screen. -
Page 95: About Auto-Hanging And Auto-Pairing
Selenia Dimensions System User Guide Chapter 5: The Images 5.1.3 About Auto-Hanging and Auto-Pairing To set the system for Auto-Hanging and Auto-Pairing: Select the current user name area of the taskbar at the bottom of the screen. Select the My Settings option to display the Edit Operator screen. -
Page 96: How To Review The Images
Selenia Dimensions System User Guide Chapter 5: The Images How to Review the Images Review of images involves use of the thumbnails, image review tools, and display modes. Figure 52: The Tools Tab (Tomosynthesis option shown) Figure Legend Image Review Tools - refer to The Image Review Tools Tab on page 81. -
Page 97: The Image Review Tools Tab
Selenia Dimensions System User Guide Chapter 5: The Images 5.2.1 The Image Review Tools Tab The Tools tab in the Procedure screen provides the image review tools. A check mark appears on an active tool. Figure Legend The Zoom tool magnifies a section of the image. -
Page 98: The Notices Tab
Selenia Dimensions System User Guide Chapter 5: The Images 5.2.2 The Notices Tab The tools on the Notices tab allow you to mark and annotate images and send notices about the displayed image or procedure. The Notice Output Groups drop-down menu at the bottom of the tab allows you to select the destination for the Notices. -
Page 99: Other Image Review Tools
Selenia Dimensions System User Guide Chapter 5: The Images 5.2.3 Other Image Review Tools The Other Tabs • Comments: Add comments. • Service: Mark an image for service use. • ROI: Draw a Region of Interest on the image display monitor. -
Page 100: Slice Indicator
Selenia Dimensions System User Guide Chapter 5: The Images 5.2.4 Slice Indicator The Slice Indicator shows only on tomographic reconstructions. Figure Legend Up and Down arrows let you change between slices that contain a lesion target and slices that are tagged for printing. -
Page 101: Send The Images To The Output Devices
Selenia Dimensions System User Guide Chapter 5: The Images Send the Images to the Output Devices You can send the images to output devices or use the Archive/Export function to copy images to temporary storage media. See How to Use the Output Groups... -
Page 103: 6: How To Use The Accessories
Chapter 6 How to Use the Accessories Introduction The Selenia Dimensions system can perform screening or diagnostic applications with specified accessories. This chapter describes how to use all possible system accessories. Your accessories depend on your system configuration. How to Install Accessories on the C-Arm The Retractable Face Shield, Magnification Stand, and Localization Crosshairs are installed in slots on the C-arm. -
Page 104: The Patient Face Shields
Selenia Dimensions System User Guide Chapter 6: How to Use the Accessories The Patient Face Shields The Face Shield keeps the head and face of the patient away from the x-ray field during the examination. Inspect the shield each day before use. -
Page 105: How To Use The Retractable Face Shield
Selenia Dimensions System User Guide Chapter 6: How to Use the Accessories 6.3.2 How to Use the Retractable Face Shield Note Before you make an exposure, make sure the Face Shield is completely extended or completely retracted. To extend the Face Shield, pull the Face Shield away from the C-arm until the device latches in the outer position. -
Page 106: How To Install Or Remove The Conventional Face Shield
Selenia Dimensions System User Guide Chapter 6: How to Use the Accessories 6.3.3 How to Install or Remove the Conventional Face Shield Figure 63: How to Install the Conventional Face Shield To install the Conventional Face Shield: Carefully put the tab ends of the Face Shield (item 1 in the previous figure) into the slots at the front of the tubehead mount. -
Page 107: Compression Paddles
15 cm Large Ultrasound Patient Face Shield Magnification Stand Localization Crosshair Device Magnification Crosshair Device Note On the Selenia Dimensions 2D Screening system, only use the 7.5 cm Spot Contact Paddle for compression thickness calibration. MAN-10622 Revision 001 Page 91... -
Page 108: Routine Screening Paddles
Selenia Dimensions System User Guide Chapter 6: How to Use the Accessories 6.4.1 Routine Screening Paddles 18 x 24 cm Frameless 24 x 29 cm Frameless Small Breast Screening Paddle Screening Paddle Frameless Paddle 6.4.2 Contact and Spot Compression Paddles... -
Page 109: Localization Paddles
Selenia Dimensions System User Guide Chapter 6: How to Use the Accessories 6.4.4 Localization Paddles 10 cm Rectangular Opening 15 cm Rectangular Opening 10 cm Magnification Localization Paddle Localization Paddle Localization Paddle 10 cm Perforated 15 cm Perforated 10 cm Magnification... -
Page 110: How To Install Or Remove A Compression Paddle
Selenia Dimensions System User Guide Chapter 6: How to Use the Accessories 6.4.6 How to Install or Remove a Compression Paddle See the figure How to Install a Compression Paddle on page 94 to install a Compression Paddle: Hold the front of the paddle with one hand in front of the Compression Device. -
Page 111: Paddle Shift
Selenia Dimensions System User Guide Chapter 6: How to Use the Accessories 6.4.8 Paddle Shift The system allows most paddles to move to the left or right of the center position. The feature helps small-breast examinations with lateral views. When a lateral view is selected, the system automatically moves the collimator for the selected paddle position. -
Page 112: Magnification Stand
Chapter 6: How to Use the Accessories Magnification Stand The Selenia Dimensions Magnification Stand has a breast platform and an abdominal shield. When the Magnification Stand is installed, the grid automatically retracts and the x-ray exposure techniques are set to the Magnification default values. When the platform... -
Page 113: Crosshair Devices
Selenia Dimensions System User Guide Chapter 6: How to Use the Accessories Put the hooks of the Magnification Stand into the C-arm slots. Slide the Magnification Stand down, until the thin black lines on the Magnification Stand and the black line of the C-arm meet. See item 2 in the previous figure. -
Page 114: How To Use The Localization Crosshair Device
Selenia Dimensions System User Guide Chapter 6: How to Use the Accessories To Install the Localization Crosshair Device Remove the face shield (see The Patient Face Shields on page 88). Move the Compression Device below the mounting slots, indicated by a crosshair icon. -
Page 115: How To Install And Remove The Magnification Crosshair Device
Selenia Dimensions System User Guide Chapter 6: How to Use the Accessories 6.6.3 How to Install and Remove the Magnification Crosshair Device Figure 69: How to Install and Remove the Magnification Crosshair Device To Install the Magnification Crosshair Device Remove the face shield (see How to Install or Remove the Conventional Face Shield page 90). -
Page 116: How To Align The Crosshair Device
Selenia Dimensions System User Guide Chapter 6: How to Use the Accessories 6.6.4 How to Align the Crosshair Device Note If the crosshair light rectangle appears skewed to the opening in the paddle, perform this alignment procedure. Install the rectangular localization paddle. -
Page 117: 7: Clinical Procedures
Selenia Dimensions System User Guide Chapter 7: Clinical Procedures Chapter 7 Clinical Procedures Warning: C-arm movement is motorized. Warning: Keep the hands of the patient away from all buttons and switches at all times. Warning: Place each footswitch in a position where, when used, they remain in reach of the Emergency Off Switches. -
Page 118: At The Acquisition Workstation
Selenia Dimensions System User Guide Chapter 7: Clinical Procedures 7.1.3 At the Acquisition Workstation Set the exposure technique. Acquire the image. Release the patient. Preview the image. Look at the Exposure Index to make sure that the exposure is within acceptable range. -
Page 119: How To Position The Patient
Selenia Dimensions System User Guide Chapter 7: Clinical Procedures 7.2.1 How to Position the Patient Lift or lower the breast platform for the patient. Move the tubehead to the projection angle. Move the patient to the C-arm. Position the patient as required. - Page 120 Selenia Dimensions System User Guide Chapter 7: Clinical Procedures The x-ray indicator on the control panel lights to show x ray emission. Figure 71: Exposure In Progress When the tone stops and the System Message shows Standby (see the following figure), you can release the x-ray button and/or footswitch.
-
Page 121: How To Automatically Store The Image
Selenia Dimensions System User Guide Chapter 7: Clinical Procedures 7.2.4 How to Automatically Store the Image Note A manager user can configure the system to Auto-Accept or Auto-Pend new images. Confirm the patient position and the exposure level. Accept, Reject, or Pend the image. -
Page 122: Procedure For Needle Localization With Tomosynthesis
Selenia Dimensions System User Guide Chapter 7: Clinical Procedures Procedure for Needle Localization with Tomosynthesis Install a Localization Paddle, and install the Crosshair Device at the Tubehead. Be sure that the crosshair guides are out of the x-ray field. Open a new procedure with a Tomo or TomoHD view for your approach. - Page 123 Selenia Dimensions System User Guide Chapter 7: Clinical Procedures Example: Calculating Needle Depth with Tomosynthesis In this example, use the values from the table on the previous page and refer to the following figure. Calculate the needle depth from the tissue skin line (item 1) rather than from the localization paddle (item 9).
-
Page 125: 8: Maintenance And Cleaning
Caution: Use the least possible amount of cleaning fluids. The fluids must not flow or run. If more than soap and water is required, Hologic recommends any one of the following: • 10% chlorine bleach and water with one part commercially available chlorine bleach (normally 5.25% chlorine and 94.75% water) and nine parts water... -
Page 126: To Prevent Possible Injury Or Equipment Damage
Selenia Dimensions System User Guide Chapter 8: Maintenance and Cleaning 8.1.3 To Prevent Possible Injury or Equipment Damage Do not use a corrosive solvent, abrasive detergent, or polish. Select a cleaning/disinfecting agent that does not damage the plastics, aluminum, or carbon fiber. -
Page 127: Acquisition Workstation
Selenia Dimensions System User Guide Chapter 8: Maintenance and Cleaning 8.1.4 Acquisition Workstation How to Clean the Preview Display Avoid touching the display screen. Use care when cleaning the outer surface of the LCD screen. Always use a clean, soft, lint-free cloth to clean the display area. -
Page 128: Maintenance
Selenia Dimensions System User Guide Chapter 8: Maintenance and Cleaning Maintenance 8.2.1 Preventive Maintenance Schedule Note The Preventive Maintenance Schedule for the Service Engineer is in the Service Manual. Table 17: User Preventive Maintenance Recommended Frequency Each Maintenance Task Description... -
Page 129: 9: System Administration Interface
Selenia Dimensions System User Guide Chapter 9: System Administration Interface Chapter 9 System Administration Interface How to Use the Admin Screen This section describes the functions available in the Admin screen. To access all functions in this screen, log in to the system as a user with the administrator, manager, or service permissions. -
Page 130: Table 18: Admin Screen Functions
Selenia Dimensions System User Guide Chapter 9: System Administration Interface Table 18: Admin Screen Functions Section Button Name Function Operators Manage Operators Add, delete or change Operator information. My Settings Change the information for the current Operator. Procedures Procedure Editor Add or Edit the procedures, or change the view order for each user. -
Page 131: The About Screen
Institution Tab - lists the name and address of the organization assigned to this machine • Copyright Tab - lists the copyrights of Hologic and third-party software installed on this machine • UDI Tab - lists the unique device identifier(s) of this machine... -
Page 132: How To Use The System Tools
Selenia Dimensions System User Guide Chapter 9: System Administration Interface How to Use the System Tools The Radiologic Technologist Managers and users with Service permissions can access the System Tools function. The System Tools function contains the configuration information about Selenia Dimensions system. -
Page 133: The System Tools For The Radiologic Technologist Manager
Selenia Dimensions System User Guide Chapter 9: System Administration Interface 9.3.1 The System Tools for the Radiologic Technologist Manager Figure 76: The System Tools Screen Table 19: Radiologic Technologist Manager—System Tools Functions Section Screen Functions Getting Started About: The introduction to the service tool. -
Page 134: Remote Access To Image Reports
IP Address. Using an internet browser on your remote computer, navigate to http:// [IP address]/Hologic.web/MainPage.aspx. Use the IP Address from step 1. The Service Tools Logon screen displays. Type a Manager-level user name and password, and then click Submit. - Page 135 Selenia Dimensions System User Guide Chapter 9: System Administration Interface The Service Tools Welcome screen displays. Go to AWS > Film & Image Information > Create Image Report. Figure 78: Service Tools Welcome Screen Select the parameters for the report and click Generate.
-
Page 136: How To Use The Archive Tool
Selenia Dimensions System User Guide Chapter 9: System Administration Interface The report shows on the screen. Scroll to the bottom of the report and select either Click to Download (html) or Click to Download (csv) for the file download type. - Page 137 Selenia Dimensions System User Guide Chapter 9: System Administration Interface Select the Archive button in the Admin screen to show the Multi Patient On Demand Archive screen. To search for a patient, enter at least two characters in the Search parameters area and click the magnifying glass.
- Page 138 Selenia Dimensions System User Guide Chapter 9: System Administration Interface To Export: Select patients and procedures. • Select patients from the patient list, or do a search with one of the search parameters (item 1) and select patients from the search results.
-
Page 139: Appendix A Specifications
Selenia Dimensions System User Guide Appendix A: Specifications Appendix A Specifications Appendix A Product Measurements A.1.1 Tubestand (Gantry with C-Arm) Figure 84: Tubestand (Gantry with C-arm) Dimensions Height 223 cm (87.8 inches) Width 66 cm (26 inches) Width 173 cm (68 inches) Depth 138 cm (54.25 inches) -
Page 140: Acquisition Workstations
Selenia Dimensions System User Guide Appendix A: Specifications A.1.2 Acquisition Workstations Universal Acquisition Workstation Figure 85: Universal Acquisition Workstation Dimensions system Width (max.) with optional display 135.6 cm (53.4 inches) arm extended Width (max.) with standard display 93.8 cm (36.9 inches) Depth (max) with keyboard tray 122.0 cm (48.4 inches) - Page 141 Selenia Dimensions System User Guide Appendix A: Specifications Premium Acquisition Workstation Figure 86: Premium Acquisition Workstation Dimensions system Height 202.1 cm (79.75 inches) Width 92.7 cm (36.5 inches) Depth 58.5 cm (23 inches) Weight 154 kg (340 pounds) MAN-10622 Revision 001...
- Page 142 Selenia Dimensions System User Guide Appendix A: Specifications Standard Acquisition Workstation Figure 87: Standard Acquisition Workstation Dimensions system Height 191.3 cm (75.32 inches) Width 107 cm (42 inches) Depth 76 cm (30 inches) Weight 219 kg (462 pounds) Page 126...
- Page 143 Selenia Dimensions System User Guide Appendix A: Specifications Acquisition Workstations for Mobile Use Figure 88: Mobile Universal Acquisition Workstation Dimensions system Width (max.) with optional 128 cm (50.5 inches) display arm extended Width (max.) with standard 100 cm (39.5 inches)
-
Page 144: Operation And Storage Environment
Selenia Dimensions System User Guide Appendix A: Specifications Figure 89: Mobile (non-Universal) Acquisition Workstation Dimensions system Height 167.6 cm (66.0 inches) Width 105.5 cm (41.5 inches) Depth 58.5 cm (23 inches) Weight 154 kg (340 pounds) Operation and Storage Environment A.2.1... -
Page 145: Radiation Shield
Selenia Dimensions System User Guide Appendix A: Specifications Acquisition Workstation Temperature Range –10 °C (14 °F) to 40 °C (104 °F) Relative Humidity Range 0% to 95% without condensing moisture (Put in a package for storage in a building.) Radiation Shield Radiation Shield Lead (Pb) equivalent 0.5 mm lead for x ray energy to 35 kV... -
Page 146: Compression
Selenia Dimensions System User Guide Appendix A: Specifications Note The angular velocity is the average of the velocity of the tube arm rotating clockwise between 0° and 90° or rotating counterclockwise between 90° and 0°. The angular velocity does not include the time to accelerate from zero velocity and decelerate to zero velocity. -
Page 147: X-Ray Tube
Selenia Dimensions System User Guide Appendix A: Specifications A.5.3 X-ray Tube Focal Spot Large (0.3 mm) Nominal Small (0.1 mm) Nominal Tube Voltage 20 kV to 49 kV Anode Material Tungsten X-Ray Window Beryllium 0.63 mm Tube leakage test conditions 49 kVp, 2.0 mA... -
Page 148: X-Ray Collimation
Selenia Dimensions System User Guide Appendix A: Specifications Table 20: Maximum mA Setting as a Function of kV LFS mA SFS mA mAs Steps (Table 1, default) 4, 5, 6, 7, 8, 9, 10, 12, 14, 16, 18, 20, 22, 25, 30, 32.5, 35, 37.5, 40, 42.5, 45, 47.5, 50, 52.5, 55, 57.5, 60, 62.5, 65, 67.5, 70, 75,... -
Page 149: Imaging System Technical Information
Selenia Dimensions System User Guide Appendix A: Specifications Imaging System Technical Information A.6.1 Image Receptor Fluid Ingress No fluid from accidental spillage on the Image Receptor may seep inside. Deflection Does not exceed 1.0 mm at maximum compression. Active Imaging Area Not less than 23.3 cm by 28.5 cm (9.2 inches x 11.2 inches) -
Page 151: Appendix B The System Messages And Alert Messages
Taskbar. Some conditions require a system restart or indicate that more action is necessary (for example, to call Hologic Technical Support). This appendix describes the message categories and your actions to return the system to normal operation. If errors repeat, contact Hologic Technical Support. -
Page 152: Table 21: System Messages
Selenia Dimensions System User Guide Appendix B: The System Messages and Alert Messages Table 21: System Messages Icon Message User Action Paddle is moving No action needed. Sending notice No action needed. Invalid use of Magnification You selected a tomographic view with the Magnification Stand Stand installed. - Page 153 Selenia Dimensions System User Guide Appendix B: The System Messages and Alert Messages Table 21: System Messages Icon Message User Action System in Test Mode Applies to Service Personnel. Affirm cable is not connected Connect the Affirm system cable to the side of the Gantry.
-
Page 154: Ups Operation
Selenia Dimensions System User Guide Appendix B: The System Messages and Alert Messages UPS Operation Note The User Guide for the UPS is supplied with the system. Refer to the UPS User's Guide for complete instructions. The LCD in the UPS shows the power status. -
Page 155: Appendix C Dimensions Mobile
Appendix C Dimensions Mobile Appendix C General Information This appendix describes the Selenia Dimensions system installed in a mobile environment. Conditions for Safety and Other Precautions An acceptable, stable, clean VAC power source is required to make sure that the system meets all its performance specifications. -
Page 156: Mobile Specifications
Selenia Dimensions System User Guide Appendix C: Dimensions Mobile Caution: Voltages cannot change by more than ±10% when the x-ray unit or other equipment, (for example heating or air conditioning) is operated. Note If a mobile power generator is used, make sure that it is at least 3 meters (10 feet) from the system. -
Page 157: Acquisition Workstation
Selenia Dimensions System User Guide Appendix C: Dimensions Mobile C.4.2 Acquisition Workstation Mains Voltage 100/120/200/ 208/220/230/ 240 VAC ±10% Mains Frequency 50/60 Hz ±5% Power Consumption < 1000 watts Prepare the System for Travel Before travel, perform these steps: Rotate the C-arm to 0 degrees (CC position). - Page 158 Selenia Dimensions System User Guide Appendix C: Dimensions Mobile If using the mobile Universal Acquisition Workstation, lock the swivel display using the knobs provided (see the following figure). Figure 94: Swivel Lock Knobs for Preview Display on Mobile Universal Acquisition Workstation Lower the work surface to the minimum height.
-
Page 159: Prepare The System For Use
Selenia Dimensions System User Guide Appendix C: Dimensions Mobile Prepare the System for Use Unlock the keyboard tray: Find the knob under the tray. b. Pull the knob down. Turn the knob 90°. This position keeps the latch open. Position D (in the following figure) shows the unlocked position. -
Page 160: Test The System After Travel
Selenia Dimensions System User Guide Appendix C: Dimensions Mobile Test the System after Travel C.7.1 Selenia Dimensions Controls and Functional Tests Perform the Controls and Functional Tests. Refer to Perform the Functional Tests on page • Compression Up/Down • Compression Release •... -
Page 161: Table 22: 2D Dose (Euref)
Selenia Dimensions System User Guide Appendix D: Dose Information Appendix D Dose Information Appendix D EUREF Dose Tables Notes This information is only applicable for the European Union. The following values are for the default dose tables. The following tables show typical dose values when operating the system in 2D and in BT imaging modes. - Page 163 Selenia Dimensions System User Guide Index Index calibrations, perform - 51 C-arm auto-rotation - 42 2D contrast - 67 controls and indicators - 31 2D contrast settings - 70 displays - 31 rotation - 36, 42 slots for accessories - 87...
- Page 164 Selenia Dimensions System User Guide Index clean - 111 output options - 85 compression force - 31 preview - 77, 105 preview image - 29 reject - 105 thickness - 31 Remote Access to Image Reports - 118 types of images selection - 83...
- Page 165 Selenia Dimensions System User Guide Index output groups - 72 procedure screen - 57 messages and alerts - 135 procedures mobile system add - 54 QC tests - 144 close - 66 safety - 139 specifications - 140 test after travel - 144...
- Page 166 Selenia Dimensions System User Guide Index admin - 113 preview image - 77 window level - 81 query - 56 workflow, standard - 101 scroll wheel - 27 worklist, query - 56 select exposure parameters - 58 output groups - 72...
- Page 168 Selenia Dimensions System User Guide Index Refer to the corporate website for more facilities worldwide. www.hologic.com Page 152 MAN-10622 Revision 001...
Need help?
Do you have a question about the Selenia Dimensions and is the answer not in the manual?
Questions and answers