
Subscribe to Our Youtube Channel
Related Manuals for National Instruments RMX-41011


Summary of Contents for National Instruments RMX-41011
-
Page 1: Rmx-410X User Manual
RMX-410x User Manual Rackmount Programmable DC Power Supplies 200 W/400 W/800 W Built-in USB, RS-232, RS-485, LAN Interface... - Page 3 • Register your NI product. Product registration facilitates technical support and ensures that you receive important information updates from NI. NI corporate headquarters is located at 11500 N Mopac Expwy, Austin, TX, 78759-3504, USA. © 2017-2024 National Instruments Corporation. All rights reserved. 377396E-01 © National Instruments Corporation 3...
-
Page 4: Table Of Contents
RMX-410x User Manual Contents RMX-410x User Manual ....................... 1 Electromagnetic Compatibility Guidelines ................ 5 Safety ..........................5 Electromagnetic Compatibility ..................5 CE Compliance ....................... 7 Online Product Certification ..................... 7 Environmental Management ..................7 Waste Electrical and Electronic Equipment (WEEE) ..........7 CHAPTER 1: GENERAL INFORMATION ................ -
Page 5: Electromagnetic Compatibility Guidelines
• EN 55024 (CISPR 24): Immunity • AS/NZS CISPR 11: Group 1, Class A emissions • AS/NZS CISPR 22: Class A emissions • FCC 47 CFR Part 15B: Class A emissions • ICES-001: Class A emissions © National Instruments Corporation 5... - Page 6 RMX-410x User Manual Note: In the United States (per FCC 47 CFR), Class A equipment is intended for use in commercial, light-industrial, and heavy-industrial locations. In Europe, Canada, Australia and New Zealand (per CISPR 11) Class A equipment is intended for use only in heavy-industrial locations.
-
Page 7: Ce Compliance
EU Customers: At the end of the product life cycle, all products must be sent to a WEEE recycling center. For more information about WEEE recycling centers, NI WEEE initiatives, and compliance with WEEE Directive 2002/96/EC on Waste and Electronic Equipment, visit ni.com/environment/weee. © National Instruments Corporation 7... - Page 8 RMX-410x User Manual CAUTION: RMX-410x devices are not authorized for use as critical components in nuclear control systems, life support systems or equipment for use in hazardous environments without the express written approval of NI. OVERVOLTAGE CATEGORY AND ENVIRONMENTAL CONDITIONS The RMX-410x devices have been evaluated to Overvoltage category II.
- Page 9 60VDC. Note: The protection provided by the RMX-410x can be impaired if it is used in a manner not described in this document. © National Instruments Corporation 9...
- Page 10 RMX-410x User Manual WARNING: There is a potential shock hazard when using a power supply with an output voltage greater than 60VDC. Do not turn ON power supply when output voltage is above 60VDC without output bus-bars and output connectors protection assembled. Turn OFF power supply or disconnect power supply from AC mains before making or changing any rear panel connection.
-
Page 11: Chapter 1: General Information
2024. In addition, model names shown in this manual are different from the names reported by the firmware and some of the software, such as NI Measurement and Automation Explorer (NI MAX). This is the full list of models covered by this manual and the different names. © National Instruments Corporation 11... - Page 12 The following terms are used within this document for groups of models: Term Group of models RMX-410x All of the models covered in this manual RMX-4101x RMX-41011, RMX-41012, RMX-41013, and RMX-41014 RMX-4102x RMX-41021, RMX-41022, RMX-41023, and RMX-41024 RMX-4104x RMX-41041, RMX-41042, RMX-41043, and RMX-41044 12 ni.com...
- Page 13 • Remote sensing to compensate for voltage drop of power leads. • External Analog Programming and Monitoring (0-5V or 0-10V, user selectable). • Cooling fan speed control for low noise and extended fan life. • LAN interface (SCPI compatible). © National Instruments Corporation 13...
- Page 14 RMX-410x User Manual Multiple Output Power System The RMX-410x power supplies devices can be configured into a programmable power system of up to 31 units using the built-in LAN, USB or RS232/RS485 communication port in the power supply and the RS485 linking cable provided with each power supply. In a LAN system, each power supply can be controlled using the LAN controller (installed).
- Page 15 Cable description: 0.5m length, shielded, RJ-45 type plugs, 8 contacts (P/N: 786188-01). Misc. Hardware • Bus bars protection • Connector protection • Connector housing IPD1-06-D-K(SAMTEC) • Connector housing IPD1-04-D-K(SAMTEC) • Connector housing IPD1-02-D-K(SAMTEC) • Contact pins P/N: CC79R-2024-01-L(SAMTEC) © National Instruments Corporation 15...
- Page 16 RMX-410x User Manual • Rackmount kit for RMX-410x 2U DC power supplies, holds six supplies. P/N: 786186-01 • Blank panel for RMX-410x rackmount kit. P/N: 786187-01 16 ni.com...
- Page 17 POWER CORD, AC, IEC C15 to Japan, 110V, 2.5m Serial Port Cables If a serial port cable is required, it should be ordered according to the description in section 7.2 * USB cables are not provided with the power suppl © National Instruments Corporation 17...
-
Page 18: Chapter 2: Specifications
RMX-410x User Manual CHAPTER 2: SPECIFICATIONS RMX-4101x Specifications MODEL RMX-41011 RMX-41012 RMX-41013 RMX-41014 1. Rated output voltage (*1) 2. Rated output current (*2) 3. Rated output power CONSTANT VOLTAGE MODE RMX-41011 RMX-41012 RMX-41013 RMX-41014 1. Max. Line regulation (*6) 0.01% of rated output voltage+2mV 2. - Page 19 5. Vout readback accuracy 0.05% of rated output voltage 6. Iout readback accuracy (*13) 0.1% of actual +0.3% of rated output current 7. Vout readback resolution 0.012% of full scale 8. Iout readback resolution 0.012% of full scale © National Instruments Corporation 19...
- Page 20 RMX-410x User Manual RMX-4101x Specifications INPUT CHARACTERISTICS RMX-41011 RMX-41012 RMX-41013 RMX-41014 1. Input voltage/freq. (*3) 85~265Vac continuous, 47~63Hz, single phase 2. Maximum Input current 100/200VAC (*4) (*18) 2.62/1.29 2.76/1.37 2.69/1.33 2.55/1.26 3. Power Factor (Typ) >0.99 at 100Vac, >0.98 at 200Vac,100% load 4.
- Page 21 *18: PS with LAN and models decrease efficiency by 0.5% and increase input current by 0.5%. *19: At rated output power. *20: For Parallel operation more than 2 units 5% of total output current is required. © National Instruments Corporation 21...
-
Page 22: Rmx-4102X Specifications
RMX-410x User Manual RMX-4102x Specifications MODEL RMX-41021 RMX-41022 RMX-41023 RMX-41024 1. Rated output voltage(*1) 2. Rated output current (*2) 3. Rated output power CONSTANT VOLTAGE MODE RMX-41021 RMX-41022 RMX-41023 RMX-41024 1. Max. Line regulation (*6) 0.01% of rated output voltage+2mV 2. - Page 23 5. Vout readback accuracy 0.05% of rated output voltage 6. Iout readback accuracy (*13) 0.1% of actual +0.3% of rated output current 7. Vout readback resolution 0.012% of full scale 8. Iout readback resolution 0.012% of full scale © National Instruments Corporation 23...
- Page 24 RMX-410x User Manual RMX-4102x Specifications INPUT CHARACTERISTICS RMX-41021 RMX-41022 RMX-41023 RMX-41024 1. Input voltage/freq. (*3) 85~265Vac continuous, 47~63Hz, single phase 2. Maximum Input current 100/200VAC (*4) (*18) 4.98/2.45 5.25/2.57 5.10/2.50 4.80/2.37 3. Power Factor (Typ) 0.99 at 100/200Vac, 100% load 4.
- Page 25 PS with Isolated analog option decreases efficiency by 0.75% and increases input current by 0.75%. *19: At rated output power. *21: For Parallel operation more than 2 units 5% of total output current is required. © National Instruments Corporation 25...
-
Page 26: Rmx-4104X Specifications
RMX-410x User Manual RMX-4104x Specifications MODEL RMX-41041 RMX-41042 RMX-41043 RMX-41044 1. Rated output voltage(*1) Vin ≥ 100Vac, Ta ≤ 50°C 2. Rated output 85Vac ≤ Vin < 100Vac, Ta ≤ 40°C current (*2)(*21) 85Vac ≤ Vin < 100Vac, 40°C < Ta ≤ 50°C 12.5 Vin ≥... - Page 27 GREEN LEDs: FINE, MENU, PREV, PROT, REM, OUTPUT, CV, CC 3. Indications RED LED: PROT (OVP, UVP, OTP, FOLD, AC FAIL). 4. Function buttons FINE, MENU, PREV, PROT, REM, OUTPUT PROGRAMMING AND READBACK (RS232/485,USB, LAN) 1. Vout programming accuracy 0.05% of rated output voltage © National Instruments Corporation 27...
- Page 28 RMX-410x User Manual 2. Iout programming accuracy (*13) 0.1% of actual +0.1% of rated output current 3. Vout programming resolution 0.012% of full scale 4. Iout programming resolution 0.012% of full scale 5. Vout readback accuracy 0.05% of rated output voltage 6.
- Page 29 *4: Ta=25°C with rated output power. *5: Not including EMI filter inrush current, less than 0.2mSec. *6: At 85~132Vac or 170~265VAC, constant load. *7: From No-Load to Full-Load, constant input voltage. Measured at the sensing point in Remote Sense. © National Instruments Corporation 29...
- Page 30 RMX-410x User Manual *8: Measured with JEITA RC-9131A (1:1) probe. *9: From 10% to 90% or 90% to 10% of Rated Output Voltage, with rated resistive load. *10: From 90% to 10% of Rated Output Voltage. *11: For load voltage change, equal to the unit voltage rating, constant input voltage. *13: The Constant Current programming, readback and monitoring accuracy do not include the warm-up and Load regulation thermal drift.
-
Page 31: Rmx-410X Mechanical
RMX-410x User Manual RMX-410x Mechanical © National Instruments Corporation 31... - Page 32 RMX-410x User Manual Rackmount Dimensions Fig.2-3: Dimensional drawing for the shelf in the RMX-410x Rackmount Kit (PN: 786186-01) 32 ni.com...
-
Page 33: Chapter 3: Installation
In order to be operational, the power supply must be connected to an appropriate AC source. The AC source voltage should be within the power supply specification. Do not apply power before reading, AC Source Requirements and AC © National Instruments Corporation 33... - Page 34 RMX-410x User Manual Input Power Connection. Table 3-1 below, describes the basic setup procedure. Follow the instructions in Table 3-1 in the sequence given to prepare the power supply for use. Step # Item Description Reference Section Initial physical Inspection Initial inspection of the power Inspection...
- Page 35 Rackmount The RMX-410x power supply device is designed to fit in a standard 19” 2U height rack. Six units (70mm width) can be assembled into 19” 2U-rack. Refer to Fig.3-1. Fig. 3-1 © National Instruments Corporation 35...
- Page 36 RMX-410x User Manual Location, Mounting and Cooling This power supply is fan cooled. The air intake is at the front panel and the exhaust is at the rear panel. Upon installation allow cooling air to reach the front panel ventilation inlets. Allow minimum 10 cm (4”) of unrestricted air space at the front and the rear of the unit.
- Page 37 AC Source Requirements The RMX-410x device can be operated from a nominal 100V to 240V, single phase, 47~63Hz. The input voltage range and current required for each model is specified in Chapter 2. Ensure © National Instruments Corporation 37...
- Page 38 RMX-410x User Manual that under heavy load, the AC voltage supplied to the power supply does not fall below the specifications described in Chapter 2. AC Input Power Connection WARNING: Some components inside the power supply are at AC voltage even when the On/Off switch is in the ”Off”...
- Page 39 The AC input cord must be no longer than 3m. Turn-On Checkout Procedure General The following procedure ensures that the power supply is operational and may be used as a basic incoming inspection check. © National Instruments Corporation 39...
- Page 40 RMX-410x User Manual Prior to Operation Ensure that the power supply is configured to the default setting: AC On/Off switch at Off position. Sense connector : Configured to Local Sense as shown in Fig.3-4: Local (-) sense (-) Sense Plug P/N: IPD1-02-D-K (SAMTEC) (+) Sense Local (+) sense Fig.
- Page 41 Set OVP to 50% of of the unit voltage rating. Adjust the output voltage toward it’s maximum and check that the output voltage cannot be increased more than the OVP setting. Adjust OVP limit to the maximum. © National Instruments Corporation 41...
- Page 42 RMX-410x User Manual UVL Check The UVL can be set when the power supply output is Enabled (On) or Disabled (Off). UVL setting values are limited at the maximum level to approximately 5% below the Output Voltage setting. Attempting to adjust the value above this limit will result in no response to the adjustment attempt.
- Page 43 (1V maximum) to prevent excessive output power consumption from the power supply and poor dynamic response to load changes. Please refer to Tables 3-2 and 3-3 for maximum wire length to limit voltage drop in American and European dimensions respectively. © National Instruments Corporation 43...
- Page 44 RMX-410x User Manual Resistivity Maximum length in feet to limit Wire size Ohm/1000ft voltage drop to 1V or less 2.526 1.589 0.9994 12.5 0.6285 0.3953 0.2486 0.1564 1200 Table 3-2: Maximum wire length for 1V drop on lead (in feet) Cross sect.
- Page 45 Additional filtering with bypass capacitors at the load terminals may be required to bypass the high frequency load current. © National Instruments Corporation 45...
- Page 46 RMX-410x User Manual Inductive Loads Inductive loads can produce voltage spikes that may be harmful to the power supply. A diode should be connected across the output. The diode voltage and current rating should be greater than the power supply maximum output voltage and current rating. Connect the cathode to the positive output and the anode to the negative output of the power supply.
- Page 47 Fig. 3-5: Load wires connection, 20V to 100V models. PT SCREW KA40x8 WN1412 (2 PLACES) INSERT THE SNAP HOOKS INTO THE DEDICATED HOLES IN THE BUS BARS BUS BARS PROTECTION (PROVIDED IN THE PACKAGE) Fig. 3-6: Bus-bars shield mounting © National Instruments Corporation 47...
- Page 48 RMX-410x User Manual 60V, 100V Models WARNING: There is a potential shock hazard when using a power supply with an output voltage greater than 60VDC. Do not turn ON power supply when output voltage is above 60VDC without output bus-bars and output connectors protection assembled.
- Page 49 If remotely located output distribution terminals are used, the power supply output terminals should be connected to the distribution terminals by a pair of twisted and/or shielded wires. Each load should be separately connected to the remote distribution terminals (see Fig.3-10). © National Instruments Corporation 49...
- Page 50 RMX-410x User Manual If remote sensing is required, the sensing wires should be connected to the distribution terminals or at the most critical load. 50 ni.com...
- Page 51 60VDC. Local sense and remote sense wires should have a minimum insulation rating equivalent or greater than the maximum output voltage of the power supply. Ensure that the connections at the load end are shielded to prevent accidental contact with hazardous voltages. © National Instruments Corporation 51...
- Page 52 RMX-410x User Manual Local Sensing The power supply is shipped with the rear panel J2 sense connector wired for local sensing of the output voltage. Refer to Table 3-4 for J2 terminals assignment. With local sensing, the output voltage regulation is made at the output terminals. This method does not compensate for voltage drop on the load wires, therefore it is recommended only for low load current applications or where the load regulation is less critical.
- Page 53 J2 Sense Connector Technical Information - J2 connector type: IPL1-102-01-S-D-RA-K, SAMTEC. - Plug type: IPD1-02-D-K, SAMTEC. - Contact pins: CC79R-2024-01-L, SAMTEC. - Hand tool: CAT-HT-179-2024-11, SAMTEC - Wire AWG: 24 up to 20 © National Instruments Corporation 53...
- Page 54 RMX-410x User Manual Repackaging for Shipment To ensure safe transportation of the instrument, contact the NI sales or service facility near you for Return Authorization and shipping information. Refer to Warranty Information for further instructions. 54 ni.com...
-
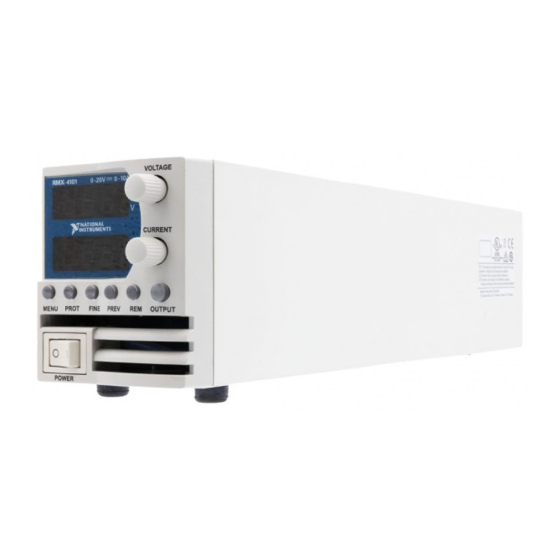
Page 55: Chapter 4: Front/Rear Panel Controls And Connectors
- Section 4.3: Rear Panel Controls and Connectors. Front Panel Display and Controls Refer to Fig4-1 and Table 4-1 for description of the Front Panel controls and indicators. Fig. 4-1: Front panel controls and indicators © National Instruments Corporation 55... - Page 56 RMX-410x User Manual Control/Indicator Description Section AC Power Switch AC ON/OFF control 4 digit 7-segment LED display. Normally displays the output current. In preview mode, the display indicates the program setting of output current. Current display 4 digit 7-segment LED display. Normally displays the output voltage. In preview mode, the display indicates the program setting of output voltage.
- Page 57 Remote-In to Remote-Out. USB Connector USB interface connector, type B LAN Connector LAN interface connector, type RJ-45 Ground screw M4X8 for chassis Ground connection Table 4-2: Rear panels connections © National Instruments Corporation 57...
- Page 58 RMX-410x User Manual WARNING: Terminals 7, 9 and 12 of J1 are connected internally to the negative sense(-S) potential of the power supply. Do not attempt to bias any of these terminals relative to the negative sense. Use the Isolated Programming interface option to allow control from a programming source at a different potential relative to the power supply negative.
- Page 59 Connected internally to the negative sense potential (-S). V_MON Output for monitoring the power supply Output Voltage. IPGM_RTN Return for IPGM input. VPGM_RTN Return for VPGM input. Connected internally to the ” -S”. Table 4-3: J1 connector terminals and functions © National Instruments Corporation 59...
- Page 60 RMX-410x User Manual J3 Connector Terminal and Function Control and monitoring signals are isolated from the power supply output. Connector Technical Information • Connector type: IPL1-104-01-S-D-RA- K, SAMTEC • Receptacle type: IPD1-04-D-K, SAMTEC • Contact pins: CC79R-2024-01-L, SAMTEC • Hand tool: CAT-HT-179-2024-11, SAMTEC Fig.4-4: J3 connector terminals and •...
- Page 61 SLAVE (BASIC) iniT INITIALIZE STEP STEP INTF INTERFACE TRiG TRIGGER INTERLOCK TR.DL TRIGGER DELAY TR. In TRIGGER IN TR.Ov TRIGGER OUT LANG LANGUAGE LOAD LOAD NEGATIVE UOLT VOLTAGE MEMO MEMORY Table 4-5: Front Panel display messages © National Instruments Corporation 61...
- Page 62 RMX-410x User Manual Navigating the Main Menu Introduction The Main Menu consists of three levels: Subsystem, Function and Parameter. To enter the Menu press the Menu button. The Menu LED illuminates and the display shows the Subsystem Menu. Navigate by rotating the Voltage encoder to scroll through the Subsystem list (first level).
- Page 63 RMX-410x User Manual Press MENU button, LED turns ON Fig.4-5: Main Menu diagram © National Instruments Corporation 63...
- Page 64 RMX-410x User Manual Exiting the Main Menu There are three ways to exit from Main Menu: Press MENU button twice. MENU LED turns OFF. Display shows present status of power supply. Press and hold MENU button 3sec. MENU LED turns OFF. Display shows present status of power supply.
- Page 65 RMX-410x User Manual Press REM button, LED turns ON Fig.4-6: Communication Menu diagram © National Instruments Corporation 65...
- Page 66 RMX-410x User Manual Exiting the Communication Menu There are three ways to exit from REM menu: Press REM button twice. REM LED turns OFF. Display shows present status of power supply. Press and hold REM button 3sec. REM LED turns OFF. Display shows present status of power supply. No action for 15 sec.
- Page 67 Press PROT button twice. PROT LED turns OFF. Display shows present status of power supply. Press and hold PROT button 3sec. PROT LED turns OFF. Display shows present status of power supply. No action for 15 sec. PROT LED turns OFF. Display shows present status of power supply. © National Instruments Corporation 67...
-
Page 68: Chapter 5: Local Operation
RMX-410x User Manual CHAPTER 5: LOCAL OPERATION Introduction This Chapter describes the operating modes that do not require programming and monitoring the power supply via its communication interface. USB or RS232/RS485 or by remote analog signals. Ensure that the REM LED on the front panel is Off, (indicating Local mode). If the REM LED is On, press the front panel REM button to change the operating mode to local. - Page 69 Then ”OFF” will appear on the Voltage display. Resolution can be set to Coarse or Fine adjustment. Press the FINE button to select between the Coarse and Fine adjustment. The FINE LED illuminates when the resolution is set to Fine. © National Instruments Corporation 69...
- Page 70 RMX-410x User Manual Automatic Crossover When the power supply operates in Constant Voltage mode, while the load current is increased to greater than the current limit setting, the power supply will automatically switch to Constant Current mode. If the load is decreased to less than the current limit setting, the power supply will automatically switch back to Constant Voltage mode.
- Page 71 The OVP can be set when the power supply output is Enabled (On) or Disabled (Off ). The minimum setting level is 5% above the output voltage, or the value in Table 5-1, whichever is higher. The maximum setting level is shown in Table 5-1. © National Instruments Corporation 71...
- Page 72 RMX-410x User Manual Press PROT button. PROT (GREEN) LED illuminates. ”OuP” message appears on the Voltage display. Press Voltage encoder. ”OuP” message appears on the Voltage display and the Current display shows OVP setting level. Rotate the Current encoder to adjust the OVP level. Press PROT button twice or wait 15 sec.
- Page 73 Rotate the Voltage encoder to set ”UuP” or ”UuL”, and then press the encoder. The display blinks once. Rotate the Current encoder to adjust the level. Press PROT button twice or wait 15 sec. to return display to its previous state and then PROT LED turns OFF. © National Instruments Corporation 73...
- Page 74 RMX-410x User Manual Activated UVP Alarm When the UVP is activated the power supply output shuts down. The Voltage and Current display shows ”UuP FA IL” and the PROT red LED blinks. Foldback Protection Foldback protection will shut down the power supply output if power supply operation mode crosses over from CC to CV or from CV to CC, according to selected operation mode.
- Page 75 Rotate the Current encoder to adjust the delay. Protection delay setting range is 0…25.5sec. Press Current encoder to select. Display blinks once and exists to the previous level. Press PROT button once to return display to the previous state and PROT LED turns off. © National Instruments Corporation 75...
- Page 76 RMX-410x User Manual Over Temperature Protection The OTP circuit shuts down the power supply before the internal components can exceed their safe internal operating temperature. When an OTP shutdown occurs, the display shows ”OtP fa IL” and the PROT LED blinks. Resetting the OTP circuit can be automatic (non-latched) or manual (latched) depending on if the power supply is in Safe or Automatic restart mode.
- Page 77 Each diode should be rated to at least the power supply rated output voltage and output current. Refer to Fig.5-3 for this operating mode. © National Instruments Corporation 77...
- Page 78 RMX-410x User Manual Remote Programming in Series Operation Programming by external voltage: The analog programming circuits of this power supply are referenced to the negative Sense potential. Therefore, the circuits used to control each series connected unit must be separated and floated from each other. Refer to section Using the SO function and PS_OK signal : The Shut Off and PS_OK circuits are referenced to the isolated interface common, IFC_COM (J3-7).
- Page 79 Master unit with 2 Slave units Master unit with 3 Slave units Master unit with 4 Slave units Master unit with 5 Slave units Slave unit (Basic mode) SLAd Slave unit (Advanced mode) Table 5-2.1: Operation Setting Mode © National Instruments Corporation 79...
- Page 80 RMX-410x User Manual Basic Parallel Operation In this method, setting the units as Master and Slaves is made by the rear panel J1 connections and setup via Front Panel. Each unit displays its own output current and voltage. To program the load current, the Master unit should be programmed to the total load current divided by the number of units in the system.
- Page 81 In parallel operation, power supplies can be connected in local or remote sensing. Refer to Fig.5-4 and 5-5 for typical connections of parallel power supplies. The figures show connection of two units, however the same connection method applies for up to 6 units. © National Instruments Corporation 81...
- Page 82 RMX-410x User Manual Fig.5-4: Parallel connection with local sensing 82 ni.com...
- Page 83 With local sensing it is important to minimize the wire length and resistance. Also the positive and negative wire resistance should be as close as possible to each other to achieve current balance between power supplies. © National Instruments Corporation 83...
- Page 84 RMX-410x User Manual Advanced Parallel Operation In Advanced Parallel operation the master unit displays the total current of all units connected in Parallel. The slave units display ”ON SLUE”. The master and slave units operate in a Daisy- Chain connection configuration. For further details about Daisy-chain connection refer to section 5.6.
- Page 85 Recycle AC power. For wiring instructions, refer to Fig.5-4: Parallel connection with local sensing or Fig.5-5: Parallel connection with remote sensing and Section 5.6: Daisy-Chain connection. NOTE: To release units from Advanced mode select ”H1”. © National Instruments Corporation 85...
- Page 86 RMX-410x User Manual Daisy-Chain Connection It is possible to configure a multiple power supply system to shut down all units when a fault condition occurs in one of the units. When the fault is removed, the system recovers according to a preset state: Safe start mode or Automatic restart. Set signal ”SO”...
- Page 87 Press the Current encoder again. The ”SO” message appears on the Voltage display. Parameter ”pOS” or ”NEG” appears on the Current display. Rotate and press the Current encoder to select the required parameter. For signal details refer to Table 5-4. © National Instruments Corporation 87...
- Page 88 RMX-410x User Manual Table 5-4: SO logic selection Interlock Function - Analog On/Off. (Enable/Disable) Interlock signal serves as Output Enable/Disable via switch or relay. Use the Interlock function to enable or disable the output as emergency shutoff or door open switch. It is an optically isolated signal from the power supply output.
- Page 89 Voltage display shows the selected Pin number. Rotate the Current encoder to toggle between ”Hi” (High) or ”Lo” (Low). Press Current encoder to select desired parameter. Press MENU button twice to return display to it’s previous state. MENU LED turns OFF. © National Instruments Corporation 89...
- Page 90 RMX-410x User Manual CAUTION: Do not connect Pin 1 and Pin 2 to a voltage source higher than 25V. Always connect Pin 1 and Pin 2 to the voltage source with a series resistor to limit the sink current to less than 100mA. Power Supply OK Signal PS_OK signal indicates fault condition in the power supply.
- Page 91 Press MENU button twice to return display to previous state, MENU LED turns OFF. NOTE: No response for FRST command. After this command the power supply loses communication because of communication setting change. © National Instruments Corporation 91...
- Page 92 RMX-410x User Manual Reset For Reset parameters refer to Table 5-7. Press MENU button. MENU (green) LED illuminates. ”set” message appears on the Voltage display. Rotate Voltage encoder until ”MEMO” message appears on Voltage display. Press Voltage encoder. ”saUe” message appears on Voltage Display. Rotate Voltage encoder until ”rst”...
- Page 93 Press Voltage encoder. ”ReCL” message appears on Current display. Press Current encoder. Numbers ”1..4” appear on Current display. Rotate the Current encoder to select required number value and then press the Current encoder. Display blinks and returns to previous level. © National Instruments Corporation 93...
- Page 94 RMX-410x User Manual Parameter Factory Default Resetting Last setting Save & Recall Output Status Voltage Set-point Current Set-point Fold Back mode Over Voltage Protection Under Voltage Level/ OFF (UVL) OFF (UVL) Protection mode Under Voltage Level/ Protection level Auto Start Mode SAFE SAFE Control pin 1...
-
Page 95: Chapter 6: Remote Analog Programming
Contact J1-1 (Fig.4-3, item 1) accepts TTL signal or Open-Short contact (Referenced to J1-7,9) to select between Local or Remote Analog programming of the output voltage and current limit. In Local mode, the output voltage and current limit can be programmed via the front © National Instruments Corporation 95... - Page 96 RMX-410x User Manual panel Voltage and Current encoders or via the Communication interface. In Remote Analog mode, the output voltage and current limit can be programmed by analog voltage or by programming resistors via J1 contacts 6 and 5. Refer to Analog Programming Setting Table 6-2.
- Page 97 12. Press MENU button twice to return display to it’s previous state. MENU LED turns OFF CAUTION: To maintain the isolation of power supply and prevent ground loops, use an isolated programming source when operating the power supply via remote analog programming at J1 connector. © National Instruments Corporation 97...
- Page 98 RMX-410x User Manual Output Voltage Programming Output Current* Programming Fig.6-1: J1-Remote Voltage Programming Connection *Max. output current is limited by front panel current setting. 98 ni.com...
- Page 99 10. ”rANG” appears on Voltage display and ”5” (5K) or ”10” (10K) appears on Current display. 11. Rotate and press the Current encoder to select the desired programming Resistance range. 12. Press MENU button twice to return display to the previous state. MENU LED turns OFF. © National Instruments Corporation 99...
- Page 100 RMX-410x User Manual Fig.6-2: J1-Remote Resistor Programming Connection *Max. output current is limited by front panel current setting. 100 ni.com...
- Page 101 ”rANG” appears on Voltage display and ”5” (5V) or ”10” (10V) appears on Current display. Rotate and press the Current encoder to select the desired monitoring Voltage range. Press MENU button twice to return display to the previous state. MENU LED turns OFF. © National Instruments Corporation 101...
- Page 102 RMX-410x User Manual CHAPTER 7: Serial RS232/RS485 and USB Interface Introduction This chapter describes the set-up, operation, commands and communication protocol of RMX- 410x power supplies via serial communication interfaces: RS232, RS485 or USB. Configuration Function Level Display Parameter Level Display INtf Interface...
- Page 103 Press Current encoder to enter selected parameter to memory. When parameter is accepted the display blinks once and returns to the previous level. * Do not connect or disconnect the USB cable when the PS is operating. © National Instruments Corporation 103...
- Page 104 RMX-410x User Manual Baud Rate Setting Seven optional rates are possible: 1200, 2400, 4800, 9600, 19200, 38400, 57600. Press REM button. The REM LED illuminates. ”INtf” message appears on the Voltage display. Rotate Voltage encoder until Voltage display shows ”baud”. Press Voltage encoder.
- Page 105 When the power supply is in Local Lockout mode, REM LED illuminates and parameters cannot be changed via the front panel. It is possible to return to Remote mode, only with a communication command or by AC power recycle. © National Instruments Corporation 105...
- Page 106 RMX-410x User Manual Rear Panel RS232/485 Connector The RS232/485 interface is accessible through the Rear panel RS232/485 IN and RS485 OUT connectors. The connectors are 8 contact RJ-45. The IN and OUT connectors are used to connect power supplies in a RS232 or RS485 chain to a controller. Refer to Fig.7-1 for IN/OUT connectors.
- Page 107 DB-9 CONNECTOR 8 PIN CONNECTOR REMARKS PIN NO. NAME PIN NO. NAME HOUSING SHIELD HOUSING SHIELD TXD- RXD- TWISTED TXD+ RXD+ PAIR RXD- TXD- TWISTED Socket RXD+ TXD+ PAIR Fig.7-4: RS485 cable with DB9 connector © National Instruments Corporation 107...
- Page 108 RMX-410x User Manual Rear Panel USB Connector A standard USB Series B device connector is located on Rear panel for USB control. Refer to Fig.7-5 and Table 7-2. Designator Description VBUS +5 VDC Data - Data + Interface com Fig.7-5: USB Table 7-2: USB connector pin out Connector Getting...
- Page 109 IN connector. RS485 RS485 RS485 POWER SUPPLY POWER SUPPLY POWER SUPPLY POWER SUPPLY Fig.7-6: Multi power supplies RS232/485 connection RS485 RS485 RS485 POWER SUPPLY POWER SUPPLY POWER SUPPLY POWER SUPPLY Fig.7-7: Multi power supplies LAN/USB connection © National Instruments Corporation 109...
- Page 110 RMX-410x User Manual NOTES: It is recommended when using ten or more power supplies in Daisy-chain system to connect 120Ω resistive termination at the last unit’s RS-485 out connector 120Ω, 0.5W between TXD+ and TXD-. 120Ω, 0.5W between RXD+ and RXD-. Fig.7-8: Serial link cable with RJ-45 shielded connectors GEN Protocol (GEN series communication language) NOTE:...
- Page 111 The backspace character (ASCII 8) clears the last character sent to the power supply. Error Messages The power supply will return error messages for illegal commands and illegal programming parameters. Refer to Table 7-3 for programming error messages and Table 7-4 for command error messages. © National Instruments Corporation 111...
- Page 112 RMX-410x User Manual Error Code Description Returned when programming output voltage below UVL setting. Returned when UVL value is programmed above the programmed output voltage. Returned when programming the Output to ON during a latched fault shut down. Cannot execute command via Advanced Slave Parallel mode. Table 7-3: Programming error messages Error Code Description...
- Page 113 = rated output current REV? Returns the software version as an ASCII string. Current rev: ”REV:1.0” Return power supply serial number. Up to 12 characters in any format. DATE? Returns date of last calibration. Format ”yyyy/mm/dd”. Example ”2009/12/17” © National Instruments Corporation 113...
- Page 114 RMX-410x User Manual Initialization Commands Command Description ADR n ADR is followed by address which can be 1 to 31 and is used to access the power supply . Clear status. Sets FEVE and SEVE registers to zero. Reset command. Brings the power supply to a safe and known state: Output voltage: zero, Remote: non-latched remote, Output current: zero, Auto-start: Off, Output: Off,...
- Page 115 Sets the Master/Slave parallel operation mode of the power supply. n=H1...H6 (Master), n=SL (Basic PMS n Mode Slave), n=ADSL (Advanced Mode Slave). (Refer to tables 5-2, 5-2.1). PMS? Returns the Master/Slave setting. Master: H1...H6, Slave (Basic mode): S, Slave (Advanced mode): AD © National Instruments Corporation 115...
- Page 116 RMX-410x User Manual NOTES: In Advanced Parallel mode (Refer to Sec. 5.5.3), ”n” is the total system current. In Advanced Parallel mode, ”MC?” returns the Master unit current multiplied by the number of Slave units. UVL? will return ”C01” if UVP is activated and vice versa. No command execution in Advance slave mode.
- Page 117 The power supply can accept values higher by 5% than the table values, however it is not recommended to program the power supply over the rated values. Model Rated Output Minimum (V) Maximum (V) Voltage (V) 24.0 40.0 66.0 Table 7-9: OVP programming range © National Instruments Corporation 117...
- Page 118 RMX-410x User Manual Model Rated Output Minimum (V) Maximum (V) Voltage (V) 19.0 34.2 57.0 95.0 Table 7-10: UVL/UVP programming range NOTE: The UVP protection starts operating for values higher than 5% of Rated Output Voltage. 118 ni.com...
- Page 119 Reads Status Conditional Register. Returns 4-digit hex. SENA Sets Status Enable Register using 4-digit hex. SENA? Reads Status Enable Register. Returns 4-digit hex. SEVE? Reads Status Event register. Returns 4-digit hex. Clears bits of Status Event register. © National Instruments Corporation 119...
- Page 120 RMX-410x User Manual Serial Communication Test Set-Up Basic set-up to test serial communication operation. 1. Equipment: PC with Windows Hyper Terminal, private edition, software installed, RMX-410x power supply, RS232 cable. 2. PC set-up: 2.1 Open Hyper Terminal ....New Connection. 2.2 Enter a name 2.3 Connect to ......
- Page 121 End of message is the Carriage Return character (ASCII 13) and the Line Feed (ASCII 10) character. End of Command End of command is Carriage Return character (ASCII 13) and/or the Line Feed (ASCII 10) character. © National Instruments Corporation 121...
- Page 122 RMX-410x User Manual Checksum The user may optionally add a checksum to the end of the command. The checksum is ”$”followed by two hex characters. If a command or a query has checksum, the response will also have one. There is no CR between the command string and the ”$” sign. SCPI Requirements The power supply conforms to the following SCPI requirements: SCPI common commands.
- Page 123 The header has only the first three or four letters, such as VOLT, STAT, and DEL. The SCPI interface is not sensitive to case. It will recognize any case mixture, such as TRIGGER, Trigger, TRIGger. Short form headers result in faster program execution. © National Instruments Corporation 123...
- Page 124 RMX-410x User Manual Data Formats Data Formats Description Digits with an implied decimal point assumed at the right of the least-significant digit. Examples: 256 <NR1> <NR2> Digits with an explicit decimal point. Example: .0253 <NR3> Digits with an explicit decimal point and an exponent. Example: 2.73E+2 <NRf>...
- Page 125 Query Syntax *ESE? Returned Parameters <NR1> 3digits Bit Position Bit Name Bit Weight CME = Command error; DDE = Device-dependent error; EXE = Execution error; OPC = Operation, complete; PON Power-on; QYE = Query error © National Instruments Corporation 125...
- Page 126 Model, Serial number, Firmware level’. Meaning and Type Identification System Interface Query Syntax *IDN? Field Information National Instruments Manufacturer Model <Vrating>-<Irating> Model ratings Returned Parameters 25B1234 Serial number, typically 7 alpha-numeric characters 3.0-C1 Revisions, <Main firmware>–<LAN/IEEE firmware> Example National Instruments,RMX20-30,25B1234, 1.0-C1 126 ni.com...
- Page 127 *OPT? The options (OPT) query returns a comma-separated list of all of the instrument options currently installed on the signal generator. Parameter Option NONE IEEE BOTH Query Syntax *OPT? Returned Parameters <CRD> © National Instruments Corporation 127...
- Page 128 RMX-410x User Manual *PSC The Power-On Status Clear (PSC) command controls the automatic power-on clearing of the Service Request Enable Register, the Standard Event Status Enable Register, and device- specific event enable registers. • ON(1) - This choice enables the power-on clearing of the listed registers. •...
- Page 129 This command resets the power supply to a defined state as shown in Table 5-7. *RST also forces an ABORt command. Command Syntax *RST Parameters None *SAV n The SAV command saves all applied configuration setting. Refer to Table 5-7. Command Syntax *SAV <NR1> Parameters 1 to 4 Query Syntax None © National Instruments Corporation 129...
- Page 130 RMX-410x User Manual *SRE Service Request Enable command. Modifies the contents of the Service Request Enable Register. Meaning and Type Service Request Enable Device Interface Command Syntax *SRE <NRf> Parameters 0 to 255 Default Value See *PSC Example *SRE 20 Query Syntax *SRE? Returned Parameters...
- Page 131 RMX-410x User Manual ABORt Resets the trigger system and places the power supply in an IDLE state without waiting for the completion of the trigger cycle. Command Syntax ABORt Parameters None Example ABOR Query Syntax None © National Instruments Corporation 131...
- Page 132 RMX-410x User Manual SCPI Subsystem Commands Subsystem commands are specific to power supply functions. They can be a single command or a group of commands. Groups are comprised of commands that extend one or more levels below the root. Commands followed by a question mark (?) take only the query form. Except as noted in the syntax descriptions, all other commands take both the command and query form.
- Page 133 (UVP), or foldback (FOLD) fault condition is detected. All conditions that generate a fault must be removed before the latch can be cleared. The output is then restored to the state before the fault condition occurred. SCPI Command Syntax OUTPut:PROTection:CLEar GEN Command Syntax None Parameters None © National Instruments Corporation 133...
- Page 134 RMX-410x User Manual OUTPut:PROTection:FOLDback Foldback mode is used to disable the output when a transition is made between the operation modes. The power supply will turn off the output after a specified delay if the power supply makes transition into CV mode or into CC mode. This feature is particularly useful for protecting current or voltage sensitive loads.
- Page 135 Selects the mode of operation of the Remote Inhibit protection. In OFF mode the power supply ignores J3-4 (ILC) status. SCPI Command Syntax OUTPut:ILC:MODE <CRD> GEN Command Syntax Parameters 0|OFF 1|ON *RST Value Examples OUTPut:ILC:MODE ON Query Syntax OUTPut:ILC:MODE? Returned Parameters ON/OFF © National Instruments Corporation 135...
- Page 136 RMX-410x User Manual OUTPut:TTLTrg:MODE Sets the operation of the Trigger Out signal to either OFF, Function Strobe or Trigger mode. Programming Mode NONE, FIX: In TRIG mode, trigger is generated when output status changes. • In Function Strobe mode, an output pulse is generated automatically any time an output parameter such as output, voltage or current is programmed.
- Page 137 Returns the power supply operation mode. When the power supply is On (OUT 1) it will return ”CV” or ”CC”. When the power supply is OFF (OUT 0) it will return ”OFF”. SCPI Query Syntax OUTPut:MODE? GEN Query Syntax MODE? Returned Parameters <CRD> CV|CC|OFF © National Instruments Corporation 137...
- Page 138 RMX-410x User Manual Instrument Subsystem The subsystem programs one or more power supplies. <NR1> from 1 to 31. INSTrument:COUPle SCPI Command Syntax INSTrument:COUPle <CRD> GEN Command Syntax None Parameters ALL|NONE INSTrument:NSELect SCPI Command Syntax INSTrument:NSELect <NRf> GEN Command Syntax ADR n (single address) Examples INSTrument:NSELect 6 Query Syntax...
- Page 139 SCPI Command Syntax [SOURce]:VOLTage:MODE <CRD> GEN Command Syntax None Parameters NONE | FIXed | LIST | WAVE *RST Value NONE Examples VOLT:MODE LIST VOLT:MODE FIX Query Syntax [SOURce]:VOLTage:MODE? Returned Parameters NONE | FIX | LIST | WAVE © National Instruments Corporation 139...
- Page 140 RMX-410x User Manual NOTE: VOLT:MODE LIST and WAVE is an implied ABORT command. WAVE mode cannot be programmed simultaneously for both Voltage and Current. Only the last sent command can be accepted as WAVE. Previous mode reverts to NONE. VOLTage:PROTection:LEVel Sets the OVP level.
- Page 141 SCPI Command Syntax [SOURce]:VOLTage:PROTection:LOW:STATe <CRD> GEN Command Syntax UVL < NRf+> , UVP < NRf+> Parameters UVL|UVP *RST Value Examples VOLT:PROT:LOW:STAT UVP Query Syntax [SOURce]:VOLTage:PROTection:LOW :STATe? Returned Parameters UVP|UVL © National Instruments Corporation 141...
- Page 142 RMX-410x User Manual VOLTage:PROTection:LOW Sets the under voltage protection (UVP) level of the power supply. SCPI Command Syntax [SOURce]:VOLTage:PROTection:LOW <NRf+> GEN Command Syntax UVL < NRf+> , UVP < NRf+> Default Suffix *RST Value Examples VOLT:PROT:LOW 2.5 VOLT:PROT:LOW MAX [SOURce]:VOLTage:PROTection:LOW [:LEVel]? Query Syntax VOLT:PROT:LOW? MIN;...
- Page 143 CURR 500 MA CURR:LEV .5 [SOURce]:CURRent[:LEVel][:IMMediate][:AMPLitude]? Query Syntax [SOURce]:CURRent? MAX [SOURce]:CURRent? MIN <NR3> CURR? returns the present programmed current level. CURR? MAX and CURR? MIN returns the maximum and minimum programmable Returned Parameters current levels. © National Instruments Corporation 143...
- Page 144 RMX-410x User Manual CURRent:MODE This command selects FIX, LIST, WAVE subsystems control over the power supply output current. SCPI Command Syntax [SOURce]:CURRent:MODE <CRD> GEN Command Syntax None Parameters NONE | FIXed | LIST | WAVE *RST Value NONE Examples CURR:MODE LIST CURR:MODE FIX Query Syntax [SOURce]:CURRent:MODE? Returned Parameters...
- Page 145 This subsystem reads the actual voltage and current. The power is a result of multiplying voltage and current measurements. MEASure:CURRent? Reads the measured output current. Returns a 6 digit string. SCPI Command Syntax MEASure:CURRent? GEN Command Syntax Parameters None Default Suffix Returned Parameters <NR3> © National Instruments Corporation 145...
- Page 146 RMX-410x User Manual MEASure:VOLTage? Reads the measured output voltage. Returns a 6 digit string. SCPI Command Syntax MEASure:VOLTage? GEN Command Syntax Parameters None Default Suffix Returned Parameters <NR3> MEASure:POWer? Reads the measured output power. Returns a 6 digit string. SCPI Command Syntax MEASure:POWer? GEN Command Syntax Parameters...
- Page 147 RMX-410x User Manual DISPlay:FLASh Makes front panel voltage and Current displays flash. SCPI Command Syntax DISPlay[:WINDow]:FLASh <bool> GEN Command Syntax none Parameters 0|OFF 1|ON Examples DISP:FLASh 1 DISP:FLASh OFF © National Instruments Corporation 147...
- Page 148 RMX-410x User Manual INITiate Subsystem INITiate Enables the trigger subsystem. If a trigger circuit is not enabled, all trigger commands are ignored. SCPI Command Syntax INITiate[:IMMediate] GEN Command Syntax None Parameters None Examples INIT:IMM Query Syntax None INITiate:CONTinuous • INIT:CONT 0 - Enables the trigger subsystem only for a single trigger action. The subsystem must be enabled prior to each subsequent trigger action.
- Page 149 INFinity. Use INF if you wish to execute a list indefinitely. SCPI Command Syntax [SOURce]:LIST:COUNt <NR1> Parameters 1 to 9999 | INFinity *RST Examples LIST:COUN 3 LIST:COUN INF Query Syntax [SOURce]:LIST:COUNt? (if count>9999 the response is INF) Returned Parameters <NR1> © National Instruments Corporation 149...
- Page 150 RMX-410x User Manual LIST:CURRent Specifies the output current points in a list. The current points are given in the command parameters, which are separated by commas. SCPI Command Syntax [SOURce]:LIST:CURRent <NRf+> {,<NRf+>} Default Suffix Examples LIST:CURR 2.5,3.0,3.5 LIST:CURR MAX,2.5,MIN up to 12 parameters Query Syntax LIST:CURRent? Returned Parameters...
- Page 151 • LIST:STEP ONCE - When triggered, it executes one step from the list. SCPI Command Syntax [SOURce]:LIST:STEP <CRD> Parameters AUTO | ONCE *RST AUTO Examples LIST:STEP ONCE Query Syntax [SOURce]:LIST:STEP? Returned Parameters AUTO | ONCE © National Instruments Corporation 151...
- Page 152 RMX-410x User Manual LIST:VOLTage Specifies the output voltage points in a list. The voltage points are given in the command parameters, which are separated by commas. SCPI Command Syntax [SOURce]:LIST:VOLTage <NRf+> {,<NRf+>} Default Suffix Examples LIST:VOLT 2.0,2.5,3.0 LIST:VOLT MAX,2.5,MIN up to 12 parameters Query Syntax LIST:VOLT? Returned Parameters...
- Page 153 Returns the value of the Condition register, which is a read-only register that holds the real- time (unlatched) operational status of the power supply. SCPI Command Syntax STATus:OPERation:CONDition? GEN Command Syntax STAT? Parameters None Returned Parameters <NR1> (Register Value) decimal Examples STAT:OPER:COND? © National Instruments Corporation 153...
- Page 154 RMX-410x User Manual STATus:OPERation:ENABle Sets the value of the Enable register. This register is a mask for enabling specific bits from the Condition register to the Event register. SCPI Command Syntax STATus:OPERation:ENABle <NRf> GEN Command Syntax SENA nnnn, SENA? Parameters 0…7FFF Returned Parameters <NR1>...
- Page 155 Condition register to the Event register. SCPI Command Syntax STATus:QUEStionable:ENABle <NRf> GEN Command Syntax FENA nnnn Parameters 0 to 32727 Returned Parameters <NR1> (Register Value) decimal Default Value Query Syntax STATus: QUEStionabl:ENABle? Examples STAT:QUES:ENAB 18 © National Instruments Corporation 155...
- Page 156 RMX-410x User Manual SYSTem Subsystem SYSTem:ERRor:ENABle Enables Error messages. SCPI Command Syntax SYSTem:ERRor:ENABle GEN Command Syntax None Parameters None Returned Parameters None SYSTem:ERRor? Returns the next error number and corresponding error message in the power supply error queue. Works as FIFO. When no error exists 0, ”No error” is returned. SCPI Command Syntax SYSTem:ERRor? GEN Command Syntax...
- Page 157 SCPI Command Syntax SYSTem:REMote[:STAte] <CRD> GEN Command Syntax Parameters LOC/0|REM/1|LLO/2 *RST Value Example SYST:REM REM Query Syntax SYST:REM? Returned Parameters LOC|REM|LLO SYSTem:VERSion? SCPI Command Syntax SYSTem:VERSion? GEN Command Syntax REV? Returned Parameters Rev:<CRD> Example Rev:1.010 © National Instruments Corporation 157...
- Page 158 RMX-410x User Manual SYSTem:DATE? SCPI Command Syntax SYSTem:DATE? GEN Command Syntax DATE? Query Syntax SYSTem:DATE? Returned Parameters <CRD> yyyy/mm/dd SYSTem:PON:TIME? Time measured from first power On. SCPI Command Syntax SYSTem:PON:TIME? Parameters Minute Example 6534 Returned Parameters <NR1> TRIGger Subsystem NOTE: The Trigger subsystem must be enabled from the Initiate subsystem or no triggering action will occur.
- Page 159 SCPI Command Syntax TRIGger[:STARt]:DELay <NRf+> GEN Command Syntax None Default Suffix *RST Value Examples TRIG:DEL .25 TRIG:DEL MAX Query Syntax TRIGger[:STARt]:DELay? Returned Parameters <NR3> © National Instruments Corporation 159...
- Page 160 RMX-410x User Manual TRIGger:SOURce Selects the power supply input trigger source as follows: • BUS (*TRG & TRIG) and Front Panel • EXT Mainframe backplane Trigger IN PIN SCPI Command Syntax TRIGger[:STARt]:SOURce <CRD> GEN Command Syntax None Parameters BUS | EXTernal *RST Value EXTernal Examples...
- Page 161 Loads Voltage or Current, Time, STEP parameter and counter values to a specific location in the memory defined by numbers <1..4>. SCPI Command Syntax [SOURce]WAVE:LOAD <NR1> Example WAVE:LOAD 3 Query Syntax none Returned Parameters 1..4 © National Instruments Corporation 161...
- Page 162 RMX-410x User Manual WAVE:STEP • WAVE:STEP AUTO - When triggered, creates waveforms consecutively, until the wave is completed. • WAVE:STEP ONCE - When triggered, it executes one step from the list. SCPI Command Syntax [SOURce]WAVE:STEP <CRD> Example WAVE:STEP AUTO Query Syntax [SOURce]:WAVE:STEP? Returned Parameters AUTO | ONCE...
- Page 163 The Busy Bit of the Status Byte will be set to 0 after this command is issued. • It will be the responsibility of the User Software to add a 20mS delay after each Global Command is issued and before any other command can be issued. © National Instruments Corporation 163...
- Page 164 RMX-410x User Manual Global Commands List Result From Command Name Description SCPI Format GEN Format Supply Enable all Outputs Output On to last V & GLOBal:OUTPut:STATe 1|ON GOUT 1 None I levels Disable all Outputs Turn outputs Off to GLOBal:OUTPut:STATe 0|OFF GOUT 0 None zero V &...
- Page 165 [:STATe] <bool> Programs the Power-ON state AST[?] :PROTection :CLEar Resets latched protection :FOLDback [:MODE] OFF|CC|CV Set operation protection mode FLD[?] :DELay <NRf+> Set protection delay FBD[?] :ILC :MODE <bool> Enables/disable analog output ON/OFF control RIE[?] :TTLTrg © National Instruments Corporation 165...
- Page 166 RMX-410x User Manual :MODE OFF|FSTR|TRIG Set output trigger mode <NC> :RELay {1|2} [:STATe] <bool> Set control pins status REL{1|2}[? :MODE? Returns the operation mode CV/CC/OFF MODE? [SOURce] :CURRent [:LEVel] [:IMMediate] [:AMPLitude] <NRf+> [:AMPLitude] <NRf+> Set the output current PC[?] :TRIGger <NRf+> Set the triggered output current <NC>...
- Page 167 Set factory default parameters FRST NOTES: • <NC> - “NO COMMAND” command/query don’t exist. • [?] – Command and query available (GEN command). • (*) – command UVP or UVL set protection or limit mode and level © National Instruments Corporation 167...
-
Page 168: Chapter 8: Advanced Functions
RMX-410x User Manual CHAPTER 8: ADVANCED FUNCTIONS Introduction This chapter describes the advanced functions of output programmable modes. There are three programmable modes: FIX, WAVE and LIST. The user can program the output transient state. The programmable modes are synchronized by input trigger (refer to section 8.5.1). According to the selected mode, the power supply activates the output trigger on J3-3 (refer to section 8.5.2). - Page 169 RMX-410x User Manual Fig.8-2: Fix Mode Sequence example LIST Mode Output change value in step determined by parameters in the LIST subsystem via input trigger. Refer to section 7.12.8 © National Instruments Corporation 169...
- Page 170 Fig.8-3: Simplified Models of LIST Mode Fig.8-4: LIST Mode Sequence example...
- Page 171 WAVE Mode Output change value in slope determined by parameters in the WAVE subsystem via input trigger. Refer to section 7.12.12. Fig.8-5: Simplified Models of Trigger in WAVE Mode...
- Page 172 Fig.8-6: WAVE Mode Sequence example...
- Page 173 Trigger Subsystem Display Function Display Parameter Level Display Description Level Level Initialization (Refer INIT init INIT iniT to command INIT) TRIG TriG ready for trigger. refer to command Continue ConT INIT:CONT BUS (via Software Trigger refer to command or front Panel), IN (input tr.
- Page 174 Input Trigger Trigger source can be set via: BUS - Command (Refer to section 7.11 *TRG, 7.12 TRIGger) or Front • Panel. EXT - Rear panel connector J3-8 (Refer to section 4.3.2). • Input Trigger source setting via Front Panel: Press MENU button.
- Page 175 Transient Waveform Example Wave Programing Select required transient operation mode Insert communication command ( Example: VOLT:MODE WAVE ). Set Voltage values Insert communication command ( Example: WAVE:VOLT 5,10,10,0 ). Set Timing values Insert communication command ( Example: WAVE:TIME 0,2,3,2 ). Set Counter value for sequence execution ( Example: WAVE:COUN 2 ).
- Page 176 Additional Examples List Example Waveform Example...
-
Page 177: Chapter 9: Status, Fault And Srq Registers
CHAPTER 9: STATUS, FAULT AND SRQ REGISTERS General This section describes various status errors (faults) and SRQ register structures. The registers can be read or set via the RS232/485/USB commands. Refer to Fig.9-1 for the Status and Fault Registers Diagram. Fig.9-1: Status and Fault Registers Diagrams (SCPI) - Page 178 Power Supply Status Structure Status and Fault Register shows the status register structure of the power supply. The Standard Event, Status Byte, and Service Request Enable registers and the Output Queue perform standard functions as defined in the IEEE 488.2 Standard Digital Interface for Programmable Instrumentation.
- Page 179 Status Register The status register sets a bit when status changes (Refer to Table 9-2). The bit is cleared when the condition is removed. Bit Number Decimal Value Bit Symbol Description Set high if Constant Voltage Operation Set high if Constant Current Operation No fault Trigger wait Auto Start Enabled...
- Page 180 Event Registers. Bits are sent to the Event register when a fault or mode change occurs. The bit remains set until the control computer reads the Event register or clears it. The control computer cannot tell if the fault or mode change occurred more than once since the last time the Event register was read.
- Page 181 Standard Event Status Group Register Functions This group consists of an Event register and an Enable register that are programmed by COMMON commands. The Standard Event register latches events relating to interface communication status. It is a read-only register that is cleared when read. The Standard Event Enable register functions similarly to the Enable registers of the Operation and Questionable status groups.
- Page 182 Device Dependent Error Set for device specific errors. These errors are entered in the System Error Queue and have error codes greater than 0. See Table 9-6 for error descriptions. Execution Error Set when a parameter exceeds its allowed range. Command Error Set for a syntax error.
- Page 183 Status Byte Register This register summarizes the information from all other status groups as defined in the IEEE 488.2 Standard Digital Interface for Programmable Instrumentation standard. The register can be read either by a serial poll or by *STB?. Both methods return the same data, except for bit 6. Sending *STB? return MSS in bit 6, while polling returns RQS in bit 6.
- Page 184 The RQS Bit Whenever the power supply requests service, it sets the SRQ interrupt line true and latches RQS into bit 6 of the Status Byte register. When the controller services the interrupt, RQS is cleared inside the register and returned in bit position 6 of the response. The remaining bits of the Status Byte register are not disturbed.
- Page 185 within the brackets is not part of the standard error message, but is included for clarification. When system errors occur, the Standard Event Status register records them as follows: Bit Set Error code Error Type Bit Set Error code Error type -100 thru -199 Command -300 thru -399...
- Page 186 Error Error Description Error Event Numb ”No Error” No Error Reported -100 ”Command Error” Unit Receives Command With Unspecified Error. -101 ”Invalid Character” A Character Was Received That Is Not: A-Z, A-Z, 0-9, ?, *, :, ;, Period, Space, CR, LF. IEEE Receives Command Parameter With Wrong Type Of Data.
-
Page 187: Chapter 10: Maintenance
CHAPTER 10: MAINTENANCE Introduction This chapter provides information about maintenance, calibration and troubleshooting. Units Under Warranty Units requiring repair during the warranty period should be returned to a NI authorized service facility. Unauthorized repairs performed by other than the authorized service facilities may void the warranty. - Page 188 Troubleshooting If the power supply appears to be operating improperly, use the troubleshooting guide to determine whether the power supply, load or external control circuits are the cause. Configure the power supply for basic front panel operation and perform the tests listed in Section 3.8 to determine whether the problem can be found with the power supply.
- Page 189 Fuse Rating There are no user replaceable fuses in the power supply. Internal fuses are sized for fault protection and if a fuse was opened it will indicate that service is required. Fuse replacement should be made by qualified technical personnel. Refer to Table 10-2 for a listing of the fuses. RMX-4101x, RMX-4102x Input AC fuse F101 250VAC, 10A, Fast acting...
-
Page 190: User Manual Index
USER MANUAL INDEX ac cables humidity 18, 22, 26 safe start 54, 58, 67, 84, 95 ac fail hyper terminal safety accessories SCPI 76, 77, 88 acknowledge shut off 49, 65, 66 address 80, ,85, 87, 102 Identification 82, 91 specifications Commands auto restart...
Need help?
Do you have a question about the RMX-41011 and is the answer not in the manual?
Questions and answers