Advertisement
Quick Links
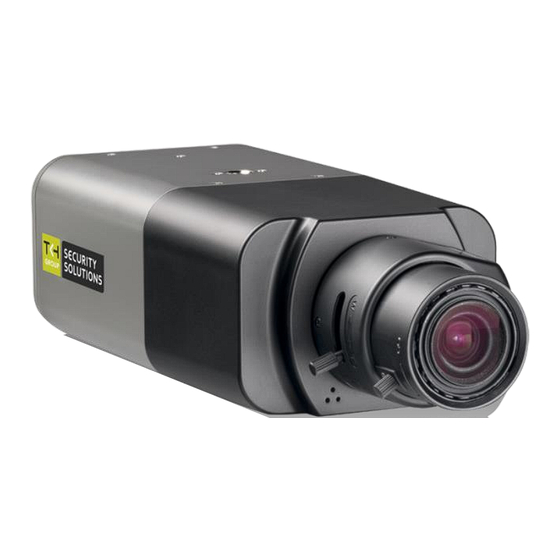
BC820v2
High-definition box camera with D/N and WDR
Quick Start Guide
Unpack
BC820v2 (lens not included)
Quick Start Guide
Figure 1 Package contents
Note: Subject to modification. Actual product and accessories may differ in appearance.
Understand the back panel
2
1
3
10
9
6
8
7
1.
BNC (Analogue video out)
6.
Reset button
2.
RJ-45 (Network and PoE)
7.
Power LED
3.
P-Iris
8.
Power connector
4.
Audio I/O
9.
Data (RS-485)
5.
microSD card (up to 64 GB)
10.
Alarm I/O
Table 1 Back panel description
© Siqura B.V. 2017
Version 1.0 (171105-1.0)
BC820v2 QSG (MW10)
Find additional manuals, the datasheet,
the EU Declaration of Conformity and the latest
firmware for this product at:
http://www.tkhsecurity.com/support-files
To mount a lens onto the camera
1.
Remove the sensor cover from the camera.
2.
Remove the protective foil from the sensor.
3.
Attach the lens to the camera.
Power connector
Figure 2 Mount a lens onto the camera.
Connect to network and power up
To power the BC820v2 with Power over Ethernet (PoE)
Connect the NETWORK RJ-45 connector on the back panel of your BC820v2 to an
appropriate PSE network switch.
Use Cat 5 Ethernet cable up to 100 m in length. Connect to a hub or switch with
straight-through cable. Use crossover cable to connect directly to a PC.
4
To power the BC820v2 with DC 12 V / DC 24 V / AC 24 V
1.
If necessary, insert the leads from your power source into the supplied power
connector (figure 1), as indicated by the connector labelling.
2.
Insert the power connector plug into the ADAPTOR connector on the back panel.
5
3.
Plug the power supply into a mains outlet.
Figure 4
Indicator LEDs
BC820v2 back panel
RJ-45 connector LEDs:
Green indicates a good network connection; orange verifies network activity.
A green power LED signifies a good power connection.
To reset the camera to the factory-default settings
With the camera powered up and using a proper tool, push and hold the reset
button for at least 20 seconds.
Important! All settings, including the IP address of the camera will be reset to
the original factory settings. The factory-set IP address can be found on the
label on the bottom of the camera.
Mount lens
P-Iris lens required!
Mount camera
Determine where you are going to install the camera.
Make sure that the provided surface has sufficient strength to support the camera.
Mount the camera, using the WM04 wall bracket sold separately for the BC series.
Adjust the angle of the camera to monitor the desired area.
Focus the lens
With the camera powered up and connected (see next steps), you can access the
web interface and use the buttons on the Home page to focus the lens as
neccessary.
You can also use an analogue video tester connected to the analogue video
output of the camera, to assess the image quality.
Log on
You can get access to the camera settings via its web interface.
Use Internet Explorer to browse the webpages.
Find the default IP address of the BC820v2 on the bottom of the camera.
The default logon user name and password (both case sensitive) are:
Admin / 1234
CAUTION: MAKE SURE THAT YOU CHANGE THE DEFAULT ADMIN PASSWORD AT
THE FIRST LOGIN. TO KEEP THE ACCOUNT SAFE, CREATE A STRONG, COMPLEX
PASSWORD. THIS HELPS TO PREVENT UNAUTHORISED ACCESS FROM PEOPLE
WHO TRY TO USE THE DEFAULT ACCOUNT.
To open communication with the camera
1.
Make an IP connection between the camera and the PC.
To achieve initial access, the network adapter of the PC must be set to the same
subnet as the camera.
2.
Type the IP address of the camera in the address bar of your browser.
3.
Enter the default user name and password (see above).
To view the webpages of the camera properly
When prompted by the camera, install the Viewer add-on.
Enable Active X controls.
http://www.tkhsecurity-usa.com
Figure 3
The BC820v2 screws
onto a WM04 mounted
wall bracket.
Figure 5 Camera IP
address in address bar
of browser
http://www.tkhsecurity.com
Advertisement

Subscribe to Our Youtube Channel
Related Manuals for TKH BC820v2


Summary of Contents for TKH BC820v2
- Page 1 Admin / 1234 CAUTION: MAKE SURE THAT YOU CHANGE THE DEFAULT ADMIN PASSWORD AT To power the BC820v2 with DC 12 V / DC 24 V / AC 24 V THE FIRST LOGIN. TO KEEP THE ACCOUNT SAFE, CREATE A STRONG, COMPLEX If necessary, insert the leads from your power source into the supplied power PASSWORD.
- Page 2 Set up alarms Use the web interface Connecting an alarm device, such as a sensor, to the BC820v2 alarm input can If microphones and speakers are implemented, the camera can be used to Use the menus across the top of the web interface to navigate the webpages.
Need help?
Do you have a question about the BC820v2 and is the answer not in the manual?
Questions and answers