Table of Contents
Advertisement
Quick Links
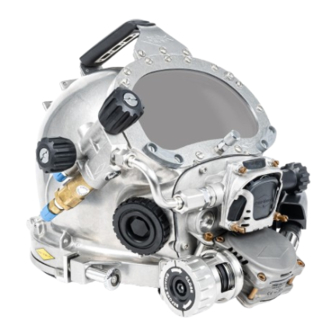
KM Diamond
DIAMD-2
DIAMD-3
1.1.1 Basic System Overview
DIAMD-3
DIAMD-3
1.1.3 Diamond Exhaust
Assembly
DIAMD-4
1.1.4 Surface Bypass Valve
Assembly
DIAMD-5
1.1.5 Water Purge Assembly
DIAMD-5
1.1.6 Specifications
DIAMD-6
DIAMD-6
DIAMD-7
1.2.2 Diamond Main Tube
DIAMD-7
1.2.3 Diamond Oral Nasal Mask
and Oral Nasal Insert
DIAMD-8
1.2.4 Diamond Exhaust
Assembly
DIAMD-8
1.2.5 Surface Bypass Valve
DIAMD-9
1.2.6 Water Shrouds
DIAMD-9
1.2.7 Constant Water Supply
System
DIAMD-9
1.2.8 Bypass Equalizer Tube
DIAMD-9
DIAMD-10
DIAMD-10
DIAMD-10
DIAMD-11
DIAMD-12
DIAMD-12
1.4.1 Supply Pressure
Requirements
DIAMD-12
DIAMD-12
1.4.3 Helmet
DIAMD-12
DIAMD-12
1.5.1 Flooding
DIAMD-13
1.5.2 Return Line System
Failure
© MMXXIV Kirby Morgan Dive Systems, Inc. All rights reserved. Document # 240701019
KM Diamond
Contents
DIAMD-13
DIAMD-13
DIAMD-13
DIAMD-14
DIAMD-14
DIAMD-15
DIAMD-16
DIAMD-16
DIAMD-16
DIAMD-17
DIAMD-17
DIAMD-18
DIAMD-19
DIAMD-19
DIAMD-19
DIAMD-19
DIAMD-20
DIAMD-21
DIAMD-22
DIAMD-22
DIAMD-24
DIAMD-1
Advertisement
Table of Contents

Related Manuals for Kirby Morgan Diamond


Summary of Contents for Kirby Morgan Diamond
-
Page 1: Table Of Contents
1.6.12.3 Removal of the Inhale DIAMD-12 1.5.1 Flooding Regulator Shroud & Access DIAMD-13 1.5.2 Return Line System Cover Failure DIAMD-24 1.6.12.4 Removal of the Side Block Shroud DIAMD-1 © MMXXIV Kirby Morgan Dive Systems, Inc. All rights reserved. Document # 240701019... - Page 2 DIAMD-2 © MMXXIV Kirby Morgan Dive Systems, Inc. All rights reserved. Document # 240701019...
-
Page 3: General Information About The Km Diamond
(850) 235-2715 or Kirby Morgan Pro- training for the Diamond Exhaust Assembly fessional Dive Center www.kirbymorganpro.com, should perform service or repair work. IMPORTANT (805) 739-1909 DIAMD-3 © MMXXIV Kirby Morgan Dive Systems, Inc. All rights reserved. Document # 240701019... - Page 4 BYPASS EQUALIZER TUBE SURFACE BYPASS VALVE SURFACE BYPASS VALVE BRACKET Blue towards control valve. NOTE SURFACE BYPASS HOSE DIAMD-4 © MMXXIV Kirby Morgan Dive Systems, Inc. All rights reserved. Document # 240701019...
- Page 5 This valve can also open when silicone, PP, Buna N. the helmet experiences excessive gas flow or is over pressured by the diver using the defogger • Recommended Lubricants: Christo-Lube ® valve. DIAMD-5 © MMXXIV Kirby Morgan Dive Systems, Inc. All rights reserved. Document # 240701019...
-
Page 6: Components
Diamond System that is not Titanium. Diamond Pod distinct characteristics: • Inhalation regulator body is part of the pod • Oral Nasal Mount attaches directly to the pod • Contains two port plugs DIAMD-6 © MMXXIV Kirby Morgan Dive Systems, Inc. All rights reserved. Document # 240701019... - Page 7 The Flex Knob will stop in the counter clockwise position (turning the knob away from helmet). This is the position that indicates the tension of the bias adjustment spring is at its least amount DIAMD-7 © MMXXIV Kirby Morgan Dive Systems, Inc. All rights reserved. Document # 240701019...
- Page 8 NPT female stainless steel fitting. This type of ter- mination allows the diver to use the NPT threads to mate the desired fitting specific to the job or location. DIAMD-8 © MMXXIV Kirby Morgan Dive Systems, Inc. All rights reserved. Document # 240701019...
-
Page 9: Exhaust Hose
The exhaust (reclaim) hose is connected to the helmet by your choice of fitting adapters. The 1/2" NPT hose fitting adapter comes standard on the Surface Bypass Valve. DIAMD-9 © MMXXIV Kirby Morgan Dive Systems, Inc. All rights reserved. Document # 240701019... -
Page 10: Pre-Dive Procedures
Any bubbles will indicate a point of potential wa- INHALE REGULATOR SHROUD SIDE BLOCK SHROUD WATER INLET ADAPTER SLEEVE ACCESS WATER TUBE-B COVER WATER TUBE-A DIAMOND VALVE SHROUD Water Shrouds DIAMD-10 © MMXXIV Kirby Morgan Dive Systems, Inc. All rights reserved. Document # 240701019... -
Page 11: Topside
(counter-clockwise). the end of the exhaust. It must also be secured to This will help to improve exhaust flow. a permanent fixture during operations. DIAMD-11 © MMXXIV Kirby Morgan Dive Systems, Inc. All rights reserved. Document # 240701019... -
Page 12: Operating Instructions
The helmet should be pressure tested prior to the cated low on the left side of the helmet. By plac- beginning of each diving day and includes: DIAMD-12 © MMXXIV Kirby Morgan Dive Systems, Inc. All rights reserved. Document # 240701019... -
Page 13: Diamond Subassemblies Removal
Valve by ro tating the control knob out and • Open End Wrenches away from the Diamond exhaust assembly in this 11/ 1 6 (2), 7/8 and 15/ 1 6 inch DIAMD-13 © MMXXIV Kirby Morgan Dive Systems, Inc. All rights reserved. Document # 240701019... -
Page 14: Removing Diamond Components
It is also possible to push up on the lower ends of • Needle nose pliers the screws, found on the underside of the exhaust assembly by turning the helmet upside down and using an Allen key. DIAMD-14 © MMXXIV Kirby Morgan Dive Systems, Inc. All rights reserved. Document # 240701019... -
Page 15: Removal Of The Surface Bypass Valve
1. Remove the two 3/ 1 6" inch screws located at the base of the Surface Bypass Valve body. At this point the assembly will be completely free from the system and easily handled. DIAMD-15 © MMXXIV Kirby Morgan Dive Systems, Inc. All rights reserved. Document # 240701019... -
Page 16: Removing The Surface Bypass Hose
• Soft Jawed Vice (Optional) Removing or replacing the exhaust hose fitting is best to be done when the main body is not at- tached to the helmet bracket. DIAMD-16 © MMXXIV Kirby Morgan Dive Systems, Inc. All rights reserved. Document # 240701019... -
Page 17: Removal Of The Water Purge Assembly
O-ring. Be careful not to lose the O- 2. Push the main body of the Water Purge As- ring. sembly into the helmet shell interior. DIAMD-17 © MMXXIV Kirby Morgan Dive Systems, Inc. All rights reserved. Document # 240701019... -
Page 18: Removing The Diamond Oral Nasal Mask And Oral Nasal Insert
Assembly MUST be removed. For guidance in disassembly of the NOTE internal components of the Diamond Main Tube see "1.5 455 Balanced NOTE Regulator Reassembly" on page 455BAL-14 DIAMD-18 © MMXXIV Kirby Morgan Dive Systems, Inc. All rights reserved. Document # 240701019... -
Page 19: Removing The Oral Nasal Mount
• 3/8 inch Nut Driver or 3/8 inch Open End Wrench Tools Required: • Hex Keys (Ball end is helpful) 7/ 6 4 and 5/ 3 2 inch DIAMD-19 © MMXXIV Kirby Morgan Dive Systems, Inc. All rights reserved. Document # 240701019... -
Page 20: Removal Of The Water Shrouds
5. Remove the nose block device as per "1.2.1 the pod, or loosening of the fasteners. Nose Block Assembly Removal" on page FCPRT-6. 1.6.12 Removal of the Water Shrouds Tools required: DIAMD-20 © MMXXIV Kirby Morgan Dive Systems, Inc. All rights reserved. Document # 240701019... -
Page 21: Removal Of The Diamond Valve Shroud
4. Side Block Shroud valve body at the opposite side of the Overpres- sure Relief Valve. 1. Use the diagonal cutters to cut the tie wrap and remove. DIAMD-21 © MMXXIV Kirby Morgan Dive Systems, Inc. All rights reserved. Document # 240701019... -
Page 22: Removal Of The Water Tube A & B With Adapter Sleeves
1. Remove the access cover by using a 7/64" Allen and inhalation regulator shrouds. wrench or similar blunt pin type tool, to push the pin through the two shrouds. DIAMD-22 © MMXXIV Kirby Morgan Dive Systems, Inc. All rights reserved. Document # 240701019... - Page 23 Exit path is over the flex knob and to the left side of the helmet. DIAMD-23 © MMXXIV Kirby Morgan Dive Systems, Inc. All rights reserved. Document # 240701019...
-
Page 24: Removal Of The Side Block Shroud
5. Pull the shroud off of the side block, starting from the steady flow end and working toward the back portion of the side block. 6. Remove shroud completely. DIAMD-24 © MMXXIV Kirby Morgan Dive Systems, Inc. All rights reserved. Document # 240701019... -
Page 25: Installing Hex Insert
NOTE Nasal Mount and Diamond Main Tube MUST be REMOVED before installing the POD. Understanding the POD system All six mounting screws should be inserted into DIAMD-25 © MMXXIV Kirby Morgan Dive Systems, Inc. All rights reserved. Document # 240701019... -
Page 26: Installing The Diamond Main Tube
Make sure the HEX flat area aligns to the mating HEX in the regulator body. DIAMD-26 © MMXXIV Kirby Morgan Dive Systems, Inc. All rights reserved. Document # 240701019... -
Page 27: Testing Demand Regulator For Correct Adjustment
Bent Tube Adapter must be removed. The Ac- psig (9.3–10.3 bar). cess Cover should be opened prior to starting the below procedure. 1. Rotate the Flex Knob in towards the helmet Tools Required: DIAMD-27 © MMXXIV Kirby Morgan Dive Systems, Inc. All rights reserved. Document # 240701019... -
Page 28: Installation Of The Water Purge Assembly
Tighten the adapter in accordance with the torque specification. See "Torque Specs" module. 2. Install/verify the O-ring is on the Water Purge Assembly’s main body; later versions of this as- DIAMD-28 © MMXXIV Kirby Morgan Dive Systems, Inc. All rights reserved. Document # 240701019... - Page 29 5. Screw the Retainer Ring onto the Water Purge Assembly from outside the helmet. Tighten by hand until snug against the helmet. NEVER use a wrench to tighten the ring. DIAMD-29 © MMXXIV Kirby Morgan Dive Systems, Inc. All rights reserved. Document # 240701019...
-
Page 30: Installation Of The Surface Bypass Valve
2. Insert screws into the rear mounting hole and bring the Surface Bypass Valve body up to the associated bracket. 3. Use the Allen Wrench to install the backmost DIAMD-30 © MMXXIV Kirby Morgan Dive Systems, Inc. All rights reserved. Document # 240701019... -
Page 31: Installing The Purge Valve In The Km Diamond Pod
NOTE may be rotated, as an adjustment, to help align the two components. DIAMD-31 © MMXXIV Kirby Morgan Dive Systems, Inc. All rights reserved. Document # 240701019... -
Page 32: Installing The Oral Nasal Mount
(tabs side) facing the opening of the slot and the angled end furthest away. The longest edge of the angled portion of DIAMD-32 © MMXXIV Kirby Morgan Dive Systems, Inc. All rights reserved. Document # 240701019... -
Page 33: Installing The Diamond Oral Nasal Mask And Oral Nasal Insert
Insert. It is very important to install the NOTE Diamond Oral Nasal Mask correctly. INCORRECT Correct Correct installation of the oral nasal valve is extremely important to your safety. DIAMD-33 © MMXXIV Kirby Morgan Dive Systems, Inc. All rights reserved. Document # 240701019... - Page 34 The lower mounting area of the Oral Nasal Insert is pressed to fit and is held in the correct place by the snug fit of the area. NOTE DIAMD-34 © MMXXIV Kirby Morgan Dive Systems, Inc. All rights reserved. Document # 240701019...
-
Page 35: Installation Of The Water Shrouds
Diamond component must be installed prior to installing another. If complete installation of DIAMD-35 © MMXXIV Kirby Morgan Dive Systems, Inc. All rights reserved. Document # 240701019... -
Page 36: Installation Of The Side Block Shroud
Allen head screws that hold the pod onto the helmet. 3. Align the access cover to the inhale regulator shroud. Install the pin into the right side (over DIAMD-36 © MMXXIV Kirby Morgan Dive Systems, Inc. All rights reserved. Document # 240701019... -
Page 37: Installation Of The Water Tubes A & B With Adapter Sleeves
Little to no gap should be evident between the two tubes. Gas flow arrow is found on the A tube and should be positioned farthest away from the helmet. DIAMD-37 © MMXXIV Kirby Morgan Dive Systems, Inc. All rights reserved. Document # 240701019... -
Page 38: Installation Of The Diamond Valve Shroud
3. With the access cover open insert and install the Diamond Exhaust Assembly into the Diamond Pod. See "1.7.3 Installation of the Diamond Pod" on page DIAMD-25 for installation details. DIAMD-38 © MMXXIV Kirby Morgan Dive Systems, Inc. All rights reserved. Document # 240701019... - Page 39 4. Close the access cover on the water shrouds. It is helpful to lightly lubricate the Bishop Pins occasionally to make opening and closing of the access cover a little easier. NOTE DIAMD-39 © MMXXIV Kirby Morgan Dive Systems, Inc. All rights reserved. Document # 240701019...
Need help?
Do you have a question about the Diamond and is the answer not in the manual?
Questions and answers