Advertisement
Table of Contents
- 1 Table of Contents
- 2 Packing List
- 3 Printer Introduction
- 4 3D Printer Tech Specs
- 5 Device Self-Check
- 6 Test Printing
- 7 Software Installation and Setup
- 8 Network Management Center
- 9 AI Camera
- 10 Resin Calibration
- 11 Firmware Upgrade
- 12 Faq
- 13 Machine Maintenance
- 14 Warranty Statement
- Download this manual
Advertisement
Table of Contents

Related Manuals for Elegoo Mars 5 Ultra


Summary of Contents for Elegoo Mars 5 Ultra
- Page 1 ●Mars 5 Ultra 3D Printer User Manual...
- Page 2 After receiving the product, please confirm whether the equipment is intact and the accessories are complete. If there is any damage or missing, please timely contact us at 3dp@elegoo.com. (To ensure the performance of each product, each product will undergo strict printing tests before leaving the factory. There may be some...
- Page 3 ●Please use 95% (or higher) ethyl alcohol or isopropyl alcohol to wash your model unless you are using water washable resin. ●If you have any problems with the printer, please contact us at 3dp@elegoo.com. Please do not disassemble or modify ELEGOO 3D printers by yourself, otherwise, the warranty will expire, and damage caused by personal...
-
Page 4: Table Of Contents
Contents Packing List Printer Introduction 3D Printer Tech Specs Device Self-Check Test Printing Software Installation and Setup Network Management Center AI Camera Resin Calibration Firmware Upgrade Machine Maintenance Warranty Statement... -
Page 5: Packing List
Packing List Wifi Antenna Build Plate Resin Tank AI Camera Resin Tray USB Flash Disk Mars 5 Ultra 3D Printer Mask Gloves Funnel Backup Screws User Manual Adapter Tool Kit Scraper... -
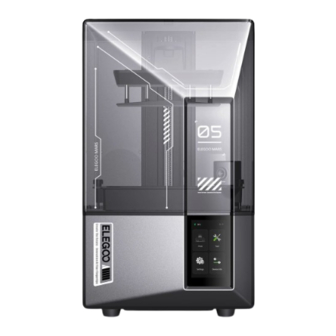
Page 6: Printer Introduction
Printer Introduction Handle Build Plate Z Axis LCD Display Screen Resin Tank Touch Screen AI Camera Screw Knob Wifi Antenna DC Socket Switch USB Interface... - Page 7 Printer Introduction Anti-UV Cover Extension Port (Connect peripherals, such as a mini heater and other compatible printer accessories)
-
Page 8: 3D Printer Tech Specs
3D Printer Tech Specs Printing Parameter Hardware Specification ●System: EL3D-4.0 ●Dimension: 260mm(L)*268mm(W)*451.5mm(H) ●Operation: 4.0-inch Capacitive Touch Screen ●Build Volume: 153.36mm(L)*77.76mm(W)*165mm(H) ●Slicer Software: CHITUBOX ●Package Size: 555mm(L)*340mm(W)*370mm(H) ●Connectivity: USB Interface & WiFi ●Gross Weight: 10.8KG ●AI Camera: Built-in 1920*1080 Resolution ●Net Weight: 8.8 KG Printing Specification ●Technology: MSLA Stereolithography ●Light Source: COB Light Source (wavelength 405nm) -
Page 9: Device Self-Check
Device Self-Check Note: Upon startup, the printer conducts a self-check on key hardware components to prevent any printing failures due to hardware malfunctions. Please refer to the error prompts on the machine to troubleshoot the printer. Do not touch the printer during the self-check process. (See Picture 1) Accumulated release film usage Check device prompts for printer status... -
Page 10: Test Printing
The tray prevents resin drips onto the machine when removing the build plate. Then, lift the handle to take out the build plate, and use a scraper to remove the model. You can use ELEGOO's cleaning and curing machine to post-process the model. -
Page 11: Software Installation And Setup
2. How to Use CHITUBOX (See Picture 3) After the installation is complete, run the CHITUBOX software. Select ELEGOO Mars 5 Ultra as your default printer and click "Next" to enter the “Printer Settings” page. - Page 12 Software Installation and Setup 3.2 Resin Parameter (See Picture 4) Resin Density: 1.1g/ml Resin Cost: You can input the real price of the resin you purchased, and the slicing software can calculate the resin costs for each model you print. (Picture4) (Picture5) 3.3 Parameters (See Picture 5)
-
Page 13: Network Management Center
Network Management Center 1. Open the slicing software and click in the upper right corner to enter "Network Management Center" (You need to download and install ChituManager for first time use.) (See Picture 6) (Picture6) 2. After entering the Network Management Center, click "Add Printer" to associate the printer (make sure the computer and printer are in the same LAN). -
Page 14: Ai Camera
AI Camera 1. In the printer management interface, you can turn on the AI camera to observe the printing situation in real time. You can also choose whether to activate the time-lapse photography feature before starting a print. The generated time-lapse videos can be saved in the history records. (See Picture 8) (Picture8) Notes:... -
Page 15: Resin Calibration
Resin Calibration Choose the appropriate section mode for the model (the screen exposure area will be divided into 4, 6, or 8 equal sections depending on the selected mode). Click the "+" button to import the sliced model (please ensure that the model is not placed on the section boundaries, refer to Picture 10 for the section positions). Set the exposure time for each section, starting from Zone 1 (the exposure times for each section should be set in a decreasing or equal manner). - Page 16 Resin Calibration 0 (mm) 76.68 153.36 0 (mm) 51.12 102.24 153.36 38.88 38.88 77.76 77.76 (4-Section Mode) (6-Section Mode) 0 (mm) 38.34 76.68 115.02 153.36 38.88 77.76 (8-Section Mode) (Picture10)
-
Page 17: Firmware Upgrade
Firmware Upgrade 1. Local Upgrade Download the local upgrade firmware package file to a USB flash drive in advance. Insert the USB flash drive into the printer, click "Settings," then click "Version Upgrade," and select "Local Upgrade." Select the version to upgrade and click "Confirm"... -
Page 18: Faq
Build plate or resin tank is not fastened. 3. Abnormal Screen Exposure If your printer doesn't work please contact us at 3dp@elegoo.com. and as to better help and solve problems for you, please add your order ID in your email. - Page 19 6. Why do I get resin insufficient or exceeding maximum volume error when starting a print At the beginning of the print, the mechanical sensor detects the remaining resin in the tank. To ensure smooth printing, the resin level must be above one-third of the tank volume. Additionally, the resin level should not exceed the MAX line to prevent leakage.
-
Page 20: Machine Maintenance
Machine Maintenance ●Please do not use sharp or pointy tools to scrape the resin tank to avoid damaging the release liner film. ●Please clean up the resin tank before changing the resin to another color. ●Before and after printing, clean the build plate with paper towels or alcohol to ensure that there are no bumps or burrs on the build plate. -
Page 21: Warranty Statement
Warranty Statement ●From the date of purchase, ELEGOO printer is entitled to a 1-year free warranty service, except for consumables of the LCD screen and the release film. ●The LCD screen enjoys a 6-month free warranty service. ●The free warranty does NOT include problems caused by self-disassembly and improper use, and wear and... - Page 22 ●Telephone--0755-21005141 ●Mailbox--3dp@elegoo.com ●Website--www.ELEGOO.com ●Address--101, No.30 Dahe Industrial Park, Guancheng Community, Guanhu Street, Longhua District, Shenzhen, China...
Need help?
Do you have a question about the Mars 5 Ultra and is the answer not in the manual?
Questions and answers