Gardena 4700/2 inox (9025-29) - Pressure Pump Manual
- Operator's manual (55 pages) ,
- Operator's manual (26 pages) ,
- Operator's manual (10 pages)
Advertisement
ASSEMBLY

Risk of injury!
Injury when the product starts accidentally.
- Disconnect the product from the mains before you assemble the product.
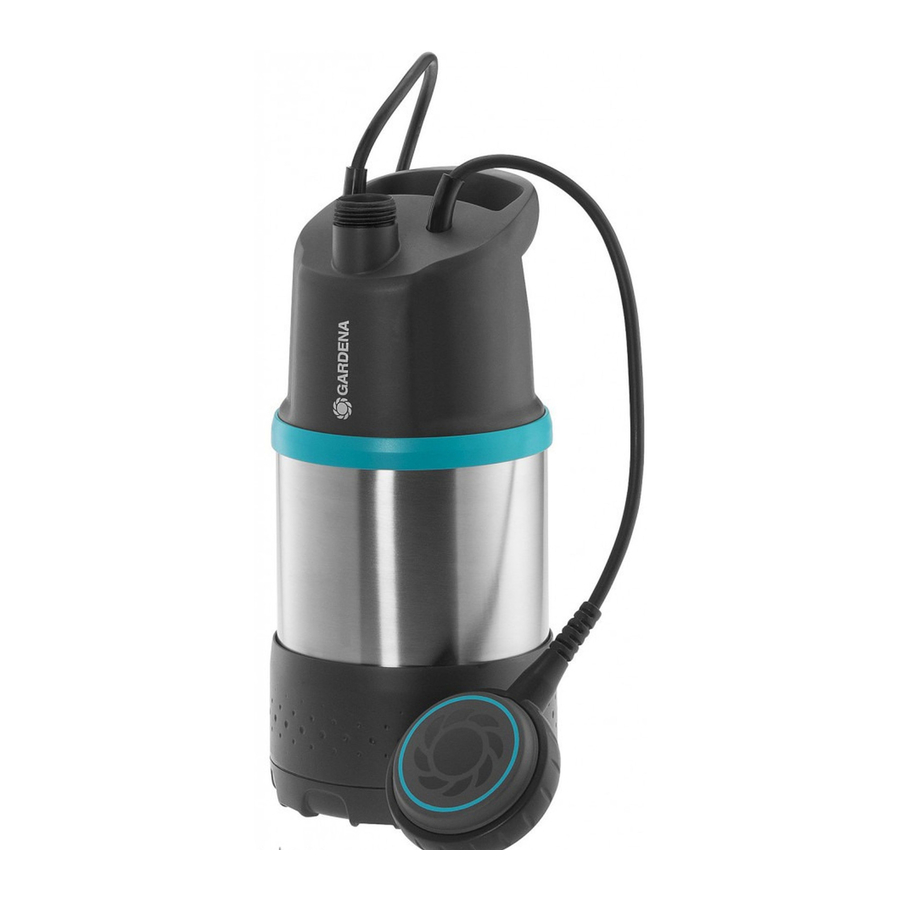
The hose can be connected via the pump connection  and the connection nipple
  [19 mm (3/4") / 25 mm (1")] or via the GARDENA Connection System [13 mm (1/2") / 16 mm (5/8") / 19 mm (3/4")]. When using a 25 mm (1") hose, the pump has the maximum delivery capacity.
With a parallel connection of more than one hose or connected devices, the GARDENA 2- / 4-Way Valve (Art. 1210 / 1194) can be used, which is screwed straight onto the pump connection .

Connect hose via connection nipple [Fig. A1]:
25 mm (1")- and 19 mm (3/4") hoses can be connected via the connection nipple .
| Hose diameter | 25 mm (1") | 19 mm (3/4") |
| GARDENA Hose Clamp | Art. 7192 | Art. 7191 |
| Hose connection [Fig. A1] |  Detach nipple at  [Fig. A2]. [Fig. A2]. |  Do not detach nipple [Fig. A3]. |
25 mm (1")- and 19 mm (3/4") hoses connected with a connection nipple must be fastened, for example with a GARDENA Hose Clamp Art. 7192 / 7191.
- [Fig. A4]: Put the float switch locking
![]() on the pump connector
on the pump connector ![]() .
.
![]()
- Screw connection nipple
![]() onto the pump connection
onto the pump connection ![]() . (With 25 mm (1") hoses, first disconnect the connection nipple
. (With 25 mm (1") hoses, first disconnect the connection nipple ![]() at
at ![]() .)
.) - Push the hose onto the connection nipple
![]() and fix e. g. with a GARDENA Hose Clamp Art. 7192 / 7191.
and fix e. g. with a GARDENA Hose Clamp Art. 7192 / 7191.

OPERATION
Risk of injury!
Injury when the product starts accidentally.
- Disconnect the product from the mains before you connect, adjust or transport the product.
To pump water
[Fig. O1]: The pump must always be submerged in the well or water reservoir with the rope provided. For the pump to be primed, the pump must be submerged at least 60 mm. So that the filter does not become dirty, the pump should be fixed at least 30 cm above the ground.

- Attach the rope
![]() securely to the handle
securely to the handle ![]() .
. - Submerge the pump in the well or water reservoir via the rope
![]() .
. - Secure the rope
![]() .
. - With deep wells or shafts (from approx. 5 m), route the connection cable
![]() along the rope
along the rope ![]() with clips.
with clips. - Connect the pump to the mains.
The pump starts approx. 3 sec. after connecting the connection cable.
 securely to the handle
  .
. along the rope
 The pump is ready for operation.
Automatic mode with float switch
[Fig. O2]: So that the pump automatically switches off when there is no liquid to pump, the Float Switch  must be able to freely move on the surface of the water.

To adjust the Cut-in and Cut-out Height
[Fig. O3]: The maximum cut-in height and minimum cut-out height (see "TECHNICAL DATA") can be adjusted by pushing the float switch wire into the float switch lock  .
.

- The shorter the length of cable between the float switch
![]() and the float switch lock
and the float switch lock ![]() , the lower the cut-in height and the higher the cut-out height.
, the lower the cut-in height and the higher the cut-out height.
- Push the cable of the float switch
![]() into the opening in the float switch lock
into the opening in the float switch lock ![]() .
.

In order to ensure that the float switch is able to switch on and off, the cable length between the float switch and the float switch lock must be at least 10 cm.
Manual operation
[Fig. O4]: The pump remains permanently in operation because the float switch is bypassed. This deactivates the dry-running protection of the pump.

- Push the float switch
![]() onto the float switch locking
onto the float switch locking ![]() with the cable downwards.
with the cable downwards. - Immerse the pump in a well or shaft using a rope attached to the pump.
- Connect the pump to the mains.
Attention! The pump begins operating immediately.
The minimum residual water depth (see "TECHNICAL DATA") is only achieved in manual mode because the float switch already switches off the pump before this when in automatic mode.
MAINTENANCE
Risk of injury!
Injury when the product starts accidentally.
- Disconnect the product from the mains before you maintain the product.
To clean the filter
[Fig. M1]: In order to ensure continuous trouble-free operation, the filter  should be cleaned at regular intervals.

After pumping dirty water, the filter must be cleaned immediately.
- Turn the filter
![]() 1/4 turn clockwise and remove it (bayonet lock).
1/4 turn clockwise and remove it (bayonet lock). - Clean the filter
![]() under running water.
under running water. - Re-install the filter
![]() in the opposite sequence.
in the opposite sequence.
The pump must not be operated without the filter.
To flush the unit
After pumping chlorinated water, the pump must be flushed.
- Pump lukewarm water (max. 35°C), possibly adding a mild cleaning agent (e. g. detergent) until the pumped water runs clear.
- Remove residuals according to the waste disposal laws applicable in your area.
STORAGE
To put into storage:
The pump is not frost-proof!
The product must be stored away from children.
- Disconnect the pump from the mains.
- Turn the pump upside down until no more water runs out.
- Clean the pump (see "MAINTENANCE").
- Store the pump in a dry, enclosed and frost-free place.
TROUBLESHOOTING
Risk of injury!
Injury when the product starts accidentally.
- Disconnect the product from the mains before you troubleshoot the product.
| Problem | Possible Cause | Remedy |
The unit is running but doesn't deliver water | Air cannot escape, because the pressure line is closed. (Pos sible kink in the pressure hose.) |
|
| Air in suction foot. |
| |
| Filter is clogged. |
| |
| Water level below minimum water level when put into operation. |
|
SAFETY
 This product may be used under supervision, or if instruction regarding the safe use of the product has been provided and the resulting dangers have been under stood, by children aged 8 and above, as well as by persons with physical, sensory or mental disabilities or a lack of expe rience and knowledge. Children must not be allowed to play with the product. Cleaning and user maintenance must not be performed by children without supervision. The use of this product by young people under the age of 16 is not recom mended. Never operate the product when you are tired, ill or under the influence of alcohol, drugs or medicine.
Intended use
The GARDENA Submersible Pressure Pump is intended for the extraction of water from wells, shafts and other water reservoirs, for the operation of irrigation equipment and systems, also for pumping rainwater, tap water and water containing chlorine in private domestic gardens and allotments.
Liquids to be pumped:
The GARDENA Submersible Pressure Pump must only be used to pump water. The pump is fully submersible (water-tight encapsulation) and is submerged in water (for max. submersion depth, see "TECHNICAL DATA"). The product is not intended for long term use (continuous circulation operation).
Risk of injury!
The pump should not be used for the delivery of salt water, muddy water, corrosive, easily inflammable or explosive liquids (e. g. petrol, paraffin, thinners), oil, heating oil or foodstuffs.

Read the operator's manual carefully before use and keep for future reference.
General safety warnings
Electrical safety

Electric shock!
Risk of injury due to electric current.
- The product must be supplied through a residual current device (RCD) having a rated residual operating current not exceeding 30 mA.
Risk of physical injury!
Risk of injury due to electric current.
- Disconnect the product from the mains before you maintain or replace parts. Thereby the disconnected socket must be in the visual range.
Safe operating practices
The water temperature should not exceed 35°C.
The pump must not be used when people are in the water.
Pollution of the liquid could occur due to leakage of lubricants.
Circuit breakers
Dry-running protection:
If the water level is too low, the pump switches off automatically.
- Submerge the pump deeper into the water.
Thermal protection switch:
In the event of an overload, the pump is switched off by the built-in thermal motor protection. After sufficient cooling of the motor, the pump is operational again.
Automatic venting
This pump is equipped with a vent valve which eliminates any air pockets in the pump. Depending on the function, a small amount of water can escape below the handle.
Additional safety warnings
Electrical safety
Cardiac arrest!
This product makes an electromagnetic field while it operates. This field may under some conditions interfere with active or passive medical implants. To decrease the risk of conditions that can possibly injure or kill, we recommend persons with medical implants to speak with their physician and the medical implant manufacturer before you operate the product.
Cables
If extension cables are used, these must comply with the minimum cross- sections in the table below:
| Voltage | Cable length | Cross section |
| 230 – 240 V / 50 Hz | Up to 20 m | 1.5 mm2 |
| 230 – 240 V / 50 Hz | 20 – 50 m | 2.5 mm 2 |
Electric shock!
With a cut off mains plug, moisture can get into electrical parts via the mains cable and cause a short circuit.
- Never cut the mains plug off (e. g. to feed through wall).
- Don't use the power cable for plugging off.
- If the supply cord is damaged, it must be replaced by the manufacturer, its service agent or similarly qualified persons in order to avoid a hazard.
Mains plug and extension connections must be protected from water splashes.
Ensure that the electrical connections for plugs and sockets are made in areas safe from flooding.
Protect the mains plug and the mains power cable from heat, oil and sharp edges.
Observe the mains voltage. The information on the nameplate must be in agreement with the data for the mains power grid.
The pump's mains plug must be disconnected before anybody enters the swimming pool.
The mains power cable must not be used for fastening or transporting the pump.
For submerging or lifting / securing the pump, please use the fastening rope.
Please regularly check the connecting line.
Before using, always subject the pump (especially the power cables and the power connections) to a visual inspection.
A pump which is damaged should not be used. In the event of damage, have the pump checked by GARDENA Service.
Do not disassemble the pump any further than the delivery condition.
Before use after maintenance, make sure that all parts are screwed together. When using our pumps with a generator, the warnings of the generator manu facturer must be observed.
Personal safety
Risk of suffocation!
Small parts can be easily swallowed. There is also a risk that the polybag can suffocate toddlers. Keep toddlers away when you assemble the product.
Observe the minimum water level in accordance with the characteristics given for the pump.
Allow the pump to run no longer than 10 minutes against a closed pressure side.
Sand and other abrasive substances cause increased wear and reduce the pump's output.
The pump must not be operated without the filter.
The hose must not be disconnected during operation.
Allow the pump to cool down before troubleshooting.
Documents / ResourcesDownload manual
Here you can download full pdf version of manual, it may contain additional safety instructions, warranty information, FCC rules, etc.
Download Gardena 4700/2 inox (9025-29) - Pressure Pump Manual
Advertisement


Need help?
Do you have a question about the 4700/2 inox and is the answer not in the manual?
Questions and answers