Gardena FP 1400 E, FP 2500 E, FP 5000 E - Fountain Pump Set Manual
- Operating instructions manual (13 pages) ,
- Operating instructions manual (36 pages)
Advertisement
Introduction
Welcome to the Garden of GARDENA...
Please read these operating instructions carefully and observe the notes given. Use the instructions to familiarise yourself with the equipment, the operating controls, their correct use, and the notes on safety.
Keep these operating instructions in a safe place.
 For safety reasons, children under 16 as well as persons not familiar with these operating instructions should not use this Fountain Pump Set.
Where to use Your GARDENA Fountain Pump Set
Intended Use
GARDENA Fountain Pumps have been designed for private use.
They are not designed for operating watering tools and systems.
The pumps may be used indoors as well as outdoors.
 GARDENA Fountain Pumps have not been designed for constant use in the industrial sector. Corrosive, easily combustible, aggressive or explosive substances (e.g. petrol, petroleum, nitro thinner) as well as salt-water or food / drinking water must not be pumped. |
For Your Safety
Electrical Safety
The pump should be operated via a residual current device with a residual current rating of ≤ 30 mA (DIN VDE 0100 -702 and 0100 -738).
The pump must be placed on solid, even ground.
- Please ask your electrician for his advice.
Always disconnect the pump from the mains before undertaking any work on it.
Mains power cables should not have a smaller cross-section than a rubber sheathed cable of the designation H05 RN-F3G0,75 (FP 4000 E, FP 5000 E, FP 7500 E: H05 RN-F3G1,0). Extension cables must meet the requirements of DIN VDE 0620.
Check line voltage. Data indicated on the type plate must match technical data of the mains supply.
The pump must not be operated when there are people in the water. Swimming pools and garden ponds should be designed according to international and national design regulations.
- Please consult a professional electrician.
For Austria:
Pumps for use on swimming pools and on ponds may only be operated via an isolating transformer. - Please consult a professional electrician.
For Switzerland:
In Switzerland mobile appliances which are used outdoors, must be connected via a residual-current device.
Note : Do not allow the pump to run without water because dry-running leads to an undesirable build up of heat.
Before operating the pump, look to see if there is any damage of the pump (esp. regarding power cable and plug). The connection cable of the pump cannot be replaced. If the cable is damaged the pump must be scrapped.
Do not use the power cable to carry the pump or to pull the plug out of the socket. Protect the power cable from heat, oil and sharp edges.
The temperature of the liquid used must not be below 4°C or above 35°C.
Sand and other abrasive substances in the liquid cause increased wear and reduce the output of the pump.
Please observe the local noise prevention regulations.
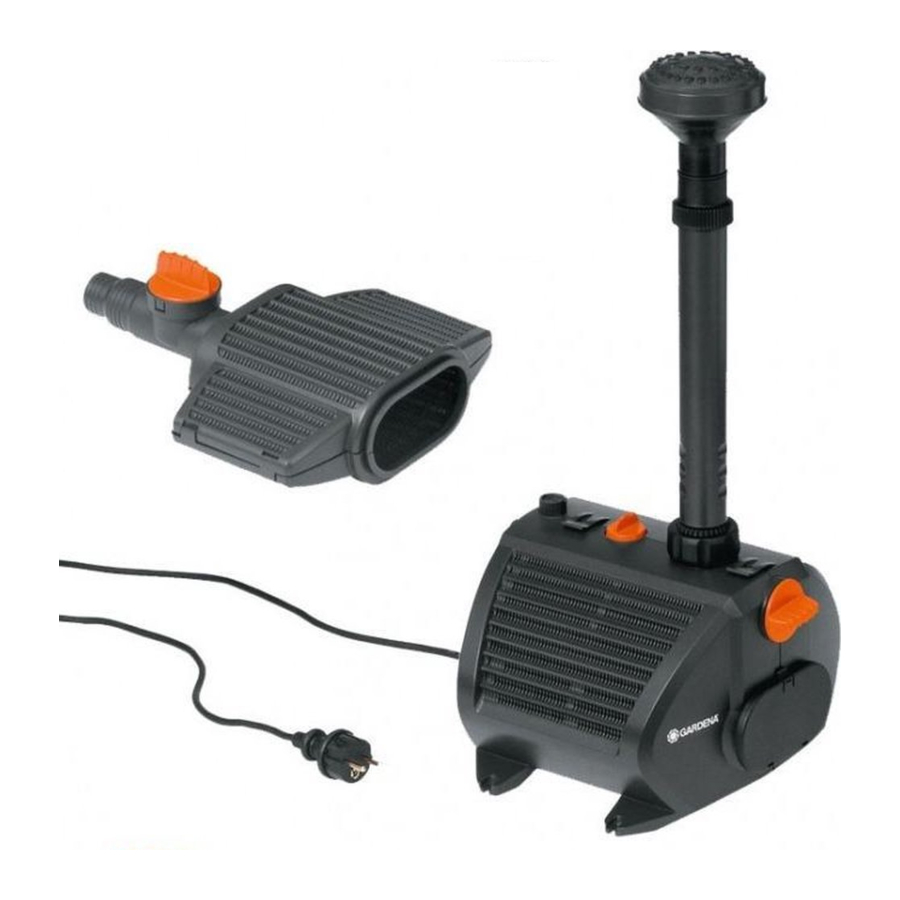
Assembly
Fit the pump

To provide a firmer mounting, the filter housing can be attached to a solid base (e.g. paving stone).
- Screw nozzle pipe 1 on to the pump with the ball and socket joint.
- Screw the water feature insert you require (a / (b / (c / (d on the nozzle pipe 1.
| All pumps | art. 7650 - 7654 | art. 7655 -7657 | |
 |  |  |  |
| (a cascade | (b Waterbell | (c jets of water | (d foaming - spring |
2 Holder for GARDENA underwater light art 7951
VARIANT 1: Mount the additional filter on the pump

The additional filter can be fitted on the filter housing to extend the maintenance interval and to give the water feature a longer life.
- Remove the cap 3 from the pump.
- Fit both filter shells 4 on the filter housing 5 and clip into place.
- Press sealing cover 3 on to the additional filter 4.
You can install additional filters ![]() to increase the filter surface.
to increase the filter surface.
Additional filters are available from GARDENA Service.
VARIANT 2: Mount the pond edge controller

The additional filter can be installed as a pond edge controller for adjusting water features and cleaning the filter housing from the edge of the pond. Water is only drawn in via the additional filter. You can connect the following hoses to the hose connection:
- 3/4" and 1" for FP 750 E / FP 1000 E / FP 1400 E / FP 1800 E / FP 2500 E
- 11/4" and 11/2" for FP 4000 E / FP 5000 E / FP 7500 E
For best results use a hose with the largest possible diameter.

- Remove the cap 3 from the pump.
- Press in snap fastenings 6 and open up the filter housing 5.
- Push the hose connection 7 on to the pump.
- Close filter housing 5.
- Insert hose connection 8 to one filter shell 4 and snap into the second filter shell 4.
- Press sealing cover 3 on to the pond edge control 4.
- Connect water feature pump and pond edge control to a hose.
Initial Operation
Switch on water feature pump

- Place water feature pump on a firm base in such a way that the filter housing 5 is completely covered by water.
- Pull telescopic pipe 9 out to the desired length.
![warning]() Warning: Pump will start immediately.
Warning: Pump will start immediately.- Set the quantity of water required for the water feature using the regulator 10.
- Water bell: Screw insert into the water feature until the water feature has produced the shape required.
Start pond edge control

 TIP: Install the pond edge controller on a bed of gravel to improve the water intake. The regulating valve 10 must be fully open when using the pond edge controller.
- Fill hose with water to remove any cushions of air in the hose.
- Secure the pond edge controller at the edge of the pond (using rocks, for example).
The pond edge control must be completely covered with water. - Set the quantity of water required for the water feature with the regulator 11.
Side outlet

Additional consumers (e.g. gargoyles) can be connected to the side outlet 12 (1/2", 3/4" and 1"nipple) The quantity of water can be adjusted via the regulator 13.
Note: The ball joint 14 can be used to align the water feature so that it is vertical.
Maintenance

Disconnect the pump from the mains before working on it.
Clean water feature insert and nozzle pipe
Do not use any hard objects or powerful detergents for cleaning the set!
- Unscrew nozzle pipe.
- Unscrew water feature insert and remove from nozzle pipe.
- Clean nozzle pipe and water feature insert in clean water.
Clean filter housing
 |
- Take water feature pump out of the water.
- Unlock snap fastenings 6 and open up the filter housing 5.
- Clean filter housing 5 with a jet of water.
- Hook the halves of the filter housing into each other and close.
Do not use any hard objects or powerful detergents for cleaning the set!
Clean the filter surface of the pond edge controller
Light soiling:
- Clean the filter surface of the pond edge controller under water.
Heavy soiling:
- Disconnect the pond edge controller from the hose underwaterto prevent air from being drawn in.
- Take pond edge controller out of the water, open and clean.
- Reconnect the pond edge controller to the hose under water.
Trouble-shooting
Clean the pump:

Disconnect the pump from the mains before working on it.
- Remove pump from the filter housing (see Maintenance).
- FP 750 E: Detach the cap 17 from the motor housing 16 at the catches 18.
Other pumps: Turn the pump housing 15 anticlockwise and pull it vertically off the motor housing 16. - Pull impeller unit 19 out of the motor housing 16 and clean.
- Push cleaned impeller unit 19 back into the motor housing 16.
- FP 750 E: Push pump cap 17 onto motor housing 15.
Other pumps: Press pump housing 15 vertically onto motor housing 16 and turn clockwise.
FP 4000 E / FP 5000 E / FP 7500 E: During assembly, ensure that the seal/foam filter 20 is correctly seated in the motor housing 16.
| Fault | Possible cause | Remedy | |
| No water feature operating. | Mains plug not plugged in. |
| |
| Impeller unit is blocked. |
| ||
| Regulating valve at pump or pond edge controller is closed. |
| ||
| FP 1800 E / FP 2500 E / FP 7500 E | Thermal overload switch has been triggered (pump has run dry). |
| |
| FP 750 E FP 1000 / FP 1400 E / FP 4000 E / FP 5000 E / FP 7500 E | Electronic dry-running safety has been triggered. |
| |
| Water feature reduced in size and uneven | Water feature insert is dirty. |
| |
| Air lock in the hose. |
| ||
| Filter housing / pond edge filter dirty. |
| ||
If any other faults arise, please contact GARDENA Service.
Storing your Fountain Pump Set
Overwintering

The pump should be stored out of the reach of children.
- Remove the pump from the pond before frost is expected and clean.
- To avoid difficulties when starting up in the spring, we recommend storing the pump in a frost-free location in a container filled with water.
The mains plug must not be submerged.
Accessories
| GARDENA Underwater lights | Illuminate water features and the edges of the pond from below the surface of the water. | art. 7951 |
| GARDENA radio control set | Start water features and lighting from the terrace or your living room. | art. 7874 |
| GARDENA Spiral Pond Hoses | For connecting the pond edge controller. | art. 7896 art. 7898 |
| GARDENA Water Features | For designing your own pond and water features. | art. 7814 - art. 7823 |
| GARDENA Telescopic Tubes | For extending the nozzle tube. | art. 7884 - art. 7885 |
Technical Data
| Type | FP 750 E | FP 1000 E | FP 1400 E | FP 1800 E | FP 2500 E | FP 4000 E | FP 5000 E | FP 7500 E |
| Art.-No. | 7650 | 7651 | 7652 | 7653 | 7654 | 7655 | 7656 | 7657 |
| Rated power | 8 W | 15 W | 18 W | 25 W | 30 W | 60 W | 80 W | 120 W |
| Flow | 750 l/ h | 1000 l/ h | 1400 l/ h | 1800 l/ h | 2300 l/ h | 4200 l/ h | 4800 l/ h | 7500 l/ h |
| Max. delivery head | 1,3 m | 1,8 m | 2,0 m | 2,2 m | 2,4 m | 3,2 m | 3,9 m | 4,5 m |
| Max. submersion depth | 4 m | 4 m | ||||||
| Power cable | 10 m H05 RN-F3G0,75 | 10 m H05 RN-F3G1,0 | ||||||
| Fitting | G 3 /4 | G 1 | ||||||
| Media temperature | 4°C – 35°C | 4°C – 35°C | ||||||
| Mains voltage / Frequency | 230 V / 50 Hz | 230 V / 50 Hz | ||||||
Service
Guarantee
GARDENA guarantees this product for 3 years (from date of purchase). This guarantee covers all serious defects of the unit that can be proved to be material or manufacturing faults. Under warranty we will either replace the unit or repair it free of charge if the following conditions apply:
- The unit must have been handled properly and in keeping with the requirements of the operating in-structions.
- Neither the purchaser or a non-authorised third party have attempted to repair the unit.
The feed impeller is a wearing part and is not covered by the warranty.
This manufacturer's guarantee does not affect the user's existing warranty claims against the dealer/seller.
If you have any problems with your Fountain Pump Set, please contact our Service or return the defective unit together with a short description of the problem – in case of guarantee, with a copy of the receipt – postage paid to one of the GARDENA Service Centres listed on the back of this leaflet.

Documents / ResourcesDownload manual
Here you can download full pdf version of manual, it may contain additional safety instructions, warranty information, FCC rules, etc.
Download Gardena FP 1400 E, FP 2500 E, FP 5000 E - Fountain Pump Set Manual
Advertisement


Need help?
Do you have a question about the FP 750 E and is the answer not in the manual?
Questions and answers