Table of Contents
Advertisement
Available languages
Available languages
Quick Links
Advertisement
Table of Contents

Subscribe to Our Youtube Channel
Related Manuals for Braun BLACK500 4K


Summary of Contents for Braun BLACK500 4K
- Page 1 BRAUN Wildkamera BLACK500 4K Bedienungsanleitung...
- Page 2 EINLEITUNG Mit ihrem hochempfindlichen 120°-Passiv-Infrarot-Sensor (PIR) erkennt die Kamera die plötzliche Änderung der Umgebungstemperatur, die durch sich bewegendes Wild in einer Region von Interesse (ROI) verursacht wird und löst die Aufnahme von Bildern/Videos aus, damit Sie nicht verpassen, was Ihnen vor die Kamera läuft. Funktionen •...
- Page 3 EINLEITUNG • Die Einstellung „Seriennummer“ ermöglicht die Codierung von Standorten auf den Fotos. Dies hilft Anwendern mit mehreren Kameras, den Standort bei der Durchsicht der Fotos zu identifizieren. • Extrem niedriger Standby-Stromverbrauch. Extrem lange Lebensdauer im Feld (im Standby-Modus bis zu 8 Monate mit 8 x AA-Batterien).
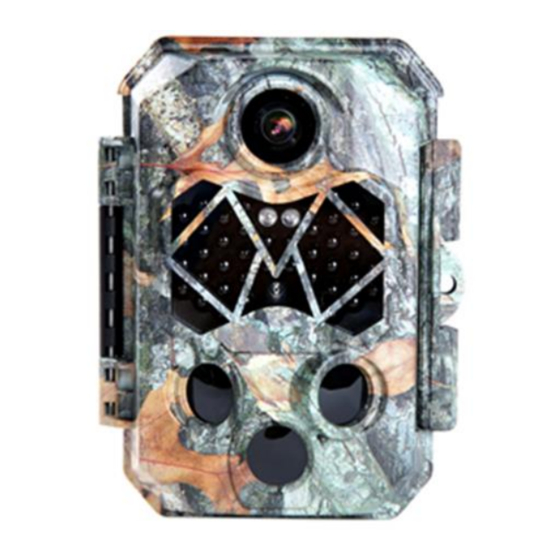
- Page 4 ÜBERSICHT KAMERA Pfeiltaste aufwärts Pfeiltaste rechts Auslöser OK-Taste Pfeiltaste links Menü Wiedergabe Pfeiltaste abwärts microSD-Kartensteckplatz USB-Port TEST 14. Infrarot-LEDs Objektiv Vorderer Bewegungssensor Seitlicher Bewegungssensor Display...
- Page 5 EINFACHE BEDIENUNG ① Batterien einsetzen ③ Umschalten zu ②microSD-Karte installieren TEST ④MENU zur ⑤ Speicherkarte ⑥Auf Einstellung drücken formatieren Werkseinstellungen zurücksetzen ⑦Datum und Uhrzeit ⑧Zur Verwendung auf einstellen ON schalten...
- Page 6 VOR VERWENDUNG Stromversorgung Batterien einsetzen Öffnen Sie die Kamera, indem Sie zunächst die Verriegelung öffnen. Das Batteriefach befindet sich im rechten Teil der Kamera. Öffnen Sie den Schutzdeckel des Batteriefachs und setzen Sie 4 x 1,5 V LR6/AA-Batterien in die Batterieschächte ein.
-
Page 7: Microsd-Karte Einsetzen
VOR VERWENDUNG microSD-Karte einsetzen Die Kamera verwendet eine microSD (Secure Digital)-Speicherkarte zum Speichern von Fotos (im jpg-Format) und/oder Videos (im MOV-Format). Es werden microSD-Karten bis zu einer Kapazität von 512 GB unterstützt. Setzen Sie die microSD-Karte (bei ausgeschalteter Kamera) ein, bevor Sie die Kamera in Betrieb nehmen. Setzen Sie die microSD-Karte nicht ein und nehmen Sie sie nicht heraus, wenn der Ein/Aus-Schalter auf „ON“... - Page 8 BEDIENUNGSHINWEISE Modus umschalten Es gibt drei Betriebsmodi: • Ausschaltfunktion: Netzschalter in der OFF-Stellung. • TEST-Funktion: Netzschalter steht in der TEST-Stellung (LCD-Display ist an). • Einschaltfunktion: Netzschalter in der ON-Stellung (Der LCD-Bildschirm schaltet sich nach einem Countdown von 5 Sekunden aus). AUS-Modus Der Modus OFF ist der „sichere“...
- Page 9 BEDIENUNGSHINWEISE Stellen Sie den Schalter auf TEST, um den Testmodus aufzurufen. • Drücken Sie die Pfeiltaste UP und dann SHOT, um ein Testvideo aufzunehmen. • Drücken Sie die Pfeiltaste DOWN und dann SHOT, um ein Testfoto aufzunehmen. • Drücken Sie MENU, damit wird das Einstellungsmenü im LCD angezeigt.
- Page 10 BEDIENUNGSHINWEISE Videoauflösung Videoauflösung auswählen. Optionen: 4K bei 30 FPS, 2,7K bei 30 FPS, 1080P bei 60/30 FPS, 720P bei 30 FPS, VGA bei 30 FPS Videolänge Stellen Sie die Länge jedes Videoclips ein, der bei jeder erkannten Bewegung aufgezeichnet wird (zwischen 5 bis 30 Sekunden oder 1 bis 5 Minuten).
- Page 11 BEDIENUNGSHINWEISE IR-Helligkeit Starkes Licht/Normal/Wirtschaftlich. Die Leuchtstärke der IR-LEDs kann für verschiedene Umgebungen eingestellt werden. Seitlicher PIR Die werksseitige Einstellung ist ON. Die beiden seitlichen PIR-Sensoren bieten einen größeren Erfassungswinkel und verbessern die Reaktionszeit. In manchen Situationen ist es jedoch schwierig, störende Zweige zu entfernen oder das Sonnenlicht zu meiden.
- Page 12 BEDIENUNGSHINWEISE Sprache Englisch, Deutsch, Schwedisch, Spanisch, Französisch, Italienisch, Portugiesisch, Chinesisch, Polnisch, Japanisch, Niederländisch, Slowakisch, Tschechisch Systemzeit Hier können Sie das Datum im JJJJ/MM/TT- und die Uhrzeit im 24-Stunden-Format einstellen. Mit LEFT oder RIGHT springen Sie zum nächsten Feld. Mit UP oder DOWN ändern Sie die Einstellung und mit OK speichern Sie.
- Page 13 BEDIENUNGSHINWEISE Passwortschutz Wählen Sie „ON“, wenn Sie zum Schutz der Kamera ein Passwort verwenden möchten. Ein Passwort aus 4 Zahlen oder Buchstaben kann eingestellt werden. Sobald der Code eingestellt ist, fordert die Kamera für den Zugriff das Passwort Speicherkarte formatieren Löscht alle auf einer Karte gespeicherten Dateien, um sie für die Wiederverwendung vorzubereiten.
- Page 14 BEDIENUNGSHINWEISE Beobachten Sie dabei die Bewegungsanzeige. Wenn diese blau aufleuchtet, wurden Sie von einem der aktivierten Seitenbewegungssensoren erkannt. Wenn sie rot aufleuchtet, wurden Sie vom Frontbewegungssensor erkannt. Auf diese Weise können Sie die beste Ausrichtung der Kamera ermitteln. Die Bewegungsanzeige leuchtet nur auf, wenn sich der Schalter in der Position TEST befindet und einer der Bewegungssensoren eine Bewegung erkannt hat.
- Page 15 ANZEIGEN/LÖSCHEN VON AUFNAHMEN • Betrachten von Bildern auf dem Kamera-LCD • Stellen Sie den Ein/Aus-Schalter auf TEST. • Drücken Sie Replay, um den Bildbetrachtungsmodus aufzurufen. • Mit UP/DOWN scrollen Sie durch Ihre Fotos oder Videos. • Drücken Sie OK, um ein Video wiederzugeben oder zu pausieren.
- Page 16 ANZEIGEN/LÖSCHEN VON AUFNAHMEN Dateischutz Drücken Sie in der Wiedergabefunktion die Menu-Taste, um die Schutzfunktion zu finden. Mit dieser Funktion können Sie einzelne oder alle gespeicherten Aufnahmen vor versehentlichem Löschen schützen. Wählen Sie „Protect Single”, um die aktuelle Datei zu ◆ schützen.
- Page 17 FEHLERBEHEBUNG/Fragen und Antworten Fotos erfassen nicht das Objekt von Interesse Diese Probleme entstehen, wenn Sie die Kamera in einer Umgebung aufstellen, in der Bewegungen durch Äste von Bäumen verursacht werden oder in einem Bereich, in dem große Hitze im Vordergrund herrscht und Bewegungen durch Wind auftreten.
- Page 18 FEHLERBEHEBUNG/Fragen und Antworten Die Kamera nimmt keine Bilder auf Überzeugen Sie sich davon, dass die microSD-Karte nicht voll ist. Wenn die Karte voll ist, nimmt die Kamera keine Bilder mehr auf oder schalten Sie bitte die Endlosaufnahme ein. Überprüfen Sie die Batterien, um sicherzustellen, dass es sich um neue Alkalibatterien handelt.
- Page 19 FEHLERBEHEBUNG/Fragen und Antworten Die besten Ergebnisse erzielen Sie, wenn sich das Motiv innerhalb der idealen Blitzreichweite befindet, also nicht weiter als 20 m entfernt ist. Bitte beachten Sie, dass, wenn der Parameter „Capture Number“ höher als „1 Photo“ eingestellt ist, oder bei sehr kurzen Intervalleinstellungen, einige Bilder dunkler erscheinen können als andere, da die Kamera schnell reagiert und schnell nachlädt, sodass der Blitz weniger Zeit...
- Page 20 FEHLERBEHEBUNG/Fragen und Antworten Datum/Zeitstempel wird nicht auf den Bildern angezeigt Achten Sie darauf, dass der Parameter „Time Stamp“ sich in der „ON“-Stellung befindet. PIR-Sensor-LED blinkt/blinkt nicht Wenn sich die Kamera im Modus TEST befindet, blinkt eine spezielle LED auf der Vorderseite der Kamera, wenn Bewegung erkannt wird.
-
Page 21: Technische Daten
TECHNISCHE DATEN Fotoauflösung 3/5/7/8/10/12/16/20/24/30/48 MP Videoauflösung 4K/ 2,7K/1080P/720P/VGA Dateiformat JPG/MOV Brennweite = 4 mm, F/NO = 1,6, Objektiv Betrachtungswinkel = 92° Display 2,4" TFT-LCD Externer Speicher microSD-Karte bis zu 512 GB Reichweite IR-Blitz 20 m Auslöseabstand 20 m PIR-Winkel 120° PIR-Empfindlichkeit Hoch/Normal/Niedrig PIR-Seitenwinkel... - Page 22 TECHNISCHE DATEN 5 bis 30 Sekunden oder 1 bis Videolänge 5 Minuten Foto und Video Erst Foto, dann Video aufnehmen Ein/Aus; einschließlich Temperatur, Zeitstempel Mondphase, Datum oder Datum und Zeit Ein/Aus; Zeitraffer Zeitraffer programmierbar 2 Zeiträume können eingestellt Ziel-Aufnahmezeit 1/2 werden;...
-
Page 23: Elektrische Sicherheitshinweise
ELEKTRISCHE SICHERHEITSHINWEISE Um Personen- und Sachschäden zu vermeiden, lesen und befolgen Sie alle elektrischen Sicherheitshinweise, bevor Sie das Gerät benutzen. Sicherheit von Batterien Alle Batterien außerhalb der Reichweite von Kindern aufbewahren • Für Batterien 1. Stellen Sie beim Einlegen der Batterien sicher, dass die Pole + und - korrekt eingesteckt sind 2. - Page 24 Das aufgedruckte CE-Kennzeichen entspricht den geltenden EU-Normen und signalisiert, dass das Gerät die Anforderungen aller für dieses Produkt gültigen EU-Richtlinien erfüllt. Die vollständige Konformitätserklärung ist auf unserer Website www.braun-phototechnik.de direkt auf der Produktseite zu finden. BRAUN Photo Technik GmbH Merkurstr. 8...
- Page 25 BRAUN Scouting Cam BLACK500 4K Instruction Manual...
- Page 26 INTRODUCTION With its highly sensitive 120° passive Infra-Red (PIR) sensor, the camera detects the sudden change of ambient temperature caused by moving game in a region of interest (ROI), and triggers to take pictures/videos, so you don’t miss what is walking in front of your camera. Features •...
- Page 27 INTRODUCTION • Serial Number setting enables you to code locations in the photos. This helps multi-camera users identify the location when reviewing the photos. • Ultra-low standby power consumption. Extremely long in field life (in standby mode, up to 8 months with 8 x AA batteries).
- Page 28 CAMERA OVERVIEW Up button Right button Shot button OK button Left button Menu button Replay button Down button MicroSD card slot USB jack TEST 14. Infrared LEDs Lens Front motion sensor Side motion sensor Display screen...
- Page 29 SIMPLE TO USE THIS CAMERA ①Install Batteries ②Install micro SD ③switch to TEST Card ④press MENU to ⑤Format memory ⑥Reset to factory setting card setting ⑦set the Date & ⑧switch to ON to use Time...
-
Page 30: Before Operation
BEFORE OPERATION Power supply Batteries Installation Open the camera by unlocking latch firstly. The battery compartment is the right part of the camera. Open the protective cover of the battery compartment and insert 4 x 1.5v LR6/AA batteries into the battery slots. Make sure to insert each battery with correct polarity (+ and - end against the long spring of each battery slot). -
Page 31: Inserting The Microsd Card
BEFORE OPERATION Inserting the microSD Card The camera uses a microSD (Secure Digital) memory card to save photos (in .jpg format) and/or videos (in .MOV format). MicroSD cards up to a maximum 512GB capacity are supported. Insert the microSD card (with the camera's power switch in the OFF position) before beginning to operate the camera. -
Page 32: Camera Operation
CAMERA OPERATION Mode Switch There are three basic operational modes: • OFF mode: power switch in the OFF Position. • TEST mode: power switch at TEST Position (LCD screen is on). • ON mode: power switch in the ON Position (LCD screen turns off after 5 seconds count down). - Page 33 CAMERA OPERATION Slide the mode switch to TEST Position to start the test mode. • Press the Up key, then press SHOT to take video for test. • Press the DOWN Key, then press SHOT to take photo for test. •...
- Page 34 CAMERA OPERATION Video resolution Select video resolution. Options: 4K@30FPS, 2.7K@30FPS, 1080P@60/30FPS, 720P@30FPS, VGA@30FPS Video Length Set the length of each video clip recorded each time motion is detected (between 5-30 seconds or 1-5 minutes), The longer the recording time selected the shorter the operating time.
- Page 35 CAMERA OPERATION IR Brightness High Light/Normal/Economics. IR LEDs Luminance can be set for different environment. Side PIR The default setting is On. The two side PlR sensors provide wider sensing angle and enhance response time. However, in some situations you have difficulty removing the interfering twigs or avoiding the sunlight.
- Page 36 CAMERA OPERATION Language English, German, Swedish, Spanish, French, Italian, Portuguese, Chinese, Polish, Japanese, Dutch, Slovak, Czech System Time Here you can set the date in yyyy/MM/DD and time in 24 hrs format. Use LEFT and RIGHT to move to next field. Use Up or DOWN to change the setting, press OK to save the setting.
- Page 37 CAMERA OPERATION Password protection Select "on" if you want to use a password to protect the camera. A 4-digit or alphabet password can be set. Once the code is set, the camera will request the password to access. Format memory card Deletes (erases) all files stored on a card to prepare it for re- use.
- Page 38 CAMERA OPERATION While doing this, monitor the motion display. If this lights up in blue, you have been detected by one of the activated side motion sensors. If it lights up in red, you have been detected by the front motion sensor. In this way, you can work out the best alignment for the camera.
- Page 39 VIEWING/DELETING RECORDINGS • Reviewing images on the Camera LCD • Put the power switch in TEST position. • Press the Replay button to enter image review mode. • Use the UP/DOWN buttons to scroll through your photos or videos. • Press the OK button to play or pause a video.
- Page 40 VIEWING/DELETING RECORDINGS File protection Under playback mode, press Menu to find Protect function. This function can be used to protect individual or all saved recordings from accidental deletion. Select “Protect Single” to protect current file ◆ Select "Protect All" to protect all saved recordings from ◆...
-
Page 41: Troubleshooting (Faq)
TROUBLE SHOOTING/FAQ Photos Do Not capture Subject of Interest This is the result of placing the camera in an environment where there is motion associated with tree branches creating motion or an area where there is high heat in the foreground and any motion from wind. - Page 42 TROUBLE SHOOTING/FAQ Camera won't take images Please make sure that the microSD card is not full. If the card is full, the camera will stop taking images, or please turn endless capture ON. Check the batteries to make sure that they are new alkaline. Make sure that the camera power switch is in the ON position and not in the OFF or TEST mode.
- Page 43 TROUBLE SHOOTING/FAQ You will get the best results when the subject is within the ideal flash range, no farther than 20 meters. Please note that when the Capture Number parameter is set higher than "1 Photo", or with very short Interval settings, some images may appear darker than others due to the quick response and rapid re-triggering of the camera, allowing less time for the flash to fully recharge before firing...
- Page 44 TROUBLE SHOOTING/FAQ Date/Time Stamp not appearing on images Make sure that the Time Stamp parameter is set to 'ON' position. PIR Sensor LED Flashes/Doesn't Flash When the camera is in the TEST mode, a special LED on the front of the camera will flash when it senses motion. This is for setup purposes only and will help the user aim the camera.
-
Page 45: Camera Specifications
CAMERA SPECIFICATIONS Photo resolution 3/5/7/8/10/12/16/20/24/30/48MP Video resolution 4K/ 2.7K/1080P/720P/VGA File format JPG/MOV Focal Length=4mm, F/NO=1.6, View Lens Angle=92° Display 2.4" TFT LCD External memory MicroSD Card up to 512GB Range of IR flash Triggering distance PIR angle 120° PIR Sensitivity High/Normal/Low Side PIR Angle on/off;... - Page 46 CAMERA SPECIFICATIONS Video Length 5-30 seconds or 1-5 minutes Photo+Video First take picture then video On/off; Including temperature, Time stamp moonphase and date or date&time Time Lapse On/off; Time Lapse programmable Target recording time 2 time periods can be set; 00:00 to 23:59 programmable Password 4-digit or alphabet...
-
Page 47: Electrical Safety Instructions
ELECTRICAL SAFETY INSTRUCTIONS To prevent personal injury or property damage, read and follow all electrical safety instructions before using the product. Safety of the batteries Keep all batteries out of the reach of children • For batteries 1. Make sure the + and - poles are properly plugged in when you insert the batteries 2. - Page 48 The CE marking complies with the European standards and indicates that the product meets the requirements of the applicable EU directives. The complete declaration of conformity can be found on our website www.braun-phototechnik.de directly on the product page. BRAUN Photo Technik GmbH Merkurstr. 8...
-
Page 49: Manuel D'instruction
Caméra de repérage BRAUN BLACK500 4K Manuel d’instruction... - Page 50 INTRODUCTION Équipée d’un capteur infrarouge passif (PIR) 120° de haute sensibilité, cette caméra détecte les variations soudaines de la température ambiante provoquées par un mouvement dans une zone d’intérêt. Dans ce cas, elle prend et enregistre immédiatement des photos ou des vidéos. Par conséquent, tout ce qui passe devant votre caméra ne vous échappera plus.
- Page 51 INTRODUCTION • Vous pourrez également coder le lieu de capture de vos photos en activant l’option du numéro d’identification. Les utilisateurs possédant plusieurs caméras peuvent ainsi identifier le lieu de capture des photos lorsqu’ils les réexaminent. • Consommation électrique en veille très faible. Autonomie sur le terrain extrêmement longue (en mode veille, jusqu’à...
- Page 52 PRÉSENTATION DE LA CAMÉRA Touche haut Touche droite Touche photo Touche OK Touche gauche Touche menu Touche lecture Touche bas Logement de la carte micro-SD Prise USB ARRÊT TEST MARCHE 14. LED infrarouge Objectif Détecteur de mouvements frontaux Détecteurs de mouvements latéraux Écran d’affichage...
- Page 53 DÉMARRAGE RAPIDE DE LA CAMÉRA ① Installer les piles ②Installer la carte ③ Placer le micro SD commutateur sur TEST ④Appuyer sur MENU ⑤ Formater la carte ⑥Réinitialiser aux paramètres d’usine pour configurer mémoire ⑦Configurer la date et ⑧Placer le l’heure commutateur sur ON pour utiliser...
-
Page 54: Avant Utilisation
AVANT UTILISATION Alimentation électrique Installation des piles Ouvrez tout d’abord la caméra en débloquant le compartiment. Le compartiment des piles se situe sur la partie droite de la caméra. Ouvrez le couvercle de protection du compartiment des piles, puis insérez 4 piles 1,5 V de type LR6/AA dans les logements des piles. -
Page 55: Insertion De La Carte Microsd
AVANT UTILISATION Insertion de la carte microSD La caméra utilise une carte mémoire microSD (Secure Digital) pour enregistrer des photos (au format .jpg) et/ou des vidéos (au format .MOV). Les cartes MicroSD d’une capacité maximale de 512 Go sont prises en charge. Avant d’utiliser la caméra, insérez la carte micro-SD (commutateur d’alimentation de la caméra réglé... -
Page 56: Fonctionnement De La Caméra
FONCTIONNEMENT DE LA CAMÉRA Commutateur de mode La caméra dispose de trois modes de fonctionnement de base : • Mode OFF : interrupteur d’alimentation en position OFF. • Mode TEST : interrupteur d’alimentation en position TEST (écran LCD allumé). • Mode ON : interrupteur d’alimentation en position ON (l’écran LCD s’éteint après 5 secondes de compte à... - Page 57 FONCTIONNEMENT DE LA CAMÉRA Déplacez le commutateur de mode sur la position TEST pour activer le mode correspondant. • Appuyez sur la touche Up, puis sur SHOT pour enregistrer une vidéo de test. • Appuyez sur la touche DOWN, puis sur SHOT pour enregistrer une photo de test.
- Page 58 FONCTIONNEMENT DE LA CAMÉRA Résolution vidéo Sélectionnez la résolution vidéo. Options : 4K@30 IPS, 2,7K@30 IPS, 1080P@60/30IPS, 720P@30IPS, VGA@30IPS Longueur vidéo Réglez la durée de chaque clip vidéo enregistré chaque fois qu’un mouvement est détecté (entre 5 et 30 secondes ou 1 à 5 minutes), plus la durée d’enregistrement sélectionnée est longue, plus la durée de fonctionnement est courte.
- Page 59 FONCTIONNEMENT DE LA CAMÉRA Luminosité IR Haute lumière/Normal/Économie. La luminance des LED IR peut être réglée pour différents environnements. PIR latéral Le paramètre par défaut est Activé. Les deux capteurs PlR latéraux offrent un angle de détection plus large et améliorent le temps de réponse.
- Page 60 FONCTIONNEMENT DE LA CAMÉRA Langue Anglais, Allemand, Suédois, Espagnol, Français, Italien, Portugais, Chinois, Polonais, Japonais, Néerlandais, Slovaque, Tchèque Heure du système Ici, vous pouvez régler la date au format aaaa/MM/JJ et l’heure au format 24 heures. Utilisez les touches LEFT et RIGHT pour basculer entre les champs.
- Page 61 FONCTIONNEMENT DE LA CAMÉRA Protection par mot de passe Sélectionnez « on » si vous souhaitez utiliser un mot de passe pour protéger la caméra. Un mot de passe à 4 chiffres ou lettres peut être défini. Une fois le code défini, la caméra demandera le mot de passe pour y accéder.
- Page 62 FONCTIONNEMENT DE LA CAMÉRA Surveillez en même temps l’affichage du mouvement. Si elles s’allument en bleu, cela signifie que vous avez été détecté par l’un des capteurs de mouvement latéraux activés. Si elles s’allument en rouge, cela signifie que vous avez été détecté...
- Page 63 VISUALISATION/SUPPRESSION D’ENREGISTREMENTS • Passage en revue des images sur l’écran LCD de la caméra • Placez le commutateur d’alimentation sur la position TEST. • Appuyez sur le bouton Replay pour passer en mode de visualisation d’image. • Utilisez les boutons UP/DOWN pour faire défiler vos photos ou vidéos.
- Page 64 VISUALISATION/SUPPRESSION D’ENREGISTREMENTS Protection du fichier En mode lecture, appuyez sur Menu pour trouver la fonction Protéger. Cette fonction peut être utilisée pour protéger un enregistrement individuel ou tous les enregistrements enregistrés contre toute suppression accidentelle. Sélectionnez « Protect Single » pour protéger le fichier ◆...
-
Page 65: Dépannage/Faq
DÉPANNAGE/FAQ La caméra ne prend pas de photos du sujet d’intérêt Vous obtenez ce résultat lorsque vous placez la caméra dans un environnement où des branches d’arbres bougent devant l’objectif ou une zone plongée en arrière-plan dans une forte chaleur et au gré du vent. La configuration d’une caméra au-dessus de l’eau est également une cause potentielle de ce problème, pour remédier à... - Page 66 DÉPANNAGE/FAQ La caméra ne prend pas de photos Assurez-vous que la carte micro-SD n’est pas pleine. Si la carte est pleine, la caméra cessera de prendre des images ou activera la capture sans fin. Vérifiez les piles pour vous assurer qu’elles sont alcalines et neuves.
- Page 67 DÉPANNAGE/FAQ Vous obtenez de meilleurs résultats lorsque le sujet est à portée de l’éclairage (flash), à une distance de moins de 20 m. Notez que, lorsque le paramètre du nombre de captures est défini à une valeur supérieure à « 1 photo » ou que le délai entre deux prises de photos est très court, certaines images peuvent apparaître plus sombres en raison du temps de réponse rapide et du déclenchement immédiat de la caméra.
- Page 68 DÉPANNAGE/FAQ La surimpression de l’heure ou de la date n’apparaît pas sur les photos Assurez-vous que le paramètre Horodatage est réglé sur la position « ON ». Le voyant du capteur PIR clignote/ne clignote pas Lorsque la caméra est en mode TEST, un voyant LED spécial placé...
-
Page 69: Caractéristiques De La Caméra
CARACTÉRISTIQUES DE LA CAMÉRA Résolution photo 3/5/7/8/10/12/16/20/24/30/48 MP Résolution vidéo 4K/2,7K/1080P/720P/VGA Format de fichier JPG/MOV Distance focale=4 mm, F=1,6, Objectif Angle de vue=92° Écran Écran LCD TFT 2,4" Carte MicroSD jusqu’à 512 Go Mémoire externe Portée de l’éclairage 20 m infrarouge Distance de 20 m... - Page 70 CARACTÉRISTIQUES DE LA CAMÉRA Longueur vidéo 5-30 secondes ou 1-5 minutes D’abord prenez une photo puis Photo + vidéo une vidéo Marche/Arrêt ; Y compris Horodatage température, phases de la lune et date et date et heure Marche/Arrêt ou timelapse Timelapse réglable 2 durées peuvent être...
- Page 71 INSTRUCTIONS DE SÉCURITÉ ÉLECTRIQUE Pour éviter les blessures corporelles ou les dommages matériels, lisez et suivez toutes les consignes de sécurité électrique avant d’utiliser le produit. Sécurité des piles Gardez toutes les piles hors de portée des enfants • Pour les piles 1.
- Page 72 Le marquage CE est conforme aux normes européennes et indique que le produit est conforme aux exigences des directives européennes applicables. La déclaration de conformité complète se trouve sur notre site Web www.braun-phototechnik.de directement sur la page du produit. BRAUN Photo Technik GmbH Merkurstr. 8...
- Page 73 Fototrappola BRAUN BLACK500 4K Manuale di istruzioni...
- Page 74 INTRODUZIONE Con il suo sensore a infrarossi passivo (PIR) 120° altamente sensibile, la fotocamera rileva gli improvvisi cambiamenti nella temperatura ambientale causati dal movimento in una regione d’interesse (ROI), scatta foto/video senza lasciarsi sfuggire tutto ciò che si sposta di fronte alla fotocamera. Caratteristiche •...
- Page 75 INTRODUZIONE • L’impostazione del Numero seriale consente di codificare i luoghi presenti sulle foto. Ciò aiuta gli utenti di più fotocamere a identificare i luoghi quando esaminano le foto. • Consumo energetico basso in modalità standby. Durata su campo estremamente lunga (in modalità standby fino a 8 mesi con 8 batterie AA).
- Page 76 PANORAMICA DELLA FOTOCAMERA Pulsante Su Pulsante destra Pulsante Scatto Pulsante OK Pulsante sinistra Pulsante Menu Pulsante Replay Pulsante Giù Alloggiamento scheda micro Jack USB DISATTIVA TEST ATTIVO 14. LED a infrarossi Obiettivo Sensore di movimento anteriore Sensore di movimento laterale Schermo...
- Page 77 FOTOCAMERA FACILE DA USARE ① Installare le batterie ② Installare la scheda ③ Passare a TEST micro SD ④ Premere MENU per ⑤ Formattare la ⑥ Ripristinare le accedere alle scheda di memori impostazioni di impostazioni fabbrica ⑦ Impostare data e ⑧...
-
Page 78: Prima Del Funzionamento
PRIMA DEL FUNZIONAMENTO Alimentazione Installazione delle batterie Aprire la fotocamera innanzitutto tirando verso il basso il fermo di blocco. Il vano batterie è la parte destra della fotocamera. Aprire il coperchio di protezione del vano batteria e inserire 4 batterie da 1,5 V LR6/AA nei vani batteria. Assicurarsi di inserire ogni batteria con polarità... - Page 79 PRIMA DEL FUNZIONAMENTO Inserire la scheda microSD La fotocamera utilizza una scheda di memoria microSD (Secure Digital) per salvare foto (in formato .jpeg) e/o video (in formato .MOV). Sono supportate schede microSD fino a una capacità massima di 512 GB. Inserire la scheda micro SD (con l'interruttore di alimentazione della fotocamera in posizione OFF) prima di iniziare a utilizzare la fotocamera.
- Page 80 FUNZIONAMENTO DELLA VIDEOCAMERA Cambio di modalità Esistono tre modalità operative di base: • Modalità OFF: interruttore di alimentazione in posizione OFF. • Modalità TEST: interruttore di alimentazione in posizione TEST (lo schermo LCD è acceso). • Modalità ON: interruttore di alimentazione in posizione ON (lo schermo LCD si spegne dopo un conto alla rovescia di 5 secondi).
- Page 81 FUNZIONAMENTO DELLA VIDEOCAMERA Far scorrere l’interruttore delle modalità in posizione di TEST per avviare la modalità test. • Premere il tasto UP, poi premere SHOT per fare video. • Premere il tasto DOWN, poi premere SHOT per scattare foto. • Premendo il pulsante MENU, sul display LCD verrà...
- Page 82 FUNZIONAMENTO DELLA VIDEOCAMERA Risoluzione video Selezionare la risoluzione video. Opzioni: 4K a 30 FPS, 2,7K a 30 FPS, 1080p a 60/30 FPS, 720p a 30 FPS, VGA a 30 FPS Lunghezza Video Impostare la durata di ogni clip video registrato ogni volta che viene rilevato un movimento (tra 5-30 secondi o 1-5 minuti).
- Page 83 FUNZIONAMENTO DELLA VIDEOCAMERA Luminosità IR Alta luminosità/normale/risparmio energetico. La luminanza dei LED IR può essere impostata per diversi ambienti. PIR laterale L'impostazione predefinita è On. I due sensori PlR laterali offrono un angolo di rilevamento più ampio e migliorano il tempo di risposta.
- Page 84 FUNZIONAMENTO DELLA VIDEOCAMERA Lingua Inglese, tedesco, svedese, spagnolo, francese, italiano, portoghese, cinese, polacco, giapponese, olandese, slovacco, ceco Ora del sistema Qui è possibile impostare la data nel formato aaaa/MM/GG e l'ora nel formato 24 ore. Usare i tasti LEFT e RIGHT per passare al campo successivo.
- Page 85 FUNZIONAMENTO DELLA VIDEOCAMERA Protezione con password Selezionare “on” se si desidera utilizzare una password per proteggere la fotocamera. È possibile impostare una password composta da 4 cifre o lettere. Una volta impostato il codice, la fotocamera richiederà la password per accedere. Formattare la scheda di memoria Elimina (cancella) tutti i file memorizzati su una scheda per il riutilizzo.
- Page 86 FUNZIONAMENTO DELLA VIDEOCAMERA Nel frattempo, monitorare il movimento. Se si illuminano in blu, uno dei sensori laterali attivati ha rilevato il movimento. Se si illumina in rosso, il sensore anteriore ha rilevato il movimento. In questo modo, è possibile determinare il miglior allineamento per la fotocamera.
- Page 87 VISUALIZZAZIONE/ELIMINAZIONE DELLE REGISTRAZIONI • Visualizzazione delle immagini sul display LCD della telecamera • Mettere l’interruttore di alimentazione in modalità TEST. • Premere il tasto Replay per rivedere le immagini. • Utilizzare i tasti UP/DOWN per scorrere attraverso le foto o i video. •...
- Page 88 VISUALIZZAZIONE/ELIMINAZIONE DELLE REGISTRAZIONI Protezione dei file In modalità di riproduzione, premere il pulsante Menu per accedere alla funzione Protezione. Questa funzione può essere utilizzata per proteggere le registrazioni individuali oppure tutte le registrazioni salvate dalla cancellazione accidentale. Selezionare “Protect Single” per proteggere il file corrente ◆...
-
Page 89: Risoluzione Dei Problemi/Faq
RISOLUZIONE DEI PROBLEMI/FAQ Le foto non catturano gli oggetti di interesse Questo è il risultato del posizionamento della fotocamera in un luogo in cui il movimento è associato ai rami degli alberi che si muovono o ad un’area con troppo calore e a un qualsiasi movimento del vento. - Page 90 RISOLUZIONE DEI PROBLEMI/FAQ La fotocamera non scatta le foto Assicurarsi del fatto che la scheda micro SD non sia piena. In tal caso, la fotocamera non scatterà più foto. In alternativa, è possibile attivare la funzione di acquisizione continua. Controllare le batterie per assicurarsi che siano alcaline e nuove.
- Page 91 RISOLUZIONE DEI PROBLEMI/FAQ I risultati migliori si otterranno quando l’oggetto è nel range ideale del flash, non oltre 20 m. Si prega di notare che quando si imposta il parametro del Numero di scatti superiore a “1 Foto”, o con un intervallo molto breve, alcune immagini posso apparire più...
- Page 92 RISOLUZIONE DEI PROBLEMI/FAQ Il timbro data/ora non appare sulle immagini Assicurarsi che il parametro Timbro ora sia impostato su "ON". Il LED del sensore PIR lampeggia/non lampeggia Quando la fotocamera è in modalità TEST, un LED speciale posto sulla parte anteriore della fotocamera lampeggerà quando rileva il movimento.
- Page 93 SPECIFICHE DELLA FOTOCAMERA Risoluzione foto 3/5/7/8/10/12/16/20/24/30/48 MP Risoluzione video 4K/2,7K/1080p/720p/VGA Formato file JPG/MOV Lunghezza focale=4 mm, Obiettivo F/NO=1,6, angolo di visione=92° Schermo LCD 2,4" TFT Memoria esterna Scheda microSD fino a 512 GB Portata flash IR 20 m Distanza di attivazione 20 m Angolo PIR 120°...
- Page 94 SPECIFICHE DELLA FOTOCAMERA Lunghezza Video 5-30 secondi o 1-5 minuti Scattare prima una foto e Foto +Video poi un video attiva/disattiva; include la Timbro ora temperatura, le fasi lunari e la data o la data e l'ora attiva/disattiva; Time Lapse Time Lapse programmabile Possono essere impostati...
- Page 95 ISTRUZIONI DI SICUREZZA ELETTRICA Per evitare lesioni personali o danni materiali, leggere e seguire tutte le istruzioni di sicurezza elettrica prima di utilizzare il prodotto. Sicurezza delle batterie Tenere le batterie fuori dalla portata dei bambini • Per le batterie 1.
- Page 96 La marcatura CE è conforme agli standard europei e indica che il prodotto soddisfa i requisiti delle direttive UE applicabili. La dichiarazione di conformità completa è disponibile sul nostro sito Web www.braun-phototechnik.de direttamente nella pagina del prodotto. BRAUN Photo Technik GmbH Merkurstr. 8 72184 Eutingen Germania www.braun-phototechnik.de post@braun-phototechnik.de...
- Page 97 Cámara de exploración BRAUN BLACK500 4K Manual de instrucciones...
- Page 98 INTRODUCCIÓN Gracias a su sensor de infrarrojos pasivo (PIR) de 120° de alta sensibilidad, la cámara detecta el cambio repentino de la temperatura ambiente causado por el movimiento generado en la región de interés (ROI, por sus siglas en inglés), y se activa para hacer fotos y grabar vídeos y no perderse lo que pasa por delante de su cámara.
- Page 99 INTRODUCCIÓN • La configuración de números de serie permite codificar las ubicaciones en las fotos. Esto ayuda a los usuarios de varias cámaras a identificar la ubicación al revisar las fotos. • Muy bajo consumo de energía en reposo. Vida útil extremadamente larga en el campo (hasta 8 meses en espera, con 8 pilas AA).
- Page 100 VISTA GENERAL DE LA CÁMARA Botón Arriba Botón Derecha Botón Disparador Botón OK Botón Izquierda Botón Menú Botón Reproducir Botón Abajo Ranura para tarjeta microSD Conector USB DESACTIVADO TEST ACTIVAR 14. LED de infrarrojos Lente Sensor de movimiento delantero Sensores de movimiento lateral Pantalla de visualización...
- Page 101 CÁMARA FÁCIL DE USAR ① Instale las baterías ②Instale la tarjeta ③ Coloque el microSD interruptor en TEST ④ Pulse MENU para ⑤ Formatee la tarjeta ⑥ Resetee a configurar de memoria configuración de fábrica ⑦ Introduzca la Fecha ⑧ Ponga el interruptor y Hora en ON para utilizarla...
-
Page 102: Antes De Usar
ANTES DE USAR Alimentación de corriente Instalación de las pilas Abra la cámara desbloqueando el cierre. El compartimiento de las pilas se encuentra en la prte derecha de la cámara. Abra la tapa protectora del compartimiento de las pilas y e introduzca 4 pilas LR6/AA de 1,5 V en los huecos correspondientes. - Page 103 ANTES DE USAR Colocar la tarjeta de memoria La cámara usa una tarjeta de memoria microSD (Secure Digital) para almacenar las fotos (en formato .jpg) o vídeos (en formato .MOV). Soporta tarjetas microSD de hasta 512 GB. Inserte la tarjeta microSD (con el interruptor de la cámara en posición «OFF») antes de empezar a usar la cámara.
-
Page 104: Funcionamiento De La Cámara
FUNCIONAMIENTO DE LA CÁMARA Interruptor de modo Hay tres modos operativos básicos: • Modo OFF: interruptor en posición OFF. • Modo TEST: interruptor en posición TEST (pantalla LCD encendida). • Modo ON: interruptor en posición ON (pantalla LCD se apaga tras una cuenta atrás de 5 segundos). Modo OFF El modo OFF es el modo «seguro»... - Page 105 FUNCIONAMIENTO DE LA CÁMARA Deslice el interruptor de modo hasta la posición TEST para entrar en el modo de pruebas. • Pulse la tecla UP y, a continuación, pulse SHOT para grabar un vídeo de prueba. • Pulse la tecla DOWN y, a continuación, pulse SHOT para hacer una foto de prueba.
- Page 106 FUNCIONAMIENTO DE LA CÁMARA Resolución de vídeo Elegir la resolución de vídeo. Opciones: 4K a 30 fps, 2,7K a 30 fps, 1080p a 60/30 fps, 720p a 30 fps, VGA a 30 fps Duración del vídeo Elegir la duración del vídeo que se graba cuando se detecta movimiento (entre 5-30 segundos o 1-5 minutos).
- Page 107 FUNCIONAMIENTO DE LA CÁMARA Iluminación IR Alta/Normal/Económica. La luminosidad de los LED IR se puede adaptar a distintos entornos. PIR lateral El modo por detecto es Activo. Los dos sensores PIR permiten un ángulo de detección mayor y un tiempo de respuesta mejorado.
- Page 108 FUNCIONAMIENTO DE LA CÁMARA Idioma Inglés, alemán, sueco, español, francés, italiano, portugués, chino, polaco, japonés, neerlandés, eslovaco, checo Fecha y hora de sistema Aquí puede introducir la fecha en formato AAAA/MM/DD y la hora en formato 24 h. Use las teclas LEFT y RIGHT para desplazarse al campo siguiente.
- Page 109 FUNCIONAMIENTO DE LA CÁMARA Protección con contraseña Seleccione «on» para proteger la cámara con una contraseña. Se puede definir una contraseña de 4 dígitos o letras. Una vez definida la contraseña, la cámara la pedirá para permitir el acceso. Formatear la tarjetas de memoria Elimina todos los archivos almacenados en la tarjeta para prepararla para su reutilización.
- Page 110 FUNCIONAMIENTO DE LA CÁMARA Mientras lo hace, observe la pantalla de movimiento. Si se ilumina en azul, ha sido detectado por uno de los sensores de movimiento lateral activado. Si se ilumina en rojo, ha sido detectado por el sensor de movimiento frontal. De esta manera, puede encontrar la mejor alineación para la cámara.
- Page 111 VISUALIZAR/ELIMINAR GRABACIONES • Revisar imágenes en la pantalla LCD de la cámara • Coloque el interruptor de encendido en la posición TEST. • Pulse el botón Replay para activar el modo de revisión de imágenes. • Use los botones UP/DOWN para navegar por sus fotos o vídeos.
- Page 112 VISUALIZAR/ELIMINAR GRABACIONES Protección de archivos En el modo de reproducción, pulse Menu y busque la función Protect. Esta función permite proteger archivos individuales o todos los archivos guardados contra su eliminación accidental. Seleccione «Protect Single» para proteger el archivo ◆ actualmente seleccionado.
- Page 113 RESOLUCIÓN DE PROBLEMAS/PREGUNTAS COMUNES Las fotos no capturan el sujeto de interés Esto es el resultado de colocar la cámara en un entorno en el que hay movimiento asociado a las ramas de los árboles que crean movimiento o una zona en la que hay mucho calor en el primer plano y cualquier movimiento del viento.
- Page 114 RESOLUCIÓN DE PROBLEMAS/PREGUNTAS COMUNES La cámara no hace fotos Asegúrese de que la tarjeta micro SD no esté llena. Si la tarjeta está llena, la cámara no hará fotos. Puede activar la cáptura infinita. Compruebe que las baterías son alcalinas y están nuevas. Compruebe que el interruptor de encendido esté...
- Page 115 RESOLUCIÓN DE PROBLEMAS/PREGUNTAS COMUNES Obtendrá los mejores resultados cuando el sujeto esté dentro del alcance ideal del flash, no más lejos de 20 metros. Tenga en cuenta que cuando el parámetro «Número de captura» se fija en un valor superior a «1 Foto», o el intervalo entre fotos es muy corto, algunas imágenes pueden aparecer más oscuras que otras debido a la rápida respuesta y al rápido re-disparo de la cámara, lo que deja menos tiempo...
- Page 116 RESOLUCIÓN DE PROBLEMAS/PREGUNTAS COMUNES La marca de fecha/hora no aparece en las imágenes Compruebe que la marca de fecha/hora están en la posición «ON». El led del sensor PIR parpadea/no parpadea Cuando la cámara está en modo TEST, un led especial en la parte frontal de la cámara parpadeará...
-
Page 117: Especificaciones De La Cámara
ESPECIFICACIONES DE LA CÁMARA Resolución de foto 3/5/7/8/10/12/16/20/24/30/48 MP Resolución de vídeo 4K/ 2,7K/1080p/720p/VGA Formato de archivos JPG/MOV Longitud focal = 4 mm, F/NO = Lente 1,6, ángulo de visión = 92° Pantalla TFT LCD de 2,4" Memoria externa Tarjeta microSD de hasta 512GB Alcance del flash IR 20 m Distancia de activación... - Page 118 ESPECIFICACIONES DE LA CÁMARA Duración del vídeo 5-30 segundos o 1-5 minutos Foto+Vídeo Primero hacer foto, luego vídeo Activado/desactivado; Incluye Marca de la hora temperatura, fase lunar y fecha o fecha y hora Activado/desactivado; Time Lapse Time Lapse programable Se pueden especificar 2 intervalos Tiempo de grabación temporales;...
- Page 119 INSTRUCCIONES DE SEGURIDAD ELÉCTRICA Pare evitar daños a las personas o propiedades, lea y observe todas las instrucciones de seguridad eléctrica antes de usar el dispositivo. Seguridad de las pilas Mantenga todas las pilas fuera del alcance de los niños •...
- Page 120 El marcado CE cumple con las normas europeas e indica que el producto cumple con los requisitos de las directivas de la UE aplicables. La declaración de conformidad completa se puede encontrar en nuestro sitio web www.braun-phototechnik.de directamente en la página del producto. BRAUN Photo Technik GmbH Merkurstr. 8...
Need help?
Do you have a question about the BLACK500 4K and is the answer not in the manual?
Questions and answers