Table of Contents
Advertisement
Quick Links
Advertisement
Table of Contents

Subscribe to Our Youtube Channel
Related Manuals for Braun BLACK1320


Summary of Contents for Braun BLACK1320
- Page 26 BRAUN Scouting Cam BLACK1320 WiFi Solar 4K DS...
-
Page 27: Table Of Contents
Contents 1.Important tips..................01 2.Product presentation............... 02 3.Install battery & SD card .……............03 4.Usage of Camera …………………….........….……..04 5.Button feature introduction………........……..04 6.System Setting………………………........……….. 05 7.APP download & installation.………..........11 8.Camera connect with Phone by WIFI……………….......12 9.Installation and positioning…………........……..18 10.Specification parameters……….............19 11.FAQ …………………………..........……….20 12.Disclaimer………………….......………………….. -
Page 28: Important Tips
1. Important tips 1.1 About Batteries ● 8pcs 1.5V AA alkaline batteries are required for the maximum battery life. Used and new batteries cannot be mixed, do not mix battery types. Note: Do not use rechargeable batteries. The low voltage affects the use time of the camera. -
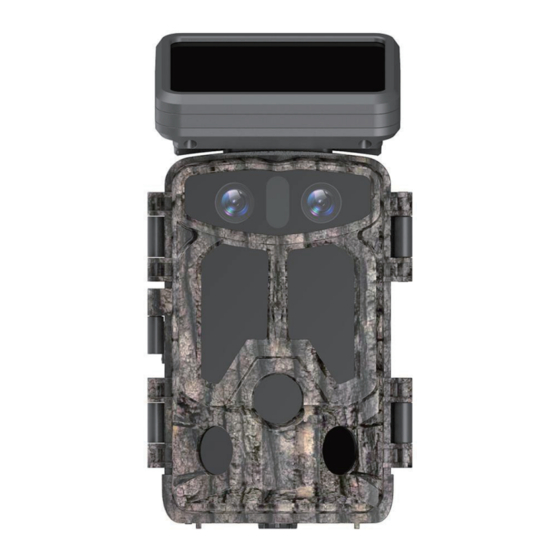
Page 29: Product Presentation
● Clean the PIR lens if it is dirty during use. ● Cleaning steps: Try to blow it off or gently pick out the dirt. Don't try to wipe it, otherwise it may cause scratches. PIR lens scratches reduce PIR detection performance. -
Page 30: Install Battery & Sd Card
2.3 Application scene ● For hunting and tracking of animal traces or habits. ● Used to observe the flowering process of plants. ● As an temperature-trigger security camera for homes, farms, offices, and communi- ties. ● Other indoor and outdoor monitoring where evidence of intrusion is required. 3.Install battery &... -
Page 31: Usage Of Camera
↓ 4.Usage of Camera 4.1 OFF mode: the switch key in “OFF” position means Power OFF mode. 4.2 SETUP mode: the switch key in “SETUP” position means settings mode. 4.3 ON mode: the switch key in “ON” position means it will be in monitoring mode after count down. -
Page 32: System Setting
6.System setting Pull the switch to “SETUP” mode, the camera enters the setting mode, the LCD will be turned on. On “SETUP” mode, press “MENU” button to enter the setting interface, then set system parameters according to the menu display on the screen, press UP/Down/LEFT / RIGHT button to move and change settings, and press “OK”... - Page 33 Name Setting Describe Mode Photo Choose the camera working mode. Video Photo + Video PIR Interval 5Seconds After the camera triggers shooting, the camera ↓ does not take photo and record again within the 59Minutes setting interval time, it can prevent the SD card from being filled fully with duplicate files.
- Page 34 IR LED OFF: the IR light won’t be turned on when the environment light is dark or all dark Note: Auto is recommended Side PIR Setup OFF: The sensors on both sides will not be turned on. Time Lapse When choosing “ON”, the camera automatically takes photos / video recording according as the set interval.
- Page 35 Image Size The options for photo resolution: the higher the 60MP(10320*5808) 24MP(6528*3672) resolution, the higher the 56MP(9984*5616) 20MP(6144*3456) quality and the bigger the 16MP(5376*3024) 52MP(9632*5408) file size of the recordings. 48MP(9248*5200) 13MP(4816*2704) 44MP(8832*4960) 8MP(3840*2160) 40MP(8416*4736) 5MP(3072*1728) 36MP(8000*4496) 3MP(2304*1296) 30MP(7392*4160) 2MP(1920*1088) at night 8MP(3840*2160) 3MP(2400*1344)
- Page 36 Video The options for photo video resolution 4K/30 Fps (3840*2160) resolution: the higher the resolution, 2.7K/30Fps(2704*1520) The higher the quality and the bigger 2K/30Fps(2560*1440) The file size of the recordings. 1296 30Fps(2304*1296) 1080P/30Fps(1920*1080) 720P/30Fps(1280*720) 480/30Fps(848*480) 360/30Fps(640*368) at night 1296 30Fps(2304*1296) 1080P/30Fps(1920*1080) 720P/30Fps(1280*720) 480/30Fps(848*480)
- Page 37 and set the current date & time. 2.Date Format: choose different date format. Time Format 12H and 24H Option for 12H or 24H Date Stamp The default is “ON”, If choosing OFF, then all watermarks in the picture and video files will not be displayed.
-
Page 38: App Download & Installation
WIFI 1minutes After turning on, the WIFI automatically Auto WIFI Of f 2minutes exits if it doesn’t connect camera 3minutes successfully within the set time. Beep sound The default is “ON” If choosing “OFF”, the buttons have no sound during the operation. Language English, French, This hunting camera supports multiple... -
Page 39: Camera Connect With Phone By Wifi
When the APP is downloaded and installed, the mobile terminal will prompt “Allow Hunting 4K to access photos and media on your device?” during the installation process. Please select “Allow” at this time. If not allowed, the APP cannot read camera pictures and videos(as picture) Android/IOS 8. - Page 40 ● After the countdown, the mobile phone will switch to its WLAN interface automatically select the “Hunting 4K” name, and follow the prompts to enter the password: 12345678 to connect to the camera WiFi as Figure 8. ● After the WiFi connection is successful, the camera displays as Figure 9. ●...
- Page 41 Figure 4 Figure 5 Figure 6 Figure 7 Figure 8 Figure 9 SSID:Hunting 4K PWD:12345678...
- Page 42 Figure 10 Figure 11 8.2 Steps for IOS system app connect camera ● Please confirm that the smartphone Bluetooth is on before operation, as Figure 1. ● Click the app icon, as Figure 2 “Hunting 4K”, the “Turn on Camera Bluetooth” interface pops up, as Figure 3.
- Page 43 ● Select “Hunting 4K” name and follow the prompts to enter the password 12345678 to connect to the camera WiFi, as Figure 10. ● After the WiFi connection is successful, the camera displays as Figure 11. Click “Hunting 4K”, then enter real time monitor screen as Figure12 to take photo and video, playback and set parameters etc.
- Page 44 Figure 4 Figure 5 Figure 6 SSID:Hunting 4K PWD:12345678 Figure 7 Figure 8 Figure 9 WIFI connection SSID:Hunting 4K Password:12345678...
-
Page 45: Installation And Positioning
9.Installation and positioning 9.1 Calibrate the camera installing position ● To verify that the camera effectively monitors the selected area, pull the switch to “SETUP” and fix the camera. ● Within the monitoring area you want, try different distances and angles to move repeatedly around the camera, the LED indicator flash to prove within the monitoring range. -
Page 46: Specification Parameters
10.Specification parameters Product name BRAUN Scouting Cam Black1320 WiFi Solar 4K DS LCD SCREEN 2.4” Camera Day: 13MP / Night: 2MP Lens FOV=100 Photo resolution Day: 60MP, 56MP, 52MP, 48MP, 44MP, 40MP, 36MP, 30MP, 24MP, 20MP, 16MP, 12MP, 8MP, 5MP, 3MP,... -
Page 47: Faq
Battery 8X1.5AA battery Built-in Microphone Speaker Built-in speaker Working temperature -20°C to +60°C Storage temperature -30°C to +65°C Camera weight About 482g Size 160x97x74MM 11.FAQ Problem analysis Solutions Camera can’t take 1. PIR protective film isn’t 1. Please check if remove the photo properly removed. -
Page 48: Disclaimer
No pictures inside 1.1.Bad SD/TF card. Change and format the SD/TF the SD/TF card 2.Whether the card is locked card, and check if the card can or not format the SD/TF . take photo and record properly. No photos or The battery voltage is too low Replace with the new battery video at night...
Need help?
Do you have a question about the BLACK1320 and is the answer not in the manual?
Questions and answers