Table of Contents
Advertisement
Quick Links
E-TMS-I-0524
Operator's Instruction Manual
Tile Saws
7" Model TMS-7
10" Model TMS-10
READ AND UNDERSTAND THE OPERATOR'S INSTRUCTION MANUAL
THOROUGHLY BEFORE ATTEMPTING TO OPERATE THIS EQUIPMENT.
Death or serious injury could occur if this machine is used improperly.
EQUIPMENT DEVELOPMENT COMPANY, INC.
Printed in USA
©2024
100 Thomas Johnson Drive, Frederick, MD 21702-4600 USA
Phone: 800-638-3326 or 301-663-1600 • Fax: 800-447-3326 or 301-663-1607
Website: www.edcoinc.com • E-mail: techsupport@edcoinc.com
Advertisement
Table of Contents

Subscribe to Our Youtube Channel
Related Manuals for Edco TMS-7


Summary of Contents for Edco TMS-7
- Page 1 E-TMS-I-0524 Operator’s Instruction Manual Tile Saws 7” Model TMS-7 10” Model TMS-10 READ AND UNDERSTAND THE OPERATOR’S INSTRUCTION MANUAL THOROUGHLY BEFORE ATTEMPTING TO OPERATE THIS EQUIPMENT. Death or serious injury could occur if this machine is used improperly. EQUIPMENT DEVELOPMENT COMPANY, INC.
-
Page 2: Safety Information
E-TMS10-I-0517 E-TMS-I-0524 SAFETY INFORMATION SAFETY MESSAGES ELECTRICAL POWERED EQUIPMENT CONTINUED • Safety Instructions are proceeded by a graphic alert symbol of DANGER, • Do not disconnect power by pulling cord. To disconnect, grasp the WARNING, or CAUTION. plug, not the cord. •... -
Page 3: Table Of Contents
Limited Equipment Warranty of Sale ......19 EDCO’s Online Customer Support ....... 20 800-638-3326 •... -
Page 4: Machine Safety Symbol Label Reference
E-TMS-I-0524 MACHINE SAFETY SYMBOL LABEL REFERENCE This symbol means that the guards must remain in place while the engine/motor on the machine is running because death or personal injury may result. (Yellow background with black pictogram and black outline) This symbol means that there are moving parts and if feet/fingers/digits are inserted under any edge of the cutter/grinder/saw cover while the engine/motor on the machine is running that personal injury and loss of foot/fingers/digits may result. - Page 5 E-TMS-I-0524 MACHINE SAFETY SYMBOL LABEL REFERENCE This symbol means that the Operator’s, owners, instruction and/or manufacturer(s) manuals must be read and understood before operating or attempting to operate this electrical, gasoline, diesel or propane powered equipment, failure to do so can result in personal injury and possible death. (Blue background with white pictogram.) This symbol means that proper eye protection must be worn/used during the operation of this equipment.
-
Page 6: California Proposition 65 Warning
California. While the exposure from EDCO products may be negligible or well within the “no significant risk” range, out of an abundance of caution, EDCO has elected to provide these Proposition 65 warnings. -
Page 7: Dust And Crystalline Silica Warning
E-TMS-I-0524 DUST AND CRYSTALLINE SILICA WARNING Grinding/cutting/drilling of masonry, concrete, metal and other materials can generate dust, mists and fumes containing chemicals known to cause serious or fatal injury or illness, such as respiratory disease, cancer, birth defects or other reproductive harm. If you are unfamiliar with the risks associated with the particular process and/or material being cut or the composition of the tool being used, review the material safety data sheets and/or consult your employer, the manufacturers/suppliers, governmental agencies such as OSHA and NIOSH and other sources... -
Page 8: Safety Guidelines
E-TMS-I-0524 Safety Guidelines READ AND UNDERSTAND THE OPERATOR’S INSTRUCTION MANUAL THOROUGHLY BEFORE ATTEMPTING TO OPERATE THIS EQUIPMENT. Death or serious injury could occur if this machine is used improperly. Safety warnings and guidelines do not by themselves eliminate danger. They are not given as substitutes for proper accident prevention procedures and good judgement. Eye and ear protection must be worn at all times while the Tile Saw is in use. -
Page 9: Dimensions And Weights
E-TMS-I-0524 Dimensions and Weights Note: Dimensions and Weights are approximate and subject to change. MODEL TMS-7 TMS-7 Dimensions & Weight with Stand Included Height 102cm 40” 68.6cm 27” Folded Folded 27” Width 24” 61cm Folded Length 51” 129.5cm 111.8cm 44” Folded... -
Page 10: Operating Controls
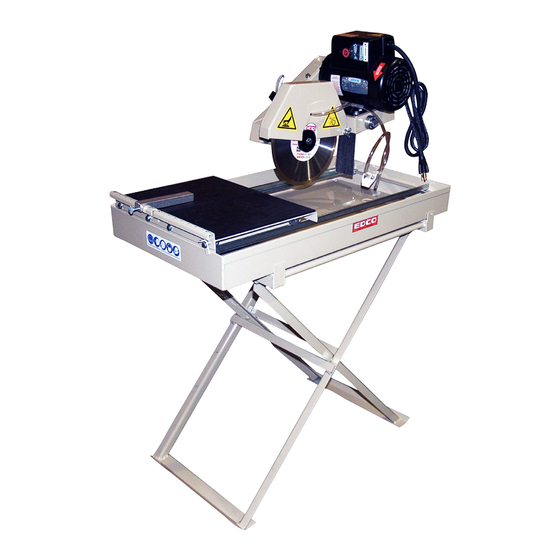
E-TMS-I-0524 Operating Controls TMS-7 A. Belt Guard B. Electric Motor D. Blade Guard E. Diamond Blade F. Water Tray G. Rolling Table Wheels H. Rolling Table J. Splash Guard Figure 1 C. On/Off Switch N. Table Latch K. Electric Motor O. - Page 11 E-TMS-I-0524 Operating Controls TMS-10 A. Belt Guard B. Electric Motor C. On/Off Switch D. Blade Guard E. Diamond Blade F. Water Tray G. Rolling Table Wheels H. Rolling Table Head Locking Handle J. Splash Guard Figure 4 K. Electric Motor L.
-
Page 12: Operating Instructions
When using diamond blades always keep water supply above minimum level to insure that blade is running cool. Use proper blade for material to be cut. On TMS-7 fill water pan up to shelf at the rear. Proper blade speed on TMS-10 is between 2400 RPM (1 HP) and 3400 RPM (1 1/2 HP) motor. - Page 13 E-TMS-I-0524 Before Starting: • Read and understand the instructions supplied by the motor manufacturer. • Familiarize yourself with all saw controls. (Figures 1-6) • Visually inspect the entire machine for damage or wear. Remove excess dirt or debris. Check that all nuts, bolts and screws are tightened.
- Page 14 E-TMS-I-0524 Starting the Saw: • Be sure blade is clear of item to be cut. • Be sure cutting head is secured in cutting position. • Turn motor power switch to on position and observe that motor comes to full speed before continuing. Cutting: •...
-
Page 15: Maintence Instructions
E-TMS-I-0524 Maintenance Instructions Disconnect power plug lead before performing Maintenance any maintenance on this machine. Consult the Motor Manufacturer’s Owner’s Manual for more detailed motor maintenance instructions. Changing the Blade: • Inspect the new blade thoroughly before installing. Check for cracks, loose segments, worn or out-of-round arbor holes. - Page 16 IMPORTANT: A belt must be replaced if it is showing wear. Refer to Figure 11 to remove belt cover for belt tensioning or replacement (see figures 1-3 for TMS-7). Note: Keep track of where hardware goes for reassembly. 1. Remove lock nuts 2 each “A” & “B”.
-
Page 17: Maintence Schedule
E-TMS-I-0524 Maintenance Schedule Repairs are to be done Read and follow instructions by authorized EDCO in the Engine Manufacturer’s Dealers only. Owner’s Manual. This is for a quick reference to the information supplied in the Maintenance portion of this manual. - Page 18 E-TMS-I-0524 THIS PAGE LEFT BLANK INTENTIONALLY 1-800-638-3326 1-800-638-3326 • edcoinc.com • techsupport@edcoinc.com Page 18...
-
Page 19: Limited Equipment Warranty Of Sale
*Seller reserves the right to alter payment terms. EDCO will, at its option, repair or replace, at the EDCO factory or at a point designated by EDCO, any part which shall appear to the satisfaction of EDCO inspection to have been 3. -
Page 20: Edco's Online Customer Support
EDCO product group. The information in these tracks help businesses be successful with those products. EDCO is always updating online training / information so you always have the most recent content. Also see Operator’s Safety & Limited Warranty Manual Equipment Development Co., Inc.
Need help?
Do you have a question about the TMS-7 and is the answer not in the manual?
Questions and answers