
Related Manuals for Vector VECBC50


Summary of Contents for Vector VECBC50
- Page 1 VECBC50 15 AMP 12-VOLT BATTERY CHARGER INSTRUCTION MANUAL SAVE THIS INSTRUCTION MANUAL FOR FUTURE REFERENCE. © 2024 Baccus Global LLC Boca Raton, FL 33432 (877) 571-2391...
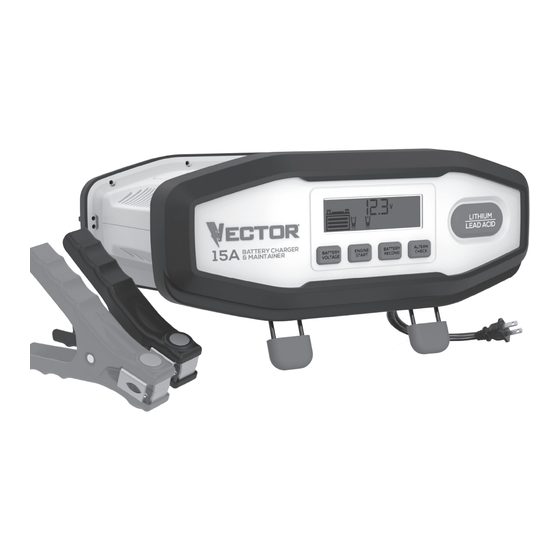
- Page 2 FEATURES FEATURES 1. Lithium/Lead Acid Button 2. LCD Screen 3. Battery Voltage Check Button 4. Engine Start Button 5. Battery Recondition Button 6. Alternator Check Button 7. Positive (Red) Clamp 8. Negative (Black) Clamp 9. 120 volt AC Plug 10. Cooling Fan...
- Page 3 LCD DISPLAY DETAIL LCD DISPLAY DETAIL A. Battery Reconditioning Icons I. Alternator Icon B. Battery Recondition Indicator J. Pump Engine Icon C. High Temperature Compensation Icon K. Overheat Alarm Icon D. Low Temperature Compensation Icon L. Alarm Icon E. Digital Display (varies by function) M.
-
Page 4: Safety Guidelines - Definitions
SAFETY GUIDELINES / will cause a drop in line voltage resulting in loss of power and overheating. The following table shows the correct size to use depending on cord length and nameplate ampere rating. If in doubt, use the next heavier DEFINITIONS gauge. -
Page 5: First Aid
• Be extra cautious to avoid dropping a metal tool onto the battery. It might spark or short-circuit the battery or another electrical part, and that may cause an explosion. Congratulations on purchasing your Vector Battery Charger. Read this ®... - Page 6 OPERATING INSTRUCTIONS 3. Check polarity of battery posts. POSITIVE (POS, P, +) battery post usually has larger diameter than NEGATIVE (NEG, N, –) post. 4. Determine which post of battery is grounded (connected) to the CHARGING A 12V LITHIUM LIFEPO4 chassis.
- Page 7 “+” and “–” signs on both the Clamp Icons and the Battery Icon flash) and a warning will sound until the clamps are disconnected: IMPORTANT: If the unit is overheated, the overheat alarm icon and Fault Icon Unplug the charger; then remove the clamps. Reconnect the clamps will flash.
-
Page 8: Checking The Battery Voltage
solid. In this mode, the unit monitors the battery voltage and charges 1. Press the Alternator Check Button to start the check. The LCD Screen as necessary to assure the battery maintains full capacity. The unit will display the following to indicate the unit is analyzing the alternator: remains in float charge mode as long as the charger is connected to the battery and plugged into a functioning AC outlet. -
Page 9: Troubleshooting
Using the Engine Start Function commencing from the date of retail purchase by the original end-user purchaser or from the date of delivery of the good, whichever occurs later IMPORTANT: Engine Start is only to be used with lead acid batteries. (“Warranty Period”). - Page 10 VECBC50 CARGADOR DE BATERÍA DE 12 VOLTIOS - 15 AMPERIOS MANUAL DE INSTRUCCIONES GUARDE ESTE MANUAL DE INSTRUCCIONES PARA FUTURAS CONSULTAS. © 2024 Baccus Global LLC Boca Raton, FL 33432 (877) 571-2391...
- Page 11 CARACTERÍSTICAS CARACTERÍSTICAS 1. Botón de Litio/Plomo Ácido 2. Pantalla LCD 3. Botón de Verificación del Voltaje de Batería 4. Botón de Arranque del Motor 5. Botón de Reacondicionamiento de Batería 6. Botón de Verificación del Alternador 7. Abrazadera Positiva (Roja) 8.
-
Page 12: Battery Icon
DETALLES DE LA PANTALLA LCD LCD DISPLAY DETAIL A. Battery Reconditioning Icons I. Alternator Icon Iconos de Reacondicionamiento de Batería I. Icono del Alternador B. Battery Recondition Indicator J. Pump Engine Icon Indicador de Reacondicionamiento de la Batería J. Icono del Motor de la Bomba Icono de Compensación de Alta Temperatura K. -
Page 13: Lea Todas Las Instrucciones
DIRECTRICES DE PELIGRO – Nunca altere el cable de CA ni el enchufe proporcionado – si no encaja en el tomacorriente, haga que un electricista SEGURIDAD / DEFINICIONES calificado instale un tomacorriente adecuado. Una conexión incorrecta puede provocar un riesgo de descarga eléctrica. PELIGRO: Indica una situación de peligro inminente que, si no se Cables de Extensión... -
Page 14: Primeros Auxilios
• Revise periódicamente el cargador de batería y los componentes para INTRODUCCIÓN detectar desgaste. No desmonte la unidad. Felicitaciones por la compra de su Cargador de Batería Vector®. Lea este Manual de instrucciones y siga las instrucciones cuidadosamente INSTRUCCIONES DE SEGURIDAD antes de usar su nuevo cargador de batería. -
Page 15: Ubicación Del Cargador
Cargar una batería que ha sido retirada de un la batería. Asegúrese de que todos los accesorios del vehículo estén apagados para no provocar un arco. vehículo 4. Limpie los terminales de la batería, teniendo cuidado de evitar que ADVERTENCIA – una chispa cerca de la batería puede material corrosivo entre en contacto con los ojos. - Page 16 descritos en la sección “INSTRUCCIONES DE SEGURIDAD IMPORTANTES” al principio de este manual. IMPORTANTE: Si las abrazaderas están conectadas correctamente con respecto a la polaridad y la unidad está conectada correctamente a la toma de CA, la unidad estará en modo de carga de litio y la pantalla LCD mostrará...
- Page 17 La pantalla digital muestra la corriente de salida que está cargando la La Pantalla Digital muestra el voltaje actual de la batería conectada y batería. Los Íconos de Abrazadera se iluminan de forma fija y las barras en LI alternativamente durante 10 segundos en el modo de carga de litio. el Ícono de Batería cambiarán de vacías a fijas (de abajo hacia arriba) para La Pantalla Digital muestra el voltaje actual de la batería conectada indicar que la unidad está...
-
Page 18: Solución De Problemas
El Ícono del Alternador parpadeará y el Ícono de Batería con dos 2. Presione el Botón de Arranque del Motor. La Pantalla LCD mostrará barras se iluminará de manera fija. lo siguiente: 2. Si la unidad detecta que el alternador está en buen estado, la pantalla LCD mostrará... -
Page 19: Especificaciones
GARANTÍA LIMITADA DEL FABRICANTE DE UN AÑO El fabricante, Baccus Global LLC, ofrece garantía por este producto contra defectos de materiales y de mano de obra por un período de UN (1) AÑO a partir de la fecha de compra minorista por parte del comprador que sea el usuario final original o desde la fecha de entrega del bien, cualquiera que sea la fecha que ocurra más tarde (“Período de Garantía”).
Need help?
Do you have a question about the VECBC50 and is the answer not in the manual?
Questions and answers
I CAN'T GET THE CHARGER TO GO TO LEAD ACID BATTERY PHOSE
To set the Vector VECBC50 charger to lead acid battery mode, ensure the unit is properly connected to a power source and the battery with correct polarity. Then, press the "Lithium/Lead Acid" button once to select the lead acid battery mode. The LCD screen will display the battery clamp icon, the battery icon, and the battery voltage.
This answer is automatically generated
Why does the word "FLO" appear when charging?