KOBE CHX30 Manual
Hide thumbs
Also See for CHX30:
- Installation instructions and operation manual (72 pages) ,
- Installation instructions and operation manual (26 pages) ,
- Installation instructions and operation manual (24 pages)
Advertisement
Quick Links
CHX30 Parts Location and Replacement
This basic guide is to show the parts location of the CHX30 and how to remove or install certain parts.
To see more detailed guidelines, please visit:
For 290 CFM models: CHX3030PDS-SC, CHX3036PDS-SC, CHX3030PDS-GC, CHX3036PDS-GC
For 400 CFM models: CHX3030PDS-SL, CHX3036PDS-SL, CHX3030PDS-GL, CHX3036PDS-GL
3
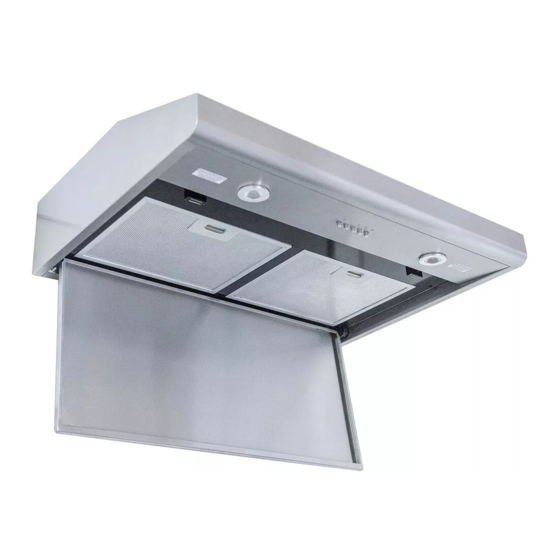
1. Aluminum Filter
2. Push Button Control
3. Light Fixture (CFL)
4. Bottom Casing
KOBE Range Hoods
"So Quiet...You Won't Believe It's On!"
Overall Snapshot of CHX30
2
4
1
Part #16 – See "Parts List" page on manual)
(Manual
Part #5 – See "Parts List" page on manual)
(Manual
Part #8 – See "Parts List" page on manual)
(Manual
Part #11 – See "Parts List" page on manual)
(Manual
Page 1 of 6
Version 20160725
Kobe Service and Repair
3
1
Advertisement

Related Manuals for KOBE CHX30


Summary of Contents for KOBE CHX30
- Page 1 “So Quiet…You Won’t Believe It’s On!” CHX30 Parts Location and Replacement This basic guide is to show the parts location of the CHX30 and how to remove or install certain parts. To see more detailed guidelines, please visit: Kobe Service and Repair...
- Page 2 KOBE Range Hoods “So Quiet…You Won’t Believe It’s On!” Accessing the Push Button Control Figure 1 Figure 2 Figure 3 Figure 4 Warning: For the process above, loosen Accessing the Light Fixture the screw first with a hand tool screw driver.
- Page 3 KOBE Range Hoods “So Quiet…You Won’t Believe It’s On!” Removing the Impeller Figure 1 Figure 2 Figure 3 Figure 4 Figure 5 Figure 6 Part #13 – See “Parts List” page on manual) 5. Safety Screen (Manual Warning: For the Part #10 –...
- Page 4 KOBE Range Hoods “So Quiet…You Won’t Believe It’s On!” Attaching the Motor Note: When placing back the motor, make sure that the wire is properly placed underneath the wiring guard. This is to prevent the wire from turning loose and hitting the turbine impeller.
- Page 5 KOBE Range Hoods “So Quiet…You Won’t Believe It’s On!” Attaching Back the Impeller Figure 1 Figure 2 Warning: Do not overtighten the nut. Figure 3 Figure 4 Note: When attaching back the impeller, make sure that the open tube in the middle of the impeller is aligned evenly to the metal rod in the center of the motor.
- Page 6 KOBE Range Hoods “So Quiet…You Won’t Believe It’s On!” More on attaching the impeller: Figure 1 Figure 2 Warning: Make sure to attach the screw on the flat surface of the motor’s metal rod. Figure 3 Page 6 of 6...
Need help?
Do you have a question about the CHX30 and is the answer not in the manual?
Questions and answers