Table of Contents
Advertisement
Quick Links
Advertisement
Table of Contents

Subscribe to Our Youtube Channel
Related Manuals for Sanus BMF320-B3


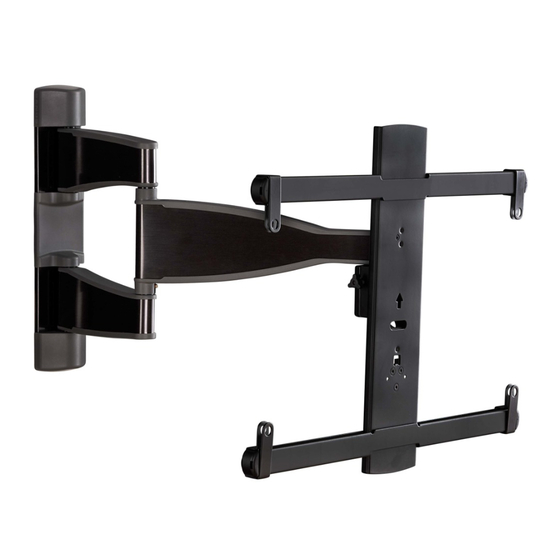
Summary of Contents for Sanus BMF320-B3
- Page 1 BMF 320 -B 3 INSTRUCTION MANUAL MANUEL D’INSTRUCTIONS Texte français page 26...
- Page 2 ? Call us at: 800-359-5520 Appelez-nous au : 800-359-5520 Watch it now at: Check it out at: SANUS.com/2801 SANUS.com/2566 Or, chat at: SANUS.com/chatSP Regardez-la maintenant sur : Découvrez-le sur : Ou, discutez en ligne sur : SANUS.com/2801 SANUS.com/2566...
-
Page 3: Before You Begin
Before you begin Remove the stand Install any accessories Protect the face from your TV of your TV — if attached. you may have purchased — if they when laying it down for installation. require the TV to be removed from the wall for assembly. - Page 4 ● Manufacturer is not responsible for damage or injury caused by incorrect assembly or use. If your TV (including accessories) exceeds this weight, this mount is NOT compatible. TV Weight Limit Visit SANUS.com or call customer service to 55 lbs. (including accessories) find a compatible mount.
-
Page 5: Wall Construction
Wall wood studs Solid concrete or CAUTION: concrete block Construction DO NOT install ONLY install on in drywall alone these acceptable wall types. Drywall alone will hold Unsure the weight of your TV. ACCEPTABLE ACCEPTABLE Call Customer Service 1-800-359-5520 Tools Needed 7/16 in. - Page 6 STEP 1 Attach TV Bracket to TV WARNING: This product contains small items that could be a choking hazard if swallowed. Before starting assembly, verify all parts are included and undamaged. If any parts are missing or damaged, do not return the damaged item to your dealer; contact Customer Service. Never use damaged parts! NOTE: Not all hardware included will be used.
- Page 7 1.1 Select TV Screw Diameter 1.2 Select TV Screw Length and Spacers Only one screw size fits your TV. NO SPACER SPACER NEEDED • Flat Back TV • Flat Back TV • Rounded or with Irregular Back TV Extra Space Needed [TV brackets lay flat on your TV] [for deep inset holes...
- Page 8 1.3 Attach TV Brackets to Your TV MEASURE ADJUST TO WIDTH inches inches inches 7 ⅞ 7 ⅞ 11 ¾ 11 ¾ 15 ¾ 15 ¾ 300 mm position illustrated inch dimensions are approximate Measure the WIDTH and HEIGHT of your TV's mounting hole pattern. Adjust mounting tabs on TV brackets to match the width...
- Page 9 ASSEMBLE FOR HEIGHT ASSEMBLE FOR HEIGHT For height 200 mm or less For height greater than 200 mm ≤ 200 mm > 200 mm For hole pattern height 200 mm and less, align horizontal TV For hole pattern height greater than 200 mm, align horizontal TV brackets with mounting tabs to the inside.
- Page 10 1. 3 (continued) CENTER LOOSELY ASSEMBLE NO SPACER SPACER NEEDED Adjust TV brackets to align with your TV hole pattern. Install using the TV bracket must be centered on your TV, but can be offset up or screw /washer /spacer combination you selected for your TV.
- Page 11 SECURE ASSEMBLY TIGHTEN ALL SCREWS Securely tighten the screws from STEP 4 and STEP 6. Secure the TV brackets using four interface screws , starting with the top two screws in the notches shown.
- Page 12 STEP 2 Attach Wall Plate to Wall WARNING: This product contains small items that could be a choking hazard if swallowed. Before starting assembly, verify all parts are included and undamaged. If any parts are missing or damaged, do not return the damaged item to your dealer; contact Customer Service. Never use damaged parts! NOTE: Not all hardware included will be used.
-
Page 13: Wood Stud Installation
STEP 2A Attach Wall Plate Wood Stud Installation CAUTION: Avoid potential Min. 3 ½ in. (8.9 cm) personal injury or property damage! Min. 1 ½ in. (3.8 cm) ● Drywall covering the wall must not exceed 5/8 in. (1.5 cm) Max. - Page 14 /2566 1/8 in. (3 mm) To calculate your precise wall plate location, Be sure you drill into the check out our HeightFinder at sanus.com TIP: CAUTION: CENTER of the stud. [www.sanus.com/2566]. Drill two holes using a 1/8 in. (3 mm) diameter drill bit.
- Page 15 SECURELY TIGHTEN INSERT COVERS CAUTION: TIP: You can make small Avoid potential personal injury or property damage! level adjustments by loosening Both lag bolts MUST BE firmly tightened to prevent unwanted the bottom lag bolt movement of arm assembly . Ensure the wall plate is securely shifting the wall plate until level.
- Page 16 Consider this when selecting the location of your wall mount. To calculate your precise wall plate location, check out TIP: TIP: our HeightFinder at sanus.com [www.sanus.com/2566]. Position wall plate template on the wall at your desired height. Level and mark the hole locations.
- Page 17 DRILL INSERT ANCHORS REMOVE COVERS 3 in. (7.5 cm) 3/8 in. (10 mm) Be sure the anchors are seated Never drill into the mortar CAUTION: CAUTION: CAUTION: CAUTION: flush with the concrete surface. between blocks. Drill two pilot holes using a 3/8 in. (10 mm) drill bit. Insert two anchors Remove wall plate covers IMPORTANT:...
- Page 18 STEP 2B (continued) SECURELY TIGHTEN INSERT COVERS CAUTION: TIP: You can make small Avoid potential personal injury or property damage! level adjustments by loosening Both lag bolts MUST BE firmly tightened to prevent unwanted the bottom lag bolt movement of arm assembly .
-
Page 19: Attach Tv To Wall Plate
STEP 3 Attach TV to Wall Plate WARNING: Before starting assembly, verify this part is HANG YOUR TV undamaged. If damaged, do not return the damaged item to your dealer; HEAVY! contact Customer Service. Never use damaged parts! You may need assistance with this step. - Page 20 STEP 3 (continued) SECURELY TIGHTEN ATTACH CAUTION: Avoid potential personal injury or property damage! Always make sure your securement screw is tightened, so the TV is securely fastened to the arm assembly Press the bottom of the TV into the arm assembly until you hear To lock the TV onto arm assembly , install the securement...
-
Page 21: Manage Cables
Manage Cables ROUTE CABLES ATTACH COVERS IMPORTANT: Pull arm to its full extension, to leave enough slack and prevent stretching the cables when the arms are moved. Remove the cable covers from the arm by sliding to unlock. Reattach cable covers to capture the cables. - Page 22 Adjustments LEVEL ADJUSTMENT TILT ADJUSTMENT TILT NOTE: If you do not intend to adjust the tilt for different viewing locations, you can tighten the tilt tension knobs , to prevent unwanted movement. If needed, use hex key to tighten more firmly. CAUTION: Screw MUST be loosened before STEP 2.
- Page 23 EXTEND / RETRACT -- ONLY IF NECESSARY CAUTION: Avoid potential personal injury or property damage! DO NOT remove screws , only turn enough for slight adjustment. TIP: ONLY If needed, adjust the arm tension when you extend or retract your TV, with screw using hex key...
- Page 24 REMOVE THE TV Disconnect all cables from the TV. Remove securement screw HEAVY ! You may need assistance with this step. Pull down on the release cord to release the TV. Carefully lift the TV from arm assembly...
-
Page 25: Troubleshooting
Troubleshooting If you are uncertain about your hardware selection, contact Customer Service TV SUPPLIED SPACERS Use your TV supplied spacer for: Use your TV supplied spacer and spacer for: • Flat Back TV • Rounded or Irregular Back TV with Extra Space Needed •... - Page 26 Poids limite Si votre téléviseur (avec les accessoires) pèse plus, Ce support n’est PAS (avec les accessoires) 24,9 kg compatible. Visitez SANUS.com ou composez le NE PAS DÉPASSER (55 lbs.) 1-800-359-5520 pour trouver un support compatible. La construcción de su pared...
-
Page 27: Avant De Commencer
Français Avant de commencer Retirez le support de votre téléviseur...s'il est installé, bien sûr. Installez tous les accessoires que vous prévoyez d'ajouter à votre téléviseur. Vérifiez les manuels d'installation de tous ces accessoires pour savoir s'ils doivent être INSTALLÉS AVANT de monter le téléviseur. Protégez l'écran de votre téléviseur lorsque vous le déposez pour l'installation. - Page 28 Français 1,3 Fixez les supports de fixation sur votre téléviseur PAGE 8 MESUREZ Mesurez la LARGEUR et la HAUTEUR des trous de montage de votre téléviseur. AJUSTEZ PAR RAPPORT À LA LARGEUR Ajustez les languettes de montage se trouvant sur les supports de fixation pour téléviseur de sorte à...
- Page 29 INSTALLEZ LE GABARIT CONSEIL : Pour trouver l'emplacement précis de la plaque murale, visitez sanus.com [www.san.us/2566] et consultez la rubrique « HeightFinder ». Disposez le gabarit de la plaque murale à la hauteur désirée et placez les trous allongés sur la ligne centrale du montant. Mettez le gabarit à niveau et marquez l'emplacement des trous.
- Page 30 INSTALLEZ LE GABARIT CONSEIL : Pour trouver l'emplacement précis de la plaque murale, visitez sanus.com [www.san.us/2566] et consultez la rubrique « HeightFinder ». Posez gabarit de la plaque murale sur le mur à la hauteur souhaitée. Mettez le gabarit à niveau et marquez l'emplacement des trous.
- Page 31 Français ÉTAPE 3 Fixez le téléviseur à la plaque murale PAGE 19 MISE EN GARDE : Avant de commencer l'assemblage, vérifiez que cette pièce n'est pas endommagée. Si elle est endommagée, ne retournez pas l'article endommagé à votre revendeur. Contactez le service clientèle. N'utilisez jamais de pièces endommagées ! ACCROCHEZ LE TÉLÉVISEUR LOURD ! Vous aurez peut-être besoin de quelqu'un pour vous aider à...
-
Page 32: Réglages Du Téléviseur
Français Gestion des câbles PAGE 21 FAITES PASSER LES CÂBLES REMARQUE: Allongez complètement le bras pour laisser suffisamment de jeu et éviter que les câbles soient étirés lorsque les bras sont déplacés Retirez le cache-câble C du bras . Faites passer les câbles à travers le bras REPLACEZ LE CACHE-CÂBLE Refixez le cache-câble C . -
Page 33: Dépannage
Français RETRAIT DU TÉLÉVISEUR PAGE 24 LOURD ! Vous aurez peut-être besoin de quelqu'un pour vous aider à cette étape. 1. Débranchez tous les câbles du téléviseur. 2. Retirez la vis de sécurisation 3. Tirez la bague de dégagement vers le bas pour libérer le téléviseur. 4. Soulevez doucement le téléviseur du bras Dépannage PAGE 25... - Page 34 Dimensions in. [mm] TV INTERFACE 18.03 458.0 3.94 100.0 15.75 16.40 3.94 400.0 416.6 100.0 0.38 16.28 413.4 WALL PLATE TOP VIEW - EXTENDED SIDE VIEW - EXTENDED 2.59 0.33 65.8 20.00 5° 508.1 60.00° 13.03 11.39 331.0 289.3 SIMULATED 49" FLAT SCREEN TV 15°...
- Page 35 Trouvez des conseils d’installation, des trucs et des solutions pour la maison. View step-by-step product videos to ease your install experiences. Find the latest news stories about your favorite SANUS products. YOUTUBE.COM/SANUSSYSTEMS Visionnez des vidéos étape par étape sur les produits pour faciliter votre expérience d’installation.
- Page 36 Legrand n’assume aucune responsabilité quant à l’exactitude, l’exhaustivité ou la su sance des informations contenues dans ce document. ©2023 Legrand AV Inc. All rights reserved. SANUS is a division of Legrand. All other brand names or marks are used for identification purposes and are trademarks of their respective owners.
Need help?
Do you have a question about the BMF320-B3 and is the answer not in the manual?
Questions and answers