Table of Contents
Advertisement
Quick Links
Advertisement
Table of Contents

Related Manuals for Custom Audio Electronics P80C


Summary of Contents for Custom Audio Electronics P80C
- Page 1 USER MANUAL P80C...
- Page 3 THE CE MARK AFFIXED TO THE CUSTOM S.p.A. GENERAL SAFETY INFORMATION PRODUCT CERTIFY THAT THE Your attention is drawn to the following actions Via Berettine 2/B PRODUCT SATISFIES THE BA- that could compromise the characteristics of the 43010 Fontevivo (PARMA) - Italy SIC SAFETY REQUIREMENTS.
-
Page 5: Table Of Contents
TABLE OF CONTENTS INTRODUCTION ..................................6 ................................. 6 RODUCT COMPOSITION ................................8 RINTER MAIN PART NAME MAIN FUNCTIONS ................................9 .......................... 9 APER FEED BUTTON AND STATUS NOTIFICATION LAMP INSTALLATION METHOD ..............................11 ..........................11 ECOMMENDED SIZE FOR PANEL INSTALLATION I ............................ -
Page 6: Introduction
INTRODUCTION P80C series printers are designed to be installed or connected to a kiosk system. 1 Product composition P80C Cover open key Screw (M3x3.5) Paper shift Mount bracket... -
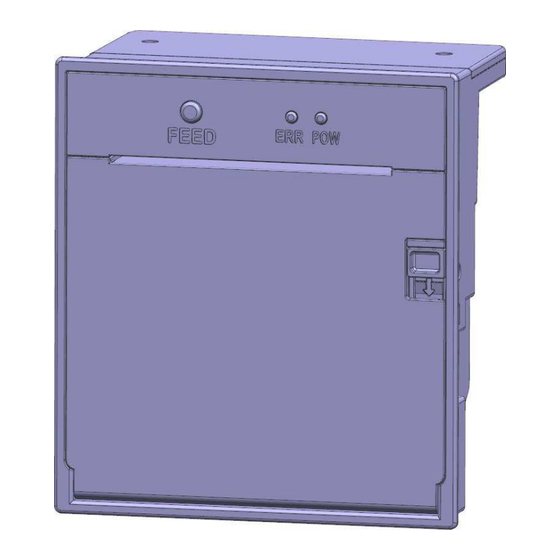
Page 8: Printer Main Part Name
2 Printer main part name Error lamp Feed Button Power lamp Mechanism Cover key hole paper shaft Cover open key Mount screw Mount screw Flatten block Movable blade of cutter USB port Power port Serial port... -
Page 9: Main Functions
MAIN FUNCTIONS 1. Paper feed button and status notification lamp Paper feed button Paper feed button The FEED button can perform the following functions. ① Paper transfer : Pressing the transfer button with the paper inserted transfers the paper while it is being pressed. - Page 10 Notification lamp status Alarm sound Status of printer Flashing briefly Beep(briefly) No paper Flashing for a long time Beep(Long term) Cover open, cutter jammed, paper jammed, etc...
-
Page 11: Installation Method
INSTALLATION METHOD 1 Recommended size for panel installation - Width : 113.6mm, - Length : 127.6mm, - Panel thickness : T1.0 or T1.6 2 How to install the panel printer I Put the product in the square hole of the panel.. - Page 12 Open the printer cover. 3) Tighten the two mounting screws for fixing the panel.. Mounting screws When fixing the mounting screw, be careful to fix it as excessive force may cause CAUTION deformation of the product.
-
Page 13: How To Install The Panel Printer Ii
3 How to install the panel printer II Put the product in the square hole of the panel. Fix up the fixing brackets on both sides using screws. (Fixing brackets, screws supplied separately) Screw Bracket Screw Bracket... -
Page 14: How To Use A Printer
HOW TO USE A PRINTER 1 Interface connection Use the interface cable that connects to the host that meets the specifications Serial port USB port Make sure to turn off the power switch when connecting the communication cable. -
Page 15: Paper Change
2 Paper change How to open the cover ① Move cover open lever in the direction of the arrow until is caught. Cover open lever Lever open status ③ Insert the cover open key in the hole and press it in the direction of the arrow until the cover is opened. - Page 16 How to fix the paper ① Insert the paper shaft into the paper pipe and fit it into the product guide groove. Paper hanging shaft Thermal paper Guide groove for the paper hanging shaft Be careful not to change the printing side of the paper.
- Page 17 ② Make sure the end of the paper is out of the printer and close the cover. Press the center of the cover in the direction of the arrow to close it. CAUTION When closing the cover, press firmly on the middle part of the cover (near the arrow) to close it. Failure to do so may result in blurred printing.
- Page 18 2. Power on and hold the feed button (approximately 1 second) until the red notification light flashes, and when the feed button is released, printing starts. 3. The following contents will be printed. ****************************** ● Model Name P80C Control Board Firmware : VerX .XX ● Firmware Version and Created Date Create...
-
Page 19: Hex Dump Print
3 HEX DUMP PRINT Turn on the power after placing the Dip SW1 number 8 to ON position. After printing as [HEX DUMP MODE], it will print all receiving datas to 16 hexadecimal data for all receiving datas. This would be useful when developing an application because this notifies the transmission status. Prints if 12 digits is received. -
Page 20: Printer Function Setting
PRINTER FUNCTION SETTING There are two ways to set the printer's functions such as serial communication conditions, Ethernet, black mark, etc., which are: a manual setting method in which the printer itself is changed, and a method using tools such as a memory switch program that connects to a PC. For the direct communication method through the Window Driver, refer to the separate manual attached with the setting program on our website. - Page 21 [Print Density] -> 1. Normal 2. Medium 3. Dark 4. Most Dark -> : Indicate current set status Select and then Enter... “->” indicates the currently set value. 3) In the same way, press for less than 1 second to toggle to the item you want to change and then set the item.
-
Page 22: Firmware Update
2 Firmware update With the adoption of flash memory, you can easily update the printer program from a PC. When updating, be sure to read the steps below. 1) Turn the power off and then back on. 2) Make sure that the communication cable is connected with the printer. (You can shorten the update time by using a USB cable.) 3) Run the provided update program, set the model name and communication port, and perform the update. -
Page 23: Product Specifications
PRODUCT SPECIFICATIONS 1 Specification ITEM SPECIFICATION Printing method Thermal dot line printing Resolution (dot size) 203 DPI Dots per line 576 dots Paper feed width (1 step) 0.125 mm 50 ㎛ ~ 80 ㎛ Paper thickness Paper width 80 mm Φ... -
Page 24: Interface Specification
INTERFACE SPECIFICATION 1 USB - Standard : USB 2.0 Compatible, Full Speed(12Mb) response - Connector : Type B - Cable : USB2.0 Standard Cable - Data Method : Bulk IN, Bulk OUT * Bulk IN : End point 6 * Bulk OUT : End point 2 * Full Speed : Max Packet Size 64 Byte(Bulk OUT),64 Byte(Bulk IN) -
Page 25: Serial (Rs-232C)
2 Serial (RS-232C) : Serial Data Transfer Method - Handshake : Hardware (RTS/CTS or DTR/DSR) - Baud Rate : 9600, 19200, 38400, 57600, 115203., BPS - Data Bit : 8 bit - Parity : None, Odd, Even - Stop Bit : 1, 2 bit - Connector: Hanlim CHD1140-4 - Cable : DSUB9(Female) - 4pin Custom Cable Printer... -
Page 26: External Dimension
EXTERNAL DIMENSION... -
Page 27: Command Specifications
COMMAND SPECIFICATIONS Classification Function Page Print and line feed Print and line feed Delete print data Horizontal tab SUB x Extended Graphic Mode, Korean mode SUB R Border of characters Border of characters SUB s Set print speed ESC D Set horizontal tab position Set the amount of space to the right of ASCII characters ESC SP... - Page 28 Set Korean character mode in extended graphic mode FS & Cancel Korean character mode in extended graphic mode FS - Set Korean Character underline FS S Set Korean Character blank spacing FS W Set Korean Character size FS q NV logo (bit image) registration FS p NV logo printing GS !
- Page 29 Function Print and line feed Code ASCII Decimal Description Same as LF Function Print and line feed ASCII Code Decimal Description ① STANDARD MODE: Prints data and line feeds as the line space setting. ② PAGE MODE: Line feeds as the line space setting. Caution LF immediately after CR is ignored.
- Page 30 SUB+’x’+n Function Extended Graphic Mode, Korean mode Code ASCII Decimal 0≤n≤1 Range Initial value Description n=0: Korean mode - When the first code is A1h or higher, 2 bytes are processed and converted into Korean automatically. n=1: Extended Graphic Mode - All codes are processed as 1-byte codes. Extended Graphic characters can be printed.
- Page 31 Initial n=14 value Description n=1: Prints at a speed of 70mm/s. n=2: Prints at a speed of 80mm/s. n=3: Prints at a speed of 90mm/s. n=4: Prints at a speed of 100mm/s. n=5: Prints at a speed of 110mm/s. n=6: Prints at a speed of 120mm/s. n=7: Prints at a speed of 130mm/s.
- Page 32 ESC+’D’+n1…nk+NUL Function Horizontal tab position setting Code ASCII n1…nk NUL n1…nk 00 Decimal n1…nk 0 1≤n≤255, 0≤k≤32 Range Description Set the horizontal tab position. n denotes the number of digits from the start of the line to the set Caution position.
- Page 33 ESC+’!’+n Function Collective setting of ASCII character decorations Code ASCII Decimal 0≤n≤255 Range Initial value Description Sets the font and character decoration all at once Caution For Korean, only font and highlight are applied. Function Decimal 0: Font 12x24, Select 24x24 1: Font 8x16, Select 16x16 0: Highlight off 1: Highlight on...
- Page 34 ESC+’$’+nL+nH Function Setting of absolute position Code ASCII Decimal 0≤nL+nH×256≤65535, 0≤nL≤255, 0≤nH≤255 Range Initial nL=0, nH=0 value Description The print position is moved from the end of the left margin to the (nL+nH×256)×0.125mm position. When the print area is exceeded, it moves to the end point of the left margin.
- Page 35 ESC+’*’+m+nL+nH+d1+…+dk Function Setting of bit image Code ASCII d1…dk d1…dk Decimal d1…dk Range m = 0, 1, 32, 33 1≤nL+nH×256≤1023, 0≤nL≤255, 0≤nH≤3, 0≤d≤255 Initial value Description Bit data is printed as graphic data in mode m by the number of dots designated by nL+nH×256.
- Page 36 8-dot mode 2X―――→ 2X―――→ ― ― → ― ― → ⇒ D1 D2 D3 Single density Double density 2X―――→ 2X―――→ 24-dot mode ― ― → ― ― → ⇒ Single density Double density...
- Page 37 ESC+’-’+n Function Set / Cancel underline Code ASCII Decimal 0≤n≤255 Range Initial value Descripti Set / Cancel underline. Function Underline off Set underline thickness to 0.125mm Set underline thickness to 0.25mm Set underline thickness to 0.375mm Set underline thickness to 0.5mm Set underline thickness to 0.625mm Set underline thickness to 0.75mm Set underline thickness to 0.875mm...
- Page 38 ESC+’3’+n Function Set row spacing Code ASCII Decimal 0≤n≤255, Range Initial value Description Set row spacing to nx 0.125mm. ESC+'@' Function Printer reset ASCII Code Decimal 0≤n≤255 Range Description Clear buffer and initialize all parameters. ESC+’E’+n Function Set bold font ASCII Code Decimal...
- Page 39 ESC+’G’+n Function Set double print(double strike) font Code ASCII Decimal 0≤n≤255 Range Initial value Description n=0 : Cancel Double print font n=1 : Set Double print font. ESC+’J’+n Function Feeding ASCII Code Decimal 0≤n≤255 Range Description After printing the data in the buffer, it is fed by n x 0.125mm. ESC+’j’+n Function Back Feeding...
- Page 40 ESC+’M’+n Function Font selection Code ASCII Decimal 0≤n≤255 Range Initial value Description Set the printer font. Upper 4 bits (2-byte font) Lower 4 bits (ASCII, 1-byte font) 0000 Korean 24x24 Gothic 0000 12x24 0001 Korean 16x16 Dotum 0001 8x16 (9x16) font 0010 Japanese 24x24 Ming...
- Page 41 ESC+’R’+n Function Setting of international characters Code ASCII Decimal 0≤n≤13 Range Initial n=13 value Description International characters are set as shown in the table below. Country name United States France Germany United Kingdom Denmark 1 Sweden Italy Spain 1 Japan Norway Denmark 2 Spain 2...
- Page 42 ESC+’a’+n Function Set printing position alignment Code ASCII Decimal 0≤n≤2 Range Initial value Description Align the printing position Alignment position 0 Left Center Right ESC+’d’+n Function Print and n row feed ASCII Code Decimal 0≤n≤255 Range Description Feeds by n line(s) after printing data.
- Page 43 ESC+’{’+n Function 180° rotation Code ASCII Decimal27 0≤n≤255 Range Initial value Description Prints by rotating 180°. Caution The reference point moves from the left end to the right end. Function Turn off 180° rotation Turn on 180° rotation ESC+’i’ Function Full Cutting Code ASCII...
- Page 44 FS+’!’+n Function Collective setting of Korean character printing mode Code ASCII Decimal28 0≤n≤255 Range Initial value Description Set Korean printing mode character decoration collectively Caution Applies only to Korean. Function Decimal Horizontal enlargement off Horizontal enlargement on Vertical enlargement Vertical enlargement Underline off Underline on...
- Page 45 FS+’&’ Function Korean character mode (2-byte mode) setting Code ASCII & Decimal28 Description Sets Korean mode (2-byte mode). Necessary when printing Korean characters in extended graphic mode. Caution It is automatically recognized during Korean mode, so no setting is required. (Refer to SUB+'x'+n command.) FS+’.’...
- Page 46 FS+’-’+n Function Set Korean Character underline Code ASCII Decimal28 0≤n≤2 Range Initial value Description Sets underlining of Korean characters. Function Deactivates underlining of Korean characters. The thickness of Korean underline is set to 0.125mm. The thickness of Korean underline is set to 0.25mm.
- Page 47 FS+’W’+n Function Set Korean Character size Code ASCII Decimal28 0≤n1≤255 Range Initial value Description Korean character size is set to be double horizontally and vertically. When n=0, 2X horizontal and 2X vertical are disabled. When n=1, 2X horizontal and 2X vertical are set.
- Page 48 FS+’q’+n+(xL+xH+yL+yH+d1…dk)1……+(xL+xH+yL+yH+d1…dk)n Function Registration of NV (non-volatile) logo (bit image) n (xL xH yL yH d1..dk)1…(xL xH yL yH d1..dk)n Code ASCII n (xL xH yL yH d1..dk)1…(xL xH yL yH d1..dk)n n (xL xH yL yH d1..dk)1…(xL xH yL yH d1..dk)n Decimal 1≤n≤255 Range...
- Page 49 FS+’p’+n+m Function NV logo print ASCII Code Decimal28 1≤n≤255, 0≤m≤3 Range Initial value The registered NV logo is printed in m mode. Description n refers to the nth registered logo. Printing mode STANDARD Horizontal enlargement Vertical enlargement Horizontal and vertical enlargement...
- Page 50 GS+’!’+n Function Set the character enlargement ratio Code ASCII Decimal29 0≤n1≤255 (However, the maximum value of horizontal and vertical Range enlargement is limited to 8.) Initial value Description Sets the character enlargement ratio. When enlarging horizontally and vertically at the same time, add both numbers below.
- Page 51 GS+’(’+’K’+pL+pH+fn+m (fn=49) Function Set the print density Code ASCII Decimal29 Range pL=2, pH=0, fn=49 0≤m≤5, 251≤m≤255 Initial value Description Sets the print density. Print density Print density Standard Density Density level -5 Density level +1 Density level -4 Density level +2 Density level -3 Density level +3 Density level -2...
- Page 52 GS+’H’+n Function Designates barcode HRI character print position. Code ASCII Decimal 0≤n≤3 Range Initial value Description Sets the printing position of barcode numbers and characters. Printing position No printing Prints on top of the barcode. Prints at the bottom of the barcode. Prints on top and at the bottom of the barcode.
- Page 53 GS+’V’+m Function Paper cutting Code ASCII Decimal29 0≤m≤1 Range Initial value Description Paper is cut using the specified options. Function Full Cutting Partial Cutting GS+’W’+nL+nH Function Designates the printing area. Code ASCII Decimal29 0≤nL≤255, 0≤nH≤255 Range nL+nH×256=448 Initial (56mm, nL=0, nH=0) value Sets the printing area to (nL+nH×256)×0.125mm in the left margin.
- Page 54 GS+’h’+n Function Sets the barcode height. Code ASCII Decimal29 1≤n≤255 Range Initial n=162 (20.25mm) value Description The barcode height is set to n×0.125mm.
- Page 55 GS+’k’+m+d1…dn+NUL Function Barcode printing Code ASCII d1…dn NUL d1…dn Decimal29 d1…dn 0 1≤m≤7, n and d differ depending on the barcode (see table below). Range Description Prints barcode Barcode n (number of barcode data) d (barcode data) type 48≤d≤57 UPC-E n=7 (verification characters added automatically) 48≤d≤57...
- Page 56 FNC2 7Bh, 32h 123, 50 FNC3 7Bh, 33h 123, 51 FNC4 7Bh, 34h 123, 52 “{“ 7Bh, 7Bh 123, 123 In addition, the starting character of CODE A, CODE B, or CODE C must be added at the beginning to distinguish the CODE 128 type. CODE128 Starting Example of printing barcode data...
- Page 57 GS+’r’+n Function Status check response Code ASCII Decimal29 Range Description Transmits the current status of the printer. Since this command cannot be received while the printer is offline, the status cannot be checked. Therefore, it is desirable to use real-time status CAUTION check (DLE+EOT+n).
- Page 58 <Status transmission data> State Decimal 0: There is paper. 1: No paper. 0: Printer head down 1: Printer head up 0: Paper not jammed. 1: Paper jammed. 0: Paper remained enough. 1: Not much paper left. 4※ 0: Print completed 1: During printing or feeding 0: No cutter error( jam).
- Page 59 DLE+ENQ+n Function Clearing each buffer in the printer in real time Code ASCII Decimal16 Range Description n=2: Each buffer of the printer is cleared in real time. If data that matches this command is received, care must be taken as the same operation as this command is performed (bit image data, etc.).
- Page 60 <Status transmission data> State Decimal 0: There is paper. 1: No paper. 0: Printer head down 1: Printer head up 0: Paper not jammed. 1: Paper jammed. 0: Paper remained enough. 1: Not much paper left. 0: Print completed. 1: Printing or feeding in progress.
- Page 61 GS+’v’+’0’+m+xL+xH+yL+yH+d1+…+dk Function Raster bit image (horizontal) ASCII xL xH yL yH d1..dk Code 76h 30h m xL xH yL yH d1..dk Decimal xL xH yL yH d1..dk 0≤m≤3 or 48≤m≤51, Range 1≤(xL+xH×256)≤150 (0≤xL≤150, xH=0) 1≤(yL+yH×256)≤436 (0≤yL≤255, 0≤yH≤1) 0≤d≤255 (yL+yH×256) k (total number of data) = (xL+xH×256) × (yL+yH×256) Descripti Prints raster bit image in mode m.
- Page 62 SUB+’B’+n1+n2+n3+d1……dk Function 2D barcode d1 ... dk ASCII Code d1 ... dk d1 ... dk Decimal26 Range 2D barc ode type PDF417 QR code 1) PDF417 2) QR code Number of Number of barcode data barcode data 1 < n2 ≤ 255 1 <...
- Page 63 SUB+’1’ Function Select rule line 1 Code ASCII Decimal26 Description Rule line 1 is selected among rule lines 1 and 2. SUB+’2’ Function Select rule line 2 ASCII 1 => 2 Code Decimal26 Description Rule line 2 is selected among rule lines 1 and 2.
- Page 64 SUB+’W’+nL+nH+kL+kH Function WRITE rule line data Code ASCII Decimal26 0≤nL+nH×256≤640、(0≤nL≤255, 0≤nH≤3) Range 0≤kL+kH×256≤640、(0≤kL≤255, 0≤kH≤3) Description Writes 1 from nL+nH×256 to kL+kH×256 on the selected rule line. It is ignored if the defined range is exceeded. Once written, the data is preserved without being erased until the clear rule CAUTION lines command is received or the power is turned off.
- Page 65 SUB+’F’ Function Rule line OFF ASCII Code Decimal26 Description Rule lines are set to OFF, and rule line data is preserved. SUB+’P’ Function Print rule line 1 dotted line ASCII Code Decimal26 Description Rule line 1 dotted line is printed. When printing character and graphic, do not use this command, but use the rule lines ON command.
- Page 66 ESC+’t’+n Function International code page setting Code ASCII Decimal27 0≤n≤8 Range Initial value Description International characters of each code page are set as shown in the table below. Valid when set to 1-byte mode with SUB + x command or FS + “.” command. Invalid when set to 2-byte mode.
- Page 68 CUSTOM S.p.A. World Headquarters Via Berettine, 2/B - 43010 Fontevivo, Parma ITALY Tel. +39 0521 680111 - Fax +39 0521 610701 info@custom.biz - www.custom.biz All rights reserved www.custom.biz...
Need help?
Do you have a question about the P80C and is the answer not in the manual?
Questions and answers