Table of Contents
Advertisement
Quick Links
Advertisement
Table of Contents

Subscribe to Our Youtube Channel
Related Manuals for BenQ EH700


Summary of Contents for BenQ EH700
- Page 1 Digital Projector User Manual EH700 V 1.00...
-
Page 2: Warranty And Copyright Information
For other information, please visit www.BenQ.com. Copyright Copyright © 2024 by BenQ Corporation. All rights reserved. No part of this publication may be reproduced, transmitted, transcribed, stored in a retrieval system or translated into any language or computer language, in any form or by any means, electronic, mechanical, magnetic, optical, chemical, manual or otherwise, without the prior written permission of BenQ Corporation. -
Page 3: Table Of Contents
Table of Contents Warranty and Copyright information ................2 Important safety instructions ..................4 Introduction ........................8 Shipping contents ......................8 Projector exterior view....................10 Controls and functions ....................11 Positioning your projector .................... 14 Choosing a location ......................14 Obtaining a preferred projected image size..............15 Mounting the projector .................... -
Page 4: Important Safety Instructions
Important safety instructions Your projector is designed and tested to meet the latest standards for safety of information technology equipment. However, to ensure safe use of this product, it is important that you follow the instructions mentioned in this manual and marked on the product. 1. - Page 5 9. Do not place this product on an unstable 12. Always place the projector on a level, cart, stand, or table. The product may fall, horizontal surface during operation. sustaining serious damage. - Do not use if tilted at an angle of more than 10 degrees left to right, nor at angle of more than 15 degrees front to back.
- Page 6 50 cm clearance from walls and free flow of air around the projector. supply's power outlet and call BenQ to - Locations where temperatures may become have the projector serviced. excessively high, such as the inside of a car with all windows rolled up.
- Page 7 Risk Group 2 1. According to the classification of photobiological safety of light sources and light source systems, this product is Risk Group 2, IEC 62471-5:2015. 2. Possibly hazardous optical radiation emitted from this product. 3. Do not stare at operating light source. May be harmful to the eyes. 4.
-
Page 8: Introduction
Introduction Shipping contents Carefully unpack and verify that you have all of the items shown below. If any of these items are missing, please contact your place of purchase. Standard accessories Remote control with Projector Quick start guide batteries Warranty card* Power cord Regulatory statements Wireless Dongle (EZC-5201BS) - Page 9 • Avoid leaving the remote control and batteries in an excessive heat or humid environment like the kitchen, bathroom, sauna, sunroom or in a closed car. • Replace only with the same or equivalent type recommended by the battery manufacturer. •...
-
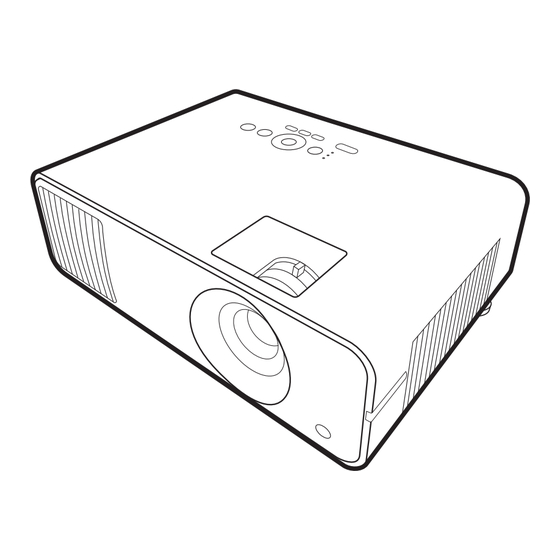
Page 10: Projector Exterior View
Projector exterior view 9 10 12 13 14151617 1. Vent (air exhaust) 11. HDMI 1 input port 2. Focus ring and Zoom ring 12. HDMI 2 input port 3. Vent (air inlet) 13. USB Type-C port 4. Projection lens 14. USB Type-A port 5. -
Page 11: Controls And Functions
• The remote control is without laser pointer in Japan. When the input source is When the input source is BenQ Launcher NOT BenQ Launcher Toggles the projector between standby mode and on. POWER 2. POWER indicator (See Indicators on page 51.) - Page 12 Selects an input source for display. HDMI, PC, LAUNCHER HDMI: Changes to HDMI-1 source. PC: Not available on this model. LAUNCHER: Changes to BenQ Launcher source. Toggles projector audio between on and off. Decreases the projector volume. Increase the projector volume.
- Page 13 When the input source is When the input source is BenQ Launcher NOT BenQ Launcher Returns to the home screen. (Not available.) (HOME) 21. AUTO (Not available.) Activates Firefox. (Not available.) (Browser) Goes into one key speedup (Not available.) (Clear memory) (one key empty) mode.
-
Page 14: Positioning Your Projector
Select this location with the projector suspended upside-down from the ceiling in suspended upside-down from the ceiling front of the screen. Purchase the BenQ behind the screen. Note that a special rear Projector Ceiling Mount Kit from your dealer to projection screen and the BenQ Projector mount your projector on the ceiling. -
Page 15: Obtaining A Preferred Projected Image Size
Obtaining a preferred projected image size The distance from the projector lens to the screen, the zoom setting (if available), and the video format each factors in the projected image size. Projection dimensions 16:9 Screen diagonal Screen Center of lens Offset Projection distance •... -
Page 16: Mounting The Projector
BenQ projector mounting kit and that you ensure it is securely and safely installed. If you use a non-BenQ brand projector mounting kit, there is a safety risk that the projector may fall down due to an improper attachment through the use of the wrong gauge or length screws. -
Page 17: Adjusting The Projected Image
Ceiling/Wall mount installation diagram Ceiling/Wall mount screw: M4 (Max L = 25 mm; Min L = 20 mm) Unit: mm Adjusting the projected image Adjusting the projection angle If the projector is not placed on a flat surface or the screen and the projector are not perpendicular to each other, the projected image becomes trapezoidal. - Page 18 Correcting keystone Keystoning refers to the situation where the projected image becomes a trapezoid due to angled projection. To correct this, besides adjusting the height of the projector, if you want the projector to automatically correct image keystoning, be sure the Auto Vertical Keystone function in the Advanced Menu - Installation menu is On.
-
Page 19: Connection
Connection When connecting a signal source to the projector, be sure to: 1. Turn all equipment off before making any connections. 2. Use the correct signal cables for each source. 3. Ensure the cables are firmly inserted. A/V device Internet HDMI cable USB Type-C cable USB flash drive... - Page 20 Connecting audio The projector has built-in mono speaker(s) which are designed to provide basic audio functionality accompanying data presentations for business purposes only. They are not designed for, nor intended for stereo audio reproduction use as might be expected in home theater or home cinema applications.
-
Page 21: Starting Up The Projector
Starting up the projector 1. Plug the power cord. Turn on the power outlet switch (where fitted). The power indicator on the projector lights orange after power has been applied. 2. Press on the projector or on the remote control to start the projector. The power indicator flashes green and stays green when the projector is The start up procedure takes about 10 seconds. - Page 22 Step 2: Choosing a Language. Available languages may vary by the product supplied for your region and may be updated without prior notice. Step 3: Adjusting Keystone. Step 4: Configure the Wireless Setting by selecting a wireless network and entering the password. 22 Starting up the projector...
- Page 23 Step 5: Specify Time Zone. Step 6: Read the End User License Agreement and press Confirm to agree with the statement. Starting up the projector...
- Page 24 Once you’ve completed the steps shown above; the projector will ask whether you want to enable the AMS function. 24 Starting up the projector...
-
Page 25: Operation (Under Non-Launcher Source)
Operation (under non-Launcher source) Using the projector menus under non-Launcher source When the input signal is HDMI-1, HDMI-2 or USB Type-C, you can use 2 types of On-Screen Display (OSD) menus for making various adjustments and settings. • Basic OSD menu: provides primary menu functions. (See Basic Menu on page •... -
Page 26: Securing The Projector
Below is the overview of the Advanced OSD menu. Main menu Picture Picture Mode Presentation User Management Audio Brightness Contrast Current input signal Display Sharpness Advanced Color Settings Installation System Sub-menu and status Information Reset Current Picture Mode Return Exit Enter Function keys Likewise, when you wish to switch from the Advanced OSD menu to the Basic OSD menu,... - Page 27 Please write down the recall code, and contact 2. Write down the number and turn off your projector. BenQ Customer Center. 3. Seek help from the local BenQ service center to decode the number. You may be required to provide Recall Code: proof of purchase documentation to verify that you are an authorized user of the projector.
-
Page 28: Switching Input Signal
When starting up, the projector automatically searches for the available signals. When the Advanced menu - Display > Auto Source Search menu is On, the projector will automatically search for BenQ Launcher. To select the source: 1. Press SOURCE or . -
Page 29: Menu Operation
Menu operation Please note that the on-screen display (OSD) menus vary according to the signal type selected and the projector model you are using. The menu items are available when the projector detects at least one valid signal. If there is no equipment connected to the projector or no signal detected, limited menu items are accessible. -
Page 30: Advanced Menu
Load Settings From Video Conference/sRGB User Management Rename User Mode Brightness 0–100 Contrast 0–100 Sharpness 0–31 Gamma Selection 1.8/2.0/2.1/2.2/2.3/2.4/2.5/2.6/BenQ R/G/B/C/M/Y Hue/Saturation/Gain Color Management W (White Balance) R Gain/G Gain/B Gain Reset Reset/Cancel Advanced Color Normal/ECO/SmartEco/SmartEco+/ Settings Light Source Mode Custom Custom Brightness 50%–100%... - Page 31 Function descriptions Menu Descriptions The projector is preset with several predefined picture modes so that you can choose one to suit your operating environment and input signal picture type. • Bright: Maximizes the brightness of the projected image. This mode is suitable for environments where extra-high brightness is required.
- Page 32 There is one user-definable mode if the current available picture modes are not suitable for your need. You can use one of the picture modes (except the User1/User2 mode) as a starting point and customize the settings. • Load Settings From 1.
- Page 33 • 2.4/2.5: Best for viewing movies in a dark environment. • 2.6: Best for viewing movies which are mostly composed of dark scenes. • BenQ: Finely-tuned gamma to optimize details and increase contrast. High Brightness Low Brightness Low Contrast High Contrast •...
- Page 34 • Custom Brightness You can adjust the light source brightness. This function is only available when Light Source Mode is Custom. • HDR Brightness Advanced Color The projector can automatically adjust the brightness levels of your image Settings according to the input source. You can also manually select a brightness (Continued) level to display better picture quality.
- Page 35 2. Main menu: Audio Structure Menu Options Mute Off/On Volume 0 – 20 Power On/Off Ring Tone Off/On Reset Audio Reset/Cancel Function descriptions Menu Descriptions Select On to temporarily turn off the projector's internal speaker or the volume being output from the audio output jack. Mute To restore the audio, select Off.
- Page 36 3. Main menu: Display Structure Menu Options Aspect Ratio Auto/4:3/16:9/16:10 Auto Source Search Off/On Source Rename HDMI-1/HDMI-2 Auto/Top Bottom/Frame Sequential/ 3D Mode Frame Packing/Side by Side/Off 3D Sync Invert Disable/Invert 3D Settings 1/3D Settings 2/ Save 3D Settings 3D Settings 3 3D Settings 1/3D Settings 2/ Apply 3D Settings 3D Settings 3...
- Page 37 Renames the input source to your desired name. On the Source Rename page: 1. Press OK to display the on-screen keyboard. 2. Press / / / to select each desired digit/letter, and press OK to Source Rename confirm each input. 3.
- Page 38 • 3D Sync Invert When your 3D image is distorted, enable this function to switch between the image for the left eye and the right eye for more comfortable 3D viewing experience. • Save 3D Settings When you have successfully displayed the 3D contents after making the appropriate adjustments, you can enable this function and choose a set of 3D settings to memorize current 3D settings.
- Page 39 Returns all the settings on the Display main menu to the factory default Reset Display values. Operation (under non-Launcher source)
- Page 40 4. Main menu: Installation Structure Menu Options Projector Position Front/Front Ceiling/Rear/Rear Ceiling H: -40 – +40 2D Keystone V: -40 – +40 Auto Vertical Keystone Off/On Test Pattern On/Off High Altitude Mode On/Off 9600/14400/19200/38400/57600/ Baud Rate 115200 Corner Fit 0~60 Off/Light Yellow/Pink/Light Green/Blue/ Wall Color Blackboard...
- Page 41 We recommend you use the High Altitude Mode when your environment is between 1501 m–3000 m above sea level, and ambient temperature is between 0°C–30°C. Operation under "High Altitude Mode" may cause a higher decibel operating noise level because of increased fan speed necessary to improve overall system cooling and performance.
- Page 42 • Digital Zoom Magnifies or reduces the projected image size. 1. After the adjustment bar displays, press on the projector on the remote control repeatedly to reduce or magnify the image to a desired size. 2. Press OK to enter panning mode. 3.
- Page 43 5. Main menu: System Structure Menu Options Language Bhs Ind Background Color Black/Blue/Purple Background Settings Splash Screen BenQ/Black/Blue Menu Type Basic/Advanced Menu Display Time 5 sec/10 sec/20 sec/30 sec/Always Menu Settings Center/Top-Left/Top-Right/ Menu Position Bottom-Right/Bottom-Left Reminder Message Off/On Light Source Usage Time...
- Page 44 • Background Color Sets the background color for the projector. Background • Splash Screen Settings Allows you to select which logo screen will be displayed during projector start-up. • Menu Type Sets the OSD menu type according to your needs. •...
- Page 45 • Panel Key Lock With the control keys on the projector and remote control locked, you can prevent your projector settings from being changed accidentally (by children, for example). When the Panel Key Lock is on, no control keys on the projector and the remote control will operate except POWER.
- Page 46 6. Main menu: Information Structure Menu Native Resolution Detected Resolution Source Picture Mode Light Source Mode 3D Format Color System Dynamic Range Light Source Usage Time Firmware Version Service Code Function descriptions Menu Descriptions Native Resolution Shows the native resolution of the projector. Detected Resolution Shows the native resolution of the input signal.
-
Page 47: Shutting Down The Projector
Shutting down the projector 1. Press on the projector or on the remote control and a confirmation message will appear prompting you. If you don't respond in a few seconds, the message will disappear. 2. Press a second time. The power indicator flashes orange, the projection light source shuts down, and the fans will continue to run for approximately 2 seconds to cool down the projector. -
Page 48: Maintenance
Maintenance Care of the projector Cleaning the lens Clean the lens whenever you notice dirt or dust on the surface. Please be sure to turn off the projector and let it cool down completely before cleaning the lens. • Use a canister of compressed air to remove dust. •... -
Page 49: Light Source Information
Light source information Getting to know the light source hour When the projector is in operation, the duration (in hours) of light source usage is automatically calculated by the built-in timer. The method of calculating the equivalent light source hour is as follows: 1. - Page 50 Extending the light source life • Setting the Light Mode Go to Advanced menu - Picture > Advanced Color Settings > Light Source Mode and select a suitable light source power from among the provided modes. Setting the projector in ECO, SmartEco, SmartEco+ or Custom mode extends light source life. Light mode Description Normal...
- Page 51 Indicators Light Status & Description Power events Stand-by mode Powering up Normal operation Normal power-down cooling Download Color wheel start failure Phosphor wheel start failure Burn-in messages Burn-in on Burn-in off Light source events light source error in normal operation light source life exhausted Thermal events Fan 1 error (the actual fan speed is outside the desired...
-
Page 52: Troubleshooting
Troubleshooting The projector does not turn on. Cause Remedy Plug the power cord into the AC power jack on the projector, and plug the power cord into the power There is no power from the power cord. outlet. If the power outlet has a switch, make sure that it is switched on. -
Page 53: Specifications
Type-A x 1 for Service Repairing Type-A x 4 for USB reader Please visit below website and choose your country to RS-232 serial control find your service contact window. 9 pin x 1 http://www.benq.com/welcome LAN control RJ45 x 1 IR receiver x 2 Specifications... -
Page 54: Dimensions
Dimensions 303.5 mm (W) x 241 mm (D) x 112.4 mm (H) 303.5 112.4 Unit: mm 54 Specifications... -
Page 55: Timing Chart
XGA_85 84.997 68.667 94.500 XGA_120 (Reduce 119.989 97.551 115.5 Supported Blanking) 1152 x 864 1152 x 864_75 67.5 BenQ Notebook 1024 x 576 60.00 35.820 46.996 Timing BenQ Notebook 1024 x 600 64.995 41.467 51.419 Timing 1280 x 720 1280 x 720_60 45.000... - Page 56 • Video timings 3D format Horizontal Vertical Pixel Timing Resolution Frequency Frequency Frequency Frame Frame Side by (kHz) (Hz) (MHz) Sequential Packing Bottom Side 480i 720 (1440) x 480 15.73 59.94 Supported 480p 720 x 480 31.47 59.94 Supported 576i 720 (1440) x 576 15.63 576p...
- Page 57 • Supported detail timings for sampling and color depth Display format (refresh rate) Chroma subsampling 8 Bit 10 Bit 12 Bit 4:4:4 Supported 4K/60p (60 Hz) 4:2:2 Supported Supported 4:2:0 Supported Supported Supported 4:4:4 Supported 4K/60p (50 Hz) 4:2:2 Supported Supported 4:2:0 Supported...
- Page 58 Supported timing for USB Type-C input • PC timings Vertical Frequency Horizontal Frequency Pixel Frequency Resolution Mode (Hz) (kHz) (MHz) VGA_60 59.940 31.469 25.175 VGA_72 72.809 37.861 31.500 640 x 480 VGA_75 75.000 37.500 31.500 VGA_85 85.008 43.269 36.000 720 x 400 720 x 400_70 70.087 31.469...
- Page 59 • Video timings Timing Resolution Horizontal Frequency (kHz) Vertical Frequency (Hz) Pixel Frequency (MHz) 480p 720 x 480 31.47 59.94 576p 720 x 576 31.25 720/50p 1280 x 720 37.5 74.25 720/60p 1280 x 720 45.00 74.25 1080/50i 1920 x 1080 28.13 74.25 1080/60i...
-
Page 60: Rs232 Command
RS232 command Function Type Operation ASCII Write Power On <CR>*pow=on#<CR> Power Write Power Off <CR>*pow=off#<CR> Read Power Status <CR>*pow=?#<CR> Write HDMI(MHL) <CR>*sour=hdmi#<CR> Write HDMI 2(MHL2) <CR>*sour=hdmi2#<CR> Source Selection Write Smart System <CR>*sour=smartsystem#<CR> Write Type-C <CR>*sour=typec#<CR> Read Current source <CR>*sour=?#<CR> Write Mute On <CR>*mute=on#<CR>... - Page 61 Function Type Operation ASCII Write Contrast + <CR>*con=+#<CR> Write Contrast - <CR>*con=-#<CR> Write Set Contrast value <CR>*con=value#<CR> Read Contrast value <CR>*con=?#<CR> Write Brightness + <CR>*bri=+#<CR> Write Brightness - <CR>*bri=-#<CR> Write Set Brightness value <CR>*bri=value#<CR> Read Brightness value <CR>*bri=?#<CR> Write Sharpness + <CR>*sharp=+#<CR>...
- Page 62 Function Type Operation ASCII Write Normal mode <CR>*lampm=lnor#<CR> Write Eco mode <CR>*lampm=eco#<CR> Write SmartEco mode <CR>*lampm=seco#<CR> Write SmartEco mode 2 <CR>*lampm=seco2#<CR> Lamp Control Write Custom mode <CR>*lampm=custom#<CR> Write Light level for custom mode <CR>*lampcustom=value#<CR> Read Light level status for custom mode <CR>*lampcustom=?#<CR>...
Need help?
Do you have a question about the EH700 and is the answer not in the manual?
Questions and answers