Advertisement
- 1 TECHNICAL SPECIFICATIONS
- 2 PARTS AND CONTROL PANEL
- 3 INSTALLATION AND OPERATING INSTRUCTIONS
- 4 FLANGE KIT INSTALLATION
- 5 CARE AND MAINTENANCE
-
6
TROUBLESHOOTING
- 6.1 The machine won't operate.
- 6.2 The compressor works abnormally with a buzzing noise
- 6.3 The water doesn't feed in after the ice maker starts.
- 6.4 Machine makes ice, but bin does not fill up with ice
- 6.5 Water is leaking out the unit.
- 6.6 Cubes are partially formed -are white at the bottom.
- 6.7 Noise during operation
- 6.8 The ice made is too large and with pieces sticking together
- 6.9 Conditions for ice making cycle are right but no ice is made
- 6.10 The icemaker stops suddenly while making ice.
- 6.11 The body of the ice maker is electrified
- 6.12 Scale builds up quickly inside the machine.
- 7 SAFETY PRECAUTIONS
- 8 Documents / Resources
TECHNICAL SPECIFICATIONS
Our Whynter MIM-14231SS features a non-corrosive and durable stainless steel body specifically designed for built-in application on marine vessels. Automatically bringing you 23 lbs of crescent-shaped in 24 hours with 12 lb storage capacity, making it the perfect solution for your ice making needs in virtually any situation. Sold separately, the optional flange kit (MIM-FK-14231) allows seamless and more finished installation.
- Built-in or freestanding installation (front venting)
- Makes 23 lbs of crescent-shaped ice cubes in 24 hours
- No drain required
- Sleek stainless steel door and housing
- Stores up to 12 lbs of ice
- Auto shut-off when ice bin is full
- Ice scoop and ice bin included
- Easy to use; one button operation
- Latch Secured Reversible Door
- Keeps ice frozen, no drain installation required
- 5 foot 1/4" standard braided stainless steel flexible hose included
- Manual defrost
- High efficiency CFC-free compressor
- Refrigerant: R134A
- UL Listed
TECHNICAL SPECIFICATIONS
| MODEL: | MIM-14231SS |
| Power Supply: | 115V/ 60Hz |
| Ice Making Current: | 1.8A |
| Ice Making Harvest: | 1.5A |
| Max Storage Capacity: | 12 lbs |
| Ice Making Capability: | 23 lbs/day |
| Refrigerant: | R-134a / 70g |
| Unit Dimensions: | 16.25" D x 14" W x 24.5" H (29.25" D when ice maker cover is opened) |
| Net Weight: | 52 lbs |
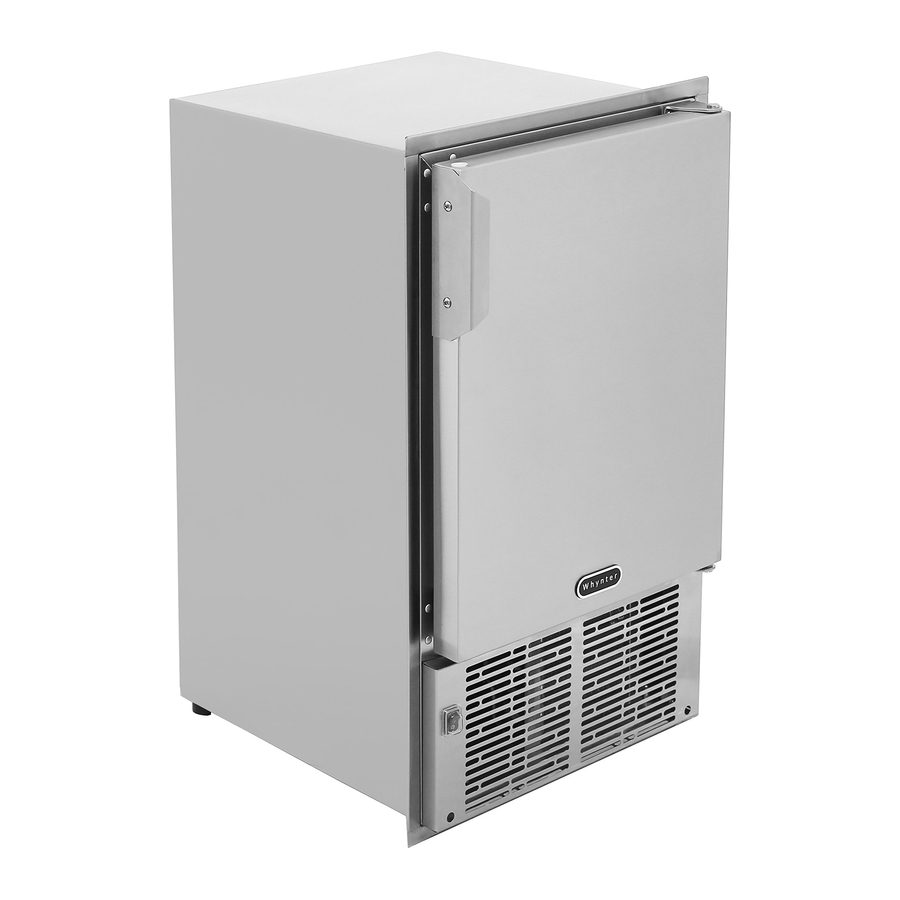
PARTS AND CONTROL PANEL


| 1 | Door Hinge |
| 2 | Ice maker Tray |
| 3 | Door Hinge Hole |
| 4 | Ice Bucket |
| 5 | Door Handle |
| 6 | Door Latch |
| 7 | Power Button |
| 8 | Air Intake |
| 9 | Air Exhaust |
| 10 | Door |
| 11 | Rear Vent |
| 12 | Water Inlet Port |
| 13 | Power Supply Cord |
| 14 | Braided Stainless Steel Flexible Hose for water supply |
| 15 | Cabinet Flange (Optional, Sold Separately) |
| 16 | Cabinet Flange (Optional, Sold Separately) |
INSTALLATION AND OPERATING INSTRUCTIONS
LEVELLING THE ICE MAKER
It is important for the ice maker to be leveled in order to work properly. It can be raised or lowered by turning the four feet on the bottom of the machine. We recommend using a carpenter's level to check the machine.

- Place a carpenter's level on top of the product to see if the ice maker is level from front to back and side to side.
- Adjust the height of the feet as follows:
- Turn the leveling feet to the right to lower that side of the icemaker
- Turn the leveling feet to the left to raise that side of the icemaker.
DOOR REVERSAL
This appliance has the capability of the door opening from either the left or right side. The appliance is delivered to you with the door opening from the left side. Should you desire to reverse the opening direction, please follow the following reversal instructions
Tools needed: Flathead screwdriver, Phillips screwdriver

Before you begin, unplug the ice maker or disconnect power
To remove door from hinges:
- Using a flathead screwdriver, separate the hinge axis from hinge 1.
- Open the door about 20°. Lift the door off the bottom hinge 2 and set the door aside.
To replace door on hinges:

- Using a flathead screwdriver, remove the plug buttons from the screw holes opposite the door hinges, top and bottom.
- Replace the hinge axis on door hinge 1 and tighten it firmly. Remove door hinge 1 and place it on the opposite bottom side.
- Remove door hinge 2, place on the opposite top side. Separate the axis from hinge 2 and set it aside.
- Align the door on the bottom hinge 1 and replace axis on the hinge 2. Tighten it firmly.
- Push the plug buttons into the original screw holes.
INSTALLATION OF YOUR ICE MAKER
- This ice maker should be installed by a licensed plumber only
- Locate the ice maker away from direct sunlight and sources of heat (stove, heater, radiator, etc.) as it may increase electrical consumption. Extreme cold ambient temperatures may also cause the ice maker not to perform properly.
- Plug the ice maker into an exclusive properly installed-grounded wall outlet. Do not under any circumstances cut or remove the third (ground) prong from the power cord.
INSTALLATION TYPES
This ice maker is designed for freestanding, recessed, or built-in installation. In every setting, there must be adequate ventilation and access for service. Never install or operate the unit in an enclosed area, such as a closed cabinet.
Freestanding installation:
A free-standing installation will allow you to install the icemaker in any place you desire provided you have access to a water supply. You must follow the stated instructions for:
- Electrical requirement
- Water supply
- Leveling the icemaker
Recessed installation:
A recessed installation will allow you to install the ice maker under a counter or in a kitchen cabinet provided the required clearance space around the ice maker is respected. This installation has the same requirements as a built-in installation.
Built-in installation:
If this method of installation is chosen, it will still be necessary to allow adequate ventilation space around the unit (make sure there is at least some ventilation room for the back of the unit). The following additional items must be observed.
- Place ice maker in front of installation location. Remove the feet and place the unit flat on the floor or on a platform depending on your installation requirements.
- The water supply hose must be plumbed before connecting to the ice maker.
- Turn on main water supply and tap. Check for water supply connection leaks. Tighten any connections (including connections at the tie-in).
- If electrical outlet for the ice maker is behind the cabinet, plug in the ice maker.
- Push the ice maker into position.
- Seal all around the cabinet to the floor with an approved caulking compound.
INSTALLATION CLEARANCES (Unit shown in an enclosed setup)

To ensure proper service access and ventilation, allow at least 4" clearance at rear, and 1" at top and sides. The installation should allow the ice maker to be pulled forward for servicing if necessary.
TRANSPORTATION AND LOCATION REQUIREMENTS
- This icemaker should be installed by a licensed plumber only.
- Before connecting the ice maker to the power source, let it stand upright for approximately 4 hours. This will reduce the possibility of a malfunction in the cooling system from handling during transportation.
- To ensure proper service access and ventilation, allow at least 4" clearance at rear, and 1" at top and sides. The installation should allow the icemaker to be pulled forward for servicing if necessary.
- When installing the ice maker under a counter, follow the recommended spacing dimensions shown. Place electrical and water supplies and drain fixtures in the recommended locations as shown.
- This unit MUST be installed in an area protected from the elements, e.g., wind, rain, water spray or drips. Do NOT use the ice maker in outdoor setting.
- The ice maker should not be located next to ovens, grills or other high heat resources.
- Too much humidity in the air will cause frost to form quickly on the evaporator requiring more frequent defrosting of the ice maker.
- The ice maker requires a continuous water supply with a minimum pressure of 15 psi and a static pressure not to exceed 80 psi.
- In general, it is always a good idea to filter the water. A water filter can remove taste and odors as well as particles. Where water is very hard, softened water may result in white, mushy cubes that stick together. Deionized water is not recommended.
- The ice maker must be installed with all electrical and water connections in accordance with state and local codes.
- The unit should be located on a hard and level surface that can support the unit when it is full. It is important for the ice maker to be level in order to work properly. If needed, you can adjust the height of the ice maker by turning the feet. See the "Leveling the Ice Maker" section.
- A standard electrical supply (115 VAC only, 60 Hz, 15 A), properly grounded in accordance with National Electrical Code and local codes and ordinances is required.
![]()
Do not kink or pinch the power supply cord between the ice maker and wall or cabinet.
OPERATING INSTRUCTIONS
The water supply should be ready at the point of installation. The water supply pressure should be a minimum of 15 psi with a static pressure not more than 80 psi. (A wall outlet directly behind the ice maker will make installation easier.)
Tools required: ½ in. open-end wrench, Phillips screwdriver
- This ice maker should be installed by a licensed plumber only.
- All installations must be in accordance with local plumbing code requirements.
- Make certain that the water supply hose is not pinched or kinked or damaged during installation.
- Check for leaks after connection.
- The ambient operational temperature should be between 50°F and 100°F. The input water temperature should be between 41°F and 90°F. Operation outside these temperatures may result in lowered production or other adverse effects.
- In general, it is always a good idea to filter the water. A water filter can remove taste and odors as well as particles. Where water is very hard, softened water may result in white, mushy cubes that stick together. Deionized water is not recommended.
- The unit should be located on a hard and level surface that can support the unit when it is full. It is important for the ice maker to be level in order to work properly. If needed, you can adjust the height of the ice maker by turning the feet. See the "Leveling the Ice Maker" section.
Connecting the water line:
- Turn off main water supply. Turn on nearest faucet long enough to clear line of water.
- Find a ½" to ¾" vertical cold water pipe near the installation location. The distance should be less than 9 feet. The water supply hose provided with the ice maker is about 9 feet long.
- A shut-off valve must be installed to the main water supply. If the water pipe has a plain piece of copper tubing, attach a ¼" O.D. compression union to the tubing and remove the nut.
- Connect nuts of the supplied water supply hose to tap and water inlet valve. Tighten firmly by hand, then one-half turn with wrench.
- Turn on main water supply and tap. Check for water supply connection leaks. Tighten every connection (including connections at the water inlet).
ICE MAKING INSTRUCTIONS
- Turn the unit on by pressing the Power button.
- Water will be pumped from the water valve to the ice maker tray for freezing. The first cubes may be small because of air in the water line. Later cubes will be of standard crescent type size.
- Once the freezing process is complete, the ice shovel will turn and push the ice cubes down to the ice basket.
- NOTE: Although the unit has been tested and cleaned at the factory, due to long-term transit and storage, discard all ice cubes made during the first 3 hours of operation.
- When the ice bucket is full, the ice maker tray will automatically shut off. When ice cubes are melted or removed, the ice maker will resume its operation.
- Ice delivery may be interrupted by raising the metal arm into an upright position.
![]()
- If the ice maker is not used regularly, it is recommended that the ice bucket be emptied periodically to ensure ice freshness.
- Sometimes the ice cubes may appear cloudy. This is due to the rapid freezing of the ice cube. This is trapped air in the water and does not affect the taste and quality of the ice.
- The air intake and exhaust should be kept free of dust and lint to allow free airflow.
- This unit should be defrosted approximately every 4-6 weeks or when frost on the ice maker wall is excessive or 1/4" thick. To defrost, turn the unit off, remove the ice cubes and keep the ice maker door open at least two inches.
- Do not place cans or bottles in the ice compartment because they will freeze.
- Never turn the water supply tap off when the ice maker is working.
- Never touch evaporator when unit is running
- Keep the ice maker door closed to reduce melting and to ensure proper ice formation.

NORMAL SOUNDS
Your new ice maker may make sounds that are not familiar to you. Hard surfaces like the floor and walls can make the sounds seem louder than they actually are. The following describes the kinds of sounds that might be new to you and what may be making them.
- Ratting noises may come from the flow of the refrigerant or the water line, items stored on top of the ice maker can also make noises.
- The high efficiency compressor may make a pulsating or high-pitched sound.
- Water running from the evaporator to the water reservoir may make a splashing sound.
- As each cycle ends, you may hear a gurgling sound due to the refrigerant flowing in your ice maker.
- You may hear air being forced over the condenser by the condenser fan.
- During the harvest cycle, you may hear the sound of ice cubes falling into the ice basket
POWER FAILURE
Most power failures are corrected within a few hours and should not affect the temperature of your ice maker if you minimize the number of times the ice maker cover is opened. If the power is going to be OFF for a longer period of time, you need to take the proper steps to disconnect your appliance. Failure to unplug the ice maker could result in electrical shock or personal injury.
FLANGE KIT INSTALLATION
The flange kit allows seamless installation of the Whynter MIM-14231SS which gives a greater degree of personalized application. This is an optional accessory, sold separately. The flange kit is used for a consistent smooth surface and additional secure fastening by screwing the flange to the cabinet.

The flange must not be used for support the weight of the unit. Adjust the feet to level the unit and make the lower edge of flange not touch the ground.
Model Number: MIM-FK-14231
FLUSH TO CABINET:

FLUSH TO DOOR:

INSTALLATION
- Remove the flange and screws from the shipping carton.
- Using a flathead screwdriver, carefully remove the ten pre-installed decorative plugs from screw holes located on top, left and right panels of the ice maker.
- Put the flange through the front of the icemaker on the cabinet.
- Adjust the feet to make sure the flange NOT touch the ground.
- Align the flange squarely with the unit. Screw the flange tight with the cabinet of icemaker.
- Move the icemaker with flange to the cabinet. Icemaker must sit on a level surface.
- Screw the flange to the kitchen cabinet if the icemaker is installed in a moving environment for anti-shock installation.
CARE AND MAINTENANCE
Failure to unplug the ice maker could result in electrical shock or personal injury
CLEANING AND MAINTENANCE
Periodic cleaning and proper maintenance will ensure efficiency, top performance, and long life. The maintenance intervals listed are based on normal conditions. You may want to shorten the intervals if you have pets, or there are other special considerations.
- Periodically vacuum dust and dirt from the condenser, locate behind the grille at the bottom front of the unit.
- Regularly inspect plumbing connections to insure that no leaks are present.
- Disconnect the water supply hose if the ice maker will not be used for a long period of time.
- Never keep anything in the ice storage bin that is not ice: objects like wine and beer bottles are not sanitary.
- Do not touch the power plug when your hands are wet.
- Never unplug the unit by pulling on the cord. Grasp the plug and pull out firmly.
Exterior cleaning
The door and cabinet may be cleaned with a mild detergent and warm water solution such as 1 oz.(28g) of dishwashing liquid mixed with 2 gallons of warm water. Do not use solvent-based or abrasive cleaners. Use a soft sponge and rinse with clean water. Wipe with a soft clean towel to prevent water spotting.
Clean stainless steel with a mild detergent and warm water solution and a damp cloth. Never use an abrasive cleaning agent.
Interior cleaning
When necessary, defrost and thoroughly clean the inside of the unit with mild soap and water. Do not use electrical heating devices, sharp or pointed tools when defrosting.
When defrosting or leaving open the unit turned off, leave the door open.
This allows air to dry the inside of the cabinet, reducing the chance for mildew and damage to the mold mechanism's components.
Winterizing

Disconnect power at source before working on the unit. Do not winterize this unit with ANY type of anti-freeze; damage to the mold coating will occur, invalidating product's Limited Warranty and creating potential health hazard.
- Shut off the water supply to the unit.
- Remove the front grille and disconnect water supply connector. Remove white plastic tubing and nut from bottom of solenoid valve.
- Turn power on. Allow unit to run for an hour. Remove any cubes that may have been ejected during this period. Turn off power and open the door to allow the inside to defrost. After it has defrosted, wipe it dry and leave door open.
Recommissioning
Connect water supply lines, turn on water, check for leaks, then restore power to the unit. After initial cool down of 45-60 minutes, the unit will cycle approximately every 40 minutes.
Start-up
Turn on water, check for leaks and then turn on power. Turn on the unit by pressing the Power button. Fan and compressor will normally turn on immediately, resulting in air circulation through the grille and a faint hum from the compressor. If machine was shut off while in ice harvesting cycle, it will have to complete the cycle before compressor and fan turn on (approximately 5 minutes). Interior temperature will drop below freezing. First harvest of ice should occur within 60 minutes of start-up. After lines are purged of air, normal harvesting and refilling occur every 40 minutes or less, under normal conditions.
Condenser cleaning
DO not touch the condenser surface. The surface is sharp and can be easily damaged.

A dirty or clogged condenser prevents proper airflow, reduces ice making capacity, and causes higher than recommended operating temperatures that may lead to component failure. Have the condenser cleaned at least once every six months.
- Unplug the ice maker or disconnect power.
- Remove the 2 screws on the front cover and gently pull it off.
- Remove dirt and lint from the condenser and the unit compartmentwith the brush attachment of a vacuum cleaner.
- Reassemble the front cover.
- Plug in the ice maker or reconnect power.
TROUBLESHOOTING
| Problem | Possible Causes | Solutions |
The machine won't operate. |
|
|
The compressor works abnormally with a buzzing noise |
|
|
The water doesn't feed in after the ice maker starts. |
|
|
Machine makes ice, but bin does not fill up with ice |
|
|
Water is leaking out the unit. |
|
|
Cubes are partially formed -are white at the bottom. |
|
|
Noise during operation |
|
|
The ice made is too large and with pieces sticking together |
|
|
Conditions for ice making cycle are right but no ice is made |
|
|
The icemaker stops suddenly while making ice. |
|
|
The body of the ice maker is electrified |
|
|
Scale builds up quickly inside the machine. |
|
|
SAFETY PRECAUTIONS
| | TO REDUCE THE RISK OF FIRE, ELECTRICAL SHOCK, OR INJURY WHEN USING YOUR ICE MAKER, FOLLOW THESE BASIC PRECAUTIONS: |
| Plug into a grounded 3-prong outlet; do not remove grounding prong, do not use an adapter, and do not use an extension cord. | |
| It is recommended that a separate circuit, serving only for your ice maker, be provided. Use receptacles that cannot be turned off by a switch or pull chain. | |
| Do not connect or disconnect the electric plug when your hands are wet. | |
| Never unplug the ice maker by pulling on the power cord. Always grip the plug firmly and pull straight out from the outlet. | |
| Never clean ice maker parts with flammable fluids. Do not store or use gasoline or other flammable vapors and liquids in the vicinity of this or any other appliances. The fumes can create a fire hazard or explosion. | |
| Before proceeding with cleaning and maintenance operations, make sure the power line of the unit is disconnected and the water line is shut off. | |
| Never allow children to operate, play with or crawl inside the ice maker. | |
| Do not touch the evaporator with your hand when the machine is operating. | |
| Unplug the ice maker or disconnect power before cleaning or servicing. Failure to do so can result in electrical shock or death. | |
| Do not attempt to repair or replace any part of your ice maker unless it is specifically recommended in this manual. All other servicing should be referred to a qualified technician. | |
| This appliance can be used by children aged from 8 years and above and persons with reduced physical, sensory or mental capabilities or lack of experience and knowledge if they have been given supervision or instruction concerning used of the appliance in a safe way and understand the hazards involved. Children shall not play with the appliance. | |
| Use two or more people to move and install ice maker. Failure to do so can result in back or other injury. | |
| To ensure proper ventilation for your ice maker, the front of the unit must be completely unobstructed. | |
| The ice maker should not be located next to ovens, grills or other sources of high heat. | |
| The ice maker must be installed with all electrical and water connections in accordance with state and local codes. A standard electrical supply, properly grounded in accordance with the National Electrical Code and local codes and ordinances, is required. | |
| Do not kink or pinch the power supply cord between the ice maker and cabinet. | |
| The fuse (or circuit breaker) size should be 15 amperes. | |
| It is important for the ice maker to be leveled in order to work properly. Otherwise water may not flow properly through the evaporator (ice mold). The ice production will be less than normal. You may need to make several adjustments to level it. | |
| All installations must be in accordance with local plumbing code requirements. | |
| This ice maker is designed for non-commercial use only. | |
| Make certain that water supply hose is not pinched, kinked or damaged during installation. | |
| Check for leaks after water line is connected. | |
| Although the unit has been tested and cleaned at the factory, due to long-term transit and storage, the first batch of cubes must be discarded. | |
| Remove the packing materials and clean the ice maker before using. | |
| Turn on the water supply tap before switching on the ice maker. Never turn the water supply tap off when the ice maker is working. | |
| Except to take ice from the unit, keep the door closed in order to reduce ice melting and to promote proper ice formation. | |
| If the ice maker will not be used for a long time, before the next use it must be thoroughly cleaned. Follow carefully any instructions provided for cleaning or use of sanitizing solution. Do not leave any solution inside the ice maker after cleaning. | |
| Do not touch the condenser surface. They are sharp and can be easily damaged. | |
| Do not use solvent-based cleaning agents or abrasives on the interior. These cleaners may transmit taste to the ice cubes, or damage or discolor the interior. | |
| Do not use the apparatus other than for its intended purpose. | |
| Cleaning and user maintenance shall not be made by children without supervision. | |
| In general, it is always a good idea to filter the water. A water filter can remove taste and odors as well as particles. Where water is very hard, softened water may result in white, mushy cubes that stick together. Deionized water is not recommended. | |
| THE MANUFACTURER DISCLAIMS ANY RESPONSIBILITY IF THE ABOVE INSTRUCTIONS ARE NOT FOLLOWED | |
Electrical Connection
Do not, under any circumstances, cut or remove the third (ground) prong from the power cord.
For personal safety, this appliance must be properly grounded. The power cord of this appliance is equipped with a 3-prong grounding plug that mates with a standard 3-prong grounding wall outlet to minimize the possibility of electric shock hazard from the appliance. Have the wall outlet and circuit checked by a qualified electrician to make sure the outlet is properly grounded. When a standard 2-prong wall outlet is encountered, it is your responsibility and obligation to have it replaced with a properly grounded 3-prong wall outlet.
The ice maker should always be plugged into its own individual electrical outlet which has a voltage rating that matches the rating label on the appliance. This provides the best performance and also prevents overloading boat wiring circuits which could cause a fire hazard from overheated wires. Never unplug your ice maker by pulling on the power cord. Always grip the plug firmly and pull straight out from the outlet. Repair or replace immediately all power cords that have become frayed or otherwise damaged. Do not use a cord that shows cracks or abrasion damage along its length or at either end. When moving the ice maker, be careful not to damage the power cord. If the supply card is damaged, it must be replaced by the manufacture, its service agent or similarly qualified persons in order to avoid a hazard.
Extension Cord
Because of potential safety hazards under certain conditions, it is strongly recommended that you do not use an extension cord with this ice maker.
Please retain the original proof of purchase in order to obtain warranty services.
Warranty begins from the original date of purchase.
To obtain service or information, contact Whynter LLC via email at support@whynter.com or call 866-WHYNTER.
Product contents and specifications may change without notice.
Documents / Resources
References
Download manual
Here you can download full pdf version of manual, it may contain additional safety instructions, warranty information, FCC rules, etc.
Advertisement


Need help?
Do you have a question about the MIM-14231SS and is the answer not in the manual?
Questions and answers