Advertisement
Quick Links
Item No. SAC44HGDC
Item No. SAC52HGDC
Item No. SAC66HGDC
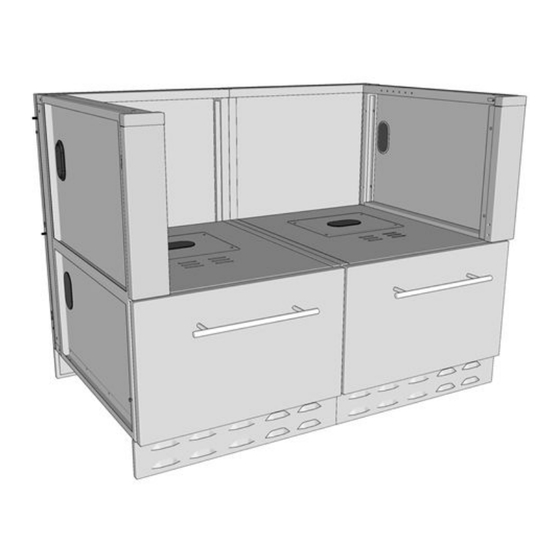
HYBRID GRILL CABINET SETUP INSTRUCTIONS
SCC22BPE
SCC22BPE
SCC16LARM
SCC16RARM
SCC22PTD
SCC22PTD
SCC15BPE
SCC22BPE
SCC15BPE
SCC16RARM
SCC16LARM
SCC15PTD
SCC22PTD
SCC15PTD
SCC22BPE
SCC22BPE
SCC16LARM
SCC22PTD
SCC22PTD
Item No. SAC37HGDC
This instructional guide is applicable to all Hybrid Grill Cabinet
Configurations. It is important to note that within any of the
configurations that utilize a combination of two different sizes
of base drawer components, you have the flexibility to
reconfigure their positioning according to your preference.
All the components are specifically designed to allow for
various combinations, providing you with the freedom to
configure them in any way you can imagine. For specific
details about each individual product, kindly refer to the
Specification Sheet included in your cabinet package.
SCC22BPE
IMPORTANT!! - COMPLETELY
SCC16RARM
READ ALL INSTRUCTIONS
BEFORE PROCEEDING
SCC22PTD
SCC15BPE
SCC22BPE
SCC16LARM
SCC16RARM
SCC15PTD
SCC22PTD
1
Advertisement

Related Manuals for SUNSTONE SAC44HGDC


Summary of Contents for SUNSTONE SAC44HGDC
- Page 1 HYBRID GRILL CABINET SETUP INSTRUCTIONS Item No. SAC37HGDC Item No. SAC44HGDC SCC22BPE SCC22BPE SCC15BPE SCC22BPE SCC16LARM SCC16LARM SCC16RARM SCC16RARM SCC22PTD SCC22PTD SCC15PTD SCC22PTD Item No. SAC52HGDC This instructional guide is applicable to all Hybrid Grill Cabinet SCC15BPE SCC22BPE SCC15BPE Configurations. It is important to note that within any of the...
- Page 2 HYBRID GRILL CABINET SETUP INSTRUCTIONS (A) Remove Base Cabinet SCC22PTD, (A) The picture shows handle in place, you can locate it mounted to the inside back of drawer face. Unscrew the handle and remount it to the front face of drawer panel. or SCC15PTD from box.
- Page 3 HYBRID GRILL CABINET SETUP INSTRUCTIONS (A) Match the back panel, either SCC15BPE or SCC22BPE, with its corresponding width drawer component, SCC15PTD or SCC22PTD. Lift the back panel and hinge it onto the back of the drawer box, following the instructions provided in Figure A, B, C. (B) To connect all the cabinet components, start by using the simple Pin-Hinge.
- Page 4 HYBRID GRILL CABINET SETUP INSTRUCTIONS As shown on the previous page you will need to lift and hinge each adjacent component assembly together and then secure the back panels. Lift each opposing back panel slightly, not (A) The Hybrid Grill Cabinet configurations SAC66HGDC and SAC52HGDC offer the flexibility of so much that they will fall off the Pin-Hinge, combining three or four base drawer components.
- Page 5 HYBRID GRILL CABINET SETUP INSTRUCTIONS (A) Locate each of the flat panels included in either (A) As depicted in Figure A, please proceed by the base drawer box or the back panel box. You attaching the second panel to the two will find one set of panels for each component.
- Page 6 HYBRID GRILL CABINET SETUP INSTRUCTIONS As shown in figure A, fasten in the two Mount the top Counter Rail, in the adjacent (A) Mount each of the two Trim-Kits included in included screws into the pre-threaded screw holes. These are blind positions, so your specific cabinet package.
- Page 7 HYBRID GRILL CABINET SETUP INSTRUCTIONS IMPORTANT! Always install Kick-Plates after ALL Cabinets have been completely assembled and leveled. Refer to main cabinet instruction manual for leveling of Peg-Legs. Always install kick-Plates from Left to Right. (A) Align either the Vented Front Panel or Back Panel to the adjacent Figure B illustrates how the Kick Plate should appear after you Hinge-Bolts.
Need help?
Do you have a question about the SAC44HGDC and is the answer not in the manual?
Questions and answers