Table of Contents
Advertisement
RUBY SERIES GRILL
BY SUNSTONE®
USE & CARE GUIDE
Read all instructions before you operate your grill.
Conforms to
ANSI STD Z21.58b-2012
Certified to CSA STD 1.6b-2012
Outdoor Cooking Gas Appliance
3174816
To installer or person assembling grill:
Keep this manual for future reference.
To consumer:
www.sunstonemetalproducts.com
Save these instructions!
Leave this manual with grill for future reference.
Advertisement
Table of Contents

Related Manuals for SUNSTONE ruby series


Summary of Contents for SUNSTONE ruby series
-
Page 1: Save These Instructions
RUBY SERIES GRILL BY SUNSTONE® USE & CARE GUIDE Read all instructions before you operate your grill. Save these instructions! Conforms to ANSI STD Z21.58b-2012 Certified to CSA STD 1.6b-2012 Outdoor Cooking Gas Appliance 3174816 Leave this manual with grill for future reference. - Page 2 Have you recently refilled the LP Tank? Please make sure you have the following information: MODEL NUMBER | DATE OF PURCHASE| INVOICE NUMBER. For warranty service, contact SUNSTONE Customer Service Department at (888)-934-9449 or email service@sunstonemetalproducts.com. SUNSTONE METAL PRODUCTS LLC.
-
Page 3: Table Of Contents
INDEX DIRECTORY SPECIFICATIONS Ruby 3B 30” Specifications ---- --------------- Ruby 4B 36” Specifications ---- ------------------- Ruby 4BIR 36” Specifications -- Ruby 5BIR 42” Specifications - LOCATING THE GRILL Grill Cut-Out Dimensions--------- ATTENTION: Indicates a potentially hazardous ------------------ Installing in Open Area ----------- situation which, if not avoided, may result in minor or ---------------- Installing in Windy Area ----------... - Page 4 START-UP CHECKLIST Caution: Never operate the grill unattended. FIRST TIME STARTUP CHECKLIST The burner is free of any debris or obstruction. Installation of the proper gas type and regulator settings. The proper gas connection is complete. Minimum clearances are maintained. ...
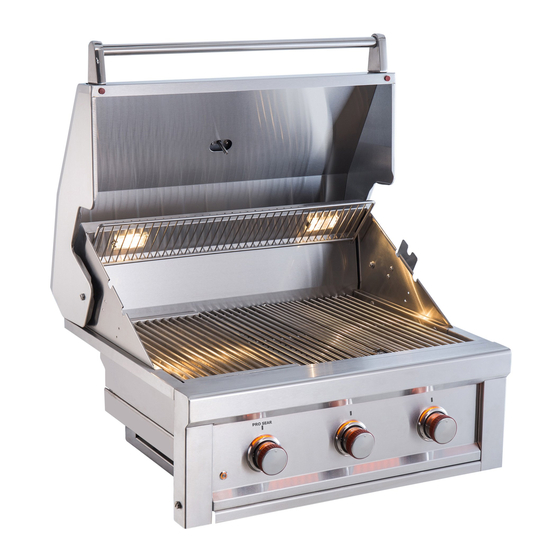
- Page 5 SPECIFICATIONS – Ruby 30” 3 Burner - Pro Sear Product Overview Model Series 3174816 RUBY3B-NG 30” RUBY3B-LP 30” ***All 304 Stainless Steel*** Product Overview Cooking Grid Size--- 27-1/2" X 19-1/2” Burger Count-------- 28 burgers Warming Rack------- 151.25 Sq. Inch Main Cooking Space 536.25 Sq.
- Page 6 SPECIFICATIONS – Parts Diagram/Ruby3B 30” RUBY3B-LP / RUBY3B-NG Parts List RUBY3B-LP / RUBY3B-NG Parts List No. Description Part No. No. Description Part No. Thermostat R-TMETER Panel Bolt 2 R-PANBOLT Hood Handle Hood-R3B-H Light Switch 1 R-LIGHT-SW Hood Hood-R3B Control Panel 1 R-PANEL-3B Hood Bolt R-HAB...
- Page 7 SPECIFICATIONS – Ruby 36” 4 Burner - Pro Sear Product Overview Model Series 3174816 RUBY3B-NG 30” RUBY3B-LP 30” ***All 304 Stainless Steel*** Product Overview 33-1/2" X 19-1/2” Cooking Grid Size--- Burger Count-------- 32 burgers Warming Rack------- 184.25 Sq. Inch 653.25 Sq. Inch Main Cooking Space 837.5 Sq.
- Page 8 SPECIFICATIONS – Parts Diagram/Ruby4B 36” RUBY4B-LP / RUBY4B-NG Parts List RUBY4B-LP / RUBY4B-NG Parts List No. Description Part No. No. Description Part No. Panel Bolt 2 R-PANBOLT Thermostat R-TMETER Light Switch 1 R-LIGHT-SW Hood Handle Hood-R4B-H Control Panel 1 R-PANEL-4B Hood Hood-R4B Knob Ring...
- Page 9 SPECIFICATIONS – Ruby 36” 4 Burner IR - Pro Sear Product Overview Model Series 3174816 RUBY4BIR-NG 36” RUBY4BIR-LP 36” ***All 304 Stainless Steel*** Product Overview 33-1/2" X 19-1/2” Cooking Grid Size--- Burger Count-------- 32 burgers 184.25 Sq. Inch Warming Rack------- Main Cooking Space 653.25 Sq.
- Page 10 SPECIFICATIONS – Parts Diagram/Ruby4BIR 36” RUBY4BIR-LP / RUBY4BIR-NG Parts RUBY4BIR-LP / RUBY4BIR-NG Parts List No. Description Part No. List No. Description Part No. Light Switch R-LIGHT-SW Thermostat R-TMETER Control Panel R-PANEL-4B Hood Handle Hood-R4B-H Knob Ring P-KNOB-R Hood Hood-R4B LED Light R-LED-4B Hood Bolt R-HAB...
- Page 11 SPECIFICATIONS – Ruby 42” 5 Burner IR - Pro Sear Product Overview Model Series 3174816 RUBY5BIR-NG 42” RUBY5BIR-LP 42” ***All 304 Stainless Steel*** Product Overview 39-1/2" X 19-1/2” Cooking Grid Size--- Burger Count-------- 36 burgers 217.25 Sq. Inch Warming Rack------- Main Cooking Space 770.25 Sq.
- Page 12 SPECIFICATIONS – Parts Diagram/Ruby5BIR 42” RUBY5BIR-LP / RUBY5BIR-NG Parts RUBY5BIR-LP / RUBY5BIR-NG Parts List List No. Description Part No. No. Description Part No. Thermostat R-TMETER Light Switch R-LIGHT-SW Hood Handle Hood-R5B-H Control Panel R-PANEL-5B Hood Hood-R5B Knob Ring P-KNOB-R Hood Bolt R-HAB LED Light R-LED-5B...
-
Page 13: Locating The Grill
Self-Rimming and is supported by the top counter surface on the Back and Sides, the front of grill is designed to Free-Hang. The bottom of Grill needs to be open to allow for proper ventilation. Ruby Series Grill Island Cut-Out Dimensions ITEM NO. -
Page 14: Installing In Open Area
LOCATING GRILL – Installing into Open Area Windy Conditions Your grill is specially designed to draw fresh air in through the front, and in direct to the bottom burners. When grilling the hot gases are then released through the back of grill through a venting system. Using your grill in windy conditions may disrupt the front-to-back air flow. -
Page 15: Installing In Windy Area
LOCATING GRILL – Installing into Windy Open Area ATTENTION: Take special precaution when installing grill in open Breezy area, check the direction of Prevailing Wind Direction, if back of grill is facing any oncoming wind or breeze, be sure to protect the back of grill, and erect a partition wall, or only use grill with hood open on breezy days. -
Page 16: Installing In Enclosed Area
LOCATING GRILL – Installing into Enclosed Area Minimum Requirements FRONT VIEW See Diagram (Page 11) to Right From Counter to Overhead Structure 8’ ft. Min. Clearance From Counter to Outdoor Vent Hood 36" Min. Clearance From Floor to Counter Top 38"... -
Page 17: Installing Components
INSTALLNG COMPONENTS- Transformer Installation LIVE CIRCUIT: IMPORTANT: All outdoor electeri 1. Locate the transformer Remove the transformer from the plastic bag located in the interior of grill. Make sure the Transformer is complete, and double check the grill light plug cord is properly secured to transformer, and all wires are firmly fixed into plastic clip plug. -
Page 18: Rotisserie Rod Assembly
INSTALLNG COMPONENTS- Rotisserie Rod Assembly Qty. Part No. Name Rotisserie assembly can be purchased individually either by individual item, or in a 3 Burner Rotisserie set P--RK-3B complete set, for your size of grill. The rotisserie 4 Burner Rotisserie set P--RK-4B assembly can also be used with or without an 5 Burner Rotisserie set... - Page 19 INSTALLNG COMPONENTS – Rotisserie Installation WARNING: Never stand with your head directly over the Grill when preparing to light the Rotisserie burner, to prevent possible bodily injury. Never operate Rotisserie Burner with main (other) burner(s) “ON”. Warming Rack must be removed when Rotisserie Burner is ON. Rotisserie is mostly used to cook large pieces of meat and poultry to assure slow, even cooking.
-
Page 20: Gas Installation Propane Tank Types
GAS INSTALLATION – Propane Tank Types Types of Propane Tanks: Propane tanks are mainly used alongside stoves, water heaters, grills, generators, and welding equipment. These bottles or metal cylinders contain propane, a type of alkaline gas that has been compressed and transformed into liquid form. Transporting, storing, and using propane safely can only be possible if it is held inside tanks or containers. - Page 21 GAS INSTALLATION – Propane Tank Types Page 17...
-
Page 22: Lp Gas Line Connection
GAS INSTALLATION – LP Gas Line Connections 1. For this type of installation, it is most similar to the NG gas installation method, only the regulator is set for liquid propane. First you will install a gas pipe, coming into island from outside, be sure the Safety Shut-Off valve is easily accessible. -
Page 23: Ng Gas Line Connection
GAS INSTALLATION – NG Gas Line Connection ATTENTION: Always turn grill knobs OFF, before installing gas lines, or making any connections and dis-connections of supply hoses. WARNING: Always take a leak test before lighting the grill to prevent a possible fire or explosion.. Page 19... -
Page 24: Propane Tank Safety
GAS INSTALLATION – Propane Tank Safety IMPORTANT: Before connecting grill to gas source, make sure BBQ Grill control knobs are in “OFF” position. Verify the type of gas supply to be used, either natural or LP, and make sure the marking on the appliance rating label agrees with that of the supply. -
Page 25: Propane Tank Connection
GAS INSTALLATION – Propane Tank Connection Hose and Regulator The Type 1 connection system has the following features: The system will not allow gas to flow until a positive connection has been made. NOTE: The cylinder control valve must be turned off before any connection is made or removed. ... -
Page 26: Propane Tank Connection
CAUTION: It is recommended you use a Propane Tank Pull-Out Drawer. It is severely hazardous to move propane tanks in and out of Island enclosure without assistance of drawer. See below for Sunstone's Combo Tank Tray Pull-Out Drawers available 30” Tank Tray Double Drawer Combo 30”... -
Page 27: Safety Checks -Service Access
SAFETY CHECKS –Service Access Easy Service Access Your grill is specially designed for easy Self-Service, similar to opening the hood of your car – the grill’s control panel opens 90 degree’s open revealing all inside valves and wires. 1. Open Hood, and remove All Cooking Grates so only the Flavorizer Grids remain. -
Page 28: Check Parts
SAFETY CHECKS –Check Parts Check Parts After removing a few components, like a Cooking Grate and Flavorizer Grid you will begin to see how the grill is configured with the various parts. 1. Inspect the Burners are all LEVEL and fixed properly in their place, if any burner has shifted – inspect that the valve is properly lined up with burner, if necessary remove the burner and re-insert into position, with back bolt inserting in through hole. -
Page 29: Leak Test
SAFETY CHECKS –Leak Test WARNING: Always take a leak test before lighting the grill to prevent a possible fire or explosion. Never store a spare propane cylinder in the vicinity of this Grill, or in the vicinity of any other potential heat source. -
Page 30: Leak Test
SAFETY CHECKS –Leak Test Liquid Propane Leak Testing Procedure Test connection from grill to LP Hose Test connection from LP Tank to Regulator regulator Natural Gas Leak Testing Procedure If unable to stop gas leak, turn gas off Test connection next to NG regulator Test connection from gas line to adapter Test Quick Disconnect Page 26... -
Page 31: Attention & Warnings
SAFETY CHECKS –Attention & Warnings WARNING: When Lighting the Grill. DO NOT RELEASE KNOB, GAS WILL CONTINUE TO FLOW. WARNING: Keep any electrical supply cords and the fuel supply hose away from any heated surfaces. WARNING: Failure to open the lid while igniting the barbecue’s burners, or not waiting 5 minutes to allow the gas to clear if the barbecue does not light, may result in an explosive flame-up which can cause serious bodily injury or death. -
Page 32: Grill Safety
CAUTION When using your Sunstone™ Grill, always cook with hood up when knobs are on HIGH HEAT setting. NEVER close the hood and walk away. Always turn burners to LOW HEAT when hood is in down... -
Page 33: Grill Start-Up Lighting The Grill
GRILL START-UP –Lighting the Grill WARNING: When Lighting the Grill, Hold the Knob in until Burner Ignites. DO NOT RELEASE KNOB, GAS WILL CONTINUE TO FLOW. Lighting Instructions 4. Upon successful lighting, repeat the Open Lid/Hood process on the other burners you wish to light. -
Page 34: Appendix Warranty
6. No one has the authority to add to or vary RUBY GRILL warranty, or to create for SUNSTONE METAL PRODUCTS LLC. any other obligation or liability in connection with the sale or use of its products.
Need help?
Do you have a question about the ruby series and is the answer not in the manual?
Questions and answers