Advertisement
Quick Links
Read all instructions before you operate your grill.
3174816
Certified to:
UL SUBJECT 2728A
ULC/ORD-C2728
Save these instructions!
MODEL NO: SUNPLT40
Fuel input rating: 1.7LBS/hr
Electrical Rate: 120Vac, 60Hz, 485W – 4.4 AMPS
Refer to Intertek's Directory of Building Products
for detailed information.
Minimum clearance from side and back of unit to
combustible construction: 24" (609.6mm) from
sides and 24" (609.6mm) from back.
Advertisement
Troubleshooting

Related Manuals for SUNSTONE SUNPLT40


Summary of Contents for SUNSTONE SUNPLT40
- Page 1 Read all instructions before you operate your grill. Save these instructions! MODEL NO: SUNPLT40 Fuel input rating: 1.7LBS/hr Electrical Rate: 120Vac, 60Hz, 485W – 4.4 AMPS Refer to Intertek’s Directory of Building Products 3174816 for detailed information. Certified to: Minimum clearance from side and back of unit to...
- Page 2 Welcome & Congratulations Congratulations on your purchase of a new Sunstone Pellet Grill! We are very proud of our product, and we are completely committed to providing you with the best service possible. ATTENTION: Please read this entire manual before installation and use of the pelletized, all natural, wood fuel-burning appliance.
- Page 3 INDEX DIRECTORY HAZARDS & WARNING SIGNS ATTENTION: Indicates a potentially hazardous situation which, if not avoided, may result in minor or moderate personal injury, or property damage. WARNING: Indicates an imminently hazardous situation which, if not avoided, will result in death or serious injury.
- Page 4 PAGE 1 PREPERATION - REQUIRMENTS ATTENTION: A MAJOR CAUSE OF FIRES IS FAILURE TO MAINTAIN REQUIRED CLEARANCES (AIR SPACES) TO COMBUSTIBLE MATERIALS. IT IS OF UTMOST IMPORTANCE THAT THIS PRODUCT BE INSTALLED ONLY IN ACCORDANCE WITH THESE INSTRUCTIONS. ATTENTION: Do not use spirit, petrol, gasoline, lighter-fluid or kerosene for lighting or refreshing a fire in your grill.
- Page 5 PREPERATION – CHECKLIST PAGE 2 Check List for pellet grill Startup and Usage: Transformer Electrical Plug is properly installed. Keep electrical supply cords away from heated surfaces. Do not use your grill in the rain or around any water source. ...
- Page 6 PAGE 3 PREPERATION – PELLET STORAGE When it comes to pellet storage, there are several methods and recommendations that can help ensure the quality and longevity of your pellets. 1. Store in a dry place: It's important to keep your pellets dry, as moisture can cause them to deteriorate and even mold.
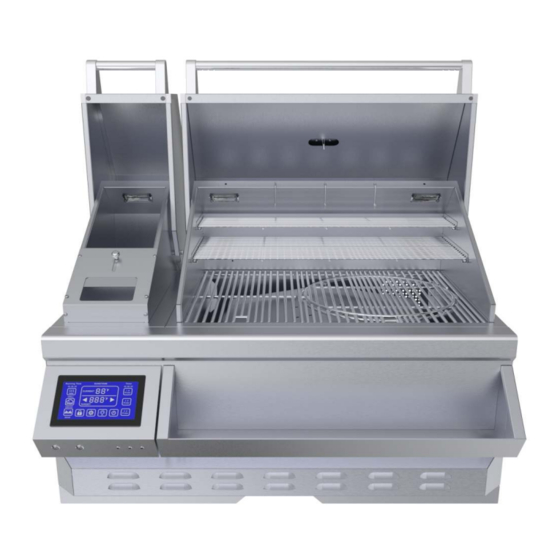
- Page 7 GRILL PARTS – PARTS LIST PAGE 4 NUMBER DESCRIPTION PART NUMBER Temperature Gauge RUBY-TMETER Left Handle Assembly PLT40-LHANDLE Right Handle Assembly PLT40-RHANDLE Hybrid Grill Badge PLT40-HGBADGE Left Loader Hood PLT40-LLHOOD Right Grill Hood PLT40-RGHOOD Hood Bolt Screw Set PLT40-HBSCREW Halogen Light PLT40-HLIGHT Grill Smoker Hooks PLT40-GSHOOKS...
-
Page 8: Grill Parts - Diagram
GRILL PARTS – DIAGRAM PAGE 5 Refer to page 4 Parts List... - Page 9 PAGE 6 MEASURMENTS – TECHNICAL Product Size Firebox Size Overall Width-------------------- 40" Box Width ---------------------- 38.43" Overall Height------------------- 30.94" Box Height---------------------- 1 6 . 8 4 " Overall Depth-------------------- 30.14" Box Depth----------------------- 21.85" SIDE VIEW FRONT VIEW BACK VIEW TOP VIEW...
- Page 10 MEASUREMENTS - CUT-OUT PAGE 7 : Never build an enclosure under the Grill or partition side walls, the Grill ATTENTION must be Free Hanging supported by the countertop only! Must have clear access to underside of Grill within reach of at least Two Vents. ISO VIEW SIDE VIEW FRONT VIEW...
- Page 11 PAGE 8 INSTALLATION – BUILT-IN DIAGRAM Enclosed Installation Definition: Structure built above Appliance that is attached to the home’s exterior outside wall, roof or is inside a separate structure like outdoor room and there is a Minimum of “One” Side open with outside exposure. Minimum Distances to Combustible Materials or other Appliances ONLY, Non-Combustible materials do not apply! (A) Must use vent hood above grill for enclosed structures...
- Page 12 304 Stainless Steel Materials, ensuring durability and long- lasting performance. Recommended Sunstone Doors & Drawers for use with the Built-in Pellet Grill: All recommended components fit within 14” clearance which still allows for structural framing of outdoor kitchen island.
- Page 13 Easy to Use - Two Large Drawers for Pellet Storage The Sunstone Grill Cabinet is easy to use, thanks to its two large drawers for pellet storage. The drawers can hold pellets for the main hopper and the built-in cold smoker, making it easy to switch between the two.
-
Page 14: Installation Safety Guidelines
PAGE 11 INSTALLATION – SAFETY GUIDELINES DEFINITION OF COMBUSTIBLE MATERIAL - Any materials of a building structure or decorative structure made of wood, compressed paper, plant fibers, vinyl/plastic or other materials that are capable of transferring heat or being ignited and burned. Such material shall be considered combustible even though flame-proofed, fire- retardant treated or surface-painted, or plastered. - Page 15 When using the Sunstone Pellet Grill, it is essential to have a minimum of two vents set in a high position to allow high heat to escape and provide proper air-circulation. This is especially important when any gas appliances are in use.
- Page 16 PAGE 13 INSTALLATION – STEP BY STEP GUIDE 1. Slide Grill in Place Begin by sliding the grill into place, ensuring it aligns properly with the cut-out. The grill is designed with an internal built-in hanger lip located on the right, left, and back sides. This allows the grill to hang by the three supported edges, while the front control panel hangs down the front of the cut-out.
- Page 17 GRILL START-UP – GRILL SEASONING PAGE 14 1. Grill Preparation Proper Grill Maintenance needs to be part of your annual care of the Pellet Grill, the following solutions help ensure your grill will last for your lifetime and beyond. First, make sure that your grill is off, and the grates are cold.
- Page 18 GRILL START-UP – BUILDING THE FIRE PAGE 15 Building & Maintaining the Fire: Building and maintaining the fire in a built-in Pellet Grill requires careful attention to the following recommendations: Use high-quality, all-natural wood pellets that are designed for use in pellet grills. Avoid using fuel with additives or other materials that can damage the grill or affect the flavor of your food.
- Page 19 PAGE 16 GRILL START-UP – USING THE GRILL Operation of the Grill: Operating and using electrical assemblies for a built-in pellet grill requires careful attention to the following technical guidelines: Ensure that the electrical supply to the grill is properly installed and grounded according to local electrical codes and manufacturer's instructions.
- Page 20 GRILL START-UP – INTIAL STARTUP PAGE 17 Plug the power cord into a Grounded power source (120 Volt Required). Initial set up of your pellet grill, Press setting icon to set time, temperature C° or F°, Bluetooth and hit save. Lock Setting, Push lock icon, Red=Locked, Green=Unlock. (Bluetooth connectivity mode is currently in development) 2.
- Page 21 PAGE 18 GRILL START-UP – GRILLING MODES SMOKE - Cold Smoking Cold smoking, open the small cover to expose the cold smoker box in front, pull the feeder tube out and add pellets then slide the tube back into compartment and close the cold smoker box cover.
- Page 22 PAGE 19 GRILL START-UP – GRILL OPERATION Ash Tray Never use the grill if the Ash Tray is not installed or fully closed. Ashes should be placed in a metal container with a tight-fitting lid. The container must be placed on a non-combustible surface well away from all other combustible materials.
- Page 23 PAGE 20 GRILL START-UP – FUEL SAFETY Use only Specified Accessories Do not use accessories not specified for use with this appliance. Using pellet grill accessories that are not specified for use with the pellet grill can be dangerous and may result in several potential hazards.
- Page 24 PAGE 21 TROUBLE SHOOTING – Q & A ATTENTION: Major causes of appliance fires are a result of poor maintenance and a failure to maintain required clearance to combustible materials. It is important that this grill be installed and used in accordance with this manual. Q.
-
Page 25: Troubleshooting Error Codes
TROUBLE SHOOTING - ERROR CODES PAGE 22 Error Codes If the grill is compromised in any way, usually a error code will display in place of the Temperature Location. They are designated by an “E” for error following by a numerical value. Refer to this page in diagnosing any issue which may arise in your grills operating, call our technical team for assistance 888-934-9449. -
Page 26: Trouble Shooting - Electrical
PAGE 23 TROUBLE SHOOTING - ELECTRICAL (A) Power Outlet (Black/White/Green) (G) Fuse Connector (H) 16mm Switch (B) Ignition Stick (Purple/White) (I) Lights (C) Ignition Stick (Purple/White) (J) 12 Volt Small Fan (D) Fan (Orange/White) (K) Food Probe Meter (E) Hopper Motor (Red/White) (L) Probe Meter (F) Motherboard : Use only extension cords approved for outdoor use marked with W-A and... -
Page 27: Grill Warranty
The cost-of-service calls to diagnose trouble, or Removal or re-installation cost. This warranty applies to the original purchaser with invoice or proof of purchase and covers Sunstone products intended for personal, family or household usage only. It does not apply to surface rust, corrosion, oxidation, or discoloration, which may occur due to moisture or overheating, unless the affected component becomes inoperable.
Need help?
Do you have a question about the SUNPLT40 and is the answer not in the manual?
Questions and answers