Table of Contents
Advertisement
Quick Links
Advertisement
Table of Contents

Related Manuals for FRENCH FITNESS FF-WR80


Summary of Contents for FRENCH FITNESS FF-WR80
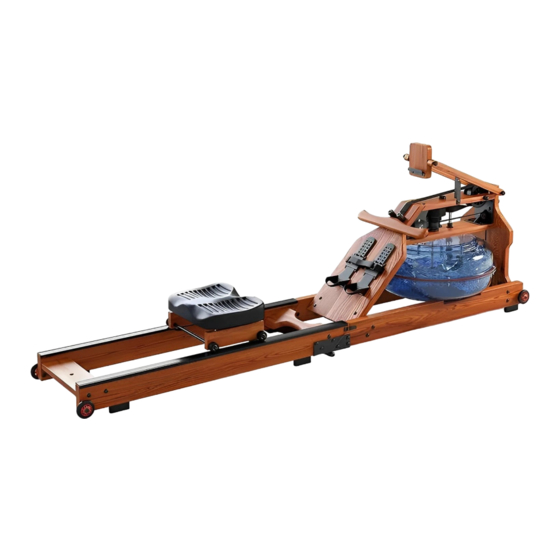
- Page 1 FF-WR80 FRENCH FITNESS WR80 WATER ROWING MACHINE W/RESISTANCE OWNERS MANUAL...
- Page 2 FE AT U RE S Tank Water Capacity: 19 litres • Blades: High-strength ABS plastic • Number of Blades: 16 blades • (5) Transport Wheels + Folds for Storage When not in Use • Resistance Levels: 8 • Material: Red Oak wood frame material •...
-
Page 3: Table Of Contents
T ABL E OF CONT E NT S ROWING MACHINE FUNCTION ..............4 SAFETY PRECAUTIONS .................. 5 INSTALLATION NOTES ................... 7 DRAINAGE STEPS ..................8 INSTRUCTIONS ....................9 EXERCISE ADVICE ..................10 EXERCISE INSTRUCTION ................12 PRODUCT PARAMETER ................13 EXPLODED VIEW .................. -
Page 4: Rowing Machine Function
ROWI NG MACHI NE FU NCT I ON Also known as rowing device, dynamometer, land rowing device, indoor rowing device The rowing machine is a machine used to simulate water rowing for training purposes. Indoor competitions have become professional. The indoor rowing machine is also called dynamometer (or ERGO ir some countries), which measures the power consumed by the athlete during exercise The rowing machine has a good effect to strengthen muscle on legs, waist, upper limbs, chest and back. -
Page 5: Safety Precautions
SAFE T Y PRE CAU T I ONS Please read the instructions manual carefully before use.. It is very important to read all the contents of the instruction manual carefully before assem- bling and using the training equipment. Only the correct installation, maintenance and use of the training equipment can achieve a safe and effective training effect. - Page 6 SAFE T Y PRE CAU T I ONS Please make sure to use the equipment according to the instruction. When defective parts are found during the assembly process or there are abnormal noises during use, please stop using it immediately and make sure that all problems are resolved before proceeding. Please wear suitable clothes for training.
-
Page 7: Installation Notes
I NST AL L AT I ON NOT E S Step1 Remove the left pre-installed limit rubber block on the end of the rail.Put the seat cushion into the rail,and then quickly instal1 the limit rubber back to the original position. -
Page 8: Drainage Steps
D RAI NAGE ST E PS Filling steps Intelligent wireless water pump Filling inlet 1、Remove the plug on the left (right) water tank 2、 Fill with intelligent wireless water pump. 3、Fill water into the water level line or below the water level line (the user wi11 be responsible for problems such as equipment breakdown and water leakage caused by exceeding the water evel line) 4、Please make sure the plug is properly plugged after filling. -
Page 9: Instructions
I NST RUCT I ONS Use Instructions Folded machine Unfolded machine 1、Unfolded 2、Start to use 3、Storage Please fold the machine slowly to avoid pinching or crushing of your hands. At the same time, the equipment can also avoid damage caused by violent collisions. -
Page 10: Exercise Advice
E XE RCI SE AD VI CE Sports suggestions and guidelines(一) Warm up There should be 5--10 minutes of warm-up exercise before each operation. Breathing Do not hold your breath during operation.Inhale through your noseand exhale forcefully through your mouth when you are preparing to restore the movement.Breathing and movement should be coordinated. - Page 11 E XE RCI SE AD VI CE Sports suggestions and guidelines(二) Stretching exercises No matter what speed you walk at, it' s better to do stretching exercises firstly and then muscles are easier to stretch. So first walk for 5-10 minutes to warm up, then stop and do stretching exercises 5 times as follows.
-
Page 12: Exercise Instruction
E XE RCI SE I NST RUCT I ON Exercise instruction 1、Put your feet on the pedals and fix them so that they will not move freely: Hold the handles, relax your shoulders, relax and straighten your arms; bend your knees at a comfortable angle that is about the calf (tibia) perpendicular to the slide rail. -
Page 13: Product Parameter
PROD UCT PARAME T E R Product Parameters 1、The main frame of the whole machine is made of wax wood imported from the United States 2、Natural resistance. The more water you add, the greater the resistance. Pay attention not to exceed the water level. -
Page 14: Exploded View
E XPL OD E D VI E W Exploded view... -
Page 15: Exploded View Parts (1)
E XPL OD E D VI E W PART S (1) Exploded view parts (1) Name Name Seat limit wheel Main frame top plate Foot pad Seat roller Main frame riser Rear link board Tailgate Adjustable pedal cover Tailgate connecting plate Adjustable pedal 40 Wear-resistant sheet Track board... -
Page 16: Exploded View Parts (2)
E XPL OD E D VI E W PART S (2) Exploded view parts (2) Name Name Guide sleeve Spinner 10 Metallurgical set Seal ring Waterproof rubber sheet Belt axis Belt wheel Cotter pin The blade axis magnet Upper water tank plug Elastic cord buckle 10 Nylon spacer Spring... -
Page 17: Electronic Manual
E L E CT RONI C MANU AL Console diagram Display function of the console: TIME: User exercise time, setting range 0:00- 99:00(+-1:00) DIST (distance): User exercise distance, setting range 0-9990 (+-10) CAL (calories): User exercise calories, setting range 0-9990(+-10) SPM (speed): Display value according to the signal input. - Page 18 E L E CT RONI C MANU AL TOTAL STROKES(total times) : According to the user's pull and release times, the value will be displayed cumulatively. WATT: Display value according to the signal input. PULSE: The user's heartbeat during exercise, setting range: 0-30-240(±1) BPM How to operate 1、power on/wake up After the A console is powered on, the BUZZER beeps for 2 seconds, and the LCD will enter the standby mode after 2 seconds of full display.
Need help?
Do you have a question about the FF-WR80 and is the answer not in the manual?
Questions and answers