Table of Contents
Advertisement
Available languages
Available languages
Quick Links
Advertisement
Table of Contents

Related Manuals for Pkm KS128EW


Summary of Contents for Pkm KS128EW
- Page 1 TECHNOLOGIE FÜR DEN HAUSHALT TECHNOLOGY FOR DOMESTIC USE 08.12.2023 EDIENUNGSANLEITUNG OLLRAUMKÜHLSCHRANK NSTRUCTION ANUAL ARDER FRIDGE KS128EW Deutsch Seite English Page www.pkm-online.de...
-
Page 2: Table Of Contents
Sehr geehrter Kunde! Sehr geehrte Kundin! Wir möchten Ihnen herzlich danken, dass Sie sich zum Erwerb eines Produkts aus unserem reichhaltigen Angebot entschieden haben. Lesen Sie die gesamte Bedienungsanleitung, bevor Sie das Gerät zum ersten Mal benutzen. Verwahren Sie diese Bedienungsanleitung zur zukünftigen Verwendung an einem sicheren Ort. - Page 3 7.3 Abtauen ........................38 7.4 Austausch der Leuchtmittel ..................39 8. Problembehandlung ......................39 9. Außerbetriebnahme......................43 10. Technische Daten ......................44 11. Entsorgung ........................45 12. Garantiebedingungen ....................46 Entsorgen Sie dieses Gerät nicht zusammen mit ihrem Hausmüll. Das Gerät darf nur über eine Sammelstelle für wiederverwendbare elektrische und elektronische Geräte entsorgt werden.
-
Page 4: Sicherheitshinweise
1. Sicherheitshinweise LESEN SIE VOR DER ERSTEN BENUTZUNG DES GERÄTES DIE GESAMTEN SICHERHEITSHINWEISE UND SICHERHEITSANWEISUNGEN GRÜNDLICH DURCH. Die darin enthaltenen Informationen dienen dem Schutz Ihrer Gesundheit. Die Nichtbeachtung der Sicherheitshinweise kann zu schweren Beeinträchtigungen Ihrer Gesundheit und im schlimmsten Fall zum Tod führen. Bewahren Sie diese Bedienungsanleitung so auf, dass sie bei Bedarf jederzeit griffbereit ist. -
Page 5: Signalwörter
1.1 Signalwörter verweist eine WARNUNG! verweist auf eine GEFAHR! Gefahrensituation, die, wenn sie nicht Gefahrensituation, die, wenn sie nicht abgewendet wird, eine mögliche abgewendet wird, eine unmittelbare Gefährdung für Leben und Gesundheit bevorstehende Gefährdung für Leben zur Folge hat. und Gesundheit zur Folge hat. VORSICHT! verweist auf eine verweist eine... - Page 6 Kundendienst oder einer qualifizierten Fachkraft (Elektrotechniker/- in) ausgetauscht werden. 8. Benutzen Sie zum Ziehen des Netzsteckers niemals das Netzanschlusskabel. Ziehen Sie immer am Netzstecker selbst, um Gerät Stromversorgung trennen. STROMSCHLAGGEFAHR! 9. Berühren Sie den Netzanschlussstecker, den Netzschalter oder andere elektrische Komponenten niemals mit nassen oder feuchten Händen.
- Page 7 zündfähige Gemische zur Explosion gebracht werden können. 7. Achten Sie beim Entpacken unbedingt darauf, dass die Bestandteile der Verpackung (Polyethylentüten, Polystyrenstücke) nicht in die Reichweite von Kindern und Tieren gelangen. ERSTICKUNGS- GEFAHR! VERLETZUNGSGEFAHR! 8. Beachten Sie immer die Angaben für eine ordnungsgemäße Belüftung des Gerätes.
- Page 8 22. Entfernen Sie regelmäßig eventuelle Staubanhaftungen am Netzanschlussstecker, an der Sicherheitssteckdose und an allen Steckverbindungen. BRANDGEFAHR! 23. Halten Sie das Netzanschlusskabel von erwärmten Flächen fern. 24. Der Netzstecker und die Steckdose müssen nach der Installation immer zugänglich sein. 25. Benutzen Sie keine elektrischen Geräte im Inneren des Gerätes, es sei denn, diese werden vom Hersteller Ihres Gerätes empfohlenen.
- Page 9 2. Achten Sie darauf, dass Ihre Finger sich beim Schließen der Tür nicht zwischen der Tür und dem Gehäuse des Gerätes befinden. QUETSCHGEFAHR! HINWEIS! 1. Lagern Sie kein Trockeneis in dem Gerät. 2. Wenn Sie das Gerät bewegen, halten Sie es immer am unteren Ende fest und heben Sie es vorsichtig an.
-
Page 10: Klimaklassen
Einbauvorrichtung (falls Ihr Gerät für einen Einbau geeignet ist) müssen immer frei und unbedeckt sein. 16. Legen Sie Lebensmittel nicht direkt gegen den Luftauslass an der Rückwand im Inneren des Gerätes 17. Überfüllen Sie die Regale / Schubladen / Türablagen nicht, da diese sonst nachhaltig beschädigt werden können. -
Page 11: Installation
3. Installation Alle Abmessungen in diesen Kapiteln sind in Millimetern angegeben. Die benötigten Abmessungen für eine ordnungsgemäße Belüftung des Gerätes finden Sie in Kapitel 3.2.3 B ELÜFTUNG 3.1 Entpacken und Wahl des Standortes WARNUNG! Achten Sie beim Entpacken unbedingt darauf, dass die Bestandteile der Verpackung (Polyethylentüten, Polystyrenstücke) nicht in die Reichweite von Kindern und Tieren gelangen. -
Page 12: Raumbedarf Und Belüftung
3.2 Raumbedarf und Belüftung Beachten Sie die Angaben für eine ordnungsgemäße Belüftung des Gerätes. 3.2.1 Raumbedarf AUMBEDARF DES ERÄTES BEI GESCHLOSSENER ÜR A = H / B = B / C = T ÖHE REITE IEFE 847 mm 546 mm 556 mm... -
Page 13: Wandabstandshalter
AUMBEDARF DES ERÄTES BEI GEÖFFNETER ÜR Beachten Sie bitte den zusätzlichen vorderen und seitlichen Platzbedarf der geöffneten Tür(en) entsprechend des Türöffnungswinkels Ihres Gerätes (s. Abb. unten). B 1 = B / C 1 = T / X = T REITE IEFE ÜRÖFFNUNGSWINKEL mind. -
Page 14: Belüftung
NSTALLATION DER ANDABSTANDSHALTER 1. Setzen Sie die Wandabstandshalter in die entsprechenden Öffnungen auf der Rückseite des Gerätes ein und schrauben Sie sie fest. 2. Stellen Sie das Gerät, mit einem freien Abstand von mindestens 50 mm und höchstens 75 mm, an die Wand. Abb. - Page 15 AUMBEDARF DES ERÄTES INKL INDESTABSTÄNDE FÜR EINE ORDNUNGSGEMÄßE ELÜFTUNG BEI GESCHLOSSENER ÜR A = H / B = B / C = T ÖHE REITE IEFE mind. 947 mm mind. 586 mm mind. 576 mm Wand...
- Page 16 AUMBEDARF DES ERÄTES INKL INDESTABSTÄNDE FÜR EINE ORDNUNGSGEMÄßE ELÜFTUNG BEI GEÖFFNETER ÜR B 1 = B / C 1 = T / X = T REITE IEFE ÜRÖFFNUNGSWINKEL mind. 1100 mm mind. 1180 mm Beachten Sie bitte den zusätzlichen vorderen und seitlichen Platzbedarf der geöffneten Tür(en) entsprechend des Türöffnungswinkels Ihres Gerätes.
-
Page 17: Gerät Ausrichten
Um eine optimale Effizienz des Gerätes zu ermöglichen, empfiehlt der Hersteller folgende Mindestabstände. Rückseite ↔ Wand mind. 50 mm Beide Seiten ↔ Möbelstück / Wand mind. 300 mm Kopffreiheit mind. 300 mm Diese Angaben können unterschritten werden, jedoch kann sich der Stromverbrauch dadurch erhöhen. -
Page 18: Wechsel Des Türanschlags
Für den ordnungsgemäßen Betrieb muss sich das Gerät in einer stabilen und ebenen Position befinden. Damit das Gerät nicht wackelt müssen die 2 vorderen Standfüße und die 2 hinteren Rollen fest auf dem Boden stehen. Justieren Sie die Standfüße dementsprechend. Der feste Kontakt der Standfüße und der Rollen mit dem Boden stellt außerdem sicher, dass das Gerät nicht vibrieren, unbeabsichtigt wegrollen oder sich bewegen kann. - Page 19 HINWEIS! Richten Sie die Türen ordnungsgemäß aus, bevor Sie beim Umbau die Scharniere fest anziehen. Die Dichtungen müssen ordnungsgemäß anliegen. HINWEIS! Kippen Sie das Gerät nicht über einen Winkel von 45° hinaus. ORBEREITENDE AßNAHMEN ➢ Leeren Sie das Gerät vorher. ➢...
- Page 20 Abb. ähnlich: Modifikationen sind möglich. CHRAUBEN BERE ERÄTEABDECKUNG Pfeil ÜCKSEITE DES ERÄTES 5. Um Zugriff auf das obere Türscharnier (3) zu erhalten, müssen Sie die obere Geräteabdeckung (2) entfernen (s. Abb. unten). Legen Sie die Abdeckung beiseite. BERE ERÄTEABDECKUNG BERES ÜRSCHARNIER...
- Page 21 6. Schrauben Sie das obere Türscharnier (3) vorsichtig ab (s. Abb. unten). Halten Sie währenddessen die Gerätetür mit der Hand fest, damit sie nicht herabfällt. BERES ÜRSCHARNIER 7. Heben Sie die Gerätetür an und entnehmen Sie sie vorsichtig (s. Abb. unten). Legen Sie die Gerätetür mit der Außenverkleidung nach oben auf eine glatte Oberfläche, damit sie nicht beschädigt wird.
- Page 22 ÜRANSCHLAGBLOCK ÜRLAGERBUCHSE 9. Es ist notwendig, dass das Gerät nach hinten gekippt wird. Lehnen Sie das Gerät dabei gegen eine feste und unverrückbare Fläche, damit es nicht wegrutschen kann. Kippen Sie das Gerät nicht über einen Winkel von 45° hinaus. 10.
- Page 23 12. Richten Sie das Gerät wieder vorsichtig auf. Achten Sie auf einen festen Stand. 13. Installieren Sie die Gerätetür am unteren Türscharnier. Setzen Sie dazu die Scharnierachse unteren Türscharniers vorsichtig untere Scharnieröffnung der Gerätetür ein. Halten Sie die Tür in Position. 14.
- Page 24 Abb. ähnlich: Modifikationen sind möglich. CHRAUBEN BERE ERÄTEABDECKUNG 18. Setzen Sie die vorher entnommenen Türablagen, Glasablagen, Schubladen etc. wieder in das Gerät ein. 19. Schließen Sie die Tür und verbinden Sie das Gerät wieder mit der Stromversorgung. HINWEIS! Richten Sie die Tür ordnungsgemäß aus. Die Dichtung muss ordnungsgemäß...
-
Page 25: Beschreibung Des Gerätes
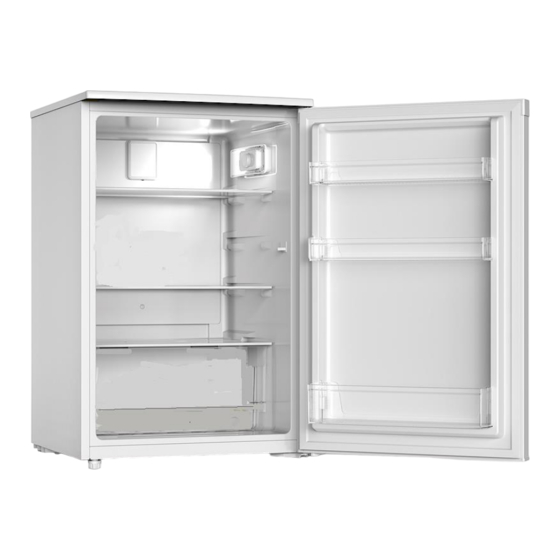
4. Beschreibung des Gerätes Abb. dient ausschließlich als Beispiel. Modifikationen sind möglich. (LED) ERSTELLBARER HERMOSTAT ELEUCHTUNG LASABLAGEN der Gemüseschublade RUCHSICHERE LASABDECKUNG EMÜSESCHUBLADE ÜRABLAGEN / 2 vorne ERSTELLBARE TANDFÜßE 5. Bedienung WARNUNG! Um das Gerät von der Stromversorgung zu trennen, müssen Sie den Netzstecker aus der Netzsteckdose ziehen oder eine Abschaltvorrichtung verwenden. -
Page 26: Vor Der Ersten Benutzung
5.1 Vor der ersten Benutzung WARNUNG! Achten Sie beim Entpacken unbedingt darauf, dass die Bestandteile der Verpackung (Polyethylentüten, Polystyrenstücke) nicht in die Reichweite von Kindern und Tieren gelangen. ERSTICKUNGS- GEFAHR! VERLETZUNGSGEFAHR! HINWEIS! Lassen Sie das Gerät für mindestens 4 - 6 Stunden aufrecht stehen, bevor Sie es an die Stromversorgung anschließen, damit das Öl in den Kompressor zurückfließen kann. -
Page 27: Temperatureinstellung (Thermostateinstellung)
RSTMALIGE NBETRIEBNAHME ➢ Stellen Sie den Thermostat des Gerätes auf eine mittlere Stufe und lassen Sie das Gerät für 3 - 4 Stunden unbeladen laufen. ➢ Wählen Sie danach die gewünschte Einstellung. Sie können nun Kühlgut in das Gerät geben. 5.2 Temperatureinstellung (Thermostateinstellung) WARNUNG! Um das Gerät von der Stromversorgung zu trennen, müssen Sie den Netzstecker aus der Netzsteckdose ziehen oder eine... - Page 28 Abbildung. ähnlich: Modifikationen sind möglich. CHT VERSCHIEDENE HERMOSTATEINSTELLUNGEN SIND VERFÜGBAR Thermostateinstellung Kühlung: Aus 1 - 2 Thermostateinstellungen niedrige / leichte Kühlung 3 - 4 Thermostateinstellungen mittlere / durchschnittliche Kühlung 5 - 6 Thermostateinstellungen hohe / starke Kühlung Thermostateinstellung höchste / stärkste Kühlung ➢...
-
Page 29: Stromausfall
Bei extrem hohen sommerlichen Temperaturen (bitte beachten Sie die Klimaklasse Ihres Gerätes im Kapitel « T »!) kann das ECHNISCHE ATEN Thermostat nach Bedarf auf eine kältere Einstellung (Thermostateinstellungen « » oder « ») gestellt werden. Dadurch kann der Energieverbrauch steigen. Stellen Sie im Falle sehr starker Eisbildung den Thermostat wieder auf eine wärmere Einstellung zurück (Thermostateinstellungen «... -
Page 30: Der Kühlbereich
5.4 Der Kühlbereich Der Kühlbereich eignet sich nicht zur Langzeitlagerung frischer Lebensmittel. Verwenden Sie also den Kühlbereich nur zur kurzzeitigen Lagerung ihrer Lebensmittel. Durch den Umlauf der gekühlten Luft ergeben sich unterschiedliche Temperaturbereiche, sodass Sie in diesen unterschiedlichen Bereichen auch unterschiedliche Lebensmittel lagern können. -
Page 31: Lagerung Von Lebensmitteln
❖ Stellen Sie keine zu schweren Flaschen in das Flaschenfach , da sich das Fach ansonsten von der Tür lösen kann. HINWEIS! Lebensmittel, insbesondere öl- bzw. fetthaltige Lebensmittel, dürfen nicht in direkten Kontakt mit der Innenverkleidung des Gerätes kommen. Direkter Kontakt mit der Innenverkleidung kann Flecken oder Beschädigungen verursachen. - Page 32 ILCHPRODUKTE UND ➢ Für die meisten vorverpackten Milchprodukte wird empfohlen, dass sie bis zum Mindesthaltbarkeitsdatum oder bis zum „Verwenden bis“- Datum verwendet werden. Bewahren Sie sie im Kühlbereich auf und verwenden Sie sie innerhalb der empfohlenen Zeit. ➢ Butter kann durch stark riechende Nahrungsmittel verdorben werden, sodass sie am besten in einem verschlossenen Behälter aufbewahrt wird.
-
Page 33: Umweltschutz
ORGEKOCHTE UND ODER ÜBRIG GEBLIEBENE EBENSMITTEL ➢ Diese sollten in geeigneten, verschlossenen Behältern aufbewahrt werden, damit die Lebensmittel nicht austrocknen. ➢ Nur 1 - 2 Tage aufbewahren. ➢ Erwärmen Sie Reste nur einmal und bis sie dampfend heiß sind. EMÜSESCHUBLADE ➢... - Page 34 ❖ Legen Sie die Gefrierschubladen / Gefrierregale nicht mit Aluminiumfolie, Wachspapier oder Papierlagen aus, weil Sie dadurch die Zirkulation der Kaltluft beeinträchtigen und das Gerät nicht mehr effektiv arbeiten kann. ❖ Bereits gekochtes Essen kann im Gerät frisch gehalten werden. Lassen Sie es dazu vorher auf Zimmertemperatur abkühlen.
-
Page 35: Betriebsparameter
HINWEIS! Um Energie zu sparen, sollte ein längeres Öffnen der Tür(en) vermieden werden. 6.3 Betriebsparameter Das Gerät kann die entsprechenden Temperaturen nur dann erzeugen, wenn: 1. die durchschnittliche Umgebungstemperatur der Klimaklasse entspricht. 2. die Türen ordnungsgemäß schließen. 3. Sie die Türen nicht oft und zu lange öffnen. 4. - Page 36 2. Staubablagerungen am Kondensator erhöhen den Energieverbrauch. Reinigen Sie deshalb zweimal im Jahr den Kondensator an der Rückwand des Gerätes mit einem Staubsauger oder einem weichen Pinsel. 3. Legen Sie vor allen Reinigungs- und Wartungsarbeiten alle Ringe an Ihren Fingern sowie allen Armschmuck ab; ansonsten können Sie die Oberflächen des Gerätes beschädigen.
-
Page 37: Glasablagen Im Kühlbereich
7.1 Glasablagen im Kühlbereich ❖ Die Glasablagen können dem Gerät entsprechend entnommen werden. Entfernen Sie vor der Entnahme alle Lebensmittel von den entsprechenden Ablagen. Die Glasablagen können bei Bedarf in unterschiedlichen Höhen positioniert werden. LASABLAGE ENTNEHMEN EINSETZEN 1. Ziehen Sie die Glasablage vorsichtig auf den Führungsschienen nach vorne, bis Sie sie herausnehmen können (eventuell müssen Sie die Glasablage dabei leicht anheben / modellabhän-... -
Page 38: Abtauen
Für die Reinigung kann die Gemüseschublade auf oben gezeigte Weise entnommen und eingesetzt werden. 7.3 Abtauen WARNUNG Trennen Sie das Gerät von der Stromversorgung. Um das Gerät von der Stromversorgung zu trennen, müssen Sie den Netzstecker aus der Netzsteckdose ziehen oder eine Abschaltvorrichtung verwenden. WARNUNG! Benutzen Sie keine mechanischen Hilfsmittel, Messer oder scharfkantige Gegenstände zur Entfernung von Eisablagerungen. -
Page 39: Austausch Der Leuchtmittel
1. Nehmen Sie die Lebensmittel aus dem Kühlschrank heraus und lagern Sie sie in einer Kühlbox. 2. Schalten Sie das Gerät ab, indem Sie den Thermostatschalter auf 0 / AUS / OFF stellen und anschließend den Netzstecker aus der Steckdose ziehen. 3. - Page 40 EHLER ÖGLICHE RSACHE AßNAHMEN ERÄT ARBEITET NICHT 1. Das Gerät ist mit dem Netzstecker 1. Schließen Gerät nicht Steckdose ordnungsgemäß an die Steckdose an. angeschlossen. 2. Der Netzstecker ist locker. 2. Überprüfen Sie den Netzstecker. 3. Die Steckdose wird nicht mit Strom 3.
- Page 41 EHLER ÖGLICHE RSACHE AßNAHMEN NGEWÖHNLICHE ERÄUSCHBILDUNG 1. Das Gerät steht nicht auf einer 1. Richten Sie das Gerät neu aus. flachen und geraden Oberfläche. Das Gerät berührt eine Wand oder einen anderen Gegenstand. 2. Das Kühlgut ist falsch positioniert. 2. Richten Sie das Kühlgut neu aus. 3.
- Page 42 IE FOLGENDEN ETRIEBSVORGÄNGE SIND NORMAL UND KEIN NZEICHEN EINER EHLFUNKTION ❖ Die Kühlflüssigkeit erzeugt ein Geräusch ähnlich fließenden Wassers. ❖ Gelegentlich sind Geräusche zu hören, die durch den Einspritzvorgang in das Kühlsystem verursacht werden. ❖ Es ist normal, dass die Seitenwände des Gerätes aufgrund des Betriebs des Kühlkreislaufs warm werden.
-
Page 43: Außerbetriebnahme
9. Außerbetriebnahme UßERBETRIEBNAHME ZEITWEILIGE WENN DAS ERÄT ÜBER EINEN LÄNGEREN EITRAUM NICHT BENUTZT WIRD 1. Trennen Sie das Gerät von der Stromversorgung. Um das Gerät von der Stromversorgung zu trennen, müssen Sie den Netzstecker aus der Netzsteckdose ziehen oder eine Abschaltvorrichtung verwenden. 2. -
Page 44: Technische Daten
10. Technische Daten ECHNISCHE ATEN Geräteart Vollraumkühlschrank N / ST Klimaklasse (Umgebungstemperatur 16 °C - 38 °C) Farbe der Front weiß Farbe der Seitenteile weiß Angabe zum Gerät freistehend Energieeffizienzklasse** Energieverbrauch pro Jahr in kWh*** 89,00 Stromspannung / Frequenz 220 - 240 V AC / 50 Hz Gesamtinhalt netto in l 128,00 Inhalt netto Kühlen in l... -
Page 45: Entsorgung
11. Entsorgung 1. Bitte entsorgen Sie das Gerät unter Beachtung der jeweiligen Gesetzgebung hinsichtlich explosiver Gase. Kühlgeräte enthalten in den Kühlsystemen und Isolierungen Kältemittel und Gase, die fachgerecht entsorgt werden müssen. Beschädigen Sie an einem zur fachgerechten Entsorgung vorgesehenen Kühlgerät nicht die Kühlrippen und Rohre. Bei Austritt von Kältemittel besteht BRANDGEFAHR! 2. -
Page 46: Garantiebedingungen
5. Schäden am Produkt, die durch nicht fachgerechte Installation oder Transport verursacht wurden; 6. Schäden infolge nicht haushaltsüblicher Nutzung; 7. Schäden, die außerhalb des Gerätes durch ein PKM-Produkt entstanden sind - soweit eine Haftung nicht zwingend gesetzlich angeordnet ist. Die Gültigkeit der Garantie endet bei: 1. - Page 47 Ohne diese Angaben kann Ihr Garantieanspruch nicht umgehend bearbeitet werden. ESONDERER INWEIS Bitte fotografieren Sie vor Installation/Aufstellung des Gerätes das Typenschild und speichern Sie die Aufnahme zur möglichen späteren Verwendung. Das Typenschild finden Sie an den folgenden Stellen: 1. Kühlgeräte: im Innenraum oder an der Rückseite 2.
- Page 48 Dear customer! We would like to thank you for purchasing a product from our wide range of domestic appliances. Read the complete instruction manual before you operate the appliance for the first time. Retain this instruction manual in a safe place for future reference.
- Page 49 7.3 Defrosting ........................79 7.4 Replacing of the illuminants ..................81 8. Troubleshooting........................ 81 9. Decommissioning ......................84 10. Technical data........................85 11. Waste management ......................86 12. Guarantee conditions ....................87 Do not dispose of this appliance together with your domestic waste. The appliance must be disposed of at a collecting centre for recyclable electric and electronic appliances.
- Page 50 1. Safety information READ THE SAFETY INFORMATION AND THE SAFETY INSTRUCTIONS CAREFULLY BEFORE YOU OPERATE THE APPLIANCE FOR THE FIRST TIME. All information included in those pages serve for the protection of the operator. If you ignore the safety instructions, you will endanger your health and life. Store this manual in a safe place so you can use it whenever it is needed.
- Page 51 1.1 Signal words indicates a hazardous WARNING! indicates a hazardous DANGER! situation which, if ignored, will result in situation which, if ignored, could result death or serious injury. in death or serious injury. NOTICE! indicates possible damage to CAUTION! indicates a hazardous the appliance.
- Page 52 WARNING! To reduce the risk of burns, electrocution, fire or injury to persons. 1. This appliance is equipped with the environmental-friendly refrigerant R600a. The refrigerant R600a is inflammable. The components of the cooling circuit must neither be damaged during transport nor use. 2.
- Page 53 13. Do not connect the appliance to an energy saving plug (e.g., Sava Plug) and to inverters which convert direct current (DC) into alternating current (AC), e.g., solar systems, power supply of ships. 14. A dedicated and properly grounded socket meeting the data of the plug is required to minimise any kind of hazard.
- Page 54 33. Strictly observe the instructions in chapter I NSTALLATION CAUTION! 1. The condenser and the compressor, located at the rear of the appliance, can reach high temperatures during ordinary operation. Carry out the installation according to this manual. An insufficient ventilation of the appliance will impair its operation and will damage the appliance.
- Page 55 12. Do not stand or lean on the base, the drawers, the doors etc of the appliance. 13. Never close the door(s) of the appliance while shelves or drawers are extended, otherwise you will damage the shelves / drawers and the appliance.
- Page 56 3. Installation All dimensions in these chapters are given in millimetres. The minimum distances required for proper ventilation can be found in chapter 3.2.3 V ENTILATION 3.1 Unpacking and positioning WARNING! While unpacking, the packaging materials (polythene bags, polystyrene pieces, etc.) should be kept away from children and pets.
- Page 57 3.2 Space and ventilation requirements Observe the required minimum distances for proper ventilation. 3.2.1 Space requirement PACE REQUIREMENT OF THE APPLIANCE WHEN THE DOOR IS CLOSED / B = / C = HEIGHT WIDTH DEPTH 847 mm 546 mm 556 mm...
- Page 58 PACE REQUIREMENT OF THE APPLIANCE WHEN THE DOOR IS OPEN Please observe the additional front and lateral space requirement of the open door(s) relevant to the door opening angle of your appliance (s. fig. below). B 1 = / C 1 = / X = WIDTH DEPTH...
- Page 59 1. Insert the wall spacers in the corresponding openings on the back of the appliance and tighten them. 2. Place the appliance against the wall with a minimum distance of 50 mm and a maximum distance of 75 mm. ACK OF THE APPLIANCE ALL SPACERS 3.2.3 Ventilation Observe the required minimum distances for proper ventilation.
- Page 60 PACE REQUIREMENT OF THE APPLIANCE WHEN THE DOOR IS CLOSED INCL MINIMUM DISTANCES FOR PROPER VENTILATION / B = / C = HEIGHT WIDTH DEPTH min. 947 mm min. 586 mm min. 576 mm Wall PACE REQUIREMENT OF THE APPLIANCE WHEN THE DOOR IS OPEN INCL MINIMUM DISTANCES FOR PROPER VENTILATION...
- Page 61 B 1 = / C 1 = / X = WIDTH DEPTH DOOR OPENING ANGLE min. 1100 mm min. 1180 mm Please observe the additional front and lateral space requirement of the open door(s) relevant to the door opening angle of your appliance. The following minimum distances are recommended by the manufacturer to ensure optimum efficiency of the appliance: back ↔...
- Page 62 The appliance is lowered. ➢ TURN THE SUPPORTING FEET CLOCKWISE TURN THE SUPPORTING FEET The appliance is lifted. ➢ ANTICLOCKWISE The appliance must stand in a stable and level position to ensure proper operation. The 2 front supporting feet and the 2 rear rollers must stand firmly on the ground so that the appliance does not wobble.
- Page 63 NOTICE! Adjust the doors properly before you finally tighten the screws of the hinges. The seals must close properly. NOTICE! Do not tilt the appliance more than 45°. REPARATORY MEASURES ➢ Empty the appliance. ➢ If possible, remove all door trays, glass shelves and drawers from the appliance so that they cannot be damaged.
- Page 64 Fig. similar: modifications are possible. CREWS of the appliance OP COVER Arrow of the appliance 5. To gain access to the top door hinge (3), you must remove the top cover of the appliance (2 / s. fig. below). Set the cover aside carefully. of the appliance OP COVER OP DOOR HINGE...
- Page 65 OP DOOR HINGE 7. Lift the door of the appliance and remove it carefully (s. fig. below). Place the door on a smooth surface with the external cladding facing up. 8. Remove the door stop block (4) and the door bearing bush (5) from the left-hand side of the appliance door and reinstall them on the right-hand side of the door (s.
- Page 66 9. It is necessary to tilt the appliance backwards. Lean the appliance against a solid and immovable surface so it will not slip. Do not tilt the appliance more than 45°. 10. Unscrew the bottom door hinge (6) (s. fig. below). Align the bottom door hinge (6) with the holes on the bottom left side of the appliance properly and screw it tight (s.
- Page 67 15. Meanwhile, hold the door of the appliance with your hand so it cannot drop down. You may need to rotate the top door hinge through 180° before installing it on the left-hand side of the appliance (depending on model). OP DOOR HINGE 16.
- Page 68 18. Open the door(s) of the appliance and reinstall the previously removed door trays, glass shelves, drawers, etc. 19. Close the door(s) of the appliance and connect it to the mains again. NOTICE! Adjust the door properly. The seal must close properly. 4.
- Page 69 5. Operation WARNING! To disconnect the appliance from the mains, you must unplug the appliance or use a cut-off device. 5.1 Before initial operation WARNING! While unpacking, the packaging materials (polythene bags, polystyrene pieces, etc.) should be kept away from children and pets.
- Page 70 NITIAL OPERATION ➢ Set the thermostat of the appliance to a medium setting and let the empty appliance operate for 3 to 4 hours. ➢ Select your desired setting. You can now store food in the appliance. 5.2 Temperature setting (thermostat setting) WARNING! To disconnect the appliance from the mains, you must unplug the appliance or use a cut-off device.
- Page 71 IGHT DIFFERENT THERMOSTAT SETTINGS ARE AVAILABLE Thermostat setting Cooling: 1 - 2 Thermostat settings lower / slight cooling 3 - 4 Thermostat settings medium / average cooling 5 - 6 Thermostat settings high / strong cooling Thermostat setting highest / strongest cooling ➢...
- Page 72 5.3 Power failure ❖ Max storage time in case of malfunctions: s. chapter T ECHNICAL DATA In the event of a power failure: ➢ reduce the opening frequency of the door. ➢ do not put any new food in the appliance to avoid a rapid rise of the temperature inside the appliance.
- Page 73 Store covered or packaged food in the appliance only so the smell or taste of the food will not diffuse. The following materials are suitable for proper packaging: ❖ Food safe cling film / airtight bags and aluminium foil. ❖ Food safe covering hoods. ❖...
- Page 74 ➢ Vegetables and fruit need not be wrapped if they are stored in the crisper of the fridge compartment. ➢ Make sure that strong smelling food is wrapped or covered in storage and kept away from foods such as butter, milk and cream as they can be spoiled by strong odours.
- Page 75 RECOOKED FOOD AND LEFTOVERS ➢ These should be stored in suitable covered containers so that the food will not dry out. ➢ Keep for 1 – 2 days only. ➢ Reheat leftovers once only and until steaming hot. RISPER ➢ The crisper is the optimum storage location for fresh fruit and vegetables. ➢...
- Page 76 ❖ Some food like meat, fish etc. may become dry and release strong odours. You can avoid these by wrapping them into aluminium foil or plastic wrap or putting them into an airtight bag or container. ❖ Allow ample storage place for your food. Do not overfill your appliance. ❖...
- Page 77 6. you have not overfilled the appliance. 7. you do not store warm or hot food in the appliance. 7. Cleaning and maintenance DANGER! Never touch the power plug, the power switch or other electrical components with wet or damp hands. RISK OF ELECTRIC SHOCK! WARNING! Disconnect the appliance from the mains before you clean or maintain it.
- Page 78 XTERNAL CLEANING 1. Use a moist cloth and a mild, non-acidic detergent. Use a suitable detergent for stubborn stains. 2. Use clear water to rinse. 3. Dry the cleaned surfaces with a cloth. NTERNAL CLEANING 1. Clean the shelves and the inside with warm water and a mild detergent. 2.
- Page 79 7.2 Crisper ❖ The crisper can be removed according to the appliance. Remove all stored vegetables or fruits of the drawer before. OW TO REMOVE INSTALL THE CRISPER 1. Pull the crisper forward carefully and lift it slightly until you can remove it. 2.
- Page 80 4. The drain must not be blocked. 5. Clean the drain carefully with a pipe cleaner. PTIONAL PROCEDURE IF ENCRUSTED ICE SHOULD HAVE OCCURRED WARNING! Switch off the appliance by turning the thermostat (depending on model) to position 0 / AUS / OFF and disconnect it from the mains.
- Page 81 7.4 Replacing of the illuminants WARNING! LED-illuminants must always be replaced by a qualified professional only. If a LED-illuminant is damaged, please contact a qualified professional (not covered by the guarantee). NOTICE! Any damage that is caused to your appliance by improper replacement of an illuminant will not be fixed free of charge, even if the guarantee period of the appliance is still valid.
- Page 82 ALFUNCTION OSSIBLE CAUSE EASURE HE COMPRESSOR OPERATES FOR TOO LONG 1. The appliance has been switched off 1. The appliance needs some time to for a while. reach the preset temperature. 2. Too much or too hot food in the 2.
- Page 83 ALFUNCTION OSSIBLE CAUSE EASURE HE APPLIANCE DOES NOT COOL PROPERLY 1. The temperature is set too high. 1. Decrease the temperature (colder). 2. The environment is too warm. 2. Keep the appliance away from direct sunlight and other sources of heat. Always observe the climatic class of your appliance...
- Page 84 NOCKING SNAPPING may be generated by sequential expansion and shrinkage of the components of the cooling system. It is caused by variation of temperature before and after the compressor is activated or deactivated. 9. Decommissioning ECOMMISSIONING TEMPORARILY F THE APPLIANCE IS NOT USED FOR A LONGER PERIOD OF TIME 1.
- Page 85 5. Follow the advice for the disposal of the appliance in chapter WASTE MANAGEMENT 10. Technical data ECHNICAL DATA Type Larder fridge N / ST Climatic class (ambient temperature 16 °C - 38 °C) Colour of the front white Colour of the side panels white Details of the appliance free-standing...
- Page 86 Based on standard measurement results within 24 hours. The current energy consumption depends on the way the appliance is used as well as on its site. **** On a scale from A (highest) to D (lowest). 11. Waste management 1. Dispose of the appliance relevant to the current legislation in view of explosive gases.
- Page 87 5. damage caused by non-professional installation and haulage; 6. damage caused by non common household use; 7. damages which have been caused outside the appliance by a PKM-product unless a liability is forced by legal regulations. The validity of the guarantee will be terminated if: 1.
- Page 88 If you do not provide the above data, your guarantee claim cannot be handled immediately. PECIAL NOTE Please photograph the rating plate of the appliance before installation and save the photo for possible later use. You find the rating plate on the following locations. 1.
- Page 89 Sie finden alle Informationen zum Kundendienst auf der Einlage in dieser Bedienungsanleitung. Aftersales service information on the leaflet inside this instruction manual. Änderungen vorbehalten Subject to alterations TAND PDATED 08.12.2023 08/12/2023 © PKM GmbH & Co. KG, Neuer Wall 2, 47441 Moers...
Need help?
Do you have a question about the KS128EW and is the answer not in the manual?
Questions and answers