
Related Manuals for HMS Networks Ewon Netbiter EC360W


Summary of Contents for HMS Networks Ewon Netbiter EC360W
- Page 1 N N e e t t b b i i t t e e r r E E C C 3 3 0 0 0 0 S S e e r r i i e e s s STARTUP GUIDE SP3309 2.0 en-US ENGLISH...
-
Page 2: Important User Information
Important User Information Liability Every care has been taken in the preparation of this document. Please inform HMS Industrial Networks of any inaccuracies or omissions. The data and illustrations found in this document are not binding. We, HMS Industrial Networks, reserve the right to modify our products in line with our policy of continuous product development. -
Page 3: About This Document
Preparation 3 (20) Preparation About This Document This document describes how to install a Netbiter EC300 Series gateway and set up a basic configuration. For additional documentation and software downloads, FAQs, troubleshooting guides and technical support, please visit www.netbiter.com/support. Document Conventions The following formatting conventions are used in this document to indicate safety information and other content of specific importance: WARNING... -
Page 4: Installation
Installation 4 (20) Installation This product contains parts that can be damaged by electrostatic discharge (ESD). Use ESD prevention measures to avoid damage. Make sure that you have all the necessary information about the capabilities and restrictions of your local network environment before installation. Basic Installation Steps Mount the unit on a flat surface or on a DIN rail using the optional adapter kit. - Page 5 Installation 5 (20) Dimensions All measurements are in millimeters. Dimensions are identical between models except for the antenna*. *Antenna not included SP3309 2.0 en-US Netbiter EC300 Series Startup Guide...
-
Page 6: I/O Terminal Block
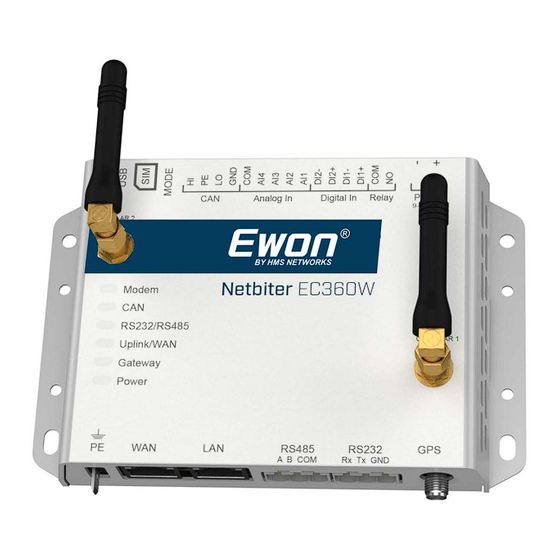
Installation 6 (20) Connectors 2.2.1 I/O Terminal Block Label Function Note CAN High CAN Shield J1939 CAN Low CAN Ground Analog Input common 0–20 mA or 0–10 VDC Analog Input 4 Analog Input 3 0–20 mA or 0–10 VDC or PT100 Analog Input 2 0–20 mA or 0–10 VDC 0–20 mA or 0–10 VDC or PT100... -
Page 7: Power Supply
Installation 7 (20) 2.2.2 Power Supply Connecting power with reverse polarity or using the wrong type of power supply may damage the equipment. Make sure that the power supply is connected correctly and of the recommended type. Connect a DC power supply of the recommended type to the + (plus) - (minus) terminals. -
Page 8: Antenna Connectors
Installation 8 (20) 2.2.4 SIM Card The SIM card must have a mobile data plan and allow text messaging. PIN code security must be disabled. Additional configuration in Argos or in the local web interface is required. Insert the SIM card carefully and push it firmly downwards until it clicks into place. - Page 9 Installation 8 (20) EC360W Note: External 4G antennas are not included in EC360 or EC360W, as they are sold separately and is available from your supplier. SP3309 2.0 en-US Netbiter EC300 Series Startup Guide...
- Page 10 Installation 10 (20) 2.2.6 RS-485 Serial Interface (3-pin) The RS-485 interface can be used for multiple Modbus RTU devices. RS-485 connector pin layout Function RS-485 A line RS-485 B line RS-485 common 2.2.7 RS-232 Serial Interface (3-pin) The RS-232 interface can be used for a single Modbus RTU device. RS-232 connector pin layout Function Receive (input)
-
Page 11: Ethernet Ports (Rj45)
Installation 11 (20) 2.2.8 Ethernet Ports (RJ45) Use for Internet and Argos Use for EtherNet/IP, Modbus TCP and Remote Access Never connect the LAN and WAN ports to the same logical network. RJ45 pin layout Function 4, 5, 7, 8 (reserved) Ethernet Port LED Indication... -
Page 12: Led Indicators
Installation 12 (20) LED Indicators All indicators will light up while the unit is starting up. When the startup sequence has completed they will indicate system status. In case of an Uplink/WAN error, check the network and firewall settings. If using DHCP, also check that the DHCP server is active. -
Page 13: Mode Button
Installation 13 (20) MODE Button Factory Reset Keep the MODE button pressed while powering on to reset the unit to the factory default settings. Mobile Signal Strength Indication Press and release the MODE button to make the top 5 LED indicators indicate mobile signal strength for 60 seconds. - Page 14 Configuration 14 (20) Configuration Creating an Argos Account Before the Netbiter can be used it must be registered and activated from a user account in Argos. To register an Argos account you will need the System ID and Activation Code that were supplied with the Netbiter.
- Page 15 Configuration 15 (20) Activating the Netbiter Make sure that the Netbiter is operating and connected to the Internet. Log in to your account at www.netbiter.net. On the System activation tab, your System ID and Activation code should already be filled in. If not, enter them now. Select Use system for View and Control (Remote Access).
-
Page 16: Technical Data
Technical Data 16 (20) Technical Data Technical Specifications Product name Netbiter EC360 Netbiter EC360W Netbiter EC310 Model name NB301B NB302E NB302U NB302W Order code NB1022 NB1024 NB1007-C NB1023 Regional North America Global Global Europe Variants 850, 900, 1800, 1900 MHz 2G frequency –... - Page 17 Technical Data 17 (20) Product name Netbiter EC310 Netbiter EC360W Netbiter EC360 Max. connected devices Baud rates 1200 to 115200 baud Proxy support SOCKS (authentication: none, username/password) WEB (authentication: none, basic) Mounting Screw mount or DIN rail using optional mounting kit 92 x 135 x 27 mm Dimensions (L x W x H)
- Page 18 Technical Data 18 (20) SP3309 2.0 en-US Netbiter EC300 Series Startup Guide...
- Page 19 This page intentionally left blank...
- Page 20 last page © 2019 HMS Industrial Networks Box 4126 300 04 Halmstad, Sweden info@hms.se SP3309 2.0 en-US / 2024-03-25 / 11892...
Need help?
Do you have a question about the Ewon Netbiter EC360W and is the answer not in the manual?
Questions and answers