Table of Contents
Advertisement
Quick Links
Advertisement
Table of Contents
Troubleshooting

Subscribe to Our Youtube Channel
Related Manuals for Christie Matrix StIM


Summary of Contents for Christie Matrix StIM
- Page 1 Matrix StIM/SIM U s e r M a n u a l 020-100306-05...
- Page 3 Matrix StIM/SIM U s e r M a n u a l 020-100306-05...
- Page 4 Performance specifications are based on information available at the time of printing. Christie makes no warranty of any kind with regard to this material, including, but not limited to, implied warranties of fitness for a particular purpose.
-
Page 5: Table Of Contents
2.4.2 Turning the Projector ON ....................2-10 2.4.3 Disconnecting the projector from AC..................2-10 2.5 Communicating With the Projector .....................2-10 2.6 Projector Network Setup for External Communication ..............2-11 2.6.1 Ethernet (Recommended) ....................2-11 2.6.2 Mixed Network ........................2-12 Matrix StIM/SIM User Manual 020-100306-05 Rev. 1 (03-2012) - Page 6 Enter ............................3-6 Exit ............................3-6 Arrow Keys ..........................3-6 Laser ............................3-6 3.2 Navigating the Menus ........................3-7 3.2.1 Main Menu ...........................3-7 3.2.2 On-line Help.........................3-7 3.2.3 The Global Icon ........................3-8 3.2.4 Using Slidebars and Other Controls..................3-8 Matrix StIM/SIM User Manual 020-100306-05 Rev. 1 (03-2012)
- Page 7 Service ..........................3-48 Option Card Settings ......................3-48 ArrayLOC Menu ........................3-48 Managing Colors with ArrayLOC ..................3-57 Managing InfraRGB with IRLOC ..................3-65 3.4.6 Main Menu > Status......................3-69 3.4.7 Main Menu > Secondary Input & Switching...............3-69 Matrix StIM/SIM User Manual 020-100306-05 Rev. 1 (03-2012)
- Page 8 6.5.7 Data is Cropped from Edges ....................6-6 6.5.8 Display Quality Appears to Drift from Good to Bad, Bad to Good ........6-6 6.5.9 Display has Suddenly Froze....................6-6 6.5.10 Colors in the Display are Inaccurate .................6-6 Matrix StIM/SIM User Manual 020-100306-05 Rev. 1 (03-2012)
- Page 9 7: Specifications 7.1 Regulatory ...........................7-1 7.1.1 Safety ...........................7-1 7.1.2 Environmental Regulations....................7-1 7.1.3 Emissions ..........................7-1 7.1.4 Electromagnetic Compatibility ....................7-2 7.1.5 Immunity..........................7-2 7.2 Matrix StIM/SIM Specifications ....................7-2 7.2.1 Display ..........................7-2 7.3 Lenses ............................7-3 7.4 Power Requirements ........................7-4 7.5 Light Module ............................7-4 7.6 Physical Specifications ........................7-4 Maximum Product Dimensions (L x W x H) ...............7-4...
- Page 10 C.2.2 Sample Messages and their Meaning ..................C-4 C.2.3 What is Actually Sent in a Message ..................C-5 C.2.4 Maximizing Message Integrity....................C-5 C.2.5 Accessing Specific Channels or Inputs ................C-6 C.2.6 Flow Control........................C-6 C.2.7 Network Operation ......................C-7 Matrix StIM/SIM User Manual 020-100306-05 Rev. 1 (03-2012)
- Page 11 Table of Contents C.3 Description Of Control Types.....................C-8 C.3.1 Subclasses ...........................C-8 C.3.2 Control Groups........................C-8 C.3.3 Access Levels........................C-8 D: Serial Command Reference Matrix StIM/SIM User Manual 020-100306-05 Rev. 1 (03-2012)
-
Page 13: Labels And Marking
LED Figure 1-1 LED Caution Label Location radiation. This projector must be operated in an environment that meets the operating range specification, as NOTICE: listed in Operating Environment, on page 7-6. Matrix StIM/SIM User Manual 020-100306-05 Rev. 1 (03-2012) -
Page 14: Purchase Record And Service Contacts
Matrix StIM/SIM projectors makes them an ideal choice for the demanding needs of simulation applications as well as 24/7 command and control centers, telecommunications, surveillance and broadcasting applications. -
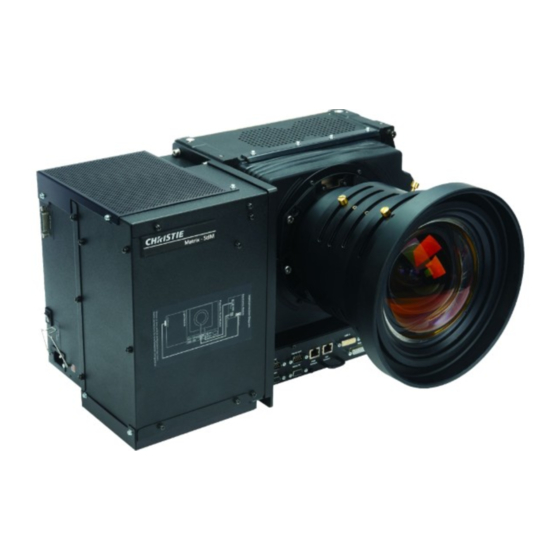
Page 15: Projection Head Module (Phm)
A Dual Image Processing Card (DIPC) provides an interleaved InfraRGB mode allowing simultaneous display of 2 image sources (1 channel RGB, and the other channel IR). A 120Hz frame rate capability supports two 60Hz image sources; 1RGB source and 1IR source, or 2 RGB sources. Matrix StIM/SIM User Manual 020-100306-05 Rev. 1 (03-2012) -
Page 16: Key Features
: Each projection system requires a User Kit (P/N: 125-107109-xx). If you did not receive a User Kit or if NOTE you want to purchase additional kits, you can order them separately. Matrix StIM/SIM User Manual 020-100306-05 Rev. 1 (03-2012) -
Page 17: 2: Installation And Setup
Make sure there is a minimum clearance of 25cm (10”) on the left, right, top and rear sides of the projector. Matrix StIM/SIM User Manual 020-100306-05 Rev. 1 (03-2012) -
Page 18: Lifting, Transporting And Mounting
The projector should be lifted by 2 people. Use a stable cart to transport the projector. Refer to the drawings given for your specific projector model for the mounting hole location and other technical information and restrictions which may be useful during installation. Figure 2-1 Mounting Holes Matrix StIM/SIM User Manual 020-100306-05 Rev. 1 (03-2012) -
Page 19: Installing The Projector
Security screws MUST be installed. NOTICE: 7. Remove the front lens cap. For more information concerning lenses, see 2.11 Projection Lenses, Lens Mount and Other Features, on page 2-19 2.12 Cleaning the Lens, on page 2-19. Matrix StIM/SIM User Manual 020-100306-05 Rev. 1 (03-2012) -
Page 20: Lens Focus Adjustment For Fixed Lenses
4. Finally the focus screw should be adjusted for best overall screen focus. 5. Although it is not necessary, you may want to retighten the main locking screw. NOTE: Use a maximum of 4in.-lbs to tighten the main locking screw. Matrix StIM/SIM User Manual 020-100306-05 Rev. 1 (03-2012) -
Page 21: Calculating Throw Distance, Position And Mount Projector
Vertical offset can be expressed as the percent of half the image height or the number of pixels of shift from lens center. NOTES: Offsets are subject to ±7% centering tolerance. Matrix StIM/SIM User Manual 020-100306-05 Rev. 1 (03-2012) -
Page 22: Mounting The Projector
Mounting the Projector Use only the CHRISTIE approved projector mounts designed for your projector. Refer to the NOTICE: installation instructions and safety guidelines provided with in the kit. There are several methods for mounting the projector. In typical front and rear screen installations the projector can be mounted to a secure and level surface. -
Page 23: Connecting Sources
Use the DVI-I connector to connect either analog or digital video devices to the projector. Use a cable with DVI-I connectors at both ends to connect devices that transmit digital and analog video signals. NOTE: true digital output from devices that transmit digital signals, connect to the DVI-I connector. Matrix StIM/SIM User Manual 020-100306-05 Rev. 1 (03-2012) -
Page 24: Dual Link Digital Video Input (Dvi) Input Card
The sync is connected to the Green/Y BNC connector. This card offers no loop out capability. There are 2 LED’s on the module faceplate. PWR indicates power has been applied and the card is initialized, signal indicates a valid signal has been detected. Matrix StIM/SIM User Manual 020-100306-05 Rev. 1 (03-2012) -
Page 25: Dual Sd/Hd-Sdi Input Card
The projector is a class 2M source of visible and invisible LED radiation. Directly viewing the LED output with certain optical instruments (for example, eye loupes, magnifiers and microscopes) within a distance of 100 mm (3.94”) may pose an eye hazard. Matrix StIM/SIM User Manual 020-100306-05 Rev. 1 (03-2012) -
Page 26: Connecting The Projector To Ac
As an alternative to the projector keypad or remote, communicate with the projector using a PC or other controller. Commands and feedback are sent to the projector's Electronics Module using Ethernet or serial links (RS232 and RS422). Do not connect to the Projector Head Module (PHM). NOTE: 2-10 Matrix StIM/SIM User Manual 020-100306-05 Rev. 1 (03-2012) -
Page 27: Projector Network Setup For External Communication
To complete the projector network setup you will also need to connect the projectors together for IMPORTANT: arrayLOC communication and functions. See ArrayLOC Network, on page 3-55. This section outlines a several ways to set up a Matrix StIM/SIM projector network for external communication. 2.6.1 Ethernet (Recommended) In the Ethernet network the controller communicates with each projector separately. -
Page 28: Mixed Network
• To isolate just RS422 communications, select RS232 and Ethernet Joined. Only projector #3 will respond to the RS422 controller. • To isolate just Ethernet communications, select RS232 and RS422 Joined—only projector #1 will respond using Ethernet. 2-12 Matrix StIM/SIM User Manual 020-100306-05 Rev. 1 (03-2012) -
Page 29: Network
• Set the RS-232 serial options in Configuration > Communications. See Communications, on page 3-34. • Set Configuration > Communications > Network Routing to one RS232 and RS422 Joined. See Network Routing, on page 3-35. Matrix StIM/SIM User Manual 2-13 020-100306-05 Rev. 1 (03-2012) -
Page 30: Mixed Serial Network (Rs-232 And Rs-422)
• Set the serial options in Configuration > Communications. See Communications, on page 3-34. • Set Configuration > Communications > Network Routing to one RS232 and RS422 Joined. See Network Routing, on page 3-35. 2-14 Matrix StIM/SIM User Manual 020-100306-05 Rev. 1 (03-2012) -
Page 31: Projector Network Setup For Arrayloc Communication
The position of the projector and mirror must be accurately set – if considering this type of installation contact Christie Customer Support for assistance. Matrix StIM/SIM User Manual 2-15 020-100306-05 Rev. -
Page 32: Boresight Alignment (Advanced)
6. Adjust cross-hair pattern II, by adjusting the appropriate capscrew, see Figure 2-7. Adjust until the cross- hair image is in focus with minimal flare. 2-16 Matrix StIM/SIM User Manual 020-100306-05 Rev. 1 (03-2012) -
Page 33: Adjust Software To Optimize Image
11. Adjust Size in Size and Position until the image is at the necessary width, then adjust Vertical Stretch. Adjusting one option may have an affect on the other; repeat adjustment if necessary. Adjust H-Position and V-Position again if required to center the image. Matrix StIM/SIM User Manual 2-17 020-100306-05 Rev. 1 (03-2012) -
Page 34: System Integration - Gpio Connector
By default, the state of each pin is high. The voltage applied to pins in the high state is + 3.3V. (GIO) General Purpose Input/Output, on page D-29. 2-18 Matrix StIM/SIM User Manual 020-100306-05 Rev. 1 (03-2012) -
Page 35: Projection Lenses, Lens Mount And Other Features
Using the lens cap when transporting the lens avoids scratching and damaging the lens. The Matrix StIM projector includes a lens mount that allows lens control and adjustment: vertical and horizontal offsets, zoom and focus. The lens mount can be fitted with any one of the available optional lenses –... -
Page 37: Using The Ir Remote
This section describes the controls and switches used for basic projector operation once it is properly installed, aligned and configured by a Christie accredited service technician. You can access projector controls and settings with the IR remote, or with a laptop using the web interface. This chapter focuses on the use of the IR remote, and the projector menus. -
Page 38: Ir Remote
Select an active or inactive Input Lens V input on any slot - Press OSD to turn Off Swap Swap Menu Exit Channel Proj Laser Gamma Bright Contrast Help Func Matrix StIM/SIM User Manual 020-100306-05 Rev. 1 (03-2012) -
Page 39: Wired Remote
Brightness Size and Blanking Auto Input Level (OFF) Vertical Stretch Detail (if video source) Position Filter Input Levels Luma Delay You must have an unlocked channel present to use Auto Setup. NOTE: Matrix StIM/SIM User Manual 020-100306-05 Rev. 1 (03-2012) -
Page 40: Channel
“in-between” values used in grays. Unlike brightness and contrast controls, the overall tone of an image can be lightened or darkened without changing the 2 extremes and your images will be Matrix StIM/SIM User Manual 020-100306-05 Rev. 1 (03-2012) -
Page 41: Number Keys
• Press FUNC followed by the UP arrow key or DOWN arrow key to convert between capital and lowercase letters. • Press FUNC followed by the LEFT or RIGHT arrow key to insert or delete a character respectively. • Press FUNC followed by ENTER to delete all characters. Matrix StIM/SIM User Manual 020-100306-05 Rev. 1 (03-2012) -
Page 42: Proj
LASER pointer LASER RADIATION requires batteries in the wired remote to work. DO NOT STARE INTO BEAM LASER DIODE Wavelength 670nm Max Output 1mW CLASS II LASER PRODUCT Matrix StIM/SIM User Manual 020-100306-05 Rev. 1 (03-2012) -
Page 43: Navigating The Menus
The Status menu is read-only. 3.2.2 On-line Help Press the HELP button to display information about the current menu or highlighted option. Press HELP again to exit. Matrix StIM/SIM User Manual 020-100306-05 Rev. 1 (03-2012) -
Page 44: The Global Icon
ENTER to choose a highlighted option from the list. • To quickly scroll through a list without first pulling it down, highlight the menu option, and use the LEFT or RIGHT arrow key. Press ENTER when the desired choice appears. Matrix StIM/SIM User Manual 020-100306-05 Rev. 1 (03-2012) -
Page 45: Editing Text
“07”. Enter 07 to use this channel. If you press any non-numbered key, the next sequential number is assigned as the new value. Press EXIT to cancel editing of numerical values. Matrix StIM/SIM User Manual 020-100306-05 Rev. 1 (03-2012) -
Page 46: Using Inputs And Channels
• Press the appropriate SLOT key (1-4) to quickly display one of the 4 inputs connected to the projector for the Main image. Press SLOT again to select a different input. This will not bring up any menu selection, and is only applicable for the Main image. 3-10 Matrix StIM/SIM User Manual 020-100306-05 Rev. 1 (03-2012) -
Page 47: Channels
Once you have Channel# Signal Vertical Horizontal adjusted a display parameter, such as pixel tracking or contrast, Slot Type Frequency Frequency Input i-Interlaced p-Progressive Figure 3-6 Channel List Matrix StIM/SIM User Manual 3-11 020-100306-05 Rev. 1 (03-2012) -
Page 48: Creating A New Channel
Channels created automatically p-Progressive (temporary) do not appear in the channel list Figure 3-7 Using a Channel unless a parameter for the channel was changed. See Creating a New Channel, on page 3-12. 3-12 Matrix StIM/SIM User Manual 020-100306-05 Rev. 1 (03-2012) -
Page 49: Channel Setup Menu
Signal Type No Sync Composite (4 wire) on HC input Composite (4 wire) on V input Sync-on-green (4 wire) Separate H,V (5-wire) Separate H,V swapped (5-wire) SVid S-Video CVid Composite Video Matrix StIM/SIM User Manual 3-13 020-100306-05 Rev. 1 (03-2012) -
Page 50: Copy A Channel
15.73kHz- i59.94-Hz- pDig 33.72kHz+ p29.07-Hz+ Select Channel Operation Edit Copy Delete Delete Unlocked Only Do you wish to delete this channel setup? Delete All Channels Delete Channel Setup (default) Cancel 3-14 Matrix StIM/SIM User Manual 020-100306-05 Rev. 1 (03-2012) -
Page 51: Delete Multiple Channels
If checked, all of the image settings for this channel are locked. If unchecked (default), all available image settings can be adjusted as desired. You cannot use Auto Setup with a locked channel. Matrix StIM/SIM User Manual 3-15 020-100306-05 Rev. 1 (03-2012) -
Page 52: Adjusting The Image
To determine active window size: • Video images should have whites and blacks in the image • Wide range video images should have content (including white) that extends to all edges of the image. 3-16 Matrix StIM/SIM User Manual 020-100306-05 Rev. 1 (03-2012) -
Page 53: Main Menu > Size And Position Menu
By default when displaying a new source, your image will use as much of the projector display area as possible for the type of incoming source data, but with minimal or no changes to aspect ratio. Matrix StIM/SIM User Manual 3-17... -
Page 54: Size
Controls both the image width and height, maintaining the current aspect ratio of the displayed signal data. Vertical Stretch Adjusts the height of the image while keeping the width constant. Use Vertical Stretch to change the aspect ratio of the display. 3-18 Matrix StIM/SIM User Manual 020-100306-05 Rev. 1 (03-2012) -
Page 55: Pixel Track
This read-only value indicates the current size of your displayed data or “region of interest” as defined by the blanking controls. By default, the projector automatically determines what portion of its full Figure 3-8 Full Width Matrix StIM/SIM User Manual 3-19 020-100306-05 Rev. 1 (03-2012) -
Page 56: Image Settings Menu
If the environment lighting changes, an adjustment of Gamma is recommended (see below). NOTE: 3-20 Matrix StIM/SIM User Manual 020-100306-05 Rev. 1 (03-2012) - Page 57 Use the Advanced Image Settings submenu to make the adjustments necessary for lesser-used but more specialized applications on your projector. See Image Settings > Advanced Image Settings Menu, on page 3- Matrix StIM/SIM User Manual 3-21 020-100306-05 Rev. 1 (03-2012)
- Page 58 (i.e., where dark grays appear black) nor excessively elevated (i.e., where blacks appear dark gray). By default, the projector automatically determines the best setting according to the type of incoming video signal: 3-22 Matrix StIM/SIM User Manual 020-100306-05 Rev. 1 (03-2012)
- Page 59 However, image processing controls (such as, Detail, Sharpness, Noise Reduction and Adaptive Contrast) only happen on the left side or top image. Changing inputs, channels or test patterns will disable this control. PIP operation must be disabled prior to enabling this control. Matrix StIM/SIM User Manual 3-23 020-100306-05 Rev. 1 (03-2012)
-
Page 60: Image Settings > Input Levels Menu
OFF upon exit from the Input Levels menu. Black Levels and Drives Do not use Input Levels to adjust color temperature. This will distort contrast and brightness IMPORTANT: functions as well as color temperature. 3-24 Matrix StIM/SIM User Manual 020-100306-05 Rev. 1 (03-2012) - Page 61 The Input Peak Detector will initially render the grayscale as a uniform gray field before NOTE: adjustment or extreme crushing. 2. Display one primary color. Select Auto Color Enable to ensure that the correct color is displayed for each setting. NOTE: Matrix StIM/SIM User Manual 3-25 020-100306-05 Rev. 1 (03-2012)
-
Page 62: Image Settings > Advanced Image Settings Menu
Image Settings > Advanced Image Settings Menu Use the Advanced Image Settings submenu to make the adjustments necessary for lesser-used but more specialized applications on your projector. Figure 3-13 Advanced Image Settings 3-26 Matrix StIM/SIM User Manual 020-100306-05 Rev. 1 (03-2012) - Page 63 This slope can be used to bring in or out the low level blacks in the image. This slope, combined with the gamma function, defines the custom Gamma table. Matrix StIM/SIM User Manual 3-27 020-100306-05 Rev. 1 (03-2012)
- Page 64 Allows a snap shot of the main image to be presented on the right side of the screen to allow evaluation of advanced image processing features. All resizing controls are honoured on both images; however, image 3-28 Matrix StIM/SIM User Manual 020-100306-05 Rev. 1 (03-2012)
- Page 65 • 3200K is useful if the projected image is to be filmed or shot as part of a studio set illuminated with incandescent lights For all color temperatures the color primaries; red, green, and blue are unchanged and reflect the native colors of the projector. Matrix StIM/SIM User Manual 3-29 020-100306-05 Rev. 1 (03-2012)
-
Page 66: Main Menu > Channel Setup
The first 6 options in the Configuration menu are explained in the following section. Language Choose the available language to use in the projector menus. The change will take effect immediately. 3-30 Matrix StIM/SIM User Manual 020-100306-05 Rev. 1 (03-2012) -
Page 67: Output Options
• Choose Main/Secondary Loop to loop the main & secondary video to the outputs, regardless of which card these signals originate from. The main video signal is looped to Output1, and the secondary video signal is looped to Output2. Matrix StIM/SIM User Manual 3-31 020-100306-05 Rev. 1 (03-2012) -
Page 68: Power Management
Fan assist increases noise levels due to the simultaneous full speed operation of the fans. Date & Time The current year-month-day, hour-minute-second. Changes made reset the projector real-time clock. 3-32 Matrix StIM/SIM User Manual 020-100306-05 Rev. 1 (03-2012) -
Page 69: Menu Preferences
• Start-up And No Signal – A splash screen appears at start-up and at any time when there is no signal. To add your own splash screen in addition to the default “CHRISTIE logo” splash screen, use the Web UI to download the desired bitmap (.bmp) file to the projector. -
Page 70: Communications
ENTER key. Do not scroll this control with LEFT arrow key or RIGHT arrow key. Serial communication is always 8 data bits, no parity. 3-34 Matrix StIM/SIM User Manual 020-100306-05 Rev. 1 (03-2012) - Page 71 All messages reach all ports, regardless of type. In the case of multiple Ethernet sessions, input on one Ethernet session will be relayed to all other Ethernet sessions as well as to the RS-232 and RS-422 ports. Matrix StIM/SIM User Manual 3-35...
- Page 72 Use Broadcast Keys to relay all key presses received by the projector to all other projectors on the network. Front IR Enabled Check this option to enable the front IR sensor. Wired Keypad Enabled Check this option to use the wired keypad. 3-36 Matrix StIM/SIM User Manual 020-100306-05 Rev. 1 (03-2012)
-
Page 73: Geometry & Color
See Figure 3-18 Figure 3-17 Vertical Keystone Figure 3-18 Horizontal Keystone Matrix StIM/SIM User Manual 3-37 020-100306-05 Rev. 1 (03-2012) - Page 74 10. Repeat Steps 6 to 9 to adjust all 4 corners until they match the screen. 11. Select OK to apply the new corner positions to the image. A message will be displayed for approximately 10 seconds indicating that the projector is NOTE: “Processing request”. 3-38 Matrix StIM/SIM User Manual 020-100306-05 Rev. 1 (03-2012)
-
Page 75: Brightness Uniformity
The procedure provided here assumes a multiple-screen application. For information about the Eye Motion Filter fields, see Noise Reduction, on page 3-28. NOTE: Matrix StIM/SIM User Manual 3-39 020-100306-05 Rev. 1 (03-2012) - Page 76 (both horizontal and vertical) in the Edge Blending test pattern. The intersection of these lines is the true center of the projector display area. 3-40 Matrix StIM/SIM User Manual 020-100306-05 Rev. 1 (03-2012)
- Page 77 • A setting of “0” signifies no blending. For best results in most applications, use a blend width of 12-25% (for example with a screen size of 1920 x 1200, 230-480 pixels). Ranges: 0-960 horizontal, 0-600 vertical. NOTE: Matrix StIM/SIM User Manual 3-41 020-100306-05 Rev. 1 (03-2012)
- Page 78 On one projector, increase the Blend Width for an overlapping edge (for example, if the projector image is on left, its right edge overlaps the adjacent image by adjusting Right Blend Width). Use the same setting on the second projector for this shared edge. 3-42 Matrix StIM/SIM User Manual 020-100306-05 Rev. 1 (03-2012)
- Page 79 Blend zones. If a given Edge Blend zone width is set to 0 (i.e. no blend on that side), then the corresponding BLB zone is disabled. It only becomes accessible when that Edge Blend zone is active. Matrix StIM/SIM User Manual 3-43 020-100306-05 Rev. 1 (03-2012)
- Page 80 Image tiling allows a single input image to be spread over multiple screens, with each screen displaying a fraction of the image. Matrix StIM projectors support up to a 2 x 2 tiled array, while Matrix SIM projectors support up to a 3 x 3 array (for example, 1 x 2, 3 x 1, or 2 x 3).
- Page 81 Color Target menu. See 3.4.10 How Color Settings Interact in a StIM Array, on page 3-72. IMPORTANT: Only Christie accredited service technicians should attempt this procedure. For general use, adjust color and brightness using ArrayLOC. Table 3.5 Manual RGB Adjustment menu...
-
Page 82: Diagnostics & Calibration
Images from this source will display correct blacks and whites without crushing or washing out. If using Peak Detector with PIP, both images must have the same color space. NOTE: 3-46 Matrix StIM/SIM User Manual 020-100306-05 Rev. 1 (03-2012) - Page 83 Level Detector Threshold Specifies the threshold to be used by the level detector. Light Engine Test Pattern One of 3 light module test patterns may be displayed: black, white, or grey scale. Matrix StIM/SIM User Manual 3-47 020-100306-05 Rev. 1 (03-2012)
-
Page 84: Service
Use this advanced option to correct color banding by adjusting the slider left or right as required. Service The Service menu is intended for use by accredited Christie service technicians only. It is passcode protected. Option Card Settings Allows adjustment of any settings specific to each option card that is currently installed in the projector. - Page 85 Bright/ColorLOC Array Status window with an M. If the projector falls below the minimum, the projector operates at its current brightness and gamut. Changes will not be made. Matrix StIM/SIM User Manual 3-49 020-100306-05 Rev. 1 (03-2012)
- Page 86 Rxx% Gxx% Bxx%”. Changing this option: • Recalculates the Internal gamut warning level. • If warnings are enabled, checks the current common gamut against the gamut warning level. 3-50 Matrix StIM/SIM User Manual 020-100306-05 Rev. 1 (03-2012)
- Page 87 • Only values for user defined white points (User White 1 through 4) can be changed. • When Set White Color to Color Temperature is checked, the values are calculated based on the specified White Color Temperature. Matrix StIM/SIM User Manual 3-51 020-100306-05 Rev. 1 (03-2012)
- Page 88 Identifies the BCLOC group to which the projector belongs. The BCLOC group identifies a subset of projectors in the array that are used in the Array BCLOC algorithm, and are included in the Array Capability data table. 3-52 Matrix StIM/SIM User Manual 020-100306-05 Rev. 1 (03-2012)
- Page 89 • Red/green/blue part of green changes the system color to green. • Red/green/blue part of blue changes the system color to blue. • All other menu options change the system color to white. Matrix StIM/SIM User Manual 3-53 020-100306-05 Rev. 1 (03-2012)
- Page 90 • The least blue projector is identified with a lowercase b. • The dimmest projector is identified with a lowercase w. • The projector with white brightness capability less than Target brightness is identified with an uppercase 3-54 Matrix StIM/SIM User Manual 020-100306-05 Rev. 1 (03-2012)
- Page 91 ArrayLOC functions, including ArrayLOC messages, and BCLOC messages. • EM Network: All Ethernet messages related to ArrayLOC flow through the EM Network port of the PHM. Figure 3-24 Projectors in an EM Network Matrix StIM/SIM User Manual 3-55 020-100306-05 Rev. 1 (03-2012)
- Page 92 ArrayLOC group. Set the value equal to or higher than the reported Minimum Array Frame Delay value. Setting the value lower than the reported minimum may result in tearing artifacts. 3-56 Matrix StIM/SIM User Manual 020-100306-05 Rev. 1 (03-2012)
-
Page 93: Managing Colors With Arrayloc
Use this option to adjust the brightness of the projector array as a percentage of the target brightness. Managing Colors with ArrayLOC Matrix StIM projectors use ArrayLOC to display a reasonably saturated gamut at the maximum brightness that all the projectors in the array can support. ArrayLOC monitors the projector array and adjusts settings automatically. - Page 94 50). If any of these values is less than 100, there is at least one projector in the array that cannot achieve target values. Reducing Target Color Space and RGB Brightness Target values in the master projector will bring the Array Capability values closer to 100. 3-58 Matrix StIM/SIM User Manual 020-100306-05 Rev. 1 (03-2012)
- Page 95 Adjusting XXX Part of XXX adjusts the color’s brightness and affects the color of white. Example: If the blue primary color does not match. Use the Red Part of Blue and Green Part of Blue Matrix StIM/SIM User Manual 3-59 020-100306-05 Rev. 1 (03-2012)
- Page 96 Some corrections require both red and green adjustments. Alternative: decrease blue (-B) instead of increasing red and green. Alternative: increase blue (+B) and increase green (+G) instead of decreasing red, and increasing green. 3-60 Matrix StIM/SIM User Manual 020-100306-05 Rev. 1 (03-2012)
- Page 97 Click to swap between the Main and Secondary inputs. Edit Secondary Channel Settings Select to allow independent secondary channel control during interleaved operation. By default, size and position controls act on both channels at the same time. Matrix StIM/SIM User Manual 3-61 020-100306-05 Rev. 1 (03-2012)
- Page 98 Red part of Red to 240, the brightest red can get is 240 using an RGB brightness of 100. Set the IR intensity for IR content by specifying the power level. 3-62 Matrix StIM/SIM User Manual 020-100306-05 Rev. 1 (03-2012)
- Page 99 Reset Current Lighting Mode To Default Resets the current lighting mode to the default values for that lighting mode. Reset All Lighting Modes To Default Resets all lighting modes to factory default values. Matrix StIM/SIM User Manual 3-63 020-100306-05 Rev. 1 (03-2012)
- Page 100 Choose an adjustment value for the IR Green Weight. IR Blue Weight Adjustment Choose an adjustment value for the IR Blue Weight. Clear Adjustments Click this to reset all adjustments to 0 (zero). When prompted to confirm, click Yes. 3-64 Matrix StIM/SIM User Manual 020-100306-05 Rev. 1 (03-2012)
-
Page 101: Managing Infrargb With Irloc
Controls the IR LED brightness in response to blue content (Range is 0 to 255). Managing InfraRGB with IRLOC Matrix StIM projectors use IRLOC to maintain the target IR brightness and target IR weight across an array of projectors. To make InfraRGB adjustments across the array, from the master projector: 1. - Page 102 When using Simultaneous RGB+IR or Interleaved RGB+IR modes, you must not be displaying a test NOTE: pattern. We recommend that you provide a video source with a test pattern so that you can configure IRLOC with interleaved mode turned on. 3-66 Matrix StIM/SIM User Manual 020-100306-05 Rev. 1 (03-2012)
- Page 103 • Missing Secondary Signal: The input card and the input selected as Secondary Input is not providing video data. Check the input. • Secondary Frequency Mismatch: When running frame-locked mode the primary and secondary frame- rates must match. Please correct this condition, or run in free-run mode. Matrix StIM/SIM User Manual 3-67 020-100306-05 Rev. 1 (03-2012)
- Page 104 5. Press MENU to exit. To reset the modes to their NOTE: default values, from the Configure Lighting Mode menu, choose Reset Current Lighting Mode to Default or Reset All Lighting Modes to Default. 3-68 Matrix StIM/SIM User Manual 020-100306-05 Rev. 1 (03-2012)
-
Page 105: Main Menu > Status
Secondary Input & Switching menu. From the Secondary Input & Switching menu, if you choose either PIP or PBP, you are limited to a maximum of 60 Hz each. Matrix StIM/SIM User Manual 3-69 020-100306-05 Rev. 1 (03-2012) - Page 106 The value shown represents where the approximate center of the image lies in relation to the total NOTE: number of pixels available vertically. This varies widely according to the signal; watch the image while adjusting. 3-70 Matrix StIM/SIM User Manual 020-100306-05 Rev. 1 (03-2012)
- Page 107 When enabled, the system will continually search for the next valid signal when no signal is present or when loss of sync occurs on the current user-selected input. In the case of multiple signals to choose from, the order is based on slot, followed by inputs on that slot. Matrix StIM/SIM User Manual 3-71 020-100306-05 Rev. 1 (03-2012)
-
Page 108: Main Menu > Language
Ft-L. See 6.6.10 Array Status Decoder & Setting the RGB Brightness Target Unit, on page 6-13 in the troubleshooting section. 3-72 Matrix StIM/SIM User Manual 020-100306-05 Rev. 1 (03-2012) -
Page 109: Menu Tree
4 Menu Tree Matrix StIM/SIM User Manual 020-100306-05 Rev. 1 (03-2012) - Page 111 Section 4: Menu Tree Menu Tree Matrix StIM/SIM User Manual 020-100306-05 Rev. 1 (03-2012)
-
Page 112: Menu Tree Continued - Configuration
Section 4: Menu Tree 4.1.1 Menu Tree Continued - Configuration Matrix StIM/SIM User Manual 020-100306-05 Rev. 1 (03-2012) -
Page 113: Menu Tree Continued - Geometry And Color
Section 4: Menu Tree 4.1.2 Menu Tree Continued - Geometry and Color Matrix StIM/SIM User Manual 020-100306-05 Rev. 1 (03-2012) -
Page 114: Menu Tree Continued - Arrayloc
Section 4: Menu Tree 4.1.3 Menu Tree Continued - ArrayLOC Matrix StIM/SIM User Manual 020-100306-05 Rev. 1 (03-2012) -
Page 115: Safety Warnings And Guidelines
• Do not spill liquids into the projector. If a spill occurs, immediately disconnect the projector and have it serviced by a Christie accredited service technician. Maintenance and Cleaning The projector is an international regulatory agency approved product designed for safe and reliable operation. -
Page 116: Labels And Markings
Sudden stops, excessive force and uneven surfaces may cause the projector and cart combination to overturn. 5.3.5 SERVICING All servicing must be performed by CHRISTIE accredited service technicians. Use replacement parts that are manufacturer-approved only. Use of any other part other than the ones specified by the manufacturer can result in fire, electric shock or risk of personal injury and irreparable equipment damage. -
Page 117: Cleaning And Maintenance Guide
Directly viewing the LED output with certain optical instruments (for example, eye loupes, magnifiers and microscopes) within a distance of 100 mm (3.94”) may pose an eye hazard. Lenses are easily replaced on the Matrix StIM. See 2.2.2 Installing the Lens, on page 2-3. -
Page 119: Troubleshooting Guidelines
Exit If an error code recurs, try resetting the projector by turning the projector OFF and ON. A persistent error code may indicate that you need a Christie accredited service technician. System Warnings Shows that a system malfunction exists. A system warning message replaces the input signal message and disappears when the input signal status changes. -
Page 120: System Errors
Solid Red • Key press error • Wrong protocol sent Flashing red — — Waiting to establish a connection with PHM blank Rotating Initializing hardware and connecting to PHM blank Matrix StIM/SIM User Manual 020-100306-05 Rev. 1 (03-2012) -
Page 121: Error Codes
Section 6: Troubleshooting 6.2.2 Error Codes If the status display window shows one of the codes in the Error Codes table you may need a Christie accredited service technician to repair the component identified by the error code. Error codes are displayed in a three phase format: •... -
Page 122: Power
Image processor card is missing or not seated correctly Power 6.3.1 Projector Does Not Power ON 1. Ensure that the projector is plugged in. 2. Ensure that cables are connected and not damaged. Matrix StIM/SIM User Manual 020-100306-05 Rev. 1 (03-2012) -
Page 123: Light Module
6.5.4 The Upper Portion of the Display is Waving, Tearing or Jittering 1. This can occur with video or VCR sources. Check your source. 2. Check that the RGB Brightness setting is not unexpectedly low. Matrix StIM/SIM User Manual 020-100306-05 Rev. 1 (03-2012) -
Page 124: Portions Of The Display Are Cut Off Or Warped To The Opposite Edge
2. Make Sure the video input is terminated (75 ohms). If it is the last connection in a loop-through chain, the video input must be terminated at the last source input only. 3. The input signal and/or signal cables carrying the input signal may be of poor quality. Matrix StIM/SIM User Manual 020-100306-05 Rev. 1 (03-2012) -
Page 125: Arrayloc
(Group). This setting is not saved between session. 6.6.3 Sensor Isn’t Calibrated (yellow alert) Sensor calibration must be performed by Christie accredited service technicians. Contact Customer Support. 6.6.4 Invalid Target Gamut (yellow alert) A color setting is not valid for the current color space, for example a white point is outside of the gamut. -
Page 127: Troubleshooting Tree - Color And Brightness Array
700 295 343.7 181 749 700.9 149 23 57.3 313 329 390.5 Are the missing projector(s) See page 3-11 Is the Broadcast Interval set Troubleshooting Tree set to the correct to an appropriate value? Array Colors Bright/ColorLOC Group? Matrix StIM/SIM User Manual 020-100306-05 Rev. 1 (03-2012) -
Page 128: Troubleshooting Tree - Array Brightness
700 295 343.7 181 749 700.9 149 57.3 313 329 390.5 improve their performance? Check lens for dust / dirt Check screen gain 6-10 Matrix StIM/SIM User Manual 020-100306-05 Rev. 1 (03-2012) -
Page 129: Troubleshooting Tree - Array Colors
687 306 109.9 193 741 123.4 145 23 17.9 313 329 361.2 699 296 416.5 188 745 778.5 141 29 91.7 313 329 418.0 700 295 343.7 181 749 700.9 149 23 57.3 313 329 390.5 Matrix StIM/SIM User Manual 6-11 020-100306-05 Rev. 1 (03-2012) -
Page 130: Bright/Colorloc Setup And Walkthrough
To create a color space with preset primaries but a different white point, select a User color space, then “Copy Color Space From“ the desired preset color space. The User color space white point can then be adjusted as described in step 2D. 6-12 Matrix StIM/SIM User Manual 020-100306-05 Rev. 1 (03-2012) -
Page 131: Array Status Decoder & Setting The Rgb Brightness Target Unit
Projector 2 Projector 3 New WBA = Old WBA * ( Expected Brightness / Measured Brightness ) Repeat step 3B until the measured brightness is sufficiently close to the expected brightness. Matrix StIM/SIM User Manual 6-13 020-100306-05 Rev. 1 (03-2012) -
Page 133: Regulatory
• FCC Code of Federal Regulations, Title 47, Part 15, Conducted and Radiated Emissions, Class A • EN55022 (CISPR 22) for Information Technology Equipment, Conducted and Radiated, Class A • EN61000-3-2 Induced Harmonic Distortion • EN61000-3-3 Induced Voltage Fluctuations (Flicker) Matrix StIM/SIM User Manual 020-100306-05 Rev. 1 (03-2012) -
Page 134: Electromagnetic Compatibility
• Color Temperature • Native White Color (K) 6500 ± 500 • Image White Color (K) 3200 - 9300 • Range of Adjustment (K) 3200 - 9600 • Color Temp. Variation (K) Matrix StIM/SIM User Manual 020-100306-05 Rev. 1 (03-2012) -
Page 135: Lenses
Geometry distortion 0.3% max. 1.2-1.6:1 Throw Ratio HD/WUXGA 1.2-1.6 Projection range (diagonal) 1.5 m to 5.4 m (4.92 ft to 17.7 ft) Lateral color error <5 microns Geometry distortion <0.3% at 0 offset Matrix StIM/SIM User Manual 020-100306-05 Rev. 1 (03-2012) -
Page 136: Power Requirements
426 mm x 426 mm x 169 mm (16.8” x 16.8” x 6.7”) Product Weight Projector Head Module Assembly and Light Module 15.9 kg (35 lb) Electronic Module 4.4 kg (9.7 lb) Matrix StIM/SIM User Manual 020-100306-05 Rev. 1 (03-2012) -
Page 137: Projector Dimensions And Mounting Information
Section 7: Specifications 7.6.1 Projector Dimensions and Mounting Information Figure 7-1 StIM Front Dimensions Figure 7-2 StIM Side Dimensions Matrix StIM/SIM User Manual 020-100306-05 Rev. 1 (03-2012) -
Page 138: Environment
-25C to +70C (-13°F to 158°F) with relative humidity varying between 0% to 95% Humidity 0% - 95% (non-condensing) Altitude 0 to 9144 m (30,000ft) Vibration .074Grms 10-500Hz, 15 minutes all axes Matrix StIM/SIM User Manual 020-100306-05 Rev. 1 (03-2012) -
Page 139: Standard And Optional Components
• Service Manual (P/N:020-100201-xx) Motoblend Mounting Kit • Custom Motoblend Mounting Kit Lenses • Fixed 0.64:1 (HD/WUXGA) - P/N: 125-103105-xx • Fixed 0.75:1 (HD/WUXGA) - P/N: 125-105107-xx • Zoom 1.2-1.6:1 (HD/WUXGA) - P/N: 125-101103-xx Matrix StIM/SIM User Manual 020-100306-05 Rev. 1 (03-2012) -
Page 140: Inputs
DVI-I – ANALOG Input Characteristics Same as Analog RGB, except as noted below. Formats RGB or YPbPr – video signal cannot be routed to the decoder Matrix StIM/SIM User Manual 020-100306-05 Rev. 1 (03-2012) - Page 141 Low Frequency IR with wired ability Range 30 Meters Laser Pointer Included Battery Type (2 Required) AA, 1.5V Alkaline WIRED CONTROL Connector Type Input Levels High: 2.2V min. Low: 0.9V max. Power: 500mA @ 5V Matrix StIM/SIM User Manual 020-100306-05 Rev. 1 (03-2012)
-
Page 143: A Interconnect Drawing
A Interconnect Drawing Matrix StIM/SIM User Manual 020-100306-05 Rev. 1 (03-2012) -
Page 145: Interconnect Drawing
Appendix A: Interconnect Drawing A.1 INTERCONNECT DRAWING Matrix StIM/SIM User Manual 020-100306-05 Rev. 1 (03-2012) -
Page 146: Logging On
3. Type your user name and password in the User Name and Password (see Figure B-2) fields respectively. Both entries are case-sensitive. Figure B-1 Language drop-down list Figure B-2 Login 4. Click the Login button. The Main window appears. Matrix StIM/SIM User Manual 020-100306-05 Rev. 1 (03-2012) -
Page 147: Navigating The Web User Interface
Help text is not available for a disabled NOTE: buttons. When working with the projector menu system on the Tools Figure B-3 Help Mouse Over Example tab, highlight the menu option and press “h”. Matrix StIM/SIM User Manual 020-100306-05 Rev. 1 (03-2012) -
Page 148: Basic Operation
• Green = Good • Yellow = Warning • Red = Error For more information about each LED, click an LED button for details. Figure B-4 Category Status Example Matrix StIM/SIM User Manual 020-100306-05 Rev. 1 (03-2012) -
Page 149: Tools Tab - Virtual Osd
Off button. Only one is enabled manufacture’s default settings depending on the current state of (refer to Section 3, Operation for the OSD. Control of the OSD is more details). always available through the remote. Matrix StIM/SIM User Manual 020-100306-05 Rev. 1 (03-2012) -
Page 150: Virtual Osd Menu
2. Click to highlight the field entry. If you click the menu option, the field cannot be edited. NOTE: 3. Edit the field entry. 4. Press Enter to save your changes. Figure B-6 Select Numeric Field Matrix StIM/SIM User Manual 020-100306-05 Rev. 1 (03-2012) - Page 151 To select or clear a check box, click the check box with your mouse pointer. This enables or clears the option respectively. Clock setting 1. Click within the field (i.e. Lamp Regeneration Start Time option) to allow access. 2. Change the Hour, Minute, and Seconds fields (double-digit field entry) as required. Matrix StIM/SIM User Manual 020-100306-05 Rev. 1 (03-2012)
-
Page 152: Admin Tab - System
If you select a Gamma file type, it must be a .csv file with 1024 values (all colors same) or 1024 x 3 for individual colors. This enables the Gamma Properties section. Proceed to step 4a. Matrix StIM/SIM User Manual 020-100306-05 Rev. 1 (03-2012) -
Page 153: Create A Backup File
A Interrogator in Progress bar appears. Once the download is complete, a File Download window appears. Once the Interrogate function begins, you must allow it to run until completion. NOTE: 2. Click Save to save the diagnostic test results file to your Network drive or hard-drive. Matrix StIM/SIM User Manual 020-100306-05 Rev. 1 (03-2012) -
Page 154: Admin Tab - Users
• Copy, clone an existing event • Stop, discontinue the event running • GPIO Setup, used to configure the GPIO pins as inputs/outputs and to set the current state of the output pins Matrix StIM/SIM User Manual 020-100306-05 Rev. 1 (03-2012) - Page 155 : The contents of the Serial Representation box are read only. NOTE • Click the Help button for a description of special RTE commands Figure B-8 GPIO Output available for adding loops and delays to the command sequence. Helper B-10 Matrix StIM/SIM User Manual 020-100306-05 Rev. 1 (03-2012)
- Page 156 GPIO connector. Pin 1 = +12V and Pin 5 = Ground are not included or changed. Clicking a block toggles between H, L and X. See Appendix D: Serial Command Reference for detailed information. Matrix StIM/SIM User Manual B-11 020-100306-05 Rev. 1 (03-2012)
-
Page 157: Add A Serial Command
2. Click Send to add the serial command. B.3.8 About Tabbed Page Provides information about the projector’s software version, model, serial number, and license information. The information provided on the Version and License tabs are read-only. NOTE: B-12 Matrix StIM/SIM User Manual 020-100306-05 Rev. 1 (03-2012) -
Page 158: Connection And Use
Appendix C: Serial Communication This document describes the serial communication protocol, consisting of ASCII text messages, used to control a Matrix StIM projector remotely. C.1 Connection and Use Once you have connected your computer to either the RS-232 IN or RS-422 IN port (depending on which standard is supported by your computer) or to the ETHERNET port on a projector, you can remotely access projector controls and image setups, issue commands or queries, and receive replies. -
Page 159: Basic Message Structure
(left bracket) that starts the message. In messages sent to the projector that do not have a Subcode, a space between the Function code, and the first parameter (or special character) is optional. Matrix StIM/SIM User Manual 020-100306-05 Rev. 1 (03-2012) -
Page 160: Subcode
• If entering a negative number, there must be a space between the code/subcode, and the value. For example, (CRM3) and (CRM 3) can both be used when the number is positive. (CRM -2) is acceptable, but (CRM-2) is not. Matrix StIM/SIM User Manual 020-100306-05 Rev. 1 (03-2012) -
Page 161: Text Parameters
SET AND ACKNOWLEDGE MESSAGE (message processed?ffr55) ($5pwr1) For a Specific Projector within a Network with Multiple Controllers present Message Format Function Example (Dest Addr Src Code?) REQUEST (get contrast from projector #5 to controller #2) (5 2con?) Matrix StIM/SIM User Manual 020-100306-05 Rev. 1 (03-2012) -
Page 162: What Is Actually Sent In A Message
CHECKSUM EXAMPLE = & + c + o + n + 6 + 4 + ‘space’ = 26h+63h +6Fh +6E h +36h +$34h +$20h = 01F0h = F0h when only the low byte is used = 240 Matrix StIM/SIM User Manual 020-100306-05 Rev. 1 (03-2012) -
Page 163: Accessing Specific Channels Or Inputs
11h (Xon) command to resume transmission. Xon and Xoff controls apply to both directions of communication. The projector will not send more than NOTE: 3 characters after it has received a 13h (Xoff) code. Matrix StIM/SIM User Manual 020-100306-05 Rev. 1 (03-2012) -
Page 164: Network Operation
Message from Controller Reply from Projector Turn Projector #5 on. (5pwr1) {none} What is the contrast level in Projector 30? (30con?) (CON!127) Return Contrast from Projector #30 to Controller #2. (30 2con?) (00002 00030con!127) Matrix StIM/SIM User Manual 020-100306-05 Rev. 1 (03-2012) - Page 165 • Advanced - Command is available at the advanced operator level log in. • Admin - Command is available at the administrator level log in. • Service - Command is available at the service level log in. Matrix StIM/SIM User Manual 020-100306-05 Rev. 1 (03-2012)
- Page 166 Appendix D: Serial Command Reference The following tables define the serial commands associated with the Matrix StIM/SIM projector. (ABL) ARRAY BRIGHT COLOR LOC Preference Power Up Operator CONTROL GROUP: SUBCLASS: ACCESS LEVEL: DESCRIPTION This command is used to set parameters that control how the Array Bright/ColorLOC feature operates. From this control you enable the mode in which you want to operate the feature: target brightness, target gamut, update intervals, and other miscellaneous parameters.
- Page 167 (ABL+EABL 1) - Turn ON Array Bright/ColorLOC and run in Fixed mode (ABL+BRGP 2) - Set the brightness group to 2 (ABL+BRTG 400) - Set the brightness target to 400 Lumens (ABL+ADIN ?) - Return current value of adjustment interval in seconds Matrix StIM/SIM User Manual 020-100306-05 Rev. 1 (03-2012)
- Page 168 MAIN Set the adaptive contrast for main video. Range 0-15 PIIP Set the adaptive contrast for video. Range 0-15 EXAMPLES: (ACO 8) - Sets adaptive contrast for main image to 50% strength. Matrix StIM/SIM User Manual 020-100306-05 Rev. 1 (03-2012)
- Page 169 Set the AGC on Slot x, Input y to the specified state of either enable or disable. MAIN Set automatic gain control on main image. PIIP Set automatic gain control on main image. Matrix StIM/SIM User Manual 020-100306-05 Rev. 1 (03-2012)
- Page 170 Perform auto Input level on the main image PIIP Perform auto Input level on the image EXAMPLES: (AIL 1) - Perform auto Input level on the main image. (AIL+PIIP 1) - Perform auto Input level on the image. Matrix StIM/SIM User Manual 020-100306-05 Rev. 1 (03-2012)
- Page 171 Set to 1 to enable. EXAMPLES: (APW 0) - Projector will remain in Standby Mode until the user presses the power key. (APW 1) - Projector will auto power up when A/C power is switched on. Matrix StIM/SIM User Manual 020-100306-05 Rev. 1 (03-2012)
- Page 172 If the current channel does allow Auto Channel Select, then upon signal detection, an existing channel will be chosen. If a match is not found a new channel will be created. Matrix StIM/SIM User Manual 020-100306-05 Rev. 1 (03-2012)
- Page 173 Perform a standard Auto Setup on the picture-in-picture () video. EXAMPLES: (ASU) - Perform standard Auto Setup on main video. (ASU+MAIN) - Perform standard Auto Setup on main video. (ASU+PIIP) - Perform standard Auto Setup on main video. Matrix StIM/SIM User Manual 020-100306-05 Rev. 1 (03-2012)
- Page 174 Set the baud rate on port B (RS-232 OUT) PRTC Set the baud rate on port C (RS-422) EXAMPLES: (BDR+PRTA 6) - Set baud rate on port A to 115200 bits per second. (BDR+PRTA?) - Get baud rate (BDR+PRTA!"115200"). Matrix StIM/SIM User Manual 020-100306-05 Rev. 1 (03-2012)
- Page 175 (BGF 100) - Set the base Gamma Function to 1.0 for main video. (BGF+MAIN 300) - Set the base Gamma Function to 3.0 for main video. (BGF+IN32 222) - Set the base Gamma Function to 2.22 for Slot 3, Input 2. D-10 Matrix StIM/SIM User Manual 020-100306-05 Rev. 1 (03-2012)
- Page 176 SUBCODE DESCRIPTION OF USE INxy Set the blue black level on Slot x, Input y to the specified value in the range of -255 to 255 Matrix StIM/SIM User Manual D-11 020-100306-05 Rev. 1 (03-2012)
- Page 177 (BLD?) - Returns the current blue drive value on main video. (BLD+PIIP?) - Returns the current blue drive value on video. (BLD+IN12?) - Returns the current blue drive value on Slot 1 Input 2. D-12 Matrix StIM/SIM User Manual 020-100306-05 Rev. 1 (03-2012)
- Page 178 Set the brightness on the main video to the specified value in the range -1000 to 1000. PIIP Set the brightness on the video to the specified value in the range of -1000 to 1000. Matrix StIM/SIM User Manual D-13 020-100306-05 Rev. 1 (03-2012)
- Page 179 Get/Set overall gain. UIRT Restore all parameters to factory default. EXAMPLES: (BRU+SLCT?) - Get current state of brightness uniformity, 0 is disabled, 1 is enabled. (BRU+SLCT 1) - Enable brightness uniformity. D-14 Matrix StIM/SIM User Manual 020-100306-05 Rev. 1 (03-2012)
- Page 180 1 = Color Temperature - This will allow you to specify a color temperature between 3200 and 9300 based on the setting of the Color Temperature control. Color temperature is expressed in degrees Kelvin [3200, 5400, etc.]. Matrix StIM/SIM User Manual D-15...
- Page 181 (optionally, specify a new channel number) DLET Delete a channel. MAIN Set the channel being used by main. PIIP Set the channel being used by main. INFO Display the information on the current channel. D-16 Matrix StIM/SIM User Manual 020-100306-05 Rev. 1 (03-2012)
- Page 182 For many signals, this control will have no effect. Change this setting only if the image appears unusually dim, has horizontal streaks, or shows significant color drift. Value Range: 0 = sync tip 1 = backporch 2 = tri-level Matrix StIM/SIM User Manual D-17 020-100306-05 Rev. 1 (03-2012)
- Page 183 This control is used to edit the channel index number. SUBCODE DESCRIPTION OF USE C0xx Select a new number for channel (xx=channel number from 01 to 99). EXAMPLE: (CNM+C001 3) - Change the channel number from 1 to 3 D-18 Matrix StIM/SIM User Manual 020-100306-05 Rev. 1 (03-2012)
- Page 184 Set the luma delay on the main video to the specified value in the range -3 pixel to 3 pixel Set the luma delay on the main video to the specified value in PIIP the range of -3 pixel to 3 pixel Matrix StIM/SIM User Manual D-19 020-100306-05 Rev. 1 (03-2012)
- Page 185 (CSP?) - Returns the current color space value on main video. (CSP+PIIP?) - Returns the current color space value on main video. (CSP+IN12?) - Returns the current color space value on Slot 1, Input 2. D-20 Matrix StIM/SIM User Manual 020-100306-05 Rev. 1 (03-2012)
- Page 186 Set the preferred EDID Timings on the Dual DVI Input card. Available Models are: 0 = Default 1 = 3D 2 = Custom : 3D option (1) is not supported for Entero or Matrix StIM/SIM. NOTE SUBCODE DESCRIPTION OF USE...
- Page 187 Correct adjustment eliminates uneven black levels by matching up black area hues with a target area hue (the intersection of the center lines), and adjusting the overlaps (edges) surrounding the target area. Use the black test pattern to perform this function. D-22 Matrix StIM/SIM User Manual 020-100306-05 Rev. 1 (03-2012)
- Page 188 SUBCODE DESCRIPTION OF USE SLCT Enables or disables Black Level Blending mode, or choose a saved Christie TWIST™ Black Level Blending preset CNTV Changes edge blending black level in the center zone TOPV Changes edge blending black level in the top zone.
- Page 189 2 = Serial ports 3 = All SUBCODE DESCRIPTION OF USE <No Subcode > EXAMPLES: (EME ?) - Get current Error Message Enable state. (EME 1) - Direct error messages to the screen. D-24 Matrix StIM/SIM User Manual 020-100306-05 Rev. 1 (03-2012)
- Page 190 Input signals. HDTV is typically used for 720p and 1080i video sources. The high bandwidth filter should be used for 1080p or higher frequency sources. Valid values are: Matrix StIM/SIM User Manual D-25 020-100306-05 Rev. 1 (03-2012)
- Page 191 Set the mode on port C (RS-422) EXAMPLES: (FLW+PRTA 0) - Set no flow control on port A. (FLW+PRTA 1) - Set flow control on port A to software. (FLW+PRTA?) - Get flow control (FLW+PRTA!001 "Software") D-26 Matrix StIM/SIM User Manual 020-100306-05 Rev. 1 (03-2012)
- Page 192 This controls sets the output video vertical frequency. SUBCODE DESCRIPTION OF USE <No Subcode > Set the output vertical frequency, used when running in “Free Run” mode. See (FLE) Frame Lock Enable. Matrix StIM/SIM User Manual D-27 020-100306-05 Rev. 1 (03-2012)
- Page 193 (GIA) ANALOG BNC GROUNDED INPUT SELECTION Option Power Up Operator CONTROL GROUP: SUBCLASS: ACCESS LEVEL: DESCRIPTION Set the Input signal grounding method to single-ended or differential. Valid values are: 0 = Differential (default) 1 = Single-ended D-28 Matrix StIM/SIM User Manual 020-100306-05 Rev. 1 (03-2012)
- Page 194 (GIO+STAT "hxxlxxx" 500) - Set status of the GPOs - 2 Pulse high, 6 Pulse Low. Use interval of 500 ms for each. (GIO+CNFG "IIOOOIO") - Set pins 2, 3 and 8 to Input, 4, 6, 7 and 9 to Output. Matrix StIM/SIM User Manual D-29...
- Page 195 (GNB?) - Returns the current green black level value on main video. (GNB+PIIP ?) - Returns the current green black level value on video. (GNB+IN12 ?) - Returns the current green black level value on Slot 1, Input 2. D-30 Matrix StIM/SIM User Manual 020-100306-05 Rev. 1 (03-2012)
- Page 196 A to D converters are set to exactly the same value. SUBCODE DESCRIPTION OF USE SLx0 Set a green gain offset for the second A to D EXAMPLE: (GOG+SL10 -10) - Set a green gain offset to -10 on Slot 1. Matrix StIM/SIM User Manual D-31 020-100306-05 Rev. 1 (03-2012)
- Page 197 <No Subcode > Request entire command Help listing, or list for a single command. EXAMPLES: (HLP?) - Retrieve entire command Help listing. (HLP? "BRT") - Retrieve all subcodes/descriptions/enables for BRT control. D-32 Matrix StIM/SIM User Manual 020-100306-05 Rev. 1 (03-2012)
- Page 198 (HOR+MAIN 500) - Set horizontal position to 500 on main video. (HOR+IN32 500) - Set horizontal position to 500 on Slot 3, Input 2. (HOR?) - Returns the horizontal position value on main video. Matrix StIM/SIM User Manual D-33 020-100306-05 Rev. 1 (03-2012)
- Page 199 4 = moonlight 9 = IR only 5 = halfmoon 10 = User RGBx RGB Brightness (0-1000) percentage with 1 decimal place. IRDx IR Brightness (0-1000) percentage with 1 decimal place. D-34 Matrix StIM/SIM User Manual 020-100306-05 Rev. 1 (03-2012)
- Page 200 (IRCB). Note: each preset may be individually configured using subcode RPCx COPY Copy RGB and IR brightness from preset to current. Value 1- 10 for source preset RSTL Reset current preset to default factory values Matrix StIM/SIM User Manual D-35 020-100306-05 Rev. 1 (03-2012)
- Page 201 (INM+PIIP 1) - Show in-menu for the channel being used by main. (INM+MAIN 0) - Hide in-menu for the channel being used by main. (INM+C001 0) - Hide in-menu for channel 1. D-36 Matrix StIM/SIM User Manual 020-100306-05 Rev. 1 (03-2012)
- Page 202 Red offset custom (deprecated) GNOC Green offset custom (deprecated) BLOC Blue offset custom (deprecated) REDx IR Manual Red Power (0-255) GRNx IR Manual Green Power (0-255) BLUx IR Manual Blue Power (0-255) Matrix StIM/SIM User Manual D-37 020-100306-05 Rev. 1 (03-2012)
- Page 203 Power Up Operator CONTROL GROUP: SUBCLASS: ACCESS LEVEL: DESCRIPTION This control offsets the 2D Keystone cursors from the edge of the image to allow manipulation of keystone on an overshot display. D-38 Matrix StIM/SIM User Manual 020-100306-05 Rev. 1 (03-2012)
- Page 204 Set the number of lines to blank (turn to black) at the left of the image. This can be used to blank out any unwanted data near the left edge of the image. Matrix StIM/SIM User Manual D-39 020-100306-05 Rev. 1 (03-2012)
- Page 205 CONTROL GROUP: SUBCLASS: ACCESS LEVEL: DESCRIPTION The Level Value control specifies the value to be used by the level detector. The range is 1-1023. This control takes place before the scaler/deinterlacer. D-40 Matrix StIM/SIM User Manual 020-100306-05 Rev. 1 (03-2012)
- Page 206 <No Subcode > 0 Normal projection mode 1 Black (turns OFF light) 2 White (correction display) EXAMPLES: (LSH 1) - Turn OFF the LEDs. (LSH ?) - Report current logical shutter setting. Matrix StIM/SIM User Manual D-41 020-100306-05 Rev. 1 (03-2012)
- Page 207 OSD. EXAMPLES: (MFT ?) - Get current font option used by the OSD. 0 is small font, 1 is large font. (MFT 1) - Use large font as the OSD font. D-42 Matrix StIM/SIM User Manual 020-100306-05 Rev. 1 (03-2012)
- Page 208 ACCESS LEVEL: DESCRIPTION Set menu type, view OSD state, read menu structure. SUBCODE DESCRIPTION OF USE <No Subcode > View/change the current state of the OSD (0=presentation, 1=main, 2=submenu). EXAMPLE: (MNU?)(MNU!0) Matrix StIM/SIM User Manual D-43 020-100306-05 Rev. 1 (03-2012)
- Page 209 Set the channel name for the channel (xx=channel number from 01 to 99). MAIN Set the channel name for the channel being used by main. PIIP Set the channel name for the channel being used by main. D-44 Matrix StIM/SIM User Manual 020-100306-05 Rev. 1 (03-2012)
- Page 210 (NET+MAC0 ?) - Get MAC address from first controller. (NET+MAC0! "00:12:3F:7B:76:B4"). (NET+GATE ?) - Get default gateway. (NET+GATE! "192.168.0.1"). (NET+PORT 3002) - Set the Port number. (NET+PORT ?) - Get the Port number. (NET+PORT! 3002). Matrix StIM/SIM User Manual D-45 020-100306-05 Rev. 1 (03-2012)
- Page 211 1 = RS-422 port(s) is/are connected to the RS-232 network 2 = The Ethernet port is connected to the RS-232 network 3 = RS-232, RS-422 & Ethernet are all connected to each other D-46 Matrix StIM/SIM User Manual 020-100306-05 Rev. 1 (03-2012)
- Page 212 Operator CONTROL GROUP: SUBCLASS: ACCESS LEVEL: DESCRIPTION Enable or Disable on screen display transparency. SUBCODE DESCRIPTION OF USE <No Subcode > Enable/Disable OSD transparency. EXAMPLE: (OST 1) - Enable OSD transparency. Matrix StIM/SIM User Manual D-47 020-100306-05 Rev. 1 (03-2012)
- Page 213 This control takes place before the scaler/deinterlacer. SUBCODE DESCRIPTION OF USE <No Subcode > EXAMPLES: (PDT 1) - Turn ON peak detector. (PDT 0) - Turn OFF peak detector. D-48 Matrix StIM/SIM User Manual 020-100306-05 Rev. 1 (03-2012)
- Page 214 0 = Disables. 1 = Enables. EXAMPLES: ( 0) - Disables video. ( 1) - Enables video. ( ?) - Returns the state of the control. i.e. (! 1) - enabled. Matrix StIM/SIM User Manual D-49 020-100306-05 Rev. 1 (03-2012)
- Page 215 This command accepts either 0 or 1. 0 = disables maintain aspect, 1 = enables maintain aspect. EXAMPLES: (PPA 0) - Disables maintain aspect during auto setup. (PPA 1) - Enables maintain aspect during auto setup. D-50 Matrix StIM/SIM User Manual 020-100306-05 Rev. 1 (03-2012)
- Page 216 Gets the current serial port being used, or gets a list of all serial ports available on the device. SUBCODE DESCRIPTION OF USE <No Subcode > EXAMPLES: (PRT ?) - Gets current serial port. (PRT ?L) - Gets list of ports. Matrix StIM/SIM User Manual D-51 020-100306-05 Rev. 1 (03-2012)
- Page 217 Set the protocol on port C (RS-422). EXAMPLES: (PTL+PRTA "RAW") - Set protocol on port A to a pass through raw data protocol. (PTL+PRTA "CHRISTIE") - Set protocol on port A to a Christie Digital serial protocol. (PTL+PRTA?) - Get protocol (PTL+PRTA!"RAW"). (PVP) VERTICAL POSITION...
- Page 218 (PXT?) - Returns the pixel tracking value on main video. (PXT+PIIP?) - Returns the pixel tracking value on main video. (PXT+IN12?) - Returns the pixel tracking value on Slot 1, Input 2. Matrix StIM/SIM User Manual D-53 020-100306-05 Rev. 1 (03-2012)
- Page 219 (RBL?) - Returns the right blanking value on main video. (RBL+PIIP?) - Returns the right blanking value on main video. (RBL+IN12?) - Returns the right blanking value on Slot 1, Input 2. D-54 Matrix StIM/SIM User Manual 020-100306-05 Rev. 1 (03-2012)
- Page 220 Set the red drive on the main video to the specified value in the range -255 to 255. PIIP Set the red drive on the main video to the specified value in the range of -255 to 255. Matrix StIM/SIM User Manual D-55 020-100306-05 Rev. 1 (03-2012)
- Page 221 1 = Copy from Native 4 = Copy from User 2 2 = Copy from EBU 5 = Copy from User 3 3 = Copy from User 1 6 = Copy from User 4 D-56 Matrix StIM/SIM User Manual 020-100306-05 Rev. 1 (03-2012)
- Page 222 DESCRIPTION OF USE INxy Set the RGB quantization range for Slot x, Input y MAIN Set the RGB quantization range for main video PIIP main Set the RGB quantization range for video Matrix StIM/SIM User Manual D-57 020-100306-05 Rev. 1 (03-2012)
- Page 223 (RTE F K "description" "command"), where K = the specific function key (1-5,7-9). Key 6 is reserved and cannot be used. DMX Events: (RTE M C "description" "command"), where C = channel (54-63) D-58 Matrix StIM/SIM User Manual 020-100306-05 Rev. 1 (03-2012)
- Page 224 23:00:00, starting from January 1, 2009 until February 1, 2009 (RTE T 2009/01/01 23:00:00 2009/02/01 D 5 "description" "(PWR 1)") - power on the projector every fifth day at 23:00:00, starting from January 1, 2009 until February 1, 2009 Matrix StIM/SIM User Manual D-59 020-100306-05 Rev. 1 (03-2012)
- Page 225 (RTE G "LLHXX" "description" "(FRZ 0)") - freeze the image if pins 1,2 are set to Low and pin 3 is set to high (RTE G "LLH" "description" "(FRZ 0)") - freeze the image if pins 1,2 are set to Low and pin 3 is set to high D-60 Matrix StIM/SIM User Manual 020-100306-05 Rev. 1 (03-2012)
- Page 226 This control sets the color sampling mode for a digital signal to either YCbCr 4:4:4, RGB or YCbCr 4:2:2. Although the proper sampling mode is determined automatically by the projector, you can override the setting. Valid values are: 0 = YCbCr 4:4:4 (or RGB) 1 = YCbCr 4:2:2 Matrix StIM/SIM User Manual D-61 020-100306-05 Rev. 1 (03-2012)
- Page 227 1 = Display on Startup only 2 = Display on Startup and when there is no Signal SLCT View/Set which logo to display. Valid values are: 0 = Default Splash Screen 1 = User Splash Screen D-62 Matrix StIM/SIM User Manual 020-100306-05 Rev. 1 (03-2012)
- Page 228 (SPS ?) - Get the display option. If 0, logo is always OFF. 1, logo is displayed at start up, etc. (SPS 2) - Set the display option. Logo will be displayed when there is no signal. (SPS+SLCT 0) - Use Christie logo. (SPT) SPLIT SCREEN...
- Page 229 (STD+IN12 ?) - Returns the current video standard value on Slot 1 Input 2. (SZP) SIZE PRESETS Unsaved Power Up Operator CONTROL GROUP: SUBCLASS: ACCESS LEVEL: DESCRIPTION Sets the image to one of several preset size/position presets. D-64 Matrix StIM/SIM User Manual 020-100306-05 Rev. 1 (03-2012)
- Page 230 The control subcodes provide access to all the presets. Due to the large number of sub- codes they are not all listed. Instead a simple substitution for the small 'x' is made, according to the following table: Max drives, read only Matrix StIM/SIM User Manual D-65 020-100306-05 Rev. 1 (03-2012)
- Page 231 (TCS+RDCX 290) - Set current Target gamut red x point to 0.290 (TCS+BLEY ?) - Return value of EBU preset blue y point (TCS+COPY 3) - Copy settings from HD Video to current D-66 Matrix StIM/SIM User Manual 020-100306-05 Rev. 1 (03-2012)
- Page 232 Set the preferred EDID Timings on the Twin HDMI Input card. Available Models are: 0 = Default 1 = 3D 2 = Custom : 3D option (1) is not supported for Entero or Matrix StIM/SIM. NOTE SUBCODE DESCRIPTION OF USE SLxy Set the EDID timings on Slot x to the specified type.
- Page 233 OSD menu is selected, for example if they have specific content that they wish to evaluate. 0 = Disable automatic test pattern enable 1 = Enable automatic test pattern enable D-68 Matrix StIM/SIM User Manual 020-100306-05 Rev. 1 (03-2012)
- Page 234 Instead a simple substitution for the small 'x' is made, according to the following table: 3200K 5000K (D50) 6500K (D65) 7500K (D75) 9300K (D93) User 1 User 2 User 3 User 4 Current Matrix StIM/SIM User Manual D-69 020-100306-05 Rev. 1 (03-2012)
- Page 235 Set the texture enhancement for Slot x, Input y. MAIN Set the texture enhancement for main video. PIIP Set the texture enhancement for main video. EXAMPLE: (TXE 50) - Set the texture enhancement to 50% for main video. D-70 Matrix StIM/SIM User Manual 020-100306-05 Rev. 1 (03-2012)
- Page 236 <No Subcode > Set the vertical position for the main image. EXAMPLE: (VRT 500) - Set vertical position to 500 on main video. (VRT?) - Returns the vertical position value on main video. Matrix StIM/SIM User Manual D-71 020-100306-05 Rev. 1 (03-2012)
- Page 237 1 = 2D keystone 2 = TWIST maps KRST Reset keystone settings to zero EXAMPLES: (WRP+SLCT 0) - Warping disabled. (WRP+SLCT 1) - Use 2D keystone mode. (WRP+SLCT 2) - Use TWIST map #1. D-72 Matrix StIM/SIM User Manual 020-100306-05 Rev. 1 (03-2012)
- Page 238 54 gateway 36 blending copy color space from 52 general purpose input/output, see GPIO block artifact reduction 28 copy white point from 52 Geometry Correction menu 37 boresight alignment 16 Matrix StIM/SIM User Manual Index-1 020-100306-05 Rev. 1(03-2012)
- Page 239 10 master projector 57 projector capability 50 Channel Setup menu 13 master projector, see synchronize to this pro- projector clock 32 channels 11 jector projector color adjustment 59 copying channels 14 Index-2 Matrix StIM/SIM User Manual 020-100306-05 Rev. 1 (03-2012)
- Page 240 56 video standards 22 set white to color temperature 52 shutdown, auto 32 shutter key 5 warning brightness threshold 50 signal types 13 warning gamut threshold 50 slot keys 4 Matrix StIM/SIM User Manual Index-3 020-100306-05 Rev. 1(03-2012)
- Page 242 *000-101813-03* ASSY TECH DOCS StiM/SIM...
- Page 243 Corporate offi ces Worldwide offi ces USA – Cypress United Kingdom Eastern Europe Singapore Japan ph: 714-236-8610 ph: +44 118 977 8000 ph: +36 (0) 1 47 48 100 ph: +65 6877-8737 ph: 81-3-3599-7481 Canada – Kitchener France Middle East Beijing South Korea ph: 519-744-8005...
Need help?
Do you have a question about the Matrix StIM and is the answer not in the manual?
Questions and answers