Advertisement
Quick Links
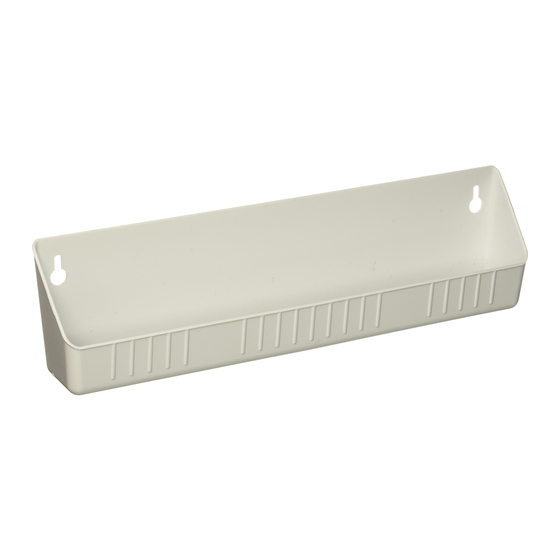
TIP-OUT TRAYS
TOOLS REQUIRED:
#2
#2
#2
3
32
ESTIMATED ASSEMBLY TIME:
30 MIN
CARE AND MAINTENANCE:
Clean with a damp cloth and
wipe parts dry.
SCAN HERE FOR
INSTALLATION VIDEO
WWW.REV-A-SHELF.COM/VIDEOS
No.
A
B
C
D
You will recieve 1 or 2 trays and either 1 pair or 2 pair
of hinges depending on unit purchased.
A.
INSTALLATION INSTRUCTIONS: TIP-OUT TRAYS
Parts List
Description
Tip-Out Tray
Hinges
#8X1/2 Truss Head Screws
#8X5/8 Flat Head Screws
B.
12400 Earl Jones Way
Louisville, KY 40299
rev-a-shelf.com
Customer Service: 800-626-1126
Qty
1 or 2
2 or 4
8 or 16
8 or 16
C.
D.
I-LD-65XX-0324
Advertisement

Subscribe to Our Youtube Channel
Related Manuals for Rev-A-Shelf TIP-OUT TRAYS


Summary of Contents for Rev-A-Shelf TIP-OUT TRAYS
- Page 1 You will recieve 1 or 2 trays and either 1 pair or 2 pair Clean with a damp cloth and of hinges depending on unit purchased. wipe parts dry. SCAN HERE FOR INSTALLATION VIDEO WWW.REV-A-SHELF.COM/VIDEOS INSTALLATION INSTRUCTIONS: TIP-OUT TRAYS I-LD-65XX-0324...
- Page 2 (2) or (1) opening. Once your holes are marked, pre- drill (2) 3/32” pilot holes per hinge into the frame of the cabinet (See Fig. 2). Hinge Template Customer Service: 800-626-1126 | rev-a-shelf.com...
- Page 3 (2) 3/32 pilot holes in the center of the keyholes. Note: When pre-drilling into the door panel(s), make sure to NOT drill through your panel. INSTALLATION INSTRUCTIONS: TIP-OUT TRAYS...
- Page 4 Do not screw in all the way as you will want a little room behind the screw head so the trays slide down into the keyhole (See Figure 5A - 5C). FIGURE 5B FIGURE 5C Customer Service: 800-626-1126 | rev-a-shelf.com...
- Page 5 Having someone hold the panel while attaching may be required. (See Fig. 6). Attach your trays, tighten the screws and your installation is complete (See Fig. 7). FIGURE 7 extension template EXTENSION TEMPLATE INSTALLATION INSTRUCTIONS: TIP-OUT TRAYS...
- Page 6 12400 Earl Jones Way Louisville, KY 40299 rev-a-shelf.com Customer Service: 800-626-1126 INSTRUCCIONES DE INSTALACIÓN / INSTRUCTIONS D’INSTALLATION BANDEJAS BASCULANTES COMPARTIMENTS BASCULANTS Herramientas requeridas: Outils Requis: Tiempo estimado de ensamblado Durée de l’installation: 30 MIN LISTA DE PARTES / LISTE DES PIÈCES Descripción / Description...
- Page 7 (2) ou (1). Une fois les trous marqués, prépercez (2) avant-trous de 3/32 po par charnière dans le cadre de l’armoire. (Voir Fig. 2). Customer Service: 800-626-1126 | rev-a-shelf.com...
- Page 8 PASO 3 / ÉTAPE 3 modèle d’extension modèle d’extension plantilla de extensión extension template HINGE TEMPLATE FIGURE 3 Preparación de la plantilla de extensión para los paneles de las puertas: Ahora tomará la plantilla de extensión y la alineará a la esquina de cada línea trazada como Panel de la puerta se muestra.
- Page 9 Veillez à ne pas visser à fond, car vous aurez besoin d’un peu d’espace derrière la tête de vis pour que les plateaux glissent dans le trou de serrure (voir figures 5A - 5C). FIGURE 5B FIGURE 5C Customer Service: 800-626-1126 | rev-a-shelf.com...
- Page 10 FIGURE 6 PASO 6 / ÉTAPE 6 Instalación de bisagras: Usando los tornillos #8 x 5/8” proporcionados, ahora puede unir sus bisagras al marco. Es posible que se requiera que alguien sostenga el panel mientras lo une. (Véase la Fig. 6). Coloque sus bandejas, apriete los tornillos y su instalación estará...
Need help?
Do you have a question about the TIP-OUT TRAYS and is the answer not in the manual?
Questions and answers