Advertisement
Available languages
Available languages
Quick Links
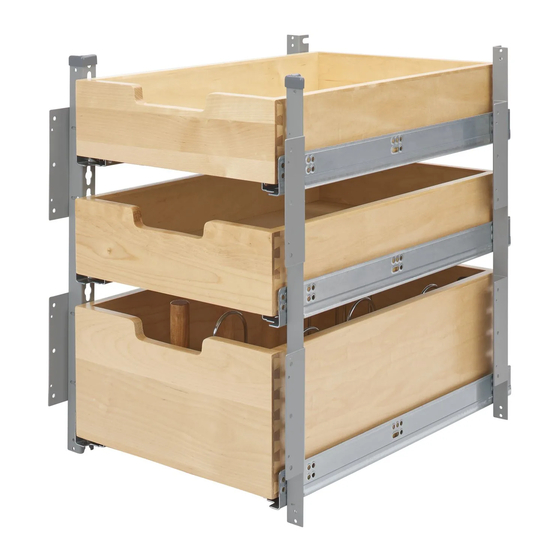
PILASTER UPRIGHT KIT
TOOLS REQUIRED:
#2
#2
ESTIMATED ASSEMBLY TIME:
45 MIN
CARE AND MAINTENANCE:
Clean with a damp cloth and
wipe parts dry.
For video instruction visit:
rev-a-shelf.com/videos
Parts List
No.
Description
1
Front Pilaster Uprights
2
Back Pilaster Uprights
3
#8 x 3/4" Deep Thread Screws
(Screw Pack #059)
4
#6 x 1/2" Wood Screws
(Screw Pack #084)
5
Upright Safety Caps
6
Slide Buttons
7
BLUM
8
Wood Box (Short)
9
Wood Box (Tall)
10
BLUM
®
11
Wood Pegs (Tall Box Only)
12
Wire Dividers
7
8
INSTALLATION INSTRUCTIONS: PILASTER UPRIGHT KIT
Qty
2
2
16
8 or 12
2
2 or 3/sets
Slides
2 or 3/sets
®
1 or 2
1
Triggers
2 or 3/sets
3 or 4
6 or 8
9
12400 Earl Jones Way
Louisville, KY 40299
rev-a-shelf.com
Customer Service: 800-626-1126
1
2
3
4
5
10
11
6
12
I-4PIL21-1019
Advertisement

Related Manuals for Rev-A-Shelf 4PIL-18SC-2


Summary of Contents for Rev-A-Shelf 4PIL-18SC-2
- Page 1 12400 Earl Jones Way Louisville, KY 40299 rev-a-shelf.com Customer Service: 800-626-1126 PILASTER UPRIGHT KIT TOOLS REQUIRED: ESTIMATED ASSEMBLY TIME: Parts List 45 MIN Description Front Pilaster Uprights Back Pilaster Uprights #8 x 3/4” Deep Thread Screws (Screw Pack #059) CARE AND MAINTENANCE: #6 x 1/2”...
- Page 2 UPRIGHT AND REATTACH SCREWS REQUIRED LOWER UPRIGHT MINIMUM VERTICAL SPACE STEP 2 FIG. FIG. Remove extension plates that 2.1) and place end caps on the PRESS DOWN FIRMLY REMOVE EXTENSION BRACKET REMOVE SCREWS Customer Service: 800-626-1126 | rev-a-shelf.com...
- Page 3 STEP 3 FIG. Brackets are currently set for FIG. side of your cabinet, you must UPRIGHTS FOR HINGE RIGHT SIDE CABINET remove the brackets from all match their respective left Once you have the correct REAR UPRIGHTS insert (2) machine screws into NOTE: (RIGHT HAND HINGE) Keep the machine screws...
- Page 4 Then measure the distance button to the center of the second button and record as B SECURE BUTTONS WITH PROVIDED SCREWS AS SHOWN NOTE: Your slide may not appear as shown if you are not Customer Service: 800-626-1126 | rev-a-shelf.com...
- Page 5 STEP 6 FIG. measurement A and record as C. Mark the distance calculated from C from the back of the face frame towards the rear of on opposite side of the cabinet with the bottom of the cabinet SIDE VIEW OF CABINET NOTE: attachment.
- Page 6 NOTE: Your slide may not appear as shown if you are not 1-29/64” (37 mm) 16” (406 mm) FIG. 15-3/16” (387 mm) 2-3/4” (70 mm) Customer Service: 800-626-1126 | rev-a-shelf.com...
- Page 7 STEP 10 Insert the button attached FIG. to the rear of the slide into at desired location. Drop the front slide button into the and press down to secure the PRESS DOWN TO SECURE SLIDE INTO PLACE STEP 11 PRE-DRILLED HOLE FIG.
- Page 8 STEP 12 FIG. L-BRACKET 12400 Earl Jones Way Louisville, KY 40299 rev-a-shelf.com Customer Service: 800-626-1126 Customer Service: 800-626-1126 | rev-a-shelf.com...
- Page 9 12400 Earl Jones Way Louisville, KY 40299 rev-a-shelf.com Customer Service: 800-626-1126 KIT DE CRÉMAILLÈRE DE PILASTRE KIT PARA PILASTRA VERTICAL OUTILS REQUIS: HERRAMIENTAS REQUERIDAS Liste des pieces Lista de Partes Description Quantité Descripción Cantidad Front Pilaster Upright Frente de las Pilastras Verticales...
- Page 10 Quite las extensiones de las placas QUITE LA EXTENSION DEL SOPORTE que no están siendo usadas de RETIREZ LES VIS parte frontal de los dos verticales QUITE LOS TORNILLOS Service à la clientèle: 800-626-1126 | rev-a-shelf.com Servicio a Clientes 800-626-1126 | rev-a-shelf.com...
- Page 11 ÉTAPE 3 PASO 3 FIG. FIG. Les supports sont actuellement CRÉMAILLÈRES POUR CHARNIÈRE SUR CÔTÉ DROIT DE L ’ARMOIRE VERTICALES PARA LA BISAGRA DEL LADO DERECHO DEL GABINETE vos charnières se trouvent sur le devez retirer les supports de tous nouveau pour correspondre à...
- Page 12 Una vez que tenga todos los botones colocados, mida la distancia desde el frente del deslizante al centro de su NOTA: NOTA: Su deslizante puede no parecerse como se muestra si usted no está utilizando deslizantes Blum. Service à la clientèle: 800-626-1126 | rev-a-shelf.com Servicio a Clientes 800-626-1126 | rev-a-shelf.com...
- Page 13 ÉTAPE 6 PASO 6 VUE LATÉRALE DE L ’ARMOIRE FIG. VISTA LATERAL DEL GABINETE comme étant C. Marquez la distance calculée de C de l’arrière de l’armoire (voir l’Illustration 6). Répétez l’opération sur le côté l’armoire. Avec la crémaillère à ras du fond de l’armoire et des supports qui font face à...
- Page 14 REMARQUE: Votre coulisse peut ne pas être comme indiqué si vous n’utilisez pas les coulisses Blum. Repita esto para cada deslizante. NOTA: Su deslizante puede no parecerse como se muestra si usted no está utilizando deslizantes Blum. Service à la clientèle: 800-626-1126 | rev-a-shelf.com Servicio a Clientes 800-626-1126 | rev-a-shelf.com...
- Page 15 ÉTAPE 10 PASO 10 FIG. Insérez le bouton attaché à l’arrière de la coulisse dans l’arrière de la rainure de la crémaillère à l’emplacement souhaité. Déposez le bouton de la coulisse avant dans le centre de la rainure de la crémaillère avant et appuyez l’Illustration 10).
- Page 16 L (voir l’Illustration 12). Apriete los tornillos sosteniendo los SERREZ LES VIS EN TENANT LES SUPPORTS EN L. APRIETE LOS TORNILLOS SOSTENIENDO LOS SOPORTES TIPO L. 12400 Earl Jones Way Louisville, KY 40299 rev-a-shelf.com Customer Service: 800-626-1126 Customer Service: 800-626-1126 | rev-a-shelf.com...
Need help?
Do you have a question about the 4PIL-18SC-2 and is the answer not in the manual?
Questions and answers