Advertisement
Quick Links
TOOLS REQUIRED:
3
3
8
8
DETERMINING YOUR INSTALLATION
If you plan to secure your 448 organizer using the
STEP 1
provided bolts, please proceed to the "Installation
with bolts" section. If you plan to secure using wood
screws (See Fig 1.1), proceed to the "Installation
with wood screws" section.
INSTALLATION WITH WOOD SCREWS
STEP 1
Turn your 448 upside down. Pull your SC slide set
into the open position and locate the triggers on
the left and right side (See Fig 1.2). Press and hold
the triggers either up or down while also removing
the slide set. Set your wood frame to the side for
now. After you remove the slides, your soft-close
mechanism will be in the open position. Flick the
trigger and reset it to the closed position.
STEP 2
Place Template inside of your wall cabinet. Orientate
the template so the front edge is positioned to the
back of your cabinet door (See Fig 2).
STEP 4
Using your awl and rubber mallet, punch your hole
locations identified by the smaller black circles
(See Fig 2).
STEP 5
Secure slide set to cabinet floor using the 4 wood
screws provided.
STEP 6
Re-attach the wood frame to your slides. Be sure
your ball bearing race tracks have been placed at
the front of your slide channels. Align the wood
frame & push to the closed position. Proceed to the
door mounting section at this time.
INSTALLATION WITH BOLTS
STEP 1
Place Template inside of your wall cabinet. Orientate
the template so the front edge is positioned to the
back of your cabinet door (See Fig 2).
STEP 2
Using your 3/8" drill bit, drill through the 4 marked
hole locations labeled "Pre-drill here for bolt
application." You will drill through your cabinet floor.
STEP 3
Place your 448 unit over the top of your holes and
secure using the 4 machine bolts. Make sure the
bolts go through the holes from the underside of
the cabinet up into the cabinet floor, and secure
with a 1/4" nut driver or wrench. The corresponding
holes on the slide set are threaded for attachment.
STEP 4
Proceed to the door mounting section.
12400 Earl Jones Way
Louisville, KY 40299
rev-a-shelf.com
Customer Service: 800-626-1126
ESTIMATED ASSEMBLY
TIME:
30-45 MIN
4
Cut at this line to fit
template in your cabinet
Edge front of template
to back of cabinet door.
CARE AND MAINTENANCE:
CLEAN WITH A DAMP CLOTH
AND WIPE PARTS DRY
Pre-Drill for
bolt application
Pre-Drill for wood
screw application
Center of Cabinet
Pre-Drill for
bolt application
Pre-Drill for wood
screw application
448 Ball-Bearing Soft-Close Wall
Cabinet Pullout Installation
Template - 5" Version
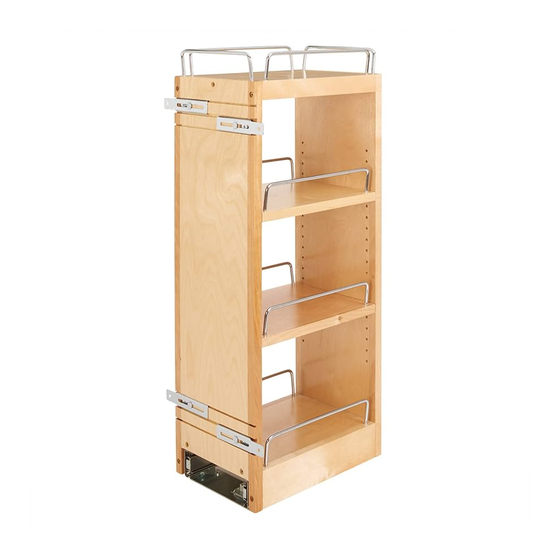
PARTS LIST:
WOOD FRAME W/ ATTACHED SLIDE
DOOR MOUNT BRACKETS
FIGURE 1.1
WOOD SCREWS FROM
TOP OF SLIDE ASSEMBLY
(4 TOTAL)
SLIDE RELEASE LOCATION
FIGURE 2
DOOR MOUNTING INSTRUCTIONS
SEE BELOW FOR ILLUSTRATIONS
Measure from the base of the face frame up to each
mounting bracket slotted hole location and record
those dimensions.
Measure the entire door opening and record that
value. Measure the height of your cabinet door and
record that value.
Transfer these dimensions to your door from the
bottom and mark the hole locations.
Pre-drill these holes on the back side of your cabinet
door, keeping sure not to drill through the door.
1.
Measure from frame to left bracket slot ________
Measure from frame to right bracket slot ________
(repeat step for top brackets)
(a)
2.
Measure Opening Height (a)________
Height Difference ________
Measure Door Height (b)________
Divide Difference by 2 _______
3.
If your door is larger than cabinet opening, add the divided
difference you found in step 2 to the measurements in step 1.
If your door is smaller, subtract the divided difference from the
measurements in step 1.
Top bracket Measurements
Right________ Left________
Bottom bracket Measurements
drill through the
Right________ Left________
T-448BBSCWC-1116
SHELVES
FIGURE 1.2
3
32
(b)
Mark screw
locations on
your door and
pre-drill. Be
careful not to
cabinet door.
Advertisement

Related Manuals for Rev-A-Shelf 448


Summary of Contents for Rev-A-Shelf 448
- Page 1 2 to the measurements in step 1. If your door is smaller, subtract the divided difference from the Place your 448 unit over the top of your holes and measurements in step 1. secure using the 4 machine bolts. Make sure the...
- Page 2 2 to the measurements in step 1. If your door is smaller, subtract the divided difference from the Place your 448 unit over the top of your holes and measurements in step 1. secure using the 4 machine bolts. Make sure the...
Need help?
Do you have a question about the 448 and is the answer not in the manual?
Questions and answers