
Related Manuals for Techly IDATA HDMI-WL699


Summary of Contents for Techly IDATA HDMI-WL699
- Page 1 User's Manual 4K HDMI WIRELESS Manuale d’istruzione EXTENDER Technical features PLUG&PLAY P/N: IDATA HDMI-WL699 8059018368222 WWW.TECHLY.COM...
-
Page 2: Important Safety Instruction
• Power supply: DC5V, use only the power supply included in the package. Don't use power supply if this is damaged. Use DC5V only. If a third-party power supply is used, please ensure that the power supply specifications meet the product requirements. WWW.TECHLY.COM... -
Page 3: Package Contents
• IR Receiver Extension cable x1 • IR Blaster Extension cable x1 • Antenna x4 • Mounting ears x4 • Screws x10 • Ground Screws x2 INSTALLATION REQUIREMENTS 1. HDMI source device (DVD, game console, PC, etc.) 2. HDMI display device (TV, projector, LED screen, etc.) WWW.TECHLY.COM... -
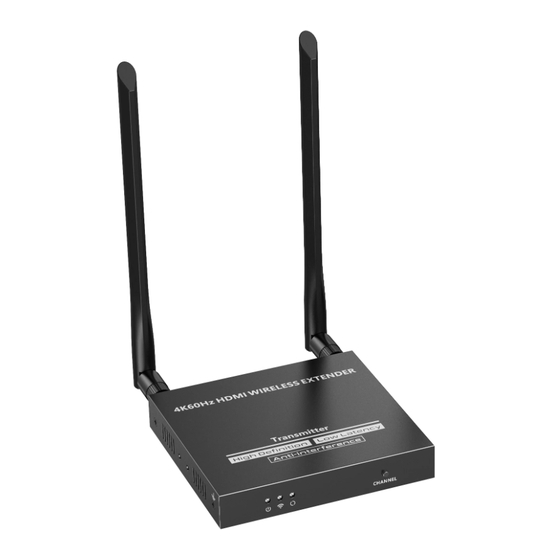
Page 4: Panel Description
HDMI input HDMI cable Connect with local HDMI display device with HDMI output HDMI cable IR out Connect with IR blaster extension cable Power input Connect with DC 5V/2A power adapter HDMI IN HDMI OUT Video Source WWW.TECHLY.COM HDMI Display... - Page 5 HDMI Display Antenna connectors Connect with antennas Micro USB port Used for firmware upgrade Connect with HDMI display device with HDMI output HDMI cable IR in Connect with IR receiver extension cable Power input Connect with DC 5V/2A power adapter WWW.TECHLY.COM...
-
Page 6: Installation Procedures
4) In the case of multiple sets being used at the same time in the same area. In order to prevent mutual interference, switch each set of transmitters and receivers to a different channel after they have been manually paired with the SSID. WWW.TECHLY.COM... - Page 7 Q: Why is the display stuttering or unstable? A: 1) Place the transmitter or receiver within the signal coverage and minimize obstructions between the transmitter and receiver. 2) Switch to a different channel to avoid interference from other wireless signals. 3) Re-power the receiver or transmitter. WWW.TECHLY.COM...
-
Page 8: Specifications
-20~60°C temperature Operating Storage -30~70°C Environment temperature Humidity 0~90% RH (no condensation) TX: 115(W) x 125(L) x 20.6(H) mm Dimension RX: 115(W) x 125(L) x 20.6(H) mm Physical Color Black Properties Material Iron Net weight TX: 353g; RX: 346g WWW.TECHLY.COM... -
Page 9: Importanti Informazioni Sulla Sicurezza
• Alimentatore: DC 5V, utilizzare solo l’alimentatore fornito nella confezione. Non utilizzare se l’alimentatore risulta danneggiato. Nel caso in cui non sia possibile utilizzare l’alimentatore originale fornito nella confezione, assicurarsi che le specifiche dell’alimentatore sostitutivo corrispondano a quelle dell’originale. WWW.TECHLY.COM... -
Page 10: Contenuto Della Confezione
• Prolunga ricevitore IR x1 • Prolunga IR blaster x1 • Antenna x4 • Alette di fissaggio x4 • Viti x10 • Viti di terra x2 REQUISITI D’INSTALLAZIONE 1. Periferica sorgente HDMI (DVD, console di gioco, PC, ecc..) 2. Schermi HDMI come TV, proiettore, schermi LCD, ecc WWW.TECHLY.COM... - Page 11 HDMI Collegare con lo schermo locale HDMI Uscita HDMI HDMI IN HDMI OUT tramite un cavo HDMI Video Source Uscita IR Collegare con il cavo prolunga IR Blaster Ingresso alimentazione Collegare con l'alimentatore DC 5V/2A WWW.TECHLY.COM HDMI Display...
- Page 12 Connettori antenna Collegare le antenne Porta Micro USB Utilizzata per aggiornare il firmware Collegare con lo schermo HDMI tramite Uscita HDMI un cavo HDMI Ingresso IR Collegare con il cavo prolunga IR Ingresso alimentazione Collegare con l'alimentatore DC 5V/2A WWW.TECHLY.COM...
- Page 13 3) Alimentare i dispositivi per metterli in funzione. 4) In caso di utilizzo contemporaneo di più set nella stessa area, per evitare interferenze reciproche, commutare ciascun set di trasmettitori e ricevitori su un differente canale dopo che sono stati accoppiati manualmente tramite SSID. WWW.TECHLY.COM...
-
Page 14: Domande Frequenti
R: 1) Posizionare il trasmettitore o il ricevitore entro la copertura del segnale e ridurre al minimo gli ostacoli tra trasmettitore e ricevitore. 2) Passare a un canale diverso per evitare interferenze provenienti da altri segnali wireless. 3) Spegnere e riaccendere il ricevitore o il trasmettitore. WWW.TECHLY.COM... - Page 15 Ambiente Temperatura -30~70°C operativo di stoccaggio Umidità 0~90% RH (senza condensa) TX: 115(W) x 125(L) x 20.6(H) mm Dimensioni RX: 115(W) x 125(L) x 20.6(H) mm Proprietà Colore Nero fisiche Materiale Ferro Peso netto TX: 353g; RX: 346g WWW.TECHLY.COM...
- Page 16 RESTRICTED TO INDOOR USE • SOLO PER USO INTERNO All rights reserved. All trademarks and trade names are those of their respective owners. TECHLY® - Viale Europa 33 - 33077 Sacile (PN) - Italy WWW.TECHLY.COM...
Need help?
Do you have a question about the IDATA HDMI-WL699 and is the answer not in the manual?
Questions and answers