Advertisement
Quick Links
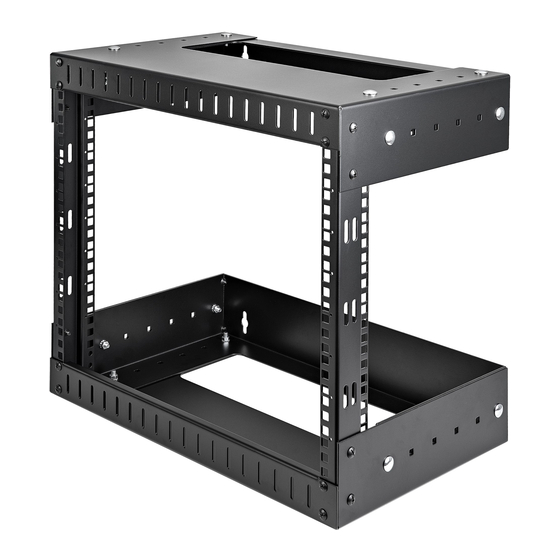
8U Adjustable Depth Wall Mount Rack
Product Diagram (RK812WALLOA)
Front
1
1
3
Component
• Features Square Cage Nut Holes to front-mount your
1
Vertical Rails (x2)
equipment
Wall-Mount Anchor
2
• Used to mount the enclosure to a wall
Points (x4)
• Used to install the Truss Head Screws and nuts to set
Depth Adjustment
the depth of the Wall Mount Rack
3
Holes
• 12 - 20 in. Adjustable Depth
To view manuals, FAQs, videos, drivers, downloads, technical drawings, and more, visit www.startech.com/support.
Back
2
2
2
2
Side
3
3
Function
Package Contents
• Wall Mount Rack x1
• M5 Screws x16
• Truss Head Screws x16
Warnings!
• Read the entire manual and ensure the instructions are fully understood before
assembling and/or using this product.
• StarTech.com Ltd. is not responsible for any property damage and/or personal injury
resulting from the installation procedures outlined in this technical document.
• Mounting hardware is not included with this product. Make sure to source
appropriate mounting hardware that is capable of supporting the weight of a
loaded Rack, and is adequate for the wall type the rack is going to be mounted on.
• If you lack the necessary expertise required to attach this product to the wall
structure or to assess the suitability of the hardware provided, please contact a
professional installer.
• Before adding equipment to this product, ensure this product has been properly
mounted.
• Never operate this product if parts are missing or damaged.
• Ensure the weight of the equipment does not exceed the weight capacity of this
product. If the weight capacity is exceeded, personal injury or damage to the
equipment are possibilities. The weight capacity for this product is:
Up to 135 lb [61.2 kg]
• Wall structures vary. Ensure the type of wall structure and mounting hardware will
properly support the mounted equipment. Failure to do so might result in personal
injury and/or equipment damage. The wall structure should be capable of supporting
at least four times the weight of the mounted equipment.
How to Identify the LOT Code Revision Number
The Revision Number (Rev #) appears as the fifth and sixth digits of the LOT code,
located on the sticker affixed to the product and its packaging. If the LOT code
sticker is missing, the product is Rev 01.
Quick-Start Guide
• Assembly Screws x16
• M5 Cage Nuts x16
• Quick-Start Guide
Manual Revision: March 25, 2024
Advertisement

Related Manuals for StarTech.com RK812WALLOA


Summary of Contents for StarTech.com RK812WALLOA
- Page 1 • Read the entire manual and ensure the instructions are fully understood before assembling and/or using this product. • StarTech.com Ltd. is not responsible for any property damage and/or personal injury resulting from the installation procedures outlined in this technical document.
- Page 2 StarTech.com. Where they occur these references are for illustrative purposes only and do not represent an endorsement of a product or service by StarTech.com, or an endorsement of the product(s) to which this manual applies by the third-party company in question.
Need help?
Do you have a question about the RK812WALLOA and is the answer not in the manual?
Questions and answers