VESTEL EVC04 Series Installation Manuallines
Electric vehicle charger
Hide thumbs
Also See for EVC04 Series:
- Installation manual ,
- Installation manuallines (182 pages) ,
- Assembly & installation manuallines (120 pages)
Table of Contents
Advertisement
Quick Links
Advertisement
Table of Contents

Subscribe to Our Youtube Channel
Related Manuals for VESTEL EVC04 Series


Summary of Contents for VESTEL EVC04 Series
- Page 1 Mobilite ELECTRIC VEHICLE CHARGER EVC04 Ser�es Installat�on Gu�del�ne...
-
Page 2: Table Of Contents
6.3.9 - BUILT-IN TIC RECEIVER / POWER OPTIMIZATION MODULE (OPTIONAL) ..38 6.3.10 - LOAD SHEDDING ................39 6.3.11 - MONITORING OF WELDED RELAY CONTACTS FAILURE ......40 6.3.12 - FACTORY RESET ................41 © 2023 VESTEL - All rights reserved English - 1... - Page 3 6.6.4 - CHANGE OCPP SETTINGS OF THE DEVICE ..........62 6.6.5 - CHANGE NETWORK INTERFACES SETTINGS OF THE DEVICE .....63 6.6.6 - CHANGE STANDALONE MODE SETTINGS OF THE DEVICE ......65 6.6.7 - LOCAL LOAD MANAGEMENT OF THE DEVICE .........66 © 2023 VESTEL - All rights reserved English - 2...
- Page 4 6.6.8 - MAKING SYSTEM MAINTANENCE OF THE DEVICE ........80 6.6.9 - FIRMWARE UPDATE SCREEN FLOW (WITH DISPLAY MODELS) ..... 81 7 - UK REGULATION CHANGES ACCORDING TO SMART CHARGING (OPTIONAL) ....84 © 2023 VESTEL - All rights reserved English - 3...
-
Page 5: Safety Information
Moreover, the charging station shall not be exposed to spilled or splashed liquids. • Do not touch end terminals, electric vehicle connector and other hazardous live parts of the charging station with sharp metallic objects. © 2023 VESTEL - All rights reserved English - 4... -
Page 6: Ground Connection Warnings
To avoid a risk of fire or electric shock, do not use this device with an extension cable. If the mains cable or vehicle cable is damaged it must be replaced by the manufacturer, its service agent, or similarly qualified persons in order to avoid a hazard. © 2023 VESTEL - All rights reserved English - 5... -
Page 7: Wall Mounting Warnings
This unit is rated for indoor or outdoor installation. If this unit is mounted outdoors, the hardware for connecting the conduits to the unit must be rated for outdoor installation and be installed properly to maintain the proper IP rating on the unit. © 2023 VESTEL - All rights reserved English - 6... -
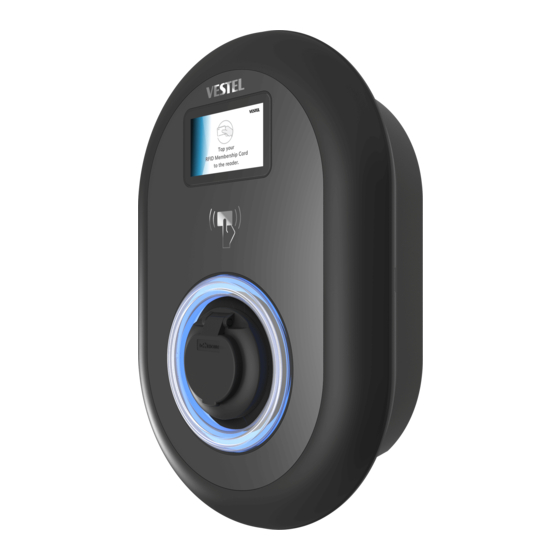
Page 8: Description
Blank : Case-B Connection with normal socket T2S : Case-B Connection with shuttered socket T2P : Case-C Connection with Type-2 plug T1P : Case-C Connection with Type-1 plug Cabinet EVC04 © 2023 VESTEL - All rights reserved English - 7... -
Page 9: General Information
Charging station connection Charging station Ethernet cable union nut connection cable gland nut Charging station Ethernet Charging Cable (Optional) or connection cable gland nut Out of use Charging cable © 2023 VESTEL - All rights reserved English - 8... -
Page 10: Mid Models
Status indicator LED MID Meter Display (Optional) Socket Outlet Product Label Charging station connection cable union nut Charging station Ethernet connection cable gland nut Charging Cable (Optional) or Out of use © 2023 VESTEL - All rights reserved English - 9... -
Page 11: Dimensional Drawings
3.2 - DIMENSIONAL DRAWINGS 3.2.1 - Without Display Model 135.0mm 315.0mm 177.5mm 459.5mm 101.0mm 181.0mm 3.2.2 - With Display Model 135.0mm 315.0mm 177.5mm 459.5mm 101.0mm 181.0mm © 2023 VESTEL - All rights reserved English - 10... -
Page 12: Required Equipment, Tools And Accessories
Torx T25 Security Volt Indicator Water Level Screwdriver Flathead Right Angle Screwdriver Screwdriver (Tip Pointed Spudger Adapter / Torx T20 Security width 2.00-2.5 mm) Cat5e or cat6 RJ45 Crimping Tool ethernet cable © 2023 VESTEL - All rights reserved English - 11... -
Page 13: Technical Specification
LTE: B1 (2100 MHz), B3 (1800 MHz), B7 (2600 MHz), B8 (900 MHz), B20 (800 MHz), B28A (700 MHz) WCDMA: B1 (2100 MHz), B8 (900 MHz) GSM: B3 (1800 MHz), B8 (900 MHz) © 2023 VESTEL - All rights reserved English - 12... - Page 14 Temperature -35 °C to 55 °C (without direct sunlight) -25 °C to 50 °C (optionaly product has RCCB) Humidity 5% - 95% (relative humidity, without condensation) Altitude 0 - 4,000m © 2023 VESTEL - All rights reserved English - 13...
-
Page 15: Installing Charging Station
IP for screws which are used for L-Wrench mounting charging station to the Wall. Disassembling and fastening the cable Wrench glands RCCB Wrench(Optional) To open the RCCB Cover RJ45 Male Connector – LAN Cable connection Optional © 2023 VESTEL - All rights reserved English - 14... - Page 16 Adding&Removing the User RFID Cards (Optional) to Local RFID List MASTER Installation Guide Installation Manual 1 Set (Optional) Instruction Book (Optional) User Manual 1 Set Quick Start Guide 1 Set © 2023 VESTEL - All rights reserved English - 15...
-
Page 17: Product Installation Steps
Please power off the charging station mains supply Remove the cover screws with Torx T20 security L-Wrench or Right Angle Screwdriver Adapter using Torx T20 Security Bit. Open the cover. © 2023 VESTEL - All rights reserved English - 16... -
Page 18: Wall Mount Installation
To close the cover of the charging station, tighten the cover screws which you were removed with Torx T20 Security L-Wrench or Right Angle Screwdriver Adapter using Torx T20 Security Bit. (Min:1.2Nm; Max:1.8Nm) Mounting the charging station on the wall is finished. © 2023 VESTEL - All rights reserved English - 17... - Page 19 Before next step (7), Please check the instructions for Single Phase or Three Phase cable connections. © 2023 VESTEL - All rights reserved English - 18...
- Page 20 Tamper-protection boundary switch is activated In the case of front cover of the EVC04 is opened while the product is energized. An OCPP security message is shared with backend if the tamper-protection boundary switch is activated and LED status indicator blinks yellow. © 2023 VESTEL - All rights reserved English - 19...
- Page 21 Before closing the cover of the charging station, check next instructions if any function related to these sections are used. © 2023 VESTEL - All rights reserved English - 20...
-
Page 22: 3- Single Phase Charging Station Ac Mains Connection
For single phase IT Grid installation, wiring diagram which is shown below should be used. Also grounding type should be set to “IT Grid” from the ”Installation settings” menu in web user interface. © 2023 VESTEL - All rights reserved English - 21... -
Page 23: 4- Three Phase Charging Station Ac Mains Connection
If the unit detects broken PEN, it automatically goes into error mode and can only be cleared by power cycling the charge point i.e. powering off and back on again. The unit should be reset to get over the error. © 2023 VESTEL - All rights reserved English - 22... -
Page 24: Adjusting Current Limiter
32 A 30 A 40 A 32 A 40 A 10 A 10 A 13 A 13 A 16 A 16 A 20 A Phase 25 A 30 A 32 A © 2023 VESTEL - All rights reserved English - 23... - Page 25 32 A 26 A 32 A 32 A 40 A 10 A 10 A 13 A 13 A 16 A 16 A 20 A Phase 25 A 26 A 32 A © 2023 VESTEL - All rights reserved English - 24...
-
Page 26: Dip Switch Settings
Brief descriptions of the DIP switch pin settings can be found in below table. Pin Number Description Pin-1 Reserved Pin-2 External Enable Input Functionality Pin-3 Locked Cable Function (only for socket models) Pin-4-5-6 Power Optimizer (Requires Optional Accessories) © 2023 VESTEL - All rights reserved English - 25... -
Page 27: Data Cable Connection
Power optimizer measurement cable c. Ethernet daisy chain connection cables (Optional) d. Load shedding triggering signal cable e. Shunt trip module control signal cable for welded relay contact failure © 2023 VESTEL - All rights reserved English - 26... -
Page 28: External Enable Input Functionality
If the external relay (RL) is in non-conducting (open), the charging station will not be not be able to charge the electric vehicle. You can connect potential free input signals as shown in above circuitry (see figure). © 2023 VESTEL - All rights reserved English - 27... - Page 29 Cable Terminal Cable Color 1 (CN2-1) Green 2 (CN2-2) Green + White Green © 2023 VESTEL - All rights reserved English - 28...
-
Page 30: Locked Cable Function (Model With Socket)
Turn on the power to your charging station. plug the charging cable to the socket outlet. The cable becomes locked and the charging station starts behaving as a cable model. © 2023 VESTEL - All rights reserved English - 29... -
Page 31: Power Optimizer (Requires Optional Accessories)
Last 3 DIP switch pins (4,5,6) shown in figure below corresponds to binary digits of the maximum current value as shown in the table (Table 2 is valid for France). When 4, 5, 6 pins are in OFF position, power optimizer functionality is disabled. © 2023 VESTEL - All rights reserved English - 30... - Page 32 DIP Switch Positions Current Limit Value Power Optimizer Disabled Table-1 DIP Switch Positions Current Limit Value Power Optimizer Disabled Table-2 (Valid for France) © 2023 VESTEL - All rights reserved English - 31...
-
Page 33: Power Optimizer With External Mid Meter
Power Optimizer Meter should be placed just after the main switch of the house as shown in the figure. Power Optimizer Meter wiring connections can be made according to the information below. © 2023 VESTEL - All rights reserved English - 32... - Page 34 10-11: A-B (COM) Modbus connection over RS485 for single phase charging station models. Related board wiring of Power Optimizer connections can be made as shown below: Cable Terminal Cable Color Description 6 (CN20-2) White Blue A (COM) 5 (CN20-1) Blue B (COM) © 2023 VESTEL - All rights reserved English - 33...
-
Page 35: Power Optimizer With External Current Transformer (Ct) (Optional)
• The Slide switch (SW2) on the “21PO01” should be adjusted as shown in Figure-2 and table-1 or table 2. Phase 1 Phase 2 Phase 3 CT1 CT2 CT3 Figure.2 © 2023 VESTEL - All rights reserved English - 34... -
Page 36: Mode Selection Switch Settings
The slide switch on the control panel shown in the figure below should be positioned at The wiring of the Linky meter and the control board inside the EV charger must be carried out as shown in the figure below. © 2023 VESTEL - All rights reserved English - 35... - Page 37 You must also connect the I1 and I2 terminals of your Linky meter to the I1 and I2 terminals of the charging station’s communication card. Switch SW2 must be positioned as in the figure below. © 2023 VESTEL - All rights reserved English - 36...
- Page 38 Supported Closed contact: Off-peak hours hours (postponed Contact Open: Peak Hours pricing) Activate/deactivate charging point TIC (Dynamic Contact closed: Charge point Non supported Load) activated Contact open: Charging point deactivated © 2023 VESTEL - All rights reserved English - 37...
-
Page 39: Built-In Tic Receiver / Power Optimization Module (Optional)
To use the charging station in TIC and PO mode, the DIP switch on the TIC SR /PO module must be set as shown in the table below. Mode Description Figure Slide Switch Right Position Power optimization by Slide Switch Left Position external CT © 2023 VESTEL - All rights reserved English - 38... -
Page 40: Load Shedding
Cable Terminal Input Load Shedding Input + Load shedding Input – Load Shedding Input State Behaviour Opened Contact Charge with max. available current Closed Contact Charge with 8A © 2023 VESTEL - All rights reserved English - 39... -
Page 41: Monitoring Of Welded Relay Contacts Failure
RCCB (or MCB) at the fuse box of the charging station. The circuitry block diagram that must be used at the fuse box of the charging station is shown below. RCCB SHUNT EVSE 230V TRIP L1_W CN33 CN33 © 2023 VESTEL - All rights reserved English - 40... -
Page 42: Factory Reset
• The first RFID card which is registered within this 60 seconds of duration will be the new master RFID card. Please follow instructions to register RFID user card which is used during charging process. © 2023 VESTEL - All rights reserved English - 41... -
Page 43: Setting Ethernet Port Of Charger To Static Ip In Standalone Usage
Note: You can also use factory reset function to set the LAN interface back to DHCP mode again but please well note that all other parameters will be set to factory default parameters. © 2023 VESTEL - All rights reserved English - 42... -
Page 44: Web Configuration Interface Enable / Disable
Daisy-Chain connection can be done as shown in Figure. Here, Ethernet router/switch/hub is used to route the traffic in the medium and any device can communicate with the back-end server © 2023 VESTEL - All rights reserved English - 43... -
Page 45: Ocpp Connection
Make sure the charging station is powered-off. 6.4.1 - CONNECT OCPP OVER CELLULAR NETWORK (Optional) Insert the micro SIM card in the SIM card slot on cellular module as shown in the below figure. © 2023 VESTEL - All rights reserved English - 44... -
Page 46: Connect Ocpp Over Ethernet
8 individual wires. them in the following order: white/orange, solid orange, white/green, solid blue, white/blue, solid green, white/brown, solid brown. © 2023 VESTEL - All rights reserved English - 45... - Page 47 The closer the and repeat this step to ensure a proper crimp. wire ends are trimmed, the better your final plug-in connection will be. Termination is complete. © 2023 VESTEL - All rights reserved English - 46...
-
Page 48: Commissioning
• Network Interface Settings : Cellular, Ethernet, Wi-Fi, Wi-Fi Hotspot • Standalone mode settings • Local Load Management : General Settings • System Maintanence: Log Files,Firmware Updates,Configuration BackUp&Restore,System Reset,Administration Password,Factory Default Configuration, Local Charge Sessions © 2023 VESTEL - All rights reserved English - 47... -
Page 49: Connect Pc To The Same Network With Smart Board
After connecting to the "Wi-Fi Hotspot" network, the user can open the WEB browser from the computer or mobile device and type the IP address of the charging station, Wi-Fi Hotspot at IP-Address is written on the label. © 2023 VESTEL - All rights reserved English - 48... - Page 50 Network Interfaces tab. New password character length must be minimum 8 and maximum 63 valid characters a..z A..Z 0..9 .,:;!#^+$%&/ (){[]}=*?-_@<>|. Note: Maximum 3 users can connect to WEB Configuration Interface via Wi-Fi hotspot. It supports 2.4Ghz. © 2023 VESTEL - All rights reserved English - 49...
-
Page 51: Opening Web Configuration Interface With Browser
Forcing Refresh or Clearing (depending on your operating system and browser) them fixes certain problems, like loading or formatting issues on web page. © 2023 VESTEL - All rights reserved English - 50... - Page 52 After submitting this page you will be redirected to login page. Also if you don’t want to change the password you can turn back the login page with “Back To Login”. Changing password is important for your security. © 2023 VESTEL - All rights reserved English - 51...
-
Page 53: Web Configuration Interface
Technician can select display language from the general settings page. Available languages for display language are as shown in figure below for now. After selecting the language, user can save selection by “Save Button”. © 2023 VESTEL - All rights reserved English - 52... -
Page 54: Display Backlight Settings
Technician can select LED dimming settings from the general settings page. Sunrise Time and Sunset Time can be selected when Led Dimming Level is time based. Led Dimming level options are Very Low,Low,Mid,High and Time Based. Time values can be between 00:00 and 23:59. © 2023 VESTEL - All rights reserved English - 53... -
Page 55: Standby Led Behaviour
6.6.2.5 - Display Theme Technician can change display theme from the general settings page. Blue theme is selected as default. If you want to change display theme, you can use this field. © 2023 VESTEL - All rights reserved English - 54... -
Page 56: Display Service Contact Info
80x80. Technician Also you can remove the logo with remove button. © 2023 VESTEL - All rights reserved English - 55... -
Page 57: Display Qr Code
If the device is in Standalone Mode, you can only set Randomised Delay Maximum Duration and Continue Charging After Power Loss settings. Randomised Delay Maximum Duration, can take values between 0 and 1800. © 2023 VESTEL - All rights reserved English - 56... -
Page 58: Installation Settings
Earthing System Tab in web configuration interface. If Earthing Type is selected as IT, the protective earth error check is disabled. In web configuration interface, earthing type is “TN/TT” by default. © 2023 VESTEL - All rights reserved English - 57... -
Page 59: Current Limiter Settings
If Unbalanced Load Detection is selected as an Enabled, Unbalanced Load Detection Max Current can be selected. Unbalanced Load Detection Minimum value is 6, max value is Current Limiter Value. Current Limiter Value can be set on Current Limiter Settings. © 2023 VESTEL - All rights reserved English - 58... -
Page 60: External Enabled Input
5.6.3.4 - External Enabled Input In this part, you can select External Enable Input from Web configuration. Options are Disabled and Enabled. © 2023 VESTEL - All rights reserved English - 59... -
Page 61: Lockable Cable
Power Optimizer External Meter. can be selected Auto Selected, Klefr 6924 / 6934, Garo GNM3T / GNM3D, Embedded Power Optimizer with CT, P1 Slimmemeter. If Power Optimizer External Meter is Auto Selected, Power Optimizer value reads from main board. © 2023 VESTEL - All rights reserved English - 60... -
Page 62: Location
In this part, Load Sheddding Status is reading from main board, you can select Load Shedding Minimum Current from Web configuration. This parameter can take values between 0 and Current Limiter Value. Current Limiter Value can be set on Current Limiter Settings. © 2023 VESTEL - All rights reserved English - 61... -
Page 63: Change Ocpp Settings Of The Device
Please be careful for your entered values because the system does not accept the unsuitable values and gives the warning. In this case, values will not be saved. Then the page does not to be redirected the main page so you should check your values. © 2023 VESTEL - All rights reserved English - 62... -
Page 64: Change Network Interfaces Settings Of The Device
If you select Ethernet or Wi-Fi IP Settings as “Static”; “IP Address”, “Network Mask”, Default Gateway” and “Primary DNS” spaces are mandatory. If you set Wi-Fi as enabled, “SSID”, “Password” and “Security” are mandatory. You should fill all spaces in suitable formats. CELLULAR © 2023 VESTEL - All rights reserved English - 63... - Page 65 WLAN When you finish it, click “Save” button. © 2023 VESTEL - All rights reserved English - 64...
-
Page 66: Change Standalone Mode Settings Of The Device
Select “Autostart” mode to allow charging without the need for authorization. It will be enough to plug to start charging. If you are done with mode selection, click “Save” button and reboot the device. © 2023 VESTEL - All rights reserved English - 65... -
Page 67: Local Load Management Of The Device
6.6.7.2 - Static Management For static management, a power limit can be set to the load management group and the charger won’t go above the power limit. © 2023 VESTEL - All rights reserved English - 66... -
Page 68: Dynamic Management
“Network Interfaces” menu. In this scenario, slave charging stations get their IP addresses from master charging station. Block diagrams for static and dynamic supply in star network topology are provided as below. © 2023 VESTEL - All rights reserved English - 67... -
Page 69: Static Supply Star Topology
Slave Slave Slave Local Load Management configuration of static supply. 6.6.7.4.2 - Dynamic Supply Star Topology: Main Supply Additional Loads Building Meter Electrical Panel Supply Slave Slave Master Slave Modbus © 2023 VESTEL - All rights reserved English - 68... -
Page 70: Daisy Chain (Serial)
Electrical Panel Master Slave Slave Slave Fixed Supply Ethernet 6.6.7.5.2 - Dynamic Supply Daisy Chain Topology: Main Supply Additional Loads Building Meter Electrical Panel Master Slave Slave Slave Supply Modbus Ethernet © 2023 VESTEL - All rights reserved English - 69... -
Page 71: Configuration Of Slave Charging Stations
Load management option is “disabled” by default. After accessing to configuration web interface, you need to tab “Local Load Management” menu and select “Master/Slave” in “Load management Option”. “Charge Point Role” should be selected as “Slave” as shown in below menus. © 2023 VESTEL - All rights reserved English - 70... - Page 72 The slave charging stations should be set as DHCP client as shown in image below. Note that, this setting causes disconnection from configuration web interface of the charging station, so this setting should be the latest setting in slave configuration of the charging station. © 2023 VESTEL - All rights reserved English - 71...
-
Page 73: Configuration Of Master Charging Station
When you want to enter to the web configuration interface in the first time, you will see the warning as “We recommend you to change your default password from system maintenance menu”. You can enter the system with: Default username = xxxxx Default password = xxxxx © 2023 VESTEL - All rights reserved English - 72... - Page 74 Load management option is “disabled” by default. After accessing to configuration web interface, you need to tab “Local Load Management” menu and select “Master/Slave” in “Load management Option”. “Charge Point Role” should be selected as “Master” as shown in the image below. © 2023 VESTEL - All rights reserved English - 73...
- Page 75 First out” and “Combined” modes. Combined mode needs extra configuration as “Fifo Charging Percentage” which effects the share between equally shared and first-in first-out calculations of the load managament algorithm. © 2023 VESTEL - All rights reserved English - 74...
-
Page 76: Equally Shared
All available power is distributed equally to all EVs connected. This is more suitable-for workplace or condominium chargings where the cars are parked for a considerable period of time. 120A Total amperage available © 2023 VESTEL - All rights reserved English - 75... -
Page 77: Fifo (First In - First Out)
“UPDATE DLM GROUP” button in “Load Management Group” menu. When “UPDATE DLM GROUP” button is clicked, master charging station starts slave discovery mode and automatically finds and lists slave charging stations in the list including master charging station itself as connector. © 2023 VESTEL - All rights reserved English - 76... - Page 78 If the selected connector is required to be prioritized over the other charging stations, you can set “VIP Charging” as enabled as shown in the image below. © 2023 VESTEL - All rights reserved English - 77...
- Page 79 Note that if the charging station has only one phase supply, then you just need to select correct phase number from the drop down menu. © 2023 VESTEL - All rights reserved English - 78...
- Page 80 Other parameters are just read only information from the connectors, which can be updated to the latest values by refreshing the configuration web interface. © 2023 VESTEL - All rights reserved English - 79...
-
Page 81: Making System Maintanence Of The Device
See to Firmware Update Screen Flow section. After the firmware update is finished, your charger will restart automatically. You can see the latest firmware version of your charger from webconfig UI in main page. © 2023 VESTEL - All rights reserved English - 80... -
Page 82: Firmware Update Screen Flow (With Display Models)
In CONFIGURATION AND BACKUP Page, you can backup of the sytem. If you want to restore you can click the Restore Config File button and upload the backup file. The system only accepts the .bak files. © 2023 VESTEL - All rights reserved English - 81... - Page 83 In ADMINISTRATION PASSWORD Page, you can change the web config’s login password. New password must contain at least 1 lowercase letter, 1 uppercase letter, 1 numeric character and minimum 6 characters. All spaces are mandatory. © 2023 VESTEL - All rights reserved English - 82...
- Page 84 From this page, the full session log and the charging summary of how long it has been charged with which RFID card can be downloaded and viewed in excel file format. © 2023 VESTEL - All rights reserved English - 83...
-
Page 85: Regulation Changes According To Smart Charging (Optional)
“Waiting for random delay, Charging will start at hh:mm” will be shown on the screen as below while OCPP mode and random delay mode are active sync of the time information from the server. © 2023 VESTEL - All rights reserved English - 84... - Page 86 Continue charging at the end of off-peak interval (Enabled / Disabled) vi. Continue charging without re-authentication after power loss (Enabled / Disabled) Off-peak charging function will be active if and only if device is connected to the central system. © 2023 VESTEL - All rights reserved English - 85...
- Page 87 For the unit in standalone mode the settings will be as above. For Standalone modes, off peak charging will be hidden because of the time sync issue. Randomised Delay Maximum Duration, can take values between 0 and 1800. © 2023 VESTEL - All rights reserved English - 86...
Need help?
Do you have a question about the EVC04 Series and is the answer not in the manual?
Questions and answers