Shimadzu GC-2014 Operation Manual
Gas chromatograph
Hide thumbs
Also See for GC-2014:
- Instruction manual (318 pages) ,
- Service manual (98 pages) ,
- Service manual (122 pages)

Subscribe to Our Youtube Channel
Related Manuals for Shimadzu GC-2014


Summary of Contents for Shimadzu GC-2014
- Page 1 221-79043C Jun. 2017 Gas Chromatograph GC-2014 Operation Manual Read this manual thoroughly before you use the product. Keep this manual for future reference.
- Page 2 This page is intentionally left blank.
-
Page 3: Introduction
• If the user or usage location changes, ensure that this Instruction Manual is always kept together with the product. • If this manual or a product warning label is lost or damaged, immediately contact your Shimadzu representative to request a replacement. -
Page 4: Gc Models And Supplied Equipment
Introduction GC Models and Supplied Equipment The supplied injection ports and detectors vary according to the model of the instrument. The accessories and types of columns that can be used will also vary depending on the GC model. The contents of this manual are organized according to the type of columns (packed column, capillary column), etc. Read this manual carefully before you start GC operation. -
Page 5: Safety Precautions
Safety Precautions Safety Precautions The GC-2014 Gas Chromatograph is a gas chromatography system used to perform qualitative and quantitative analysis. Be sure to observe the following precautions to ensure safe GC operation. Be sure to use the system only for analytical purposes. - Page 6 Safety Precautions WA R N I N G EXPLOSION Risk of explosion. If a large amount of hydrogen leaks into an inadequately-ventilated work area, it could cause an explosion. 1. Connect gas lines correctly. If the hydrogen line is accidentally connected to the air inlet, a large amount of hydrogen will be exhausted into the work area.
-
Page 7: Gas Usage Precautions
Safety Precautions Gas Usage Precautions The following information explains important points concerning the handling of high-pressure gas. Be sure to read all information carefully and follow all instructions. For information on gas types, purity, and supply pressures, refer to the GC Instruction Manual [2.6 Gas supply plumbing]. - Page 8 Safety Precautions WA R N I N G WHEN USING HYDROGEN GAS • Be sure the supply pressure to the flow controller does not exceed 500 Detectors (FID) kPa. If the flow controller should malfunction while operating at a pressure in excess of 500 kPa, a large amount of gas will overflow and flames will leak out from the FID detector, which may lead to a serious fire.
-
Page 9: Installation Location
Safety Precautions Installation Location To ensure safe operation, contact your Shimadzu representative if product installation, adjustment, or re- installation (after the product is moved) is required. WA R N I N G FIRE Be sure to keep flammable materials away from exhaust opening, since exhaust air is extremely hot. -
Page 10: In The Event Of An Emergency Or Power Outage
• If the GC-2014 unit’s power cable is connected to a power distribution board, turn OFF the board’s switch. • If the GC-2014 unit’s power cable is connected to the main power supply via a plug, unplug the cable. Power switch... -
Page 11: Precaution For Maintenance
Safety Precautions Precaution for Maintenance WA R N I N G HIGH TEMPERATURE RISK OF BURN - Be sure to confirm that the temperatures of all components (column oven, injection ports or detectors) are 40°C or less prior to starting maintenance. C A U T I O N SEIZE UP •... -
Page 12: Warranty
Shimadzu may not be able to provide identical replacement products. 3. Limitation of Liability: (1) In no event will Shimadzu be liable for any lost revenue, profit or data, or for special, indirect, consequential, incidental or punitive damages, however caused regardless of the theory of liability, arising out of or related to the use of or inability to use the product, even if Shimadzu has been advised of the possibility of such damage. -
Page 13: After-Sales Service And Availability Of Replacement
Note, however, that the availability of units or parts not manufactured by Shimadzu shall be determined by the relevant manufacturers. If Shimadzu receives notice of the discontinuation of units or parts, the necessary quantity for the above period is immediately calculated and secured. -
Page 14: Electromagnetic Compatibility
Electromagnetic Compatibility Electromagnetic Compatibility NOTE Descriptions of this section are only applied to the following models: 221-75025-44 GC-2014AF 221-75027-44 GC-2014AT 221-75026-44 GC-2014ATF 221-75028-44 GC-2014AF/SPL 221-75029-44 GC-2014ATF/SPL 221-75020-44 GC-2014AFsc 221-75019-44 GC-2014A 221-75021-44 GC-2014Asc This instrument complies with European standard EN61326-1: 2006, class A for electromagnetic interference (emission) and minimum requirement for electromagnetic susceptibility (immunity). -
Page 15: Table Of Contents
General 1.1 Features ....................... 2 1.2 Names of components ..................3 1.3 Specifications ..................... 10 Before using GC-2014… 2.1 Verifying package ....................14 2.2 Handling of instrument ..................16 Opening/closing column oven door ................16 Power ON/OFF ......................16 ... - Page 16 Contents Operation 3.1 Screen operation ....................20 Displaying main screen ....................20 Displaying sub screen ....................21 Switching PF menus ....................21 Moving cursor ......................22 Operation when you have multiple choices ..............23 Screen help ........................ 24 3.2 Analysis using packed column ................26 ...
- Page 17 Contents Maintenance and inspection 4.1 Parts for maintenance ..................80 If you are using packed column .................. 80 If you are using capillary column ................82 4.2 Inspection/maintenance intervals ............... 83 4.3 General maintenance procedures ..............84 If you are using packed column .................. 84 ...
- Page 18 Contents When trouble occurs… 5.1 Trouble shooting ....................108 5.2 Error messages (extract) ..................120 5.3 How to use CD-ROM ..................125 About the provided CD-ROM ..................125 How to use CD-ROM ....................125 To read the instruction manual in CD-ROM ............. 125 5.4 Key function list ....................126 Index Contents-...
-
Page 19: General
General Features................2 Names of components ............3 Specifications ..............10... -
Page 20: Features
Response to packed column analysis • You can use GC-14B standard parts, such as glass column, SUS column, just as they are. Cost performance • Its width being 400 mm (same as GC-14B), GC-2014 does not take up much space. -
Page 21: Names Of Components
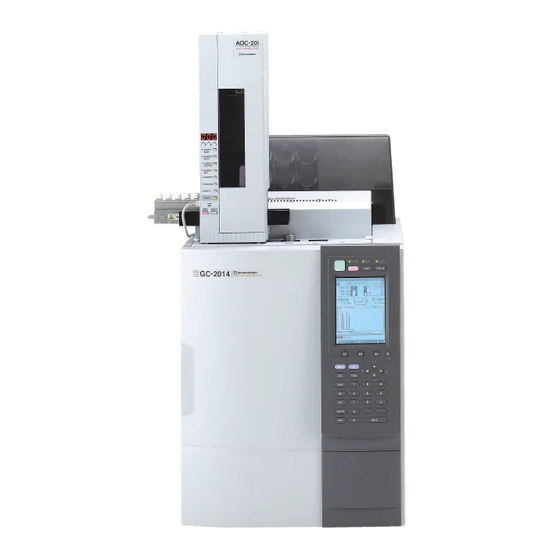
1.2 Names of components Names of components Overall view TCD zero-coarse-adjustment vent Flow controller cover control (TCD model only) (TCD model only) Flow controller INJ/DET cover Column oven door Power switch Operation panel Oven door lever Oven interior (Packed column mounting ports) Dual INJ Dual FID Example of the GC-2014ATF model... - Page 22 1.2 Names of components Oven interior (Capillary column mounting ports) Column mounting port Column mounting port (Injection port side) (Detector side) Column Column Graphite ferrule Graphite ferrule Column nut (with split) Column nut (without split) Inside of INJ/DET cover In case of GC-2014ATFSPL model Detector Detector...
- Page 23 Fiber optic cable connector Do not connect RS-232C and fiber optic cables simultaneously. 12-6 Start out/Ready in connector Inputs the Ready signal from the gas chromatograph and outputs the start signal to the gas chromatograph. This comes with AOC-20i for GC-2014.
- Page 24 1.2 Names of components Operation panel...
- Page 25 1.2 Names of components Symbol Name Function START key Starts analysis. STOP key Stops analysis. 240 320 dots, 16 lines LCD. Screen SET key Accesses frequently-used items of the GC in one screen. MONIT key Monitors the GC status and chromatograms. FUNC key Accesses less frequently used items.
- Page 26 1.2 Names of components Status indicators [STATUS] indicator [TEMP] indicator [FLOW] indicator On operation panel, there are 3 types of status indicators: [STATUS], [TEMP], [FLOW]. You will see the status of GC- 2014 by referring to the lamp colors and their status. ...
- Page 27 1.2 Names of components [FLOW] indicator: Indicates gas flow control status. Color Status Meaning Gas control is not performed. Green All gas control ports are ready. Blinking Pressure/flow rate program is running, it is on the sampling time, or the system is under high pressure during high pressure injection.
-
Page 28: Specifications
1.3 Specifications Specifications Column oven Item Specification 250 (W) 360 (H) 175 (D) Dimensions (mm) Volume (L) 15.8 Temperature range Room temperature + 10C to 400C 50C to 400C (When using liquid carbon dioxide gas.) Temperature accuracy ±1% (K) (Calibration possible at 0.01C) Temperature deviation Within 2C (on a 200 mm diameter column holder) - Page 29 1.3 Specifications Detector Item Specification Hydrogen flame ionization detector (FID) Temperature range Up to 400°C, 1C increments Overheat protection Programmable up to 420C Minimum detection 3pg C/s Dynamic range Jet material Fused quartz Time constant 4 ms to 2 s selectable ...
- Page 30 1.3 Specifications Item Specification Flow rate mode Range 0 to 1200 ml/min (When primary pressure is 980 kPa) Pressure setting 0.1 kPa increments Program ramps 7 ramps possible 400 to 400 ml/min/min, 0.01 ml/min/min increments Program rate Dual AFC (for packed INJ) Item Specification Flow rate mode...
-
Page 31: Before Using Gc-2014
Before using GC-2014… Verifying package............... 14 Handling of instrument ............16... -
Page 32: Verifying Package
One piece comes with the model without FID, and 3 pieces come with the models with FID. with FID ** Only for models For part numbers prefixed with "S", Shimadzu products are recommended. TCD accessories (only for models with TCD) Type Description Part No. - Page 33 Glass insert (3.2 mm) S221-14093 These are only for models with INJ for packed column (GC-2014 AFSPL, ATFSPL). These are only for model without INJ for packed column (GC-2014AFsc). One piece comes with the model without INJ for packed column (GC-2014AFsc), and 4 pieces come with the models with the INJ (GC-2014AFSPL, ATFSPL).
-
Page 34: Handling Of Instrument
2.2 Handling of instrument Handling of instrument Opening/closing column oven door To open the column oven door, pull the lever which exists on the left side middle of the door. To close the door, push around the left side middle of the door until the door is latched. -
Page 35: Removing Inj/Det Cover
2.2 Handling of instrument Removing INJ/DET cover To remove INJ/DET cover, remove knurled screws (2 places) (1), and lift the cover straight up (2). When installing, watch your fingers so as not to pinch between the cover and the instrument. ... - Page 36 2.2 Handling of instrument This page is intentionally left blank.
- Page 37 Operation Screen operation..............20 Analysis using packed column........... 26 Analysis using capillary column ......... 49 AOC (optional) setting............75 TCD setting ................ 77...
-
Page 38: Screen Operation
3.1 Screen operation Screen operation This section describes how to display main/sub screen, and basic screen operation. Displaying main screen Before analysis, display the main screens to specify parameters or monitor the GC status. Press any one of 10 keys shown in the figure. -
Page 39: Displaying Sub Screen
3.1 Screen operation Displaying sub screen Press one of PF keys ( corresponding to the PF menus. PF menus The respective main screen appears. When there are multiple pages in which to display PF menus, tabs will appear on the right of the PF menus. File LineConfg Customiz... -
Page 40: Moving Cursor
3.1 Screen operation Moving cursor When specifying a parameter, you need to move the cursor onto the point at which the parameter value is to be inserted. Example By pressing , move the cursor to the space in which the input value of the temperature monitor is to be entered. -
Page 41: Operation When You Have Multiple Choices
3.1 Screen operation Operation when you have multiple choices When moving cursor to a particular item, appears on the right of the item. This means that you have 2 or more selections for that item. Example Move the cursor onto the item for which you need to change the selection. -
Page 42: Screen Help
3.1 Screen operation Screen help By using screen help, you can display an explanation of the parameters which exist on the screen. Refer to this function when you find parameters of which you do not know the meaning. Press if you need a help explanation for the "Column"... - Page 43 3.1 Screen operation NOTE Sometimes, you can refer items which appear as "related terms" in help explanations. Press Press Move the cursor onto "log" in the description. Press [Display] (PF2 key). The screen help concerning "log" appears.
-
Page 44: Analysis Using Packed Column
The parts with (*) are optional, and not included in standard accessories. Refer to "4.1 Parts for maintenance" for the part numbers of optional parts. GC-2014 main body GC-2014 Operation manual GC-2014 Instruction manual (CD-ROM) Wrench (10 12), 2 pcs... - Page 45 3.2 Analysis using packed column If using SUS packed column SUS packed columns* Aluminum gaskets or silicon rubber gaskets Glass insert (3.2 mm) SUS column adaptor INJ side SUS column adaptor DET side (For TCD) (For other detectors) If using glass packed column Glass packed column* Glass insert (for insert method) Glass column joint...
-
Page 46: Installing Sus (Stainless Steel) Packed Column In Oven
C A U T I O N • GC-2014 is specified to use the dual packed INJ for the injection port and the dual FID or TCD for the detector. Therefore, prepare/install 2 set of septum, glass insert, column, etc. - Page 47 3.2 Analysis using packed column (3) Fix the nut by tightening one half turn with the wrench for glass insert nut. Install the column adaptor DET side to the detector. Insert the column adaptor DET side into the detector. NOTE There are 2 types of SUS column adaptor to be installed on detector: for TCD, and for the other detectors.
- Page 48 3.2 Analysis using packed column Fix the column adaptor DET side. Tighten the column adaptor nut by hand, and tighten one half turn with wrench. Install the SUS column to the adaptors. Attach gaskets to the connections between the SUS column and the adaptor (2 connections).
- Page 49 3.2 Analysis using packed column NOTE When using aluminum column gasket, attach 2 to 3 pieces and tighten the GM type nut by hand on top of them. Fix the SUS column. Using wrench, tighten and fix the connections between the SUS column and the adaptors (2 connections).
-
Page 50: Installing Septum To Injection Port
3.2 Analysis using packed column Installing septum to injection port Prepare septum. Tweezers Septum • After repeated analyses, septum slowly lose their gas-tightness, and that makes the carrier gas leak Injection easily. If that happens, the retention time gradually port inlet DO NOT contaminate the becomes longer due to the leakage, and this... - Page 51 3.2 Analysis using packed column Install a needle guide. Needle guide Use tweezers to hold the needle guide. Install a septum nut. (1) After installing the needle guide, attach the septum nut. (2) Tighten the septum nut clockwise as far as possible, and then loosen one-half turn.
-
Page 52: Installing Glass Packed Column In Oven
3.2 Analysis using packed column Installing glass packed column in oven Attach the box nuts to the glass column. Box nut Back ring Silicon O-ring NOTE If you analyze below 250C, use silicon rubber O-rings. Washer Spring Place the connection parts over both ends of the column. - Page 53 3.2 Analysis using packed column (2) Insert the glass insert into the column inlet end (the shorter end). (3) Insert both ends of the glass column into the mounting ports (to sample inlet/ detector), and tighten the box nuts by hand. (4) Fix the box nuts at the inlet /detector ends with wrench.
- Page 54 3.2 Analysis using packed column (2) Insert each end of the glass column to the respective mounting port (to inlet/detector), and tighten the box nuts by hand. (3) Fix the box nuts of the inlet /detector ends with wrench. NOTE If you have placed silicon O-ring, fix the box nuts loosely.
- Page 55 3.2 Analysis using packed column Column mounting location Rear side Mounting ports to detectors TCD column mounting ports Mounting ports to injection ports 50.8 mm 50.8 mm 50.8 mm Front side Dual INJ Dual FID Example of the GC-2014ATF model...
-
Page 56: Checking Gas Leak
3.2 Analysis using packed column Checking gas leak After installation of column, etc., has been completed, perform a leak check. If there is leakage in the flow line, you will not obtain high reproducibility in your analysis, and also can waste carrier gas. Prepare carrier gas. - Page 57 3.2 Analysis using packed column Start the GC. Press [Start GC] (PF1 key). After the unit starts, the carrier gas starts to flow. Check if there is leakage at connections. (1) Pressing , verify the carrier gas is flowing at your specified values. (2) Check for the leakage by applying leak-detecting fluid to the connections, or other methods.
-
Page 58: External Device Setup
3.2 Analysis using packed column Stop the GC. (1) Press (2) Press [Stop GC] (PF1 key). (3) Re-set "Start time" to the original value. Turn off the GC power. External device setup Specifying data processing devices. (1) Verify that a personal computer or a chromatopac is connected to the GC. -
Page 59: Setting For Analysis
3.2 Analysis using packed column Setting for analysis NOTE In the description of this section, you specify the injection port as dual packed INJ mode, and the detector as dual FID mode. If you use the GC as single INJ/single FID, change the corresponding part of the setting. If the computer is connected, specify the following on the computer. - Page 60 3.2 Analysis using packed column Specify injection port temperature. (1) Press (2) Specify the temperature. NOTE Normally, specify the temperature of injection port and detectors at approx. 20C higher than column oven temperature (or final temperature when executing temperature program.) Specify column oven temperature.
- Page 61 3.2 Analysis using packed column Start the GC. (1) Press When the GC is in "SYSTEM off" status, by pressing , the screen in the figure appears. (2) After specifying each parameter, press [Start GC] (PF1 key) to start the instrument. Specify detector gas flow rate.
- Page 62 NOTE About the ignition condition when Packed column is used GC-2014 has the automatic ignition function of FID. This ignition might not be ignited easily according to the flow rate condition of the carrier gas. When the flow rate of...
- Page 63 3.2 Analysis using packed column When the temperature and flow rate of each component are stabilized at their specified values, [STATUS] indicator illuminates green, and the preparation has been completed. At this time, by referring to the detector polarity setting, the GC displays "Monitor injection screen" that indicates which injection port (left or right) you should inject.
-
Page 64: Actual Analysis
3.2 Analysis using packed column Actual analysis When using an auto injector, refer to the following section, "AOC (optional) setting". If the computer is connected, specify the following on the computer. Perform Zero adjustment. When the baseline is shifted tremendously from its supposedly stabilized output, 0 V, you need to perform Zero adjustment before analysis. - Page 65 3.2 Analysis using packed column Inject a sample. Before injection, make sure that the chromatopac or the computer is ready for loading data. (For detailed information, refer to the appropriate instruction manual.) Take the sample with a microsyringe, verify the indication of the monitor injection screen, and then inject the sample to the injection port.
- Page 66 3.2 Analysis using packed column Stop the GC. (1) Press If you press when the GC status is [SYSTEM On], the screen in the right figure appears. (2) Press [Stop GC] (PF1 key) to stop the instrument. The GC stops by following the GC stop sequence.
-
Page 67: Analysis Using Capillary Column
The parts with (*) are optional, and not included in standard accessories. Refer to "4.1 Parts for maintenance" for the part numbers of optional parts. GC-2014 main body GC-2014 Operation manual GC-2014 Instruction manual (CD-ROM) Wrench (6 8) Wrench (10 ... - Page 68 3.3 Analysis using capillary column Capillary column* Column hanger Ferrule adjuster Injection port column nut Column nut (with split) Graphite ferrule (* for wide bore column optional) Aluminum gasket Silicon rubber septum Silica wool Glass insert (for split) Glass insert (for splitless) Fluoride rubber O-ring Graphite O-ring*...
- Page 69 3.3 Analysis using capillary column If you are using GC-2014AFsc Detector side adaptor In case of installing capillary column to dual FID Detector side adaptor (with purge) Graphite ferrule Detector side adaptor joint 1. Back ring 2. Washer 3.
- Page 70 3.3 Analysis using capillary column In case of installing capillary column to TCD Capillary column side Detector side adaptor (with purge) Column connection parts for TCD 1. TCD graphite ferrule 2. Sleeve 3. Spring Column connection 4. Washer parts for TCD 5.
-
Page 71: Installation To Injection Port
4 mm deep, even though you cannot expect reproducibility to be as high as in the case of vapor application, the reproducibility is not affected by the variation in how the solution flies. In split analysis using GC-2014, the latter position is recommended. - Page 72 3.3 Analysis using capillary column • The position of the silica wool shown on P.53 is for When the needle length is different: injection when using the AOC-20i auto injector. 43 mm, 50 mm. • In case of manual injection, the needle goes deeper into the insert than in the case of auto injection.
- Page 73 3.3 Analysis using capillary column Install glass insert nut. Tighten the glass insert nut using the wrench for glass insert nut. Prepare septum. Tweezers Septum • After repeated analyses, septum slowly lose their gas-tightness, and that makes the carrier gas leak Injection easily.
-
Page 74: Installing Adaptor
3.3 Analysis using capillary column Install needle guide. Hold the needle guide with tweezers. Install septum nut. NOTE Tighten the septum nut as far as possible by hand, and loosen one half turn. Installing adaptor In the case of GC-2014AFsc Install adaptor to detector. - Page 75 3.3 Analysis using capillary column In the case of GC-2014AFSPL, ATFSPL FID When performing capillary column analysis using the dual FID, supplying makeup gas from the dual packed INJ using the detector side adaptor (with purge) shown above may have an adverse effect on analysis, such as an increase in noise due to the effects of organic substances from the graphite ferrule or due to contamination inside the INJ, and prevent the system from fulfilling its specifications.
- Page 76 3.3 Analysis using capillary column In case of GC-2014ATFSPL TCD Install the Detector adaptor (with purge) to one of the TCD column mounting ports. (1) Fix the detector side adaptor to the detector using the TCD graphite ferrule and column connection parts for TCD.
-
Page 77: Installing Capillary Column In Oven
3.3 Analysis using capillary column Installing capillary column in oven Attach graphite ferrule to injection port end of Ferrule adjuster column. (1) After slipping a box nut over the injection port end Graphite ferrule of capillary column, slip the graphite ferrule. Box nut (2) Using the ferrule adjuster, fix the graphite ferrule temporarily. - Page 78 3.3 Analysis using capillary column Attach graphite ferrule to detector end of Injection port end Detector end column. 34 mm (1) Using the ferrule adjuster for FID, fix the graphite ferrule in the same procedure as in the case of the injector port end.
- Page 79 3.3 Analysis using capillary column Length from column end to ferrule Capillary jet Standard jet P/N:S221-70162-92 P/N:S221-70162-95 Internal diameter of glass tube: 0.6 mm Internal diameter of glass tube: 1.2 mm Adapter No mark P mark Detector side adapter (without purge) P/N:S221-33193-91 99 mm 82 to 83 mm...
- Page 80 3.3 Analysis using capillary column Install column to column hanger. Open the column oven door and install the column hanger. Then hang the capillary column there. Install column. (1) Insert the column end to the mounting port (injection port inlet) from inside oven. (2) Tighten the box nut (injection port side) by hand, and fix it by tightening one half turn with wrench.
-
Page 81: Checking Gas Leak
3.3 Analysis using capillary column Checking gas leak • After installation of column, etc., has been completed, perform a leak check. If there is leakage in the flow line, you will not obtain high reproducibility in your analysis, and also can waste carrier gas. •... - Page 82 3.3 Analysis using capillary column Start the GC. Press [Start GC] (PF1 key). Check if there is leakage at connections. Check for the leakage by applying leak-detecting fluid to the connections, or other methods. NOTE To determine where the gas is leaking, use a leak detector.
-
Page 83: External Device Setup
3.3 Analysis using capillary column External device setup Specifying data processing devices. (1) Verify that a personal computer or a chromatopac is connected to the GC. The computer is connected to the RS-232C connector on the back of the instrument. The chromatopac connects to the detector output signal terminal with the chromatopac cable. -
Page 84: Setting For Analysis
3.3 Analysis using capillary column Setting for analysis Specify GC configuration. NOTE Perform this operation only when you are using GC- 2014 AFSPL, ATFSPL. You can use the dual AFC connected to the dual packed INJ as AMC for makeup gas. (Left side is AMC.L, and right side is AMC.R) (1) Press key. - Page 85 3.3 Analysis using capillary column Specify column and flow rate. (1) Press [Column] (PF1 key). Specify the following on [Column] screen. • Column i.d. (internal diameter) • Column length • Film thickness (2) Press key. Specify the following parameters on the [FLOW] key main screen.
- Page 86 3.3 Analysis using capillary column (3) Press [Purge] (PF3 key). Specify the purge flow rate on the [Purge] screen. Specify the temperature of injection port. (1) Press key. (2) Specify the injection port temperature on the [INJ] key main screen. NOTE Normally, specify injection port temperature approx.
- Page 87 When optional APC is installed, press [Det Gas](PF2 key) on the [DET] key main screen to display [Detector Gas] setting screen. In case of GC-2014 AFSPL, ATFSPL FID (1) Open the flow controller cover. (2) Specify the gas setting by adjusting each control on the pressure governor of Hydrogen and Air.
- Page 88 3.3 Analysis using capillary column Specify the setting of column temperature and temperature program. (1) Press key. (2) Specify the initial temperature and temperature program. NOTE Specify without exceeding the set temperature of detector and the column allowable temperature limit. Start the GC.
- Page 89 3.3 Analysis using capillary column Specify detector setting. NOTE Usually, leave "Filter Time Constant" as the default value (200 ms). If you need to improve S/N ratio, modify this parameter. If detector is the FID (1) Press (2) Move the cursor to the top, and select [On] on the detector control.
-
Page 90: Actual Analysis
3.3 Analysis using capillary column Actual analysis In case of using an auto injector, refer to the following section, "AOC (optional) setting". NOTE If the computer is connected, specify the following on the computer. Perform Zero adjustment. The following describes performing zero-adjustment on the GC. - Page 91 3.3 Analysis using capillary column Inject a sample. Before injection, make sure that the chromatopac or the computer is ready for loading data. (For detailed information, refer to the appropriate instruction manual.) Take the sample with a microsyringe, verify the indication of the monitor injection screen, and then inject the sample to the injection port.
- Page 92 3.3 Analysis using capillary column Stop the GC. (1) Press If you press when the GC status is [SYSTEM On], the screen in the right figure appears. (2) Press [Stop GC] (PF1 key) to stop the instrument. The GC stops by following the GC stop sequence.
-
Page 93: Aoc (Optional) Setting
3.4 AOC (optional) setting AOC (optional) setting If a computer is connected to the GC, specify the following setting on the computer. If not, specify on the GC. Specifying AOC For detailed instruction, refer to the auto injector, AOC-20i instruction manual, or the auto sampler, AOC-20s instruction Auto injector manual. -
Page 94: Starting Aoc
3.4 AOC (optional) setting (2) Press [Line Confg] (PF2 key). (3) Set AOC1 to "LINE". (4) Press key. If the AOC is selected as optional device, the screen in the right figure appears. (5) Specify the AOC parameter setting. Starting AOC If the computer is connected, you can start analyzing with AOC and GC by clicking [Start] on the computer. -
Page 95: Tcd Setting
Set the temperature of block to keep the heat of the TCD cell. If temperature is displayed in only one field, it means that "INSTALLATION (PIPING)" is not specified properly. Modify it by referring to GC-2014 instruction manual (included in accessory CD-ROM), section 16.7.4. SIGNAL POLARITY Selection: +/, Default: + Set to "+"... -
Page 96: Zero Point Adjustment For Tcd
3.5 TCD setting C A U T I O N If the current is turned on before the carrier gas has completely replaced the air, the filament can be deteriorated or blown due to oxidation. To start gas chromatograph, first ensure that the current is set to 0 mA before pressing [GC Start] from the key screen. -
Page 97: Maintenance And Inspection
Maintenance and inspection Parts for maintenance............80 Inspection/maintenance intervals........83 General maintenance procedures........84 Septum ................87 O-ring for glass insert............89 Glass insert ................ 91 Graphite ferrule ..............94 Packed column ..............96 Capillary column ..............97 4.10 Flow controller (SPL, WBI only) ......... 98 4.11 FID ................... -
Page 98: Parts For Maintenance
Parts for maintenance If you are using packed column The following is the list of maintenance parts and their part numbers. All these parts are consumables. For part numbers prefixed with "S", Shimadzu products are recommended. Septum Name Part No. - Page 99 4.1 Parts for maintenance Nut and adaptor Name Part No. Purpose Glass column joint S221-15561-91 Glass column installation SUS column adaptor INJ side S221-14087-91 For SUS column connection, injection port side For SUS column connection, detector side SUS column adaptor DET side S221-08882-91 (excluding TCD) SUS column adaptor for TCD...
-
Page 100: If You Are Using Capillary Column
4.1 Parts for maintenance If you are using capillary column The following is the list of maintenance parts and their part numbers. All these parts are consumables. For part numbers prefixed with "S", Shimadzu products are recommended. Septum Name Part No. -
Page 101: Inspection/Maintenance Intervals
4.2 Inspection/maintenance intervals Inspection/maintenance intervals WA R N I N G • RISK OF BURNSDO NOT perform maintenance until the temperature of component you are going to work on (column oven, injection port, or detector) drops below 40C. • When using reagents such as organic solvents or acids, work in a well-ventilated area using a drafter or other ventilation equipment. -
Page 102: General Maintenance Procedures
4.3 General maintenance procedures General maintenance procedures For inspection/maintenance of each component, ALWAYS perform (1) preparation and (2) restart of the instrument. If you are using packed column Instrument preparation If the GC is operating, press , and [Stop GC] (PF1 key). The temperature of components starts to drop. - Page 103 4.3 General maintenance procedures Restarting after maintenance • To restart the GC after maintenance, first, re-fix the INJ/DET cover in position, press , and press [On] (PF3 key). Then, press , and [Start GC] (PF1 key). When each component is heated to the specified temperature and also the STATUS indicator illuminates green, you can start analysis.
-
Page 104: If You Are Using Capillary Column
4.3 General maintenance procedures If you are using capillary column Instrument preparation • For inspection/maintenance of septum, O-ring for glass insert, and glass insert If the GC is operating, press , and [Maint INJ] (PF2 key). Injection port and column oven starts to cool, and when their temperature drops below 40C, then the carrier gas stops automatically. -
Page 105: Septum
4.4 Septum Septum If you are using packed column Septum conditioning In high sensitivity analysis, impurities from septum may be detected as ghost peaks. In this case, condition the septum as described below. (1) Soak the septum in hexane for 10 to 15 hours. When absorbing hexane the septum swells approximately twice its original volume. -
Page 106: If You Are Using Capillary Column
4.4 Septum If you are using capillary column Septum conditioning In high sensitivity analysis, impurities from septum may be detected as ghost peaks. In that case, condition the septum as described below. (1) Soak the septum in hexane for 10 to 15 hours. When absorbing hexane the septum swells to approximately twice its original volume. -
Page 107: O-Ring For Glass Insert
4.5 O-ring for glass insert O-ring for glass insert If you are using capillary column Purpose of inspection Replace O-ring each time when replacing glass insert to prevent carrier gas leaks. C A U T I O N Handle graphite O-ring with strict care to avoid cracks or deformation. - Page 108 4.5 O-ring for glass insert (11) Check if the total flow is less than 2 ml/min. If it is above 2 ml/min, it shows that there is some leakage in the flow line. (12) On the [FLOW] key main screen, press [On/Off] (PF3 key) to turn off the AFC control. (13) Check if the pressure does not decrease 15 kPa or more in 1 hour, if using fluoride rubber O-ring.
-
Page 109: Glass Insert
4.6 Glass insert Glass insert If you are using packed column Remove glass insert by the following procedure. [In case of SUS packed column] (1) Loosen the nut with wrench, and remove the column from SUS column adaptor. (2) Loosen the nut of SUS column adaptor INJ side. (3) While carefully pulling out the SUS column adaptor INJ side, take out the glass insert inserted in the injection port. -
Page 110: If You Are Using Capillary Column
4.6 Glass insert Cleansing glass insert Cleansing procedures (1) Removing septum fragments Septum fragments dropped on the insert can degrade the analysis reproducibility, and can be the cause of ghost peaks. ALWAYS remove the septum fragments. (2) Removing stains adhered to the inside of the glass insert Wipe with gauze soaked in organic solvent (e.g. - Page 111 4.6 Glass insert How to cleanse glass insert When cleansing glass insert with solvent, ALWAYS remove O-ring. After cleansing, attach new O-ring. (1) Removing septum fragments on silica wool Septum fragments dropped on silica wool can degrade the analysis reproducibility and can be the cause of ghost peaks.
-
Page 112: Graphite Ferrule
4.7 Graphite ferrule Graphite ferrule If you are using packed column Purpose of inspection (1) Checking for carrier gas leaks If carrier gas leaks due to graphite deterioration, it causes poor reproducibility. Check to see if graphite has deteriorated or not. If it has, replace with a new graphite ferrule. Indicates deterioration (no gap) New graphite ferrule Graphite ferrule to be replaced... -
Page 113: If You Are Using Capillary Column
4.7 Graphite ferrule If you are using capillary column Purpose of inspection (1) Checking for carrier gas leaks If carrier gas leaks due to graphite deterioration, it may cause poor reproducibility. Check to see if graphite has deteriorated or not. If it has, replace with a new graphite ferrule. Indicates deterioration (no gap) New graphite ferrule Graphite ferrule to be replaced... -
Page 114: Packed Column
4.8 Packed column Packed column Conditioning packed column In order to shorten stable time, improve separation capability, and perform high-sensitivity analysis, you always have to condition your columns. Sometimes columns can contain volatile impurities or solvent, and if you use them without conditioning, it causes quite high drift of baseline and retention time. -
Page 115: Capillary Column
4.9 Capillary column Capillary column Conditioning capillary column To condition capillary columns, use the following procedures. (1) Carrier gas setting Apply the analysis flow rate. However, by lowering the split ratio, you can conserve carrier gas. (2) Column oven temperature setting Specify the temperature approx. -
Page 116: Flow Controller (Spl, Wbi Only)
4.10 Flow controller (SPL, WBI only) 4.10 Flow controller (SPL, WBI only) For split/splitless analysis, there are 3 places to be inspected: molecular sieve filter and 2 traps (PURGE and SPLIT). For WBI analysis, 2 places: molecular sieve filter and 1 trap (PURGE). Name Parts No. -
Page 117: Maintenance Intervals
4.10 Flow controller (SPL, WBI only) 4.10.1 Maintenance intervals Replace 2 traps (PURGE and SPLIT) periodically. The interval is usually 6 months. However, if you often analyze high boiling point samples, or samples which are solid at room temperature, you need to replace more frequently. Also, inspection/maintenance is required in the following cases. -
Page 118: Trap Replacement
4.10 Flow controller (SPL, WBI only) Trap replacement Replace traps by the following procedures. (1) Stop carrier gas supply. (2) Remove INJ/DET cover. (3) To avoid error, replace the traps one by one. (4) Remove the blind from a new trap. This blind has been used for sealing the inside of the trap. -
Page 119: Fid
4.11 FID 4.11 WA R N I N G Before inspecting the FID, ALWAYS make sure the following are observed. 1. Stop supplying hydrogen gas to extinguish the hydrogen flame. 2. Let the detector cool until its temperature drops below 40C. 3. -
Page 120: Maintenance Procedures
4.11 FID 4.11.2 Maintenance procedures Removing/installing igniter The inspection/maintenance of igniter is described in the following. Purpose of inspection • Check whether the filament of igniter is cut. If it is cut, replace the igniter with a new one. Loosen the igniter mounting screw. -
Page 121: Fid Jet
4.11 FID FID jet The following describes inspection/maintenance for the FID jet. Purpose of inspection • Check if jet is not clogged. If the jet tip is clogged, it may cause ignition malfunction, or you may not even obtain peaks. Clean it by inserting a thin, long stick. -
Page 122: Removing Fid High Voltage Unit
4.11 FID Remove the collector and its cramp by lifting FID collector Igniter Removing FID high voltage unit Remove the fix nut for FID high voltage unit. Pull out the high voltage cable together with the fix nut. -
Page 123: Removing Fid Jet
4.11 FID Removing FID jet Remove FID jet using the hex nut screwdriver. Hex nut screwdriver (for FID jet) (Optional, P/N S670-18800) Installing FID jet Using the hex nut screwdriver, install the FID jet by turning until it completely fixes. Hex nut screwdriver •... - Page 124 4.11 FID This page is intentionally left blank.
- Page 125 When trouble occurs… Trouble shooting .............. 108 Error messages (extract) ..........120 How to use CD-ROM ............125 Key function list..............126...
-
Page 126: Trouble Shooting
5.1 Trouble shooting Trouble shooting If you find the following problems, perform inspection/maintenance. Problem Possible cause Solution Reference Poor retention time Septum Condition septum. Refer to "4.4 reproducibility Septum" P. The position of silica wool in Re-pack silica wool. Refer to "4.6 Glass glass insert insert"... - Page 127 Peaks are negative. (In case of dual FID or TCD) Linear range is extremely narrow. (6) GC display Battery voltage error is shown. When the power supply of the GC is turned on, "GC-2014 Boot Loader (Boot menu)" will be displayed.
- Page 128 Refer to [1.3 Gas tighten the leaking section. supply plumbing] in Replace gaskets or septa. Instruction Manual. If pipes or connections of the GC themselves are damaged, they need to be replaced. Stop using the GC, and contact your Shimadzu representative.
- Page 129 5.1 Trouble shooting (2) Temperature control Problem Possible cause Solution Reference The temperature does The GC has not started yet. Press [SYSTEM] key, and press not increase or reach (In this status, if [SYSTEM] key [Start GC] on PF menu. the set value.
- Page 130 5.1 Trouble shooting (3) Detector (FID) WA R N I N G If you finally cannot ignite the FID, ALWAYS shut off Hydrogen gas supply and maintenance/inspect the instrument for safety. Problem Possible cause Solution Reference Cannot ignite or flame Column is not connected.
- Page 131 Clean dust on the jet by spraying air from above. *1 If the jet is damaged; it needs to be replaced. If the collector is contaminated with white powder, it needs to be cleaned. In both cases, contact your Shimadzu representative.
- Page 132 *1 If applying current to the filament with air still remaining in the TCD cell, you may oxidize or blow out the filament, which makes the detector impossible to be zero adjusted. The damaged cell must be replaced. Contact your Shimadzu representative.
- Page 133 5.1 Trouble shooting (5) Chromatogram and data Problem Possible cause Solution Reference No peak or extremely The Channel setting of detector Specify the correct Ch. number small peaks signal output does not (In this case, peaks correspond to the Ch. Number may not be able to be to which the signal cable is detected because of...
- Page 134 5.1 Trouble shooting Problem Possible cause Solution Reference No peak or extremely [In case the detector is TCD] small peaks Range is not "1". Set the range to "1". (In this case, peaks may not be able to be Current value is set too low. Increase the current.
- Page 135 5.1 Trouble shooting Problem Possible cause Solution Reference Presence of ghost Septum purge is not being Supply septum purge. peaks supplied. Peaks of previous analysis Increase column oven appear. temperature to the analysis maximum temperature to eliminate the sample remaining inside of column.
- Page 136 5.1 Trouble shooting Problem Possible cause Solution Reference Poor retention time The carrier gas cylinder is Replace the gas cylinder which reproducibility almost empty, and its supply has at least 3 MPa of pressure. pressure changes greatly with time. *2 Carrier gas flow rate is Tighten leaking connections.
- Page 137 (6) GC display (In cases where in the setting screen is reinitialized each time power is turned on) For GC-2014, various analysis conditions are stored, and during installation environmental settings are set by our field engineer and stored in the GC’s memory. When the power of the GC main unit is turned off, these parameters are backed up in the memory by the built-in battery (CPU battery).
-
Page 138: Error Messages (Extract)
GC may be broken down. You cannot use the instrument as it is. Turn off the power of the GC, and contact your Shimadzu representative. (2) Errors due to improper input Input of a value out of range... - Page 139 Remove these causes and select "Reset Error" to recover the system. In case the system is not recovered even though you have tried quite a few times, and you don't know the reason, contact your Shimadzu representative. Flame error in detector Message Meaning...
- Page 140 5.2 Error messages (extract) FPD Message Meaning Solution DET #n FPD Battery error The battery of FPD is abnormal. Refer to the FPD detector instruction (n = 1 to 4) manual for detail. (5) Other errors Message Meaning Solution Settings were changed This appears when the set value has been changed during the execution...
- Page 141 (7) Warning messages for Maintenance Message Meaning Solution Fan use time is over GC-2014 has the function of warning One of the following warning COL sensor use time is over of the typical time for replacement of messages appears when the use INJ1 sensor use time is over the following parts.
- Page 142 5.2 Error messages (extract) Use time (Replacement time) Fan:61320 hours (based on 8 hours per day:approx. 21 years, 24 hours: approx. 7 years) Sensor: 26280 hours (based on 8 hours per day:approx. 9 years, 24 hours: approx. 3 years; at 300 C) NOTE The replacement time shows the number of years at which a replacement is recommended.
-
Page 143: How To Use Cd-Rom
Please note that the PDF files of the GC-2014 include blank pages intentionally. These pages are for adjusting the first page of chapter to come to the right face on duplex print. -
Page 144: Key Function List
5.4 Key function list Key function list PF menu Description Start GC, Stop GC, File, Clean Up, Start Seq, • Use to start/stop the GC. On sub screen, you can specify Stop Seq, Maint INJ, Anal file management, clean up, injection port maintenance, etc. - Page 145 5.4 Key function list PF menu Description 1. Time Scheduler • You can automate the GC key operation by setting a day/ week time schedule. 2. Batch Schedule • Use this to change the analysis parameters in the middle of analysis, for example, in the case of using AOC. 3.
- Page 146 5.4 Key function list This page is intentionally left blank.
- Page 147 Index Index FID jet ..............103 Filament .............. 102 Filter position ............98 Adaptor ............28 Flow controller ............3 Amount (Silica wool) ..........53 Flow controller cover ........3 AOC power supply ..........5 [FLOW] indicator ............. 9 Auto injector ............75 Flow rate ............... 67 Auto sampler ............75 Fluoride rubber O-ring ..........
- Page 148 Index On column method ..........35 Zero adjustment ..........46 Open door lever ............. 3 Optional device ............ 75 Symbols (Cursor key) ........7 (Toggle key) ..........7 PF key ..............7 Position (Silica wool) ..........53 Power ..............16 Power cable ............VIII Power switch ............
Need help?
Do you have a question about the GC-2014 and is the answer not in the manual?
Questions and answers