
Subscribe to Our Youtube Channel
Related Manuals for Vivo MOUNT-KB05HT


Summary of Contents for Vivo MOUNT-KB05HT
- Page 1 Clamp-on Tilting Keyboard Tray with Height Adjustment SKU: MOUNT-KB05HT Instruction Manual Assembly Video & Product Info www.vivo-us.com/products/mount-kb05ht...
- Page 2 If you do not understand these directions, or if you have any doubts about the safety of the installation, please contact our product support team at 309-278-5303 or help@vivo-us.com for further assistance. Check carefully to make sure there are no missing or defective parts. Improper installation may cause damage or serious injury. Do not use this product for any purpose that is not explicitly specified in this manual.
- Page 3 Package Contents A (x1) B (x1) C (x2) D (x1) Keyboard Tray Keyboard Stop Support Bracket Clamp Set E (x1) F (x1) G (x2) Tilting Bracket Set Wrist Pad Clamp Pad Included Hardware & Tools S-A (x6) S-B (x8) S-C (x6) S-D (x5) T-A (x1) T-B (x1)
-
Page 4: Assembly Steps
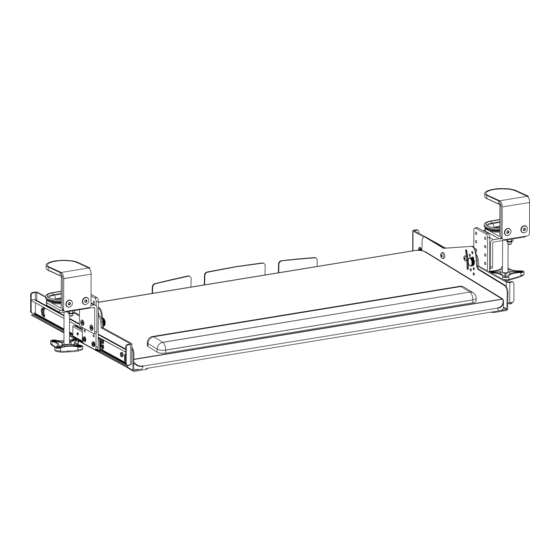
ASSEMBLY STEPS STEP 1 Flip Keyboard Tray (A) upside down and install Keyboard Stop (B) into predrilled holes using M5x12mm Flat Head Screws (S-D) and a Phillips screwdriver. S-D (x3) STEP 2 Secure Tilting Bracket Set (E) to the outer edges of Keyboard Tray (A) using M5x12mm Round Head Screws (S-B) and a Phillips screwdriver. - Page 5 STEP 3 Assemble Support Brackets (C) onto the Tilting Bracket Set (E) slider rails using M4x7mm Screws (S-A) and a Phillips screwdriver. Ensure the countersunk holes on Support Brackets (C) are facing outward, as shown below. S-A (x4) NOTE: Countersunk holes should be facing outward.
- Page 6 STEP 4 Assemble Clamp Set to Support Brackets at desired height using M5x9mm Flat Head ScrewScrews . Tighten with a Phillips screwdriver. (S-C) 5 Height Settings T-A (x1) S-C (x4) Highest Lowest Setting Setting Adjusting Clamp for Greater Desktop Thickness Clamps are pre-assembled for compatibility with desktops 0-65mm (2.56”) thick.
- Page 7 STEP 5 Place the assembled keyboard mount on the edge of the desk, then slide Clamp Pads (G) on the underside of each Clamp (D). Tighten clamps fully to secure to desktop. Remove the protective film on Wrist Pad (F) and place in desired location on Keyboard Tray (A). Note: To ensure the keyboard tray is leveled correctly, do not over-tighten clamps.
- Page 8 LAST UPDATED: 11/01/2023 REV1 v1.0 Need Help? Get In Touch Monday-Friday from 7:00am-7:00pm CST help@vivo-us.com www.vivo-us.com 309-278-5303 Chat live with an agent! FOR MORE GREAT VIVO PRODUCTS, CHECK OUT OUR WEBSITE AT: WWW.VIVO-US.COM VIVO-us @vivo_us...
Need help?
Do you have a question about the MOUNT-KB05HT and is the answer not in the manual?
Questions and answers