Advertisement
- 1 Structure Diagram
- 2 Quick Setup
- 3 GPS Function
- 4 Dash Camera Mode
- 5 Features You May Concern
- 6 Working Indicator Light
- 7 Menu Introduction
- 8 Specifications
- 9 Troubleshooting
- 10 Packaging List
- 11 Customer Service
- 12 Documents / Resources
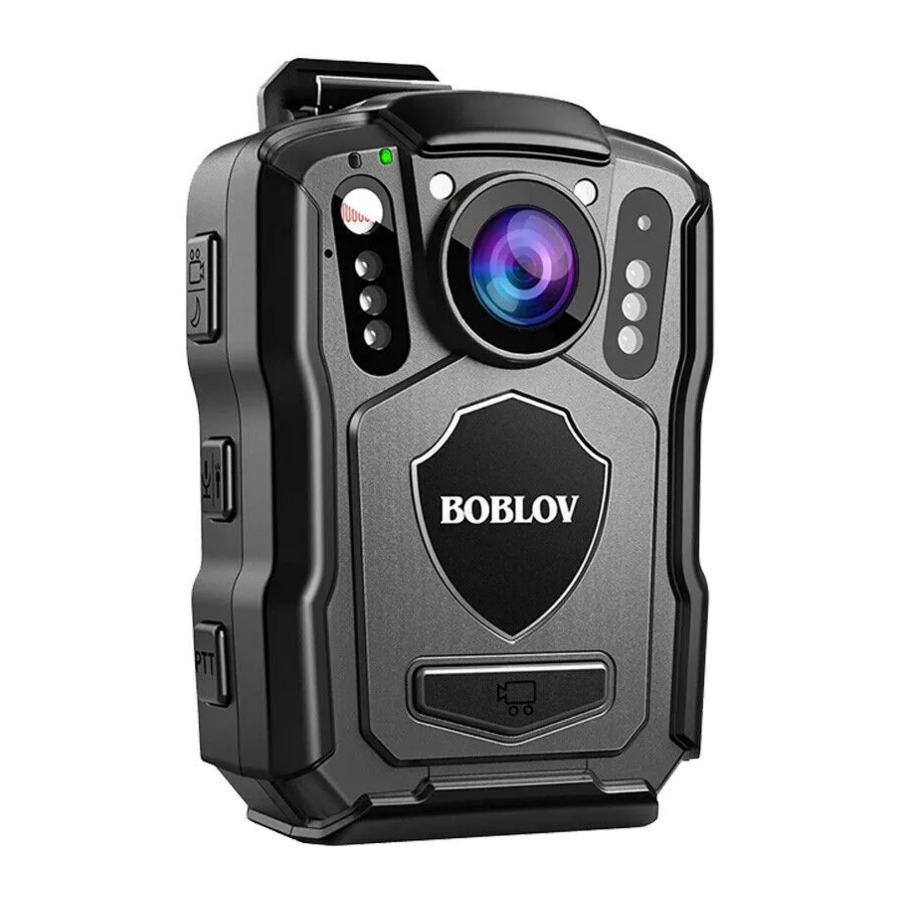
Structure Diagram


- Working Indicator Light
![]()
- Working Indicator Light
![]()
- Image Sensor
- Photo/lR Button
- Six Infrared Lights
- Audio/White Light Button
- Red-Blue Warning Active Button
- White Light
- Red Blue Flashing Light
- Laser Light
- Video Button
- Charging Port & Reset Hole
- Power Button
- Speaker Output
- Down/Playback Button
- Return Button
- Up/Video Mark Button
- Menu/OK Button


Quick Setup
Charge the Device
Note:
If you do not use the camera, please charge it every three months; otherwise, the battery will gradually degrade.
Please charge the camera completely when first getting it or before using it, using a standard USB cable and a 5Vdc/1A or 5Vdc/2A charger plug in a power socket. The M5 body camera will take 4-5 hours to fully charge with a 5Vdc/2A charger plug and 8 hours with a 5Vdc/1A charger plug.

| Charging Time | 4-6Hours |
| Charging Indicator | Blue Steady |
| Fully Charged | Blue Off |
Power On/Off
Long press the power button  to boot. After the camera is powered on, short press the button to turn the screen off/on, or long press it to power off the camera.
Screen Protection/Power Saving
In standby mode, short press the menu button  (the menu button is located at bottom on back of camera) to enter the menu setting. Turns on the "LCD Auto Off" option in the menu. If without any operation after 5min after powering on, the screen will turn off. Tap any button to light up the screen/activate the camera.
If without any operation after 10min after powering on, the camera will auto shut off. "Auto Power Off' option can be set to 1min/3min/5min/10min in the menu.
Video Recording
Normal Video Recording
In standby, short press video button  (the video button is located on the front of the camera, below the BOBLOV logo) to record video, and short press it again to stop recording and save.
One Key to Video Recording
The camera supports one key to record videos: in powering off status, long pressing the video button could activate the camera and start video recording, short press it again to stop recording and save.
Video Locked
During video recording, short press the up/video mark  button (the up/video button is located at bottom on back of camera), and a yellow triangle exclamation mark appears in the upper right corner of the screen (short press the button again releases/cancels the lock and the mark disappears); then short press the video button again to save this locked video file. The locked video file name starts with "IMP". And the normal video file name starts with "NOR"
Please check the picture below:

Take Photo
Single shot
In standby mode, short press the photo button  (the photo button is located on the side of the camera) once to take one photo, and save it automatically.
Snapshot
During video recording, short press the photo button to get a snapshot. Every press will take one photo.
Photo Burst Mode
Capture several photos in one press button. If you set "Photo Burst Mode" option to "3P/5P/10P/20P' in menu, short press the photo button once, and take several photos at one press.
Audio Recording
Normal Audio Recording
This model is able to record separate audio files. In standby, short press audio button  (the audio button is located on the side of the camera) to record audio, and short press it again to stop recording and save.
One Key to Audio Recording
The camera support one key to record audios: in powering off status, long pressing the audio button could activate the camera and start audio recording, short press it again to stop recording and save.
Night Vision
The infrared night vision of camera default is "Manual". Long press of the photo/lR button turns on/off the night vision in standby or video mode.
If you want the camera night vision to be activated auto please go to menu setting, and set "IR Filter" to "Auto". Then the camera can be switched to the night vision mode according to the brightness of the environment.
Playback Files on the Device
When the camera is powered on, short press the down/playback button  (the down/playback button is located at bottom on back of camera) to enter Playback page, and you could mange files here.
Short press  button to select a file list and confirm the file to play.
Short press the return button  (the return button is located at bottom on back of camera) to return to the previous step or exist the Playback Files Page.

File Deletion
Enter the Playback Files Page, you could delete the files as you desired.
In the file list, short press button to select the file you want to delete, then long press OK button  to get the delete option, short to select an option and confirm.

Note: the locked / marked videos can't be deleted on the camera itself.
Connect to Computer
Connect the camera to the computer by the USB cable attached.
Then enter USB disk mode, the camera display the characters of "PID: 000000 DID: 8888888"
In this state, the camera can't be taking videos or other operations.
A new removable disk of the camera will show on your computer.
*If turn on "Password Protection" option in the menu, you need to input the password you set first, (the default password is 000000) then could retrieve or delete the files in the computer.
Reset
If the camera locks up or stops working, you could do a reset by poking the reset button with a pin or thimble, as shown in the diagram below (be careful not to use excessive force). The camera will auto shut down after the reset and can long press the power button  to turn it on.

GPS Function
(Optional)
How to Enable GPS Option
If turn on the "GPS" option during video recording, the route information will be collected, and using our provided GPS player could playback the video with the track information.
Short press the menu button  to enter menu.
Short press button to get the "GPS' option and turn it to "On" and confirm.
Please check the picture below:
Return to the previous screen after selecting the "GPS" option in the menu, and a white GPS icon appear on the top right corner of the screen.
(As illustrated in Diagram 1 below)
Go to an open area and successfully locate the GPS.

Diagram 1
The red GPS icon will turn to green.
(As illustrated in Diagram 2 below)
Take a video, and GPS data will be collected.

Diagram 2
Note:
When the GPS icon is white, it means no signal is acquired; when the icon turns to green, it means signal is acquired.
If the GPS is successfully located, the screen will look like this:

Playback GPS Videos on Computer
The GPS player only supports the Windows computer.
Please download the GPS player provided by the manufacturer and playback the videos on it. There are two methods to download the GPS Player.
Method 1:
To playback the video with GPS, please search for boblov.com/pages/download and download the "M5 GPS Player - GXPlayer" software provided by the manufacturer to the computer desktop. Please check the below picture:

Method 2:
Or connecting the M5 body camera to the computer, enter the camera U disk find the "GPS Player Download.txt", then copy the link in this file to download the GXPlayer software to your desktop. Please check the below pictures:

Then follow the below steps to use the GPS Player:
- After download the software on the computer, double click the GPS Player software Installer Package to install it.
- After finish the installation, you will get a "GXPlayer" shortcut on your computer desktop.
- Double click the "GXPlayer" shortcut could enter the player. Please check picture below of "GXPlayer" shortcut:
![]()

Note: If you are alerted by Google Drive that 'the file has a virus, download it yes or no", dont worry, it is only because your computer monitors an unfamiliar file. The file has no problem.
GPS Player Interface Introduction

- To play previous video
- Pause/PIay the video
- To play next video
- Stop Playing Button
- Click to choose the video file on your computer to playback
- Screenshot
- Mufti-Lens Switch
(This model doesnt support this function) - Image Rotation
- File List, double click the file in this part could replay it
- Moving Speed
- Compass
GPS Player Setting Page
Click the setting icon  in the top right corner, here you can set the language and choose the Google Map to playback the video file.
When playing, please click the Stop Playing Button to stop playing first, otherwise the map can't be changed.
Please check the below pictures:

Stop Playing Button

Setting Page
Dash Camera Mode
Dash Cam Mode means the camera will start recording auto as long as you connect the camera to the vehicle s 12Vdc power port using the 12-24V input and 5V-1A/2A output port vehicle charger and start the engine. If you want the camera to be a dash cam, on standby mode, enter the menu setting to set the "Dash Camera Mode" to "On" and save the change.
Features You May Concern
What is Stealth Mode
If you enable "Stealth Mode" option in the menu setting, the camera will make hidden recording. It has no indicator, no sound prompt.
Camera Password
There is "Password Protection" option in the menu setting.
If want to turn it on, you need to insert the default password: 000000 first then select "On" option and confirm.
If you forget the password, just email our support team for help: support@boblov.com
After turning on the "Password Protection" option, the procedure below need to verify the password, as shown in diagrams 1-4:
- When connecting the camera to the computer;
- Try to activate the "Default Setting" or "Format SD-Card" option in the menu;
- If you choose to change the camera password, you need to verify the old password ( If the new camera, need to enter the default password).
Time & Date Setting
There are two ways for reference of time and date setting.
Manually Setting: when "GPS" option is Off
Enter Menu and find the option "Date&Time" to set a local one and save, per the diagrams shown below.

Sync Auto: when GPS option is On
- Enter Menu, find option of "Time Zone Select", set it to your local time zone, and save.
Eg: If you are in the US, set the time zone to GMT-08 (According to your local time zone) - Turn on the "GPS" option in the menu, then get the camera GPS located successfully (The white GPS icon turns to green, please refer to the diagram in "GPS Function"), then the camera date & time will sync to the local correct time. See the diagrams shown below.
Please use the GPS in an open place. Or the signal will be hard to locate.


Red-Blue Warning & White Illumination & Laser
Red-Blue Warning
In standby, short press the PTT/red-blue warning active button  to activate the alarm sound and Red-Blue Flash Lights, short press the button again to deactivate the alarm sound, and short press the button a third time to deactivate the Red-Blue Flash Lights.
White Illumination
After powering on, long press the audio/white light button  could turn on/off the White Illumination.
Red Laser
After powering on, long press the return button  could turn on/off the Red Laser.
Note: If turn on "Stealth Mode" option, the Red-Blue Warning & White Illumination and Red Laser cant be activated.
Working Indicator Light
Working ndicator Light  | Working Indicator Light  | |
| Charging | / | Solid Blue Light (When powering on for charging, this will be so id green&blue.) |
| Fully Charged | / | Blue Light Off |
| Power On/Standby | / | Solid Green Light |
| Connecting to Computer | Solid Red Light | Solid Green&Blue Light |
| Video Recording | Red Light Flash | / |
| Take Photos | Every press will flash red once | / |
| Audio Recording | Yellow Light Flash / | / |
Menu Introduction
- Short press menu button
![]() to enter menu page.
to enter menu page. - Short press
![]() button to select an option and confirm.
button to select an option and confirm. - Short press menu button
![]() to exit menu page.
to exit menu page.
 to enter menu page.
 button to select an option and confirm.
 to exit menu page.
| Menu Lists | Options |
| Resolution | 1440P30, 1296P30, 1080P30(defauIt), 720P30, 720P60, 480P30 |
| Photo Size | 8M, 12M, 14M, 20M, 26M, 34M, 40M, 48M(default) |
| Photo Burst Mode | Off(default), 3P, 5P, 10P, 20P |
| Pre Record | Off(default), On |
| Post - Record | Off(default), 5sec, 30sec, 1 min, 5min |
| Compression Storage | Off(default), On |
| Loop Recording | On(default), Off |
| Video Length | 5min, 10min, 15min, 20min(default), 30min |
| LCD Auto Off | Off, 5min (default) |
| Auto Power Off | Off, Imin, 3min, 5min, 10 min(default) |
| Key Tone | On(default), Off |
| Record with Sound | On(default), Off |
| Button Volurne | Low(default), Middle, High |
| Dash Camera Mode | Off(default), On |
| Anti-Virus | Off(default), On |
| File Browser mode | Photo mode(default), File mode |
| Device ID | 8888888(default) |
| Police ID | OOOOOO(defauIt) |
| Password Protection | Off(default), On |
| Change Password | default password: 000000 |
| Stealth Mode | Off(default), On |
| IR Filter | Manual(default), Auto |
| Video Broadcast | Off(default), On |
| Language | English(default), Espanol, Pyccкий, Deutsch, Italiano, Francais |
| Format SD-Card | / |
| Default Setting | / |
| Date & Time | Can be edited |
| GPS (Optional) | Off(default), On |
| Time Zone Select (Optional) | GMT |
| Version | Body Camera Firmware Version |
Specifications
| Display | 2.0" color display |
| Video Resolution | 1440P30, 1296P30, 1080P30(defauIt), 720P30, 720P60, 480P30 |
| Video Format | MOV |
| Photo Size | 8M, 12M, 14M, 20M, 26M, 34M, 40M, 48M(default) |
| Photo File | JPG |
| Wide Angle | 140° |
| Night Vision | Supported; 6 infrared lights |
| Power Supply | 5Vdc/1A or 5Vdc/2A |
| Battery Type | Built-in rechargeable 4500mAh lithium battery |
| Use Time | 15 Hours of video recording (1080P, GPS&IR Off, fully charged) |
| Charging Time | 6-8 Hours |
| Memory Capacity | Internal Memory; 64GB/128GB/256GB Optional |
| Voice Broadcast | Support |
| LCD Auto Off | Off, 5min (default) |
| Auto Power Off | Off, 1min, 3min, 5min, 10 min(default) |
| USB Port Type | Type-C Charging Port |
| Password Protection | Support |
| Working Temperature | Recommend: -5°C +45°C, 23-+113°F |
| Storage Temperature | Recommend: -10-+50°C, 14-+122°F |
| Size | 90x60x35mm, 3.5x2.4x1.4inch |
| Weight | 160g/5.60z/O.4lb |
| Compatible System | Windows XP/7/8 SP3/Vista and Mac 10.5 or update system version |
Troubleshooting
The device doesn't power on or stop working
- Connect the charger and USB cable to charge the camera and check whether the problem is solved after 6 hours of charging;
- Please check whether the charger and the USB cable are operating correctly.
- Connect your device to the wall socket, then press the power button to check whether it could be powered on.
- Use a pin to do a reset of the camera and re-power on to check again.
- If the problem cannot be solved, please contact customer service for further help.
Why does the camera stop recording? Can't record video anymore?
- Make sure the camera storage capacity is large enough to record. Turn on "Loop Recording" to let the camera record continuously by covering the old files once the memory is full.
- Physical Double check: Check whether the Video Button is intact and could be pressed down normally.
- Format the camera and do a hard reset then record again.
- If the problem cannot be solved, please contact customer service for further help.
A video or audio file cannot be played? Or no sound for videos?
- Please check the menu and turn on the "Record with Sound" option.
- It is recommended to play back videos/audio on the VLC media player on the computer.
The unit display is showing red/green
- Please turn on and off the night vision through the photo/lR button
![]() to check again.
to check again. - Please reset the camera and power it on to check.
 to check again.
Why does the unit screen turn off automatically
The camera enters the "LCD Auto Off' mode in default without 5 minutes of operation. If you want the display to always be on, please enter the menu to set the "LCD Auto Off" option to Off.
"LCD Auto Off" option can be set to Off, 5min (default).
Why does the unit shut off automatically
Please check whether the "Auto Power Off" option in the menu is On. If you want the camera to stay power-on state, please enter the menu to set "Auto Power Off" to Off
"Auto Power Off" can be set to Off, 1min, 3min, 5min, 10min(default).
I forgot my password so how to reset it?
We could send you the universal password to restore the camera password. Please email our support team for help: support@boblov.com
I lost the clips, can I get the replacement part?
If you need the spare accessories or replacement parts, feel free to email our after sale service: support@boblov.com
Packaging List

Please note:
Accessories may be updated without prior notice, please refer to the actual receipt of the items.
Customer Service
BOBLOV is dedicated to offering the best service to our valuable customers.
To reach BOBLOV customer service, please e-mail us:
Official Email Address: support@boblov.com
Amazon US Store: https://www.amazon.com/boblov
Amazon UK Store: https://www.amazon.co.uk/boblov
Official Website: www.boblov.com
Facebook: www.facebook.com/BOBLOVGlobal/
YouTube: https://www.youtube.com/@boblovltd
Instagram: https://www.instagram.com/boblov_ltd/
Tel: + 1(213) 905-9206
Address: 10700 Jersey Blvd #730
Rancho Cucamonga, CA 91730
The United States

 Facebook

 YouTube @boblovltd

@BOBLOV_LTD
Documents / Resources
References
Amazon.com: BOBLOV
Amazon.co.uk: BOBLOV
![www.boblov.com]() Police Body Camera | Body Worn Camera
Police Body Camera | Body Worn Camerahttp://www.facebook.com/BOBLOVGlobal/
![www.youtube.com]() BOBLOV LTD - YouTube
BOBLOV LTD - YouTube![www.instagram.com]() Instagram
Instagram![boblov.com]() Download
Download

Download manual
Here you can download full pdf version of manual, it may contain additional safety instructions, warranty information, FCC rules, etc.
Advertisement


Need help?
Do you have a question about the M5 and is the answer not in the manual?
Questions and answers