Advertisement
- 1 STRUCTURE DIAGRAM
- 2 LCD INDICATION
- 3 BASIC OPERATION
- 4 SYSTEM SETTING/MENU LIST
- 5 WORKING INDICATOR LIGHTS
- 6 WHITE LIGHT & ALARM FUNCTION
- 7 DASH CAMERA MODE
- 8 GPS FUNCTION
- 9 SPECIFICATIONS
- 10 TROUBLESHOOTING
- 11 PACKAGE LIST
- 12 CUSTOMER SERVICE
- 13 Documents / Resources
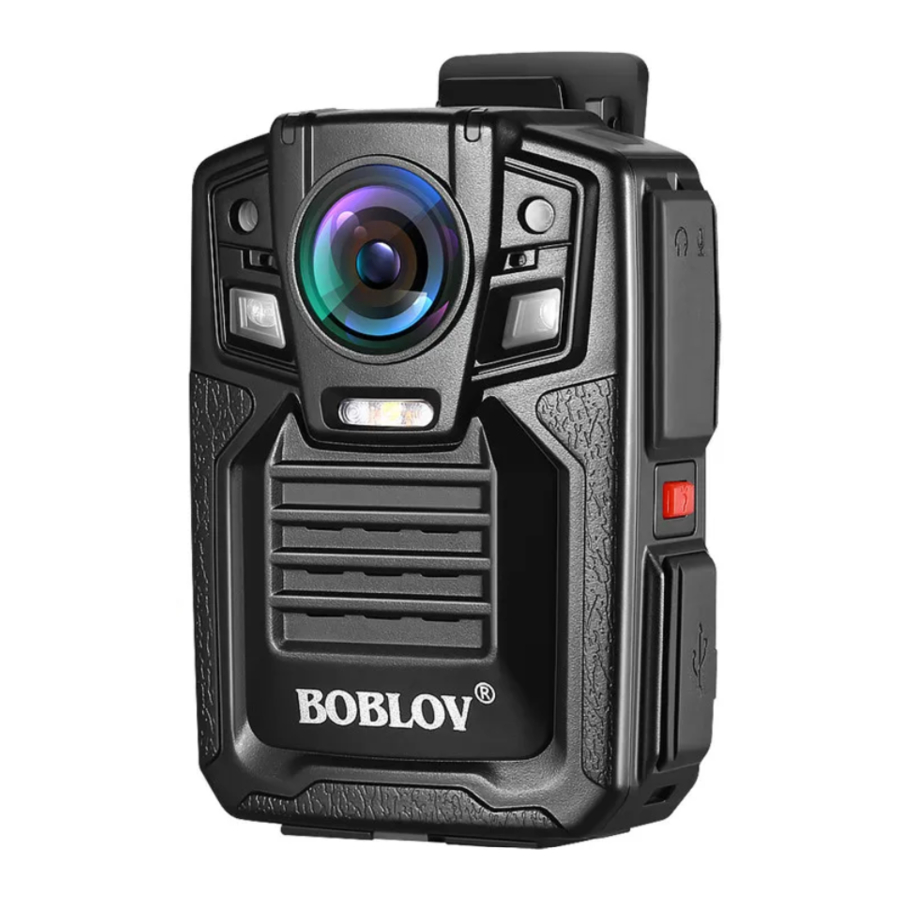
STRUCTURE DIAGRAM


- Menu/OK/Alarm Button
- Up/Mark/Zoom In/
Rewind Button - Down/Zoom Out/
Fast Forward Button - Return/Playback Button
- White Light/Flashing
- 4 pcs Infrared Lights
- Image Sensor
- Microphone
- Battery Slot
- Green Working Indicator
- Red Charging Indicator
- Reset Button
- White Light/IR Light Button
- 5-pin Mini USB Port
- Card Slot
- PPT Button(Optional, need to pair the intercom before purchase)
- Video Video Button
- Power On/Off Button
- Audio Button
- Photo Button
LCD INDICATION

- Resolution
- Remaining Video Recording Time
- Battery Capacity
- Device ID & Officer ID
- System Date & Time
- Memory Capacity
BASIC OPERATION
How to charge the device
- Low battery prompt:
When the battery voltage is too low, the battery icon in the upper right corner of the display will turn red, and the screen will intermittently display the words "Battery level is low" with a prompt sound, and it will automatically shut down after 5 minutes. - Please charge it in time if the battery is low, so as not to affect your use
- If idle the camera fora long time, please charge it every two months. When need to use it, please charge it fully first.
There are two ways to charge this product:
Method 1(Advised): Using the USB cable and charger plug to charge./Using the charging dock, USB cable and charger plug to charge.
After connecting the camera to the socket, the camera will be powered on auto and start charging, the working indicator light shows green, the charging indicator light shows red, and the red indicator goes out after fully charged.
The charging dock will show blue indicator when charging.
Method 2: Connect to computer to charge.
As shown in the below position, use the USB cable to connect to the computer.
When connect to computer charging, the working indicator light shows yellow, the charging indicator light shows red, and the red indicator goes out after fully charged.

Power On/Off/Standby Mode
Power On
In the shutdown state, press and hold the  button to power on, and enter the preview screen, the working indicator shows green.
Turn on the LCD Auto Off function in the menu, if without any operation after 5 minutes after powering on, the default is to automatically enter the LCD Auto Off mode. Start video recording for 5 minutes, without any other operations, then it automatically enters the LCD Auto Off mode and the red indicator keeps flashing.
(LCD Auto Off can be set to off/30 seconds/1min/3min/5min).
Power Off
In the power-on state, press and hold the  button for 3 seconds to power off, and all the indicator lights go out.
The Auto Power Off option in the menu, turn it on, if without any operation after 1min/3min/5min after powering on, the camera will automatically be powered off to save power.
(Auto Off can be set to Never (Default)/30 seconds/1min/3min/5min).
Standby Mode
In the power-on state, the working indicator stays green.
Turn on the LCD Auto Off option in the menu, if without any operation after 30 seconds/1min/3min/5min after powering on, the screen will turn off. Tap any button to light up the display screen.
Photo Taking
Normal Photo
In the power-on state, short press the  button to take a picture and automatically save it. There will be a "click" sound and red flashing once when taking the picture. Every press and hold will take one picture. The picture starts named with "IMG" and the date and time, and the suffix is JPG.
Short press  button in standby mode to enter the playback mode.
Zoom In & Out
In the photo mode, long press the  button to zoom in the scene on the screen, and long press the
  button to zoom out of the image.
The zoom in and zoom out can be adjusted in the range of 1X-8X.
Snapshot in Video Mode
During the recording process, short press  button to take a picture and save it automatically. The video recording will not be interrupted during this process.
Video Recording
Normal Video
In the standby mode with the preview screen, short press the  button to start the video record;
OR in power off state, long press button for 3 seconds to start video recording.
When recording, there is a red dot flashing slowly in the screen upper left corner, and the working indicator shows red flashing.
Press the button again to stop recording, the indicator turns back to steady green, the video file is automatically saved and the camera automatically returns to the preview screen. The video starts named with 'VID" and the date and time, with. MOV as the suffix.
Short press button in standby mode to enter the playback mode.
Snapshot
During the recording process, short press button to take a picture and save it automatically. The video recording will not be interrupted during this process.
Video Lock/Mark
Press button to start the video recording, click the button to lock the current video and mark it as a key video, a yellow star mark appears in the lower right corner of the screen, then need to click button again to save this key video. This function will not interrupt the video process.
(If press the button to set it to marked/locked video, can't be canceled or returned to a normal video.)
When playback files on the device, there will be a five-star mark in the upper left corner of the body cam.
When playback on the computer, the locked files name starts with "IMP".
During the important video recording, when press the button to take a picture to save, this photo is also a marked file and name starts with "IMP".
Please check the below picture:

If marked the video/photo as a locked files, this file will not be covered after the memory is full during the Loop Recording.
Zoom In & Out
In the video mode, long press the button to zoom in the scene on the screen, and long press the button to zoom out of the image. The zoom in and zoom out can be adjusted in the range of 1X-8X.
Audio Recording
Normal Audio
In the power-on state, tap the  button to start an audio recording.
When recording, the screen displays a microphone logo and recording details, and the working indicator flashes yellow.
Press the button again to stop the audio recording. The working indicator goes off and the audio file is automatically saved. The camera automatically returns to the preview screen. The indicator turns to steady green light.
The audio starts named with "AUD" and the date and time, with. WAV as the suffix.
Short press  button in standby mode to enter the playback mode.
Audio Lock/Mark
Press button to start the audio recording, click the button to lock the current audio and mark it as a key audio, a yellow star mark appears in the lower right corner of the screen, then need to click button again to save this key audio. This function will not interrupt the audio process.
(If press the button to set it to marked/locked audio, can't be canceled or returned to a normal audio.)
When playback files on the device, there will be a five-star mark in the upper left corner of the body cam.
When playback on the computer, the locked files name starts "IMP".

Night Vision
The infrared night vision function defaults to "Manual", and the infrared night vision light is off, which is suitable for daytime use.
For night use, need to manually switch to infrared night vision mode:
In the power-on state, long press the  button to turn on the IR mode.
At this time, the 4 infrared lights are turned on and appear red. The preview screen or the image changes to black and white.
Long press the button again to turn off the IR mode. IR lights turn off, and the preview screen or the image will be restored to the color one.
If need the camera to switch automatically, enter the menu to set IR Filter to "Auto". Then the camera can automatically switch the infrared night vision mode according to the brightness of the environment.
Files View/Playback
- In the standby mode, short press the
![]() button to enter the playback menu, and use the
button to enter the playback menu, and use the ![]() button or
button or ![]() button to select the desired option.
button to select the desired option. - Press the
![]() button to enter the playback list, and use the
button to enter the playback list, and use the ![]() button or
button or ![]() button to select the file to be played;
button to select the file to be played; - Press the
![]() button to view and press the
button to view and press the ![]() button to return to the previous menu.
button to return to the previous menu.
 button to enter the playback menu, and use the
 Fast forward and rewind
When playback the video files, short press the  button in order is rewind play, short press
  button act as fast forward.
Short press the or button once to increase the speed two times, The fast forward and rewind can be adjusted in the range of 2X-128X.
File Deletion
The HD66-02/D7 body camera doesn' t support deleting recorded files with the device itself, need to connect the camera to the computer using the standard cable to delete.
File Transfer/Computer Connecting
Connect to the computer by the USB cable attached. Then enter USB disk mode.
If turn on "Password" option in the menu, need to input the password you set first, (the default password is 000000) then could review or delete the files in the computer.
Camera Password
*Default Camera Password: 000000
There is "Password" option in the menu setting, click  button in the standby mode to get into menu, then turn to "Password" function. If want to turn it on, you need to insert the default password: 000000first. Click button again, then use the button or button to choose the "On" option and click button again to save the change.
After turning on the "Password" option, the below circumstance need to verify the password, including but not limited to:
- When connecting the camera to the PC side;
- Choose to change the camera password, need to verify the old password (lf the new camera, need to enter the default password), then could set a new password.
How to change the password?
Short press button in the standby mode, then turn to "Change Password" section in the menu. Before changing, you need to insert the default password: 000000 first. Then use the button or button to choose the 6 character password you desired, then need to click button to save the change.
Reset
When the device crashes or stops working due to improper operation or other special reasons, please press the button to reset the device. Then re-power the camera to check.

SYSTEM SETTING/MENU LIST
In standby mode, press the button to enter the setting menu.
After entering the menu interface, use the button or button to select the list to be set, press the button to confirm. Use the button or button to change the options, then press the button again to confirm and save the setting changes.

| Parameter Choice | Default Value | |
| Resolution | 1440P30, 1296P30, 1080P30, 720P30, 480P30 | 1080P30 |
| Photo Size | 8M, 14M, 20M, 26M, 32M, 40M | 14M |
| Photo Burst | On, Off | Off |
| Pre-Record | On, Off | Off |
| Post-Record | 5 sec, 30 sec, 1 min, 5 min, Off | Off |
| Video Quality | On, Off | Off |
| Exposure | 0, -0.3, -0.7, -1, -1.3, -1.7, -2 2, 1.7, 1.3, 1, 0.7, 0.3 | 0 |
| Loop Recording | On, Off | On |
| Video Length | 5 min, 10 min, 20 min, 30 min | 5min |
| Motion Detection | On, Off | Off |
| LCD Auto Off | 30 sec, 1 min, 3 min, 5 min, Off | 5min |
| Auto Power Off | 1 min, 3 min, 5 min, Never | Never |
| Key Tone | On, Off | On |
| Video Sound | On, Off | On |
| Device Volume | High, Middle, Low, Off | Middle |
| Dash Camera Mode | On, Off | Off |
| Device ID | Edit new numbers | 00000 |
| Officer ID | Edit new numbers | 000000 |
| Password | On, Off(Need to verify the default:.000000, then could turn on) | Off |
| Change Password | Verify and edit new password | 000000 |
| IR Filter | Auto, Manual | Manual |
| Voice Broadcast | On, Off(broadcast officer ID) | Off |
| Language | 简体中⽂,English | English |
| Default Setting | Restore default value after password verify. All settings will be reset. | - |
| Date&Time | Can be edited | - |
| Time Lapse | 2sec, 10sec, Off | Off |
| Stealth Mode | On, Off | Off |
| GPS | On, Off | Off |
| Version | Camera version information | - |
WORKING INDICATOR LIGHTS
- In the power-on state, camera standby, the working
- On the video mode, the working indicator light is red and
- On the audio mode, the working indicator is yellow and
- Connecting a camera to the computer, the working
- When charging, the charging indicator is red, and the red indicator will be off when fully charged. If charging when powering on, the charging indicator shows red and working indicator shows green;
- After powering on, every time a photo is taken, the working indicator flashes red once;
WHITE LIGHT & ALARM FUNCTION
White Light
After powering on, tap the  button once to turn on/off the white light, the camera emits white light, which acts as an illuminating light.
White Flashing and Alarm
After powering on, long press the  button to turn on the alarm function. The camera will sound an alarm and flash white light slowly. Long press the button again to turn off the alarm sound and the flashing light together.
DASH CAMERA MODE
If you want the camera to be a dash cam, on standby mode, press the button to enter the setting menu.
Use the  button or
  button to get the Dash Camera Mode option, press the button to get the two options of "Off' and "On". Press the button or button to change the option to "On", then press the button again to confirm and save the change.
Note please:
When you activate the dash camera mode, the camera will start to record auto after you connect the camera with your car in ignition status.

GPS FUNCTION
(OPTIONAL)
The GPS function is optional for the HD66-02/D7 body camera. If turn on the GPS when video recording, the route information will be collected, and using our provided GPS player could playback the video with the track information.
On standby mode, press the  button to enter the setting menu. Use the
  button or
  button to get the GPS option, press the button to get the two options of "Off' and "On". Press the button or button to change the option to "On" then press the button again to confirm and save the change.

Install the Car Suction Bracket and the Unit
(GPS Version)
Only the GPS version of the HD66-02/D7 camera includes a Car Suction Cup Bracket to install the body camera on the car windshield.
This suction cup only support the clean and smooth glass material. If the surface is not smooth enough or frosted glass can not suck firmly.
- Attach Car Bracket to D7 Camera

- Lock the snap and get the camera sucked on the windshield


Playback Video with GPS Info
After turning on the "GPS" in the menu, back to the preview screen, an  icon will show up on the right corner of the screen. Take a video and the GPS information will be collected.
Note: If the icon show white, mean the GPS signal is weak and couldn' t work. Only the icon show green the GPS information could be recorded normally.
Please use the camera in an open area to collect the GPS information. If in buildings, a traffic jam in the viaduct or tunnel, the GPS signal will be weakened.
In addition, if there is metal shielding around the camera, the weaken will be more obvious.

- GVPlayer to Playback the Video on PC
The GPS player only support the Windows Computer.
Method to download the GVP Player file:
To playback the video with GPS, please search boblov.com and find the "HD66-02/D7 GPS Video
Playback-GVP Player" file provided by the manufacturer to the computer desktop.


Steps as:
- After download the GPS Player compressed file, unzip it in a new folder on your computer desktop.
- Then enter this new folder, double click the file named "GVP" to open the GPS player.


Note please:
If there is a high-risk warning of the file or player, please don't worry, it is not virus, it is official files that we upload.
GPS Player Interface Indication

- Choose a video file to play
- Get a video screenshot
- Save file as
- Delete files
- Setting
- Slower speed
- Stop button
- Play/pause video
- Faster speed
- Volume adjust
- Auto-play next file
- Save GPS data as a KML file
- Turn on/off Map Section
- G-Sensor Curve
- Lock/Unlock file

Click the setting icon in the bottom left, here you can set the language and choose the Google Map to playback the video file.
SPECIFICATIONS
| Sensor | CMOS |
| Screen | 2.0 inch full HD LCD display screen |
| Camera angle | F2.5 iris diaphragm, 170° wide angle, 8X digital zoom |
| Video format | MOVH.264 compressed format |
| Video resolution | 1440p/30 |
| Photo format | PG |
| Photo resolution | 40 million pixel |
| Storage capacity | External memory type (max support 128GB) |
| Weight | Camera Net weight only 140g |
| Battery capacity | Dual batteries, 1950mAh per battery |
| Charging Dock Base | Equipped, standby battery and camera can be charged at the same time |
| Standby time | 9 hours (Two batteries) |
| Usage Time | 8 hours (2 batteries with 1080P, IR Off, Screen Off) |
| Full charge time | About 4 hours per battery |
| Night vision range | 10M |
| Working environment temperature | -30-55℃ |
| Working relative humidity | ≤93% |
| Storage temperature | -40-60℃ |
| Protection level | IP68 |
| Anti fall | 2.5M |
| Storage capacity | External memory type(max support 128GB) |
| Compatible Operating System | Windows 7/98/2000/ME/XP/8/10 |
TROUBLESHOOTING
The camera couldn't power on, does it stop working?
- Connect the charger and cable to charge the device, and check whether the problem is solved after 4 hours of charging;
- Please check whether the charging interface and the USB cable are normal;
- Use a pin to do a reset of the camera and re-power on to check again;
- If the problem cannot be solved, please contact customer service for further help.
Why the screen turns off automatically
The camera enters the LCD Auto Off mode in default without 5 minutes operation. If you want the display is always on, please enter the menu to set LCD Auto Off option to Off. LCD Auto Off can be set to off/30 seconds/1min/3min/5min.
Why does the unit shut off auto
Please check whether the Auto Power Off option in the menu is on. If you want the camera to stay power-on state, please enter the menu to set Auto Power Off to Off. Auto Off can be set to Never/30 seconds/1min/3min/5min.
What does the Stealth Mode in the menu mean
The Stealth Mode is default Off in the menu. If turn it on, when recording video/audio/taking photos or operating the camera, the indicator light and sound won't appear, realize the hidden recording.
A video or audio cannot be played? Or no sound for videos?
Please check the menu and turn on the "Video Sound" option. Turn to the loudest device volume of the camera to check whether the sound could playback normally with the camera itself. It is recommended to playback videos/ audio on the VCL media player/Quick Time Player on your computer.
Why the GPS can't work
Please use the camera in an open area to collect the GPS information.
If in buildings, a traffic jam in the viaduct or tunnel, the GPS signal will be weakened.
In addition, if there is metal shielding around the camera, the weaken will be more obvious. And please go to our website to download the GPS player.
Why it can't work with mac
Sorry, the camera only support windows system.
Where to buy spare clips/batteries/Car Suction Bracket for HD66-02/D7 Camera?
Please email our support team: Support@boblov.com We would spare every efforts to help you.
PACKAGE LIST

CUSTOMER SERVICE
BOBLOV is dedicated to offer the best service to our valuable customer.
To reach BOBLOV customer service, please e-mail us:
Official Email address: Support@boblov.com
Official Website: www.boblov.com
Facebook: www.facebook.com/BOBLOVGlobal/
 BOBLOV

Documents / Resources
References
![www.boblov.com]() Police Body Camera | Body Worn Camera
Police Body Camera | Body Worn Camerahttp://www.facebook.com/BOBLOVGlobal/
![boblov.com]() Police Body Camera | Body Worn Camera
Police Body Camera | Body Worn Camera

Download manual
Here you can download full pdf version of manual, it may contain additional safety instructions, warranty information, FCC rules, etc.
Advertisement


Need help?
Do you have a question about the HD66-02/D7 and is the answer not in the manual?
Questions and answers