Advertisement
- 1 Quick Start
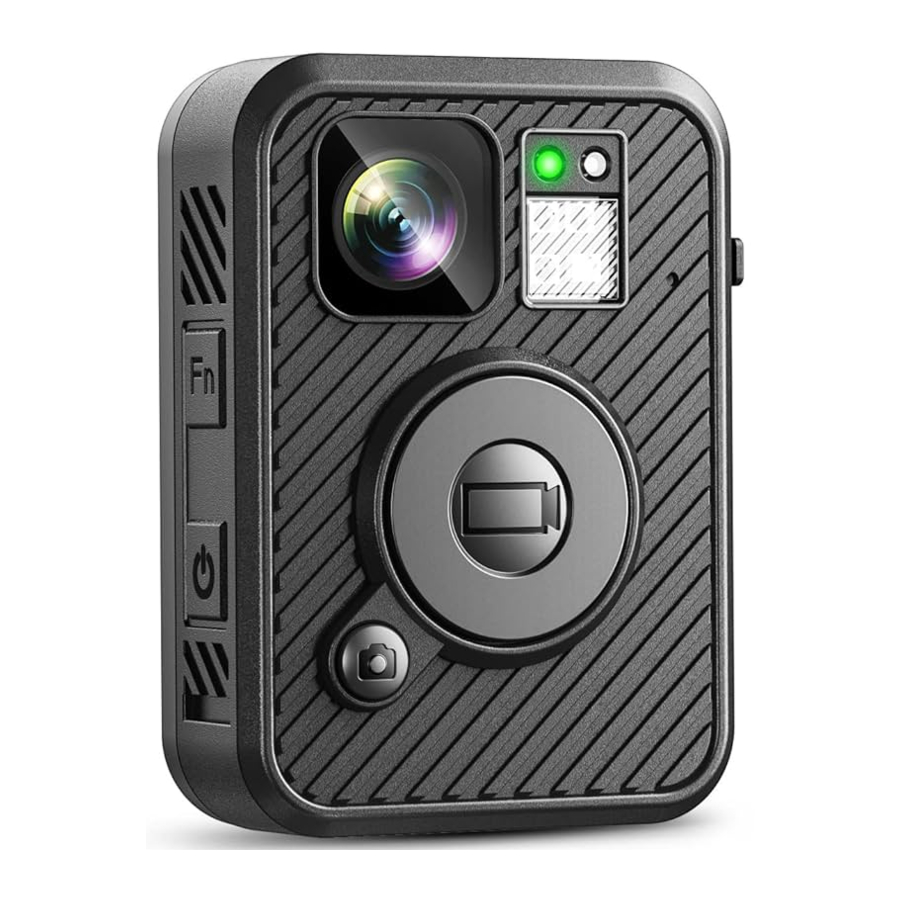
- 2 Product Button Function Introduction
- 3 Menu Function Introduction
- 4 Indicator Introduction
- 5 File Transfer/Connecting Computer
- 6 Date and Time Setting
- 7 CarDV Mode
- 8 You May Concern
- 9 GPS Function
- 10 WIFI Function
- 11 Reset
- 12 Specification
- 13 Troubleshooting
- 14 Package List
- 15 Caution
- 16 Customer Service
- 17 Documents / Resources
Quick Start
LCD Introduction

- Battery Level
- Video Resolution
- Frame per Second
- Coding Format
- Device&Officer ID
- Date and Time
- Recording Indicator
- Recording time
- Remaning recording time
- Total memory
- Available memory
Top Screen Introduction

- Battery
- Storage Icon(blocks will be decrease after recording.)
- GPS Icon
- Wifi Icon
- Recording time
Always full charge the battery before use. It advised to charge at least 6 hours by standard USB cable and charge (Power off states)
Quick Start to Get the unit for working

- Delete the files: In standby mode, press "
![]() " button to enter the playback mode, then long press "OK" button again for deleting the files on device. Short press "FN" to select video, photo, audio playback
" button to enter the playback mode, then long press "OK" button again for deleting the files on device. Short press "FN" to select video, photo, audio playback - If you set password, the default Password: 000000
- Press "Power" button to exit to previous interface when menu setting or playing back files
 " button to enter the playback mode, then long press "OK" button again for deleting the files on device. Short press "FN" to select video, photo, audio playback
 Product Button Function Introduction


| Item | Description |
| Showing GPS,WIFI, Infrared, recording status, battery level, or memory space; Press power button to turn the LCD on/off |
|
|
| Short Press to take photo in standby mode or in video recording mode |
| USB port is for power charging or data transmission |
| Short press for playback, long press for zoom out |
| Ok button for confirm |
| Short press for menu, long press for zoom in |
| Short press for audio recoridng, long press to turn on/off night vision |
|
|
Menu Function Introduction
To enter the setting menu:
- Press Menu button and then enter the password.
- If you set the password, enter the password by the following commands:
- Press Menu button to change the character to the previous letter or number.
- PressScroll down button to change the character to the next letter or number.
- Press OK button to confirm and move to the next character
PS: The default password is 000000.
- After selecting the last character, press OK button to enter the setting menu.
Settings menu:
- Press Scroll down button to select next setting or option.
- Press Menu button to select the previous setting or option.
- Press OK button to move to confirm your selection or enter the sub-menu.
- Press Power button to return to the previous menu.
| Setting | Description | Options |
| Video Resolution | The video resolution | 2560 x 1440 30P 2304 x 1296 30P 1920 x 1080 30P (default) 1280 x 720 30P 848 x 480 30P |
| Photo Resolution | The photo resolution | 5M (3008×1692 16:9) 12M (4608×2592 16:9) 20M (5984×3366 16:9) 25M (6656×3744 16:9) 30M (7296×4104 16:9) (default) 40M (8448x4752 16:9) |
| Burst | The number of images captured in a row when you take a photo. | Off(default), 2, 3, 5, 6, 8, 10, 15, 20 |
| Wifi | Wifi function on/off | Off(default), On |
| Self Timer | The time camera waits until taking a photo after you press Snapshot button. (only for photo mode) | Off(default), 5 Secs, 10 Secs, 20 Secs, 30 Secs, 1 Min |
| Quality | The quality of the video. | S.Fine(default), Fine, Normal |
| Pre-record | Merge the first 10-15s seconds of the recording into the recorded video, (The pre-record time is depens on the resolution you set) | Off(default), On |
| Post Record | The amount of the time the camera waits to stop recording video after you press the Record button. | Off(default), 5 Sec, 1 Min, 10 Mins, 20 Mins, Off(default), 5 Sec, 35 Mins |
| CarDV Mode | When on, camera will power up automatically and start video recording when it is charged. Camera will power off as it normally does when it is disconnected from the power source. | Off(default),On |
| Loop Recording | When on, camera will cover the oldest video file to save current video file once its memory is full. | Off, On(default) |
| Split Time | While recording video, the camera will automatically split its recording into files of this length. | 1 Min, 3 Mins, 5 Mins, 10 Mins(default), 15 Mins, 20 Mins, 30 Mins, 45 Mins |
| Slideshow | When on, viewing photo file will start a slideshow where each photo will be shown for around 5 seconds. | Off (default), On |
| Infrared | The night vision actived method | Manual (default), on |
| Record Warning | When on, you will hear a voice warning when you start recording. When off, voice warning is disabled. | Off(default),On |
| Video Mute | When on, there is no sound in the video. When off, there is sound in the video | Off(default),On |
| Global Positioning | GPS function on/off | Off(default),On |
| Time Zone | Must set to your local correct time zone firstly, once the GPS positioning success, camera will sync the correct local time | GMT-8:00 |
| Language | The language of the text in camera interface | English(default), 简体, 中文, Pусский, Polski, French, 日本語, |
| Screen Saver | Screen will be off to save battery without any operation | Off, 30 Secs, 1 Min, 3 Mins, 5 Mins(default) |
| LCD Brightness | Screen lighting to view | Low, Medium, High(default) |
| Auto Power off | Device will be turned off auto to save battery without any operation | Off, 5 Mins, 10Mins, 15Mins(default) |
| Indicator Light | When on, indicator LED will tell the status of the camera; When off, camera is entering stealth mode | Off, On(default) |
| Key Tone | When on, camera will play a tone each time you press a button. When off, tone is disabled. | Off, On(default) |
| Volume | The volume of camera speaker. It affects the loudness of video playback, audio playback, the key tone, record warning, and any other sounds played by camera. It doesn't affect the volume of the recorded video or audio files themselves. | 0-12 12(default) |
| Coding Format | The coding format of video files, With H.265 compression, the file size is smaller, which can save memory space. However, the player that comes with the WINDOWS system cannot directly open the file. Try to use VCL media player or Quick Time Player. | H.264(default), H.265 |
| Time Set up | Adjust time to real location | yyyy/mm/ddhh/mm |
| ID Setting | User can set Device ID and Officer ID | Alphanumeric characters |
| Password | If password is on, user needs to enter password to get access to setting and connection to PC | Off(default), On |
| Change User Password | Password can be set or changed | Alphanumeric characters |
| Default Setting | Use this to return camera to its original settings. It does not erase the memory | O (Yes), X (No) |
| FW Name | Firmware version |
Indicator Introduction
| Still Green: camera is in standby mode (Power on but not recording) Still Red: camera is on pre-recording mode Flashing Red: camera is recording video or audio recording Flashing Red Once: camera is taking photo |
| Still Blue: Charging Status Still White: Camera is fully charged |
File Transfer/Connecting Computer
Connect to the computer by the USB cable attached. Then enter USB disk mode.
If turn on "Password Protection" in the menu, need to input the password you set first (the default password is 000000) then could review or delete the files in the computer).

Date and Time Setting
GPS Version
- Enter Menu, find option of "TimeZone", set it to your local time zone, and save.
Eg: If you are in the US, set the time zone to "GMT-08:00" (According to your local time zone)

- Enter Menu, turn on the "Global Positioning" ( the top small icon will be yellow flash, the back of screen GPS icon flashes), then go outside to locate the GPS, once the GPS is located sucessfully, the top small icon will be yellow still. And back screen will show your coordinate position. Then the camera date & time will sync to the local correct time.
(Please use the GPS in an open place. Or the signal will be hard to locate.)


Note: If you don' t use GPS function, then you can enter menu to set the time directly. But if you turn on the GPS function, need to set your local correct time zone in the frist.

CarDV Mode
CarDV Mode means the camera will start recording auto as long as you power the machine.
If you want the camera to be a dash cam, on standby mode, enter the setting menu to set the "CarDV Mode" to "On" and save the change.

Note please:
When you activate the dash camera mode, the camera will start to record auto after you connect the camera with your car in ignition status.
Install the Car Suction Bracket and Camera
F2 body camera includes a Car Suction Cup Bracket to install the body camera on the car windshield.
This suction cup only support the clean and smooth glass material. If the surface is not smooth enough or frosted glass can not suck firmly.

Attach Car Bracket to F2 Camera

Lock the snap and get the camera sucked on the windshield
You May Concern
- Password
The default is password off, and if you need this function, turn on it in the menu, the default password is 000000, and if you forget your new password, enter NJMD07 to reset the camera password. - Return Button
Press "Power" button to exit to previous interface when menu setting or playing back files - Audio Button
In standby mode, short press "FN" to turn on/off the Audio - Loop Recording/Mark Important Files
When the loop record is on, the camera will cover previous files to save new file when the space is full.
If you don' t want certain files is covered, you can press "FN" button when recording as marked files. The screen will show a star as marked important file. Then this files won' t be covered.

- Video Fragment
The default is 10mins per video clip, if you want longer or shorter fragment, please go to menu " Split time" setting. - Playback
In standby mode, short press "![]() " button to enter playback.short press "FN" to select video, photo, audio playback.
" button to enter playback.short press "FN" to select video, photo, audio playback. - Delete file
- The camera supports to delete files by connecting the camera with computer
- You can also delete the password on the camera directly,

 " button to enter playback.short press "FN" to select video, photo, audio playback.
 - In standby mode, short press "
![]() " button to enter playback, and select one.
" button to enter playback, and select one. - Long press "OK" button to Delete the files
- If you don' t want to delete, press "Power" button to return previous
- Battery&Charging
The battery is 3000mAh battery, support 10 hours recording in 1080P and 4-6 hours charging. Please turn off the camera for charging.
Note:
Power off for charging and please charge camera fully after camera is left without working for long time.

GPS Function
(Optional)
Active the GPS function
Enter Menu, turn on the "Global Positioning" (the top small icon will be yellow flash, the back of screen GPS icon flashes), then go outside to locate the GPS,once the GPS is located successfully, the top small icon will be yellow still. And back screen will show your coordinate position. (Please use the GPS in an open place. Or the signal will be hard to locate.)


How to check the GPS video on computer
The GPS player only support the PC. To playback the video with GPS,
Method 1:
Connect the camera with PC via USB cable, and install the GPS player directly

Method 2:
please search boblov.com website and download the "F2 GPS Player" app provided by the manufacturer to the computer desktop.

Note:
if you are alerted that "the file has a virus, download it yes or no", don't worry, it is only because your computer monitors an unfamiliar file. The file has no problem.
GPS Player Interface Indication

- Select file and exit
- Language/Speed unit/map choose
- Version
- To play previous video
- Pause the video
- To play next video
- Stop playing
- Select a file
WIFI Function
(Optional)
IOS system
- Search "Eyescam pro" in apple store and download


- Turn on the wifi on the camera menu. The top small screen icon will be blue, and back screen icon will be green.

- Go to phone setting. Find out the body cameras Wifi SSID (amba-boss--) then input Wifi password (default 1234567890) and connect.

- Open "Eyescam Pro" App to enter main interface and connecting the device.

- Tap "Rec" "photo" icon to start recording, top "recording file" to preview the files. Tap right top icon to select file for download or delete.

- Exit the current interface Tap the folder to view the video and photo files which are downloaded. Tap Connecting device to enter online interface.


Android system
- Go to boblov.com website to download Android APK file. if you are alerted that "the file has a virus, download it yes or no", don't worry, it is only because your computer monitors an unfamiliar file. The file has no problem.
![]()
- The next connecting step is same with IOS, please refer to the IOS introduction from step

Note Please:
If the preview interface is like following, it is normal, as the files storage is big, it needs time to loading file. But don' t worry, you can still preview.

Reset

Use a small needle or paper clip to stick the camera.
Or long press power button with 18S to reset.
Specification
| Record resolution | GC4653 2M CMOS HD |
| Chipset | Amba H22 |
| Photo resolution | (5M/12M/20M/25M/30M) |
| Record resolution | 2670x1440 30P /2304x1296 30P 1920x1080 30P/1280x720 30P 848x480 30P |
| Audio format | 8-10hours |
| Recording time | 7.5hours (1080P,fully charged, IR off) |
| Battery capacity | 3000mAh |
| Charging time | 3hours (power off states) |
| Recording voice warning | On/off optional |
| Screen auto off | 30s/1min/3min/5min |
| UBS port | USB 2.0 |
| Angle degree | 125° |
| Waterproof rate | IP54 |
| Password protection | The file can only be deleted on computer after entering the password. When using the device, users can only browse files without deleting function. |
| Camera Size | 63x49x22mm |
| Camera Weight | 74g |
| Working temperature | -15~55°C (Very important, or the battery and camera will be damaged) |
Troubleshooting
The camera couldn't power on, stop working/ white screen/freeze?
Connect the charger and cable to charge the device with 4 hours; Long press power button about 18s to reset the camera.
Forget the password
The default is password off, and if you need this function, turn on it in the menu, the default password is 000000, and if you forget your new password, enter NJMD07 to reset the camera password.
A video or audio can not be played? Or no sound for videos?
Please check the menu and turn on the "Video Mute" function. Turn to the loudest volume of the Camera to check whether the sound could playback normally with the camera it self. It is recommended to playback videos/audio on the VLC media player or Quick Time Player.
Why the screen turns off automatically
The camera enters the LCD Auto Off mode in default Without 5 minutes operation. If you want the display is always on, please enter the menu to set LCD Auto Off option to Off. LCD Auto Off option can be set to off/1min/3min/5min.
Why does the unit shut off auto?
Please check whether the Auto Power Off option in the menu is auto power off in 15 mins without any operation. If you want the camera to stay power-onstate, please enter the menu to set Auto Power Off to Off. Auto Power Off mode can beset to off/5min/10min/15min.
The camera is stop recording after a coupon of hours?
To make sure the camera works well, fully charged 4-6hours before recording, then check if the sd card is full memory. we advised to open the loop recording in the menu, then the recording will cover previous file to save more space.
Package List

*Please note: Accessories maybe updated without prior notice, please refer to the actual receipt of the items.
Caution
- Do not expose camera or battery being placed in high/low temperature environment. If battery leaks or bulges, stop to use. Risk of explosion if battery is placed by an incorrect type.
- Never replace the battery on your own. It may cause the damage or explosion. Please contact us if the battery have any problem.
- Do not put the LCD display or lens under the sunshine.
- Never dismantle, crush, or pierce the product, or allow the product to short-circuit. Please persuade for professional assistance if the product doesn' t work properly.
- Always full charge the battery before use. It advised to charge at least 4 hours.
- If you do not use the machine, please charge the machine every once in a while, otherwise, the battery of the machine will be damaged slowly.
Customer Service
BOBLOV is dedicated to offer the best service to our valuable customer.
To reach BOBLOV customer service, please e-mail us:
Official Email address: Support@boblov.com
Official Website: www.boblov.com
Facebook: www.facebook.com/BOBLOVGlobal/
Tel: +1(213)905-9206
Address: 10700 Jersey Blvd Ste 730, Rancho Cucamonga CA 91730, US
 BOBLOV

Documents / Resources
References
![www.boblov.com]() Police Body Camera | Body Worn Camera
Police Body Camera | Body Worn Camerahttp://www.facebook.com/BOBLOVGlobal/
![boblov.com]() Police Body Camera | Body Worn Camera
Police Body Camera | Body Worn Camera![www.apple.com]() App Store - Apple
App Store - Apple

Download manual
Here you can download full pdf version of manual, it may contain additional safety instructions, warranty information, FCC rules, etc.
Advertisement


Need help?
Do you have a question about the F2 and is the answer not in the manual?
Questions and answers