boblov A22, A22P - Mini Body Camera Manual
- User manual (8 pages) ,
- User manual (26 pages)
Advertisement
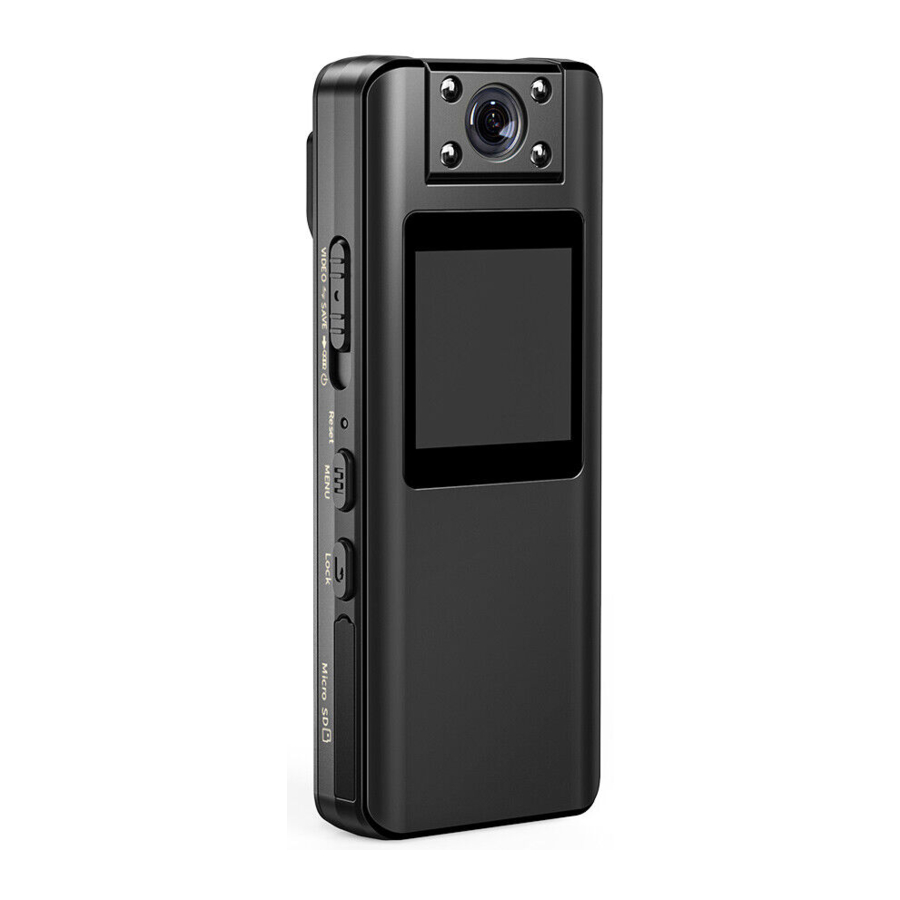
Structure Diagram

| 1 | Audio Record Button  | Push it up/down to start/end audio recording in power off/on state. |
| 2 | Play Button/ Confirm/ OK Button | When playback, act as play and pause. ln menu set, short press it to save changes. |
| 3 | Volume +/ Up Button  | In menu, short press to select upwards; When playing video, short press to increase the volume, when playback is paused, short press to the previous file; In the video/photo mode, short press to turn on/off the IR light. |
| 4 | Volume - / Down Button | In menu, short press to select down wards; When playing video, short press to decrease volume, when playback is paused, short press to next file |
| 5 | USB Interface | Charging port/ transfer files when connecting to computer |
| 6 | Power Button/ Video Record | Slide it down and hold it to power on/off. Slide it up to start video recording in powering on/off state. Then slide it to the middle position to save the video recorded. |
| 7 | Reset Hole | Use a pin to reset the camera if crashes |
| 8 | Menu Button | Long press to enter menu setting; Short press to switch the video/ photo/playback mode |
| 9 | Return/Off  Screen Button | Short press to turn off screen display; In menu, short press to previous menu |
| 10 | TF card slot | Insert a compatible card |
Basic Operation

 Note: Please format the card on the camera first when first using or changing the card.
 Power on the camera (not on the record video/ audio state);
 Long press the
  button to enter the menu
 setting, and select the "format" option via
  and
and  buttons;
Short press  and
and  buttons to select "OK"
 and short press the
  button to confirm.
Inserting Card Direction for reference:

Charging
Charge it with the standard cable. It could be cha rged correctly as you connect it to your charger or a working computer whether your device is on or off.
Inserting into power, the camera would be power on automatically, the red indicator shows up and stay. After a full of charge 3 hours, the indicator will turn sturdy green.
Note: It' s normal if it has a certain hot when charging. The screen of the recorder will display a text prompt when low battery and please charge it in time.
If idle the A22 mini camera for a long time, please charge it every 3 months.
Power On/Off
In the power-off state, push the  button down and hold for 3 seconds, the recorder is turned on then enters the standby mode of real time moni-toring. In standby mode, push the power button down and hold it for 3 seconds to turn off the device.
Take Photo
Press the  button, turn to the photo preview interface, press
  the button to take photos. When video recording, the camera couldn't snapshot at the same time.
Video Recording
Method 1: In the power-off state, slide up the video record button  to power on the device and start video recording, the blue indicator flashes. Then push the button down to a middle positioin
  to save the current file and stop video recording. The blue indicator goes off and the interface turns to the video just recorded.
Method 2: In the standby preview interface, slide the video button up to start video recording, the blue indicator flashes. While recording, push the button down to a middle position to save the current file and stop video recording. The blue indicator goes off and the interface turns to the video just recorded.
Video Mode Display

- Working Blue Indicator
- Video Icon
- Status Indicate (not displayed in standby mode, displays a red dot and flashes in video mode)
- Exposure Compensation
- System Date & Time
- Video Recording Length
- Video Resolution
- Memory Card Status
- Battery Level
Audio Recording
Method 1:
In the power-off state, push up the  button to power on the device and start the audio recor ding, the blue indicator flashes; Push the button down
  to save the current file and stop audio recording. Indicator goes off and the interface goes to the audio file page.
Method 2:
In the standby preview interface, push the audio button up  to start audio recording, the blue indicator flashes; Push the button down
  to save the current file and stop audio recording. Indicator goes off and the interface goes to the audio file page.
Night Vision (Optional)
A22 Model: In standby/video/photo mode, short pressthe  "Yolume+" button to switch to night vision mode manually. Press it again the real-time image turn colored.
A22P Model: Doesn't support the Night Vision feature. Sincewe get feedback from customers that A22 will have the pink/purple image when outside activities or in the sunshine, we remove the IR filter and disable the night vision. Update the camera for a stable image color.
LCD Off Mode / Auto Power Off
This device has a power-saving mode function. By default, it will automatically enter the LCD Off mode after 5 minutes without any operation. Then short press any key to light up the screen.
(The "LCD Off' could be set to 1 minute, 2 minutes, 3 minutes, 5 minutes, 10 minutes, off in the menu.)
Also, a short pressing of the return button  could turn off the screen display in any status, except in the menu setting. Short press any button to light up the display.
On standby, it will shut down after your set time. (The "Auto power off" could be set to 1 minute, 3 minutes, off in the menu.)
Files View /Playback
Powering on, short press the  button to switch to the playback mode, then press
  and
and  buttons to select the file needed to view, press the
  button to play the file, short press
  again could pause. (Short press
  to return or exit.)
When playing, press and buttons could adjust the volume of playing.
File Delete/Protection
Methods to delete the recorded files
Method 1: Deletion from the camera
In playback mode, (Short press  ) to enter play back when standby.) press
  and
and  buttons to select the file needed to be deleted, long press the
  button to the option of "Delete" and "Protect", press and buttons to confirm the "Delete Current"/"Delete All" choice, and press
  to choose "OK" to delete the files.
Note: The marked as protected video when recording couldn't be deleted. If unlock, still could be deleted
Method 2: Deletion from the PC side
Connecting the camera to the computer, press  and
and  buttons to choose the "MassStorage"of the camera and press the
  button to confirm.
Read the camera disk, choose to copy or delete the recorded file on PC.
File Protection
Note: The lock/protect option could only valid for VIDEO file.
In playback mode, (Short press  to enter playback when standby.) press and buttons to select the video file needed to be protected, long press the
  button to select the file needed to be protected, press and buttons to confirm the "Protect" choice, and press
  to confirm the "Lock Current" or "Lock All" choice, and press to save.
File Transfer/ Connect Computer
Connect the camera to the computer with a standard USB cable.
Press and buttons to select, and press the button to confirm.
When the recorder shows "Mass Storage", indicating that it is successfully connected to the computer and camera disk can be read.
Video files, photo files, and audio files are all stored in the DCIM folder.
Video format: MOV
Photo format: JPG
Audio format: WAV
Reset
If the camera crashesor stops working, you could do a reset by poking the reset hole with a pin or thimble (be careful not to use excessive force). The device will auto shut down after the reset and can be restarted by slide down and hold Power Button  for seconds to turn it on.

Indicator Light
- When charging or connecting to the computer, the red light showsand is steady on, and the green light stays on when fully charged.
- The blue indicator light flashes in the video recording.
- The blue indicator light keeps on for 2 seconds then goes out when taking photos.
- The blue indicator light flashes in the audio recording.
The Indicator light could be turned off the menu setting.
Abnormal Alarm
This device has two alarm prompts for abnormal conditions, namely:
- A text prompt will appear on the screen of the recorder when low battery.
- A text prompt will appear on the screen of the recorder when full memory / No TF card is inserted.
Image Rotation Function
The mini camera lens support 180 degrees of manual rotation.
There is an Image Rotation option in the menu setting, Off in default.
Circumstance 1:
The lens is on the side of the back clip, the Image Rotation option in the menu setting is Off, at this status, the image direction is in a correct way.
Reference for Wearing Way:

Circumstance 2:
The lens is on the side of the screen, at this time, the image is flipped, enter the menu setting and set the Image Rotation option to On, then a correct direction image shows up.
Reference for Wearing Way:

If find the preview image or recording image is flipped / upside down:
Method 1:
Please rotate manually the camera lens 180 degrees to check whether the image direction is corrected.
Method 2:
Enter the menu setting to turn on the "Image Rotation" function to "On'
System Setting/ Menu List
After powering on the device/ in standby, long press  button to enter the menu setting, press
  and
and  buttons to select the options to change, then press the
  button to confirm.
Option Details as follows:
| Parameter Choice | Default Value | |
| Video Resolution | 1080FHD/ 1080P/ 720P | 1080FHD |
| Photo Resolution | 40M/ 21M/ 12M/ 10M/8M/ 5M/ 3M/ 2MHD/ 1.3M/ VGA | 21M |
| Date & Time | Can be edited | / |
| Motion Detection | On, Off | Off |
| Loop Recording | Off/ 1Min/ 2Min/ 3Min/ 5Min/10Min | 10Min |
| Image Rotation | Off/ On | Off |
| Exposure compensation | +2.0, +5/3, +4/3, +1.0, +2/3, +1/3, +0.0, -1/3, -2/3, -1.0, -4/3, -5/3, -2.0 | +0.0 |
| Format | Format all the files in TF card | / |
| Language |  | English |
| Auto power off | Off/ 1 Min/ 3 Min | Off |
| LCD Off | Off/ 1Min/2Min/3Min/ 5Min/ 10Min | 5Min |
| Indicator light | Off/ On | On |
| Version | Date | / |
| Default | Restore all settings to a default value. | / |
Specifications
| Memory Capacity | Support 8GB-128GB External Card, please choose high quality Micro SDCard (Classic 10) |
| LCD Screen | 1.3 inch TFT LCD Screen |
| Lens | HD 160 degrees wide angle lens |
| Focus Distance | 50cm-Infinity |
| Exposure Method | Automatic |
| Night Vision | A22 Model: Support, Manually Activated, 4pcs invisible IR lights; A22S Model: Doesn' t Support |
| Max Photo Resolution | 40 million pixel JPG format |
| Max Video Resolution | 1080FHD (H.264) format |
| One Key Recording | Support one key to audio/ video record |
| MaxVideo Length | Turn off the Loop Recording, the camera support recording continuously, max every 10 min video saved as one file. |
| Motion Detection | Support |
| Date/Time Stamp | Support |
| Loop Recording | Support; Off/1Min/ 2Min/ 3Min/ 5Min/ 10Min |
| Live Playback | Play/ pause/fast-ward/ backward your savedvideos, photos & audios. |
| Power Saving Mode | Turn off the screen/ device to save power in recording / standby mode. |
| Prompt | Indicator/Screen Display |
| Microphone | Built-in microphone |
| Speaker | Built in speaker |
| Connection | High speed Micro USB 2.0 |
| Battery | 2200mAH / 3.8V lithium battery |
| Recording Time | About 10H (1080P, IR Off, Screen Off) |
| Input Voltage | Micro USB 5V/1A to 1.2A |
| Working Temperature | -10oC to 55oC |
| Size | 96mm x 37mm x 16mm (without back clip) |
Troubleshooting
Q: Can' t turn on or camera crashes, no response to keystrokes?
A:
- Please charge it for a least half an hour then turn it on.
- Press the Reset button once, then restart.
Q: Black screen appears after powering on.
A:
- The screen may enter the power-saving mode after pushing the return button mistakenly. Press any button again to light up the screen display;
- Press the Reset button once then restart the camera.
- Check whether the "LCD Off' is turn on in the menu,
If you want the display is always on, please enter the menu to set "LCDOff' option to Off. "LCD Off' option can be set to off/ 1 min/2 min/3min/ 5 min/10min. - If the issue remains, maybe the display screen is defective, contact after-sale for service.
Q: Incorrect system date and time.
A: Just set your date and time again in menu settings. Long press  button to enter the menu setting, press
  and
and  buttons to find " Date/Time",
press the  button to enter, press and buttons to change then press the button to confirm.
Q: The computer prompts "Please reconnect the device"./ The camera dish can' t be recognized by the computer.
A:
- Use another compatible USB cable to try again.
- Check whether the camera USB interface or computer USB port is damaged.
- If the issue remains, contact after-sale for service.
Q: The screen displays red color. A:
- Please press the
![]() button twice to reset the lens.
button twice to reset the lens. - Maybe the lens of the device malfunctioned, contact after-sale for service.
 button twice to reset the lens.
Q: A video or audio cannot be played? Or no sound for videos?
A: Turn to the loudest volume of the camera to check whether the sound could playback normally with the camera itself.lt is recommended to playback videos/ audio on the VCL media player on your computer.
Q: The preview image or recording image is flipped / upside down:
A:
- Please rotate manually the camera lens 180 degrees.
- Enter the menu setting to turn on the "Image Rotation" function to "On".
Customer Service
BOBLOV is dedicated to offer the best service to our valuable customer.
To reach BOBLOV customer service, please e-mail us:
Official Email address: support@boblov.com
Official Website: mvw.boblov.com
Facebook: www.facebook.com/BOBLOVGIobaI/
Tel: + 1(213) 905-9206
Address:
10700 Jersey Blvd #730 Rancho Cucamonga, CA 91730 USA

 BOBLOV
Documents / Resources
References
Download manual
Here you can download full pdf version of manual, it may contain additional safety instructions, warranty information, FCC rules, etc.
Advertisement


Need help?
Do you have a question about the A22 and is the answer not in the manual?
Questions and answers