Advertisement
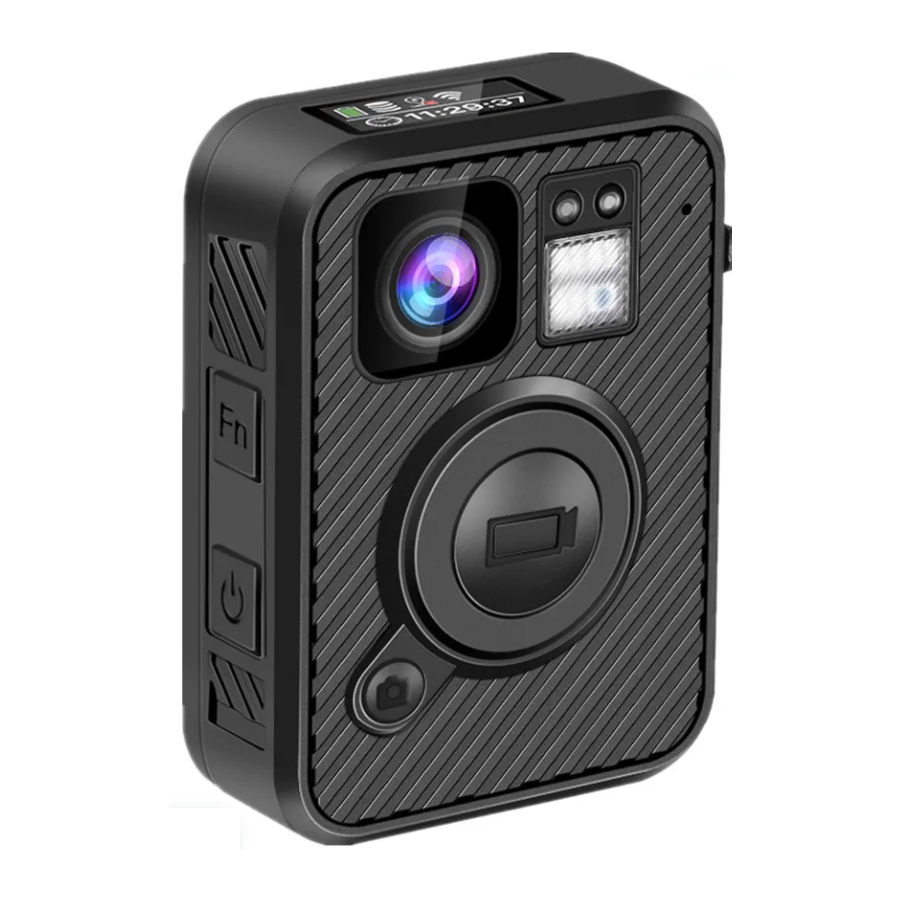
Structure Diagram

| Item | Description |
| Showing GPS,WIFI, Mute, Infrared, recording status, battery level, or memory space; Press power button to turn the LCD on/off |
| Connect the charging dock for charging or connecting to a PC. |
| Full HD camera |
| Green: standby mode (power on but not recording) Solid with Red: pre-record mode Flashing with Red: video recording (default off) Flash once: take a photo |
| Blue: charging status White: camera is fully charged |
| Providing infrared light compensation to help camera record clear video in low light conditions. |
| Detect changes of light to activate IR in lowlight condition automatically |
|
|
|
|
| For charging or connection to a PC |
|
|
| Long press for 3 seconds to turn on/off camera; Short press to turn on/off LCD screen when camera is on. |
Recording and Button Operation
Power on/off and Standby mode
Long press the power button for 3 seconds to power on the camera, camera will be in standby mode. Long press for 3 seconds again to power it off.
Video Recording
When the camera is in standby mode, short press Front Recording Button to start video recording. Recording initiates with the audio prompt (Recording start), Status Indicator LED (Red recording indicator flashing, default is off) and camera vibrates once.
Long press for 2 seconds to stop recording, camera vibrates twice and status indicator LED turns to solid green.
PS: when camera is in video recording statue, short press recording button is to turn off/on recording indicator (flashing with red), not to stop recording. You'll need to hold recording button for two seconds to stop video recording.
One Button Recording
When the camera is powered off, long press the Front Recording Button for 3 seconds to power on the camera and start video recording immediately.
Snapshot
Either when camera is in standby mode or video recording, short press the snapshot button to take a photo, status indicator LED will flash once with red.
Infrared (IR) Night Vision
When IR is in manual mode, short press the Fn button once to turn on/off IR lights. IR can be changed to auto mode via camera setting txt.
Video Mute
Short press the Fn button twice (double click) to enable Video mute function, when Mute is on, the recorded video won't have audio. When mute is enabled, camera will beep once, when mute is disabled, camera will beep twice.
Review videos / pictures on PC
Connect the camera to a computer, you can access camera folder directly. Videos / pictures are stored in DCIM.
Reset

When the device crashes or stops due to improper operation or other special reasons, please long press the Reset Button to reset the device Reset Button is under the USB cover, near the USB port.
LCD Screen

LCD screen overview
When the camera is powered on, short press the Power button to turn on / off the LCD screen. If there is no operation within 1 min, the LCD screen will be turned off automatically to save power.
")
Standby mode (power on but not recording)

Video Recording mode
")
Pre-Recording mode (Pre-recording is set to on)
IR icon: 
When camera IR Infrared light has been turned on, IR icon will show up
Mute icon: 
When camera mute function has been turned on, Mute icon will show up.
GPS icon: 
When GPS was set off, the GPS icon  shows up.
When GPS has been set on, GPS icon will show up, flashing. After GPS signal being received, GPS icon will go solid.
WIFI icon: 
When WIFI is off, WIFI icon is 
When WIFI has been turned on, WIFI icon will turn blue 
Storage icon: 
When storage is full, it will show 4 blocks, then one block less once storage has been used.
Battery icon: 
When battery is full, it will show 4 blocks, then one block less once battery has been used.
Resolution icon: 
When resolution has been set, Resolution icon will show accordingly, for example, 1440P, 1080P, 720P.
Video recording icon: 
When video recording starts, the red dot will start flashing. When camera is in standby mode, the red dot will be solid red.
Recording time: 
The time format HH:MM:SS, indicates the video recorded time.
 Note: LCD will enter screen-save mode (turn off) in one minute automatically. You can press power button to turn on/off the LCD.
LED Indication
Charging indication LED
Solid with Blue: charging status
Solid with White: camera is fully charged
Status Indicator LED
Solid with Green: standby mode (power on but not recording)
Solid with Red: pre-record mode
Flash with Red: video recording (default off)
Flash once with Red: taking a photo
Charging
Use the USB cable supplied in the box to charge the camera via the USB port on the side, or the USB port on the charging dock where camera is docked.
Note: upon receiving your body camera, it is recommended to get device fully charged before usage; Recharge the camera before long period of not being used.
Camera Settings
After camera is connected to computer, there is Setting.txt in camera folder. Double click to open it.

You can change the value after equal sign (" ") to change the camera setting. There are reference settings after double slashes. Value should be from these reference settings.
After you change the settings, click File (upper left corner) and save the change. After unplugged, camera is configured to new settings.
For example: for video resolution, you can change value from 720P to 480P.
Original: #video_resolution=720P;//1440P,1296P,1080P,720P,480P
After change: #video_resolution=480P;//1440P,1296P,1080P,720P,480P
Date and Time Setting
- Connect the camera to PC and create a txt file in root directory and rename it as datetime.txt.
- Open datetime.txt and write date and time in the format of 14 numbers (for example 20190813102305). These 14 numbers are for year (4 numbers, for example 2019), month (2 numbers from 01 to 12, for example 08), date (2 numbers from 01 to 31, for example 13), hour (2 numbers from 00 to 23, for example 10), minute (2 numbers from 00 to 59, for example 23) and second (2 numbers from 00 to 59, for example 05).
- Save the datetime.txt file and disconnect the camera with PC; and new date and time is set.


WiFi (optional)
- Search "Eyescam Pro" in App store or Google Play and download it to your phone or tablet.
 - Step 1")
- Long press Fn button to enable WiFi function of the camera, You will see WiFi icon on screen becomes blue when WiFi is on.
 - Step 2")
- Go to phone/tablet WiFi setting. Find out your body camera's WiFi SSID (amba-boss-. ...), then input WiFi password (default 1234567890) and connect.
 - Step 3")
- Open Eyescam Pro to enter main interface
 - Step 4")
Tap Folder to view the video and photo files which are downloaded.
Tap Connecting device to enter online interface.
 - Step 5")
 - Step 1")
 - Step 2")
 - Step 3")
 - Step 4")
 - Step 5")
Tap the resolution box to change the resolution (Live pictures will be smoother on a lower resolution)
Tap Recorder File to view the files online or download them (Online viewing or download will not consume phone traffic)
Tap Setting to enter setting menu.
 - Step 6")
Tap the button in the bottom right corner of the live window to maximize.
 - Step 7")
Specifications
| ID | 00000_000000 (can be edited) |
| Video Resolution | 1440P,1296P,1080P,720P (default), 480P |
| Video Split Time | 15min;//5min, 15min (default), 30min |
| Photo Resolution | 5M (default), 12M, 20M, 25M, 30M, 40M |
| GPS | off (default), on |
| Sound Volume | 0, 3, 6, 9, 12 (default) |
| Video Quality | Best (default), better, normal |
| Recording Warning | off, on (default) |
| Loop Recording | off (default), on |
| Infrared Mode | manual (default), auto, off |
| Codec Format | h.264 (default), 11.265 |
| Pre-recording | off (default), on |
| WiFi | off (default), on |
| Time zone | -12, -11, -10, -9, -8, -7, -6, -5, -4, -3, -2, -1, 0, 1, 2, 3, 4, 5, 6, 7, 8, 9, 10, 11, 12 |
| Recording Indicator | off (default), on |
| Standby Indicator | off (default), on |
Troubleshooting
Q: In video recording statue, I pressed the Front Recording Button, but it will not stop?
A: when camera is in video recording statue, short press recording button is to turn off/on recording indicator (flashing with red), not to stop recording. You'll need to hold recording button for two seconds to stop video recording.
Q: I connect the camera to a computer, but the computer doesn't recognize it.
A:
- Please make sure you are using the original USB cable.
- Please try to connect the camera to other USB ports, it is recommended to connect the camera to the back panel of your desktop pc.
Q: I can't receive GPS signal, the GPS icon keep flashing.
A:
- Please make sure you have enabled the GPS function by long press the photo button.
- GPS signals are affected by many factors, it is recommended to use the GPS function in the open air.
- Please use the GPS player (on the disc attached) to play the videos with localization.
Q: I can't place the camera on the charging dock.
A: Please make sure you placed the camera in the right direction. The big recording button should be in the same direction as the base indicator.
Q: How to change the time and date.
A: Please refer "Date and Time Setting" section.
Customer Service
BOBLOV is dedicated to offer the best service
To reach BOBLOV customer service, please e-mail us:
Support@boblov.com
Official Website: www.boblov.com
Facebook: www.facebook.com/BOBLOVGlobal/

 BOBLOV
Documents / Resources
References

Download manual
Here you can download full pdf version of manual, it may contain additional safety instructions, warranty information, FCC rules, etc.
Advertisement


Need help?
Do you have a question about the F1 and is the answer not in the manual?
Questions and answers