
Subscribe to Our Youtube Channel
Related Manuals for Grundig GEBD12302B


Summary of Contents for Grundig GEBD12302B
- Page 1 Built-in Oven User Manual GEBD12302B 385444177_/ EN/ R.AÂ/ 16/01/2024 11:29 7757787758...
- Page 2 Welcome! Dear Customer, Thank you for choosing the Grundig product. We want your product, manufactured with high quality and technology, to offer you the best efficiency. Therefore, carefully read this manual and any other documentation provided before using the product.
-
Page 3: Table Of Contents
General Warnings About Baking Table of Contents in the Oven........1 Safety Instructions......6.1.1 Pastries and oven food....25 Intended Use........6.1.2 Meat, Fish and Poultry ....28 Child, Vulnerable Person and Pet 6.1.3 Grill ..........29 Safety ..........6.1.4 Steam assisted cooking .... -
Page 4: Safety Instructions
1 Safety Instructions • This section includes the Intended Use safety instructions necessary • This product is designed to be to prevent the risk of personal used at home. It is not suitable injury or material damage. for commercial use. •... -
Page 5: Electrical Safety
supervised or trained about the • When the door is open, do not safe use and hazards of the put any heavy objects on it or product. allow children to sit on it. You • Children should not play with may cause the oven to tip over the product. - Page 6 which the product is connec- Otherwise, cable insulation ted, in compliance with the may melt and cause fire as a electrical regulations and sep- result of short circuit. arating all poles from the net- • Use original cable only. Do not work.
-
Page 7: Transportation Safety
of electric shock. Unplug the • Do not place items on the ap- product or turn off the fuse pliance. Carry the appliance from the fuse box. vertically. • The product must not be trans- If your product has a power ported when there is water in cable and plug: the it. -
Page 8: Safety Of Use
• Avoid using any heat-insulating • If you will not use the product materials to cover the interior for a long time, unplug it or of the furniture that will be in- turn off the power from the stalled. fuse box. •... -
Page 9: Temperature Warnings
Temperature Warn- • Close the oven door after pushing the accessories com- ings pletely into the cooking space, • CAUTION: When the product otherwise they may hit the is in use, the product and its door glass and damage it. accessible parts will be hot. -
Page 10: Steam System
Be mindful of the following pre- liquids dripping onto the tray cautions when using greasy can cause smoking or even ig- parchment paper or similar ma- nite flames. terials: • An air flow is generated when • Place the greaseproof paper in the product lid is opened. -
Page 11: Maintenance And Cleaning Safety
oven dry after cooking. Do not 1.11 Maintenance and store wet food items in the Cleaning Safety oven for a long time. • Wait for the product to cool be- • When removing the food after fore cleaning the product. Hot steam assisted cooking, hot li- surfaces may cause burns! quid may flow from the ac-... -
Page 12: Package Information
administration about these collection The following suggestions will help you use points. Disposing of the appliance properly your product in an ecological and energy-ef- helps prevent negative consequences for ficient way: the environment and human health. • Defrost frozen food before baking. •... -
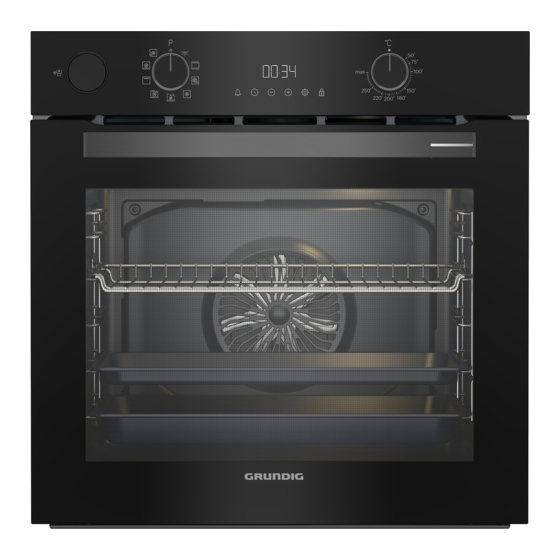
Page 13: Your Product
3 Your product 3.1 Product Introduction 1 Control panel 2 Lamp 3 Wire shelves 4 Fan motor (behind the steel plate) 5 Door 6 Handle 7 Water pool for steam assisted cook- 8 Shelf positions 9 Upper heater 10 Ventilation holes 11 Water tank 3.2 Product Control Panel Introduc- tion and Usage... -
Page 14: Control Panel
3.2.1 Control Panel 1 Water tank 2 Function selection knob 3 Timer 4 Temperature knob If there are knob(s) controlling your Timer product, in some models this/these knob(s) may be so that they come out when pushed (buried knobs). For settings to be made with these knobs, first push the relevant knob in and pull out the knob. -
Page 15: Product Accessories
order of the operating modes shown here may differ from the arrangement on your product. Function Temperature Function description Description and use symbol range (°C) Oven lamp No heater works in the oven. Only the oven lamp lights up. The oven is not heated. Only the fan (on the back wall) oper- ates. -
Page 16: Use Of Product Accessories
On models without wire shelves : Pastry tray It is used for pastries such as cookies and biscuits. Placing the wire grill on the cooking shelves On models with wire shelves : It is crucial to place the wire grill on the wire side shelves properly. - Page 17 the stopping socket on the wire shelf. It Tray stopping function - On models with must not pass over the stopping socket to wire shelves contact with the rear wall of the oven. There is also a stopping function to prevent the tray from tipping out of the wire shelf.
-
Page 18: Technical Specifications
3.6 Technical Specifications General specifications Product external dimensions (height/width/depth) (mm) 595 /594 /567 Oven installation dimensions (height / width / depth) 590-600 /560 /min. 550 (mm) Voltage/Frequency 220-240 V ~; 50 Hz Cable type and section used/suitable for use in the min. -
Page 19: First Use
4 First Use Before you start using your product, it is re- If the first timer is not set, “12:00” commended to do the following stated in symbol continue to flash the following sections respectively. and your oven will not start. For your oven to function, you must 4.1 First Timer Setting confirm the time of day by setting... -
Page 20: Using The Oven
NOTICE: During the first use, smoke and odour may come up for several hours. This is normal and you just need good ventila- tion to remove it. Avoid directly inhaling the smoke and odours that form. 5 Using the Oven •... - Page 21 Turning on the oven Cooking by setting the cooking time: When you select a operating function you You can have the oven turn off automatic- want to cook with the function selection ally at the end of the time by selecting the knob and set a certain temperature with the temperature and operating function spe- temperature knob, the oven starts operat-...
-
Page 22: Steam Assisted Cooking
5. After the set cooking time is completed, • If water remains inside the oven after each steam assisted cooking, dry the re- on the display, "End" appears, the maining water with a dry cloth after the symbol flashes and the timer beeps. oven has cooled-down. -
Page 23: Settings
the key lock is set, the timer sounds an Do not use distilled or filtered wa- audible signal and the symbol ter. Use ready-made waters only. flashes. Do not use flammable, alcoholic or solid particulate solutions instead If you release the key before the of water. - Page 24 ð After setting the alarm time, the Setting the display brightness symbol remains lit and the alarm 1. Touch key until the symbol ap- time starts to countdown on the pears on the display. display. If the alarm time and bak- ing time are set at the same time, the shorter time is shown on the display.
-
Page 25: General Information About Baking
5. Confirm by touching the key. ð The time of day is set and the sym- bol disappears on the display. 6 General Information About Baking You can find tips on preparing and cooking can create a risk of burns and affect the your food in this section. - Page 26 • Place your food on the appropriate shelf Hints for pastry recommended in the cooking table. Refer • If the pastry is too dry, increase the tem- to the bottom shelf of the oven as shelf perature by 10 °C and shorten the cook- ing time.
- Page 27 Food Accessory to be Operating func- Shelf position Temperature (°C) Baking time used tion (min) (approx.) Pastry Standard tray * Fan Heating 35 … 45 Top and bottom Standard tray * 20 … 35 heating Standard tray * Fan Heating 20 …...
-
Page 28: Meat, Fish And Poultry
• Do not preheat in the “Eco fan heating” operating function. Food Accessory to be Shelf position Temperature (°C) Baking time (min) used (approx.) Small cakes Standard tray * 30 … 40 Cookie Standard tray * 30 … 40 Pastry Standard tray * 40 …... -
Page 29: Grill
Food Accessory to be Operating func- Shelf position Temperature (°C) Baking time used tion (min) (approx.) 25 mins. 250/ Turkey (5.5 kg) Standard tray * "3D" function max, after 180 … 150 … 210 Wire grill * Top and bottom Fish 20 …... -
Page 30: Steam Assisted Cooking
Food Accessory to be Shelf position Temperature (°C) Baking time (min) used (approx.) Vegetable gratin Wire grill 4 - 5 20 … 30 Toast bread Wire grill 1 … 4 It is recommended to preheat for 5 minutes for all grilled food. Turn pieces of food after 1/2 of the total grilling time. -
Page 31: Test Foods
6.1.5 Test foods • Foods in this cooking table are prepared according to the EN 60350-1 standard to facilitate testing of the product for con- trol institutes. Cooking table for test meals Suggestions for baking with a single tray Food Accessory to be Operating func- Shelf position... -
Page 32: Maintenance And Cleaning
Preheating is recommended for all food. *These accessories may not be included with your product. **These accessories are not included with your product. They are commercially available accessories. Grill Food Accessory to be Shelf position Temperature (°C) Baking time (min) used (approx.) Meatball (veal) - 12... -
Page 33: Cleaning Accessories
• If your product has an easy steam clean- • If the surface is heavily soiled, apply the ing function, you can make easy steam cleaning agent on the stain with a sponge cleaning for light non-permanent dirt. and wait a long time for it to work prop- erly. -
Page 34: Easy Steam Cleaning
Cleaning the side walls of the oven The side walls in the cooking area can only be covered with enamel or catalytic walls. It varies by model. If there is a catalytic wall, refer to the “Catalytic surfaces” section for information. -
Page 35: Cleaning The Oven Door
2. Push the water reservoir on the control channel under the oven. Wipe this pool panel of your oven and remove the channel with a damp cloth after use and dry reservoir from its slot. Fill the reservoir with 200 ml of water. Do not use distilled or filtered wa- ter. -
Page 36: Removing The Inner Glass Of The Oven Door
5. (B) type hinge is available in soft closing 2. Pull the plastic component, attached on door types. the upper section of the front door, to- wards yourself by simultaneously push- ing on the pressure points on both sides of the component and remove it. 6. -
Page 37: Cleaning The Oven Lamp
crucial to place the lower corners of the innermost glass (1) to meet the lower plastic slots. 7. Push the plastic component towards the frame until a "click” sound is heard. 7.8 Cleaning the Oven Lamp 3. If your oven lamp is type (A) shown in the figure below, rotate the oven lamp In the event that the glass door of the oven as shown in the figure and replace it... -
Page 38: Troubleshooting
5. Refit the glass cover and wire shelves. 8 Troubleshooting If the problem persists after following the Oven is not heating. instructions in this section, contact your • The oven may not be set to a specific vendor or an Authorized Service. Never try cooking function and/or temperature.
Need help?
Do you have a question about the GEBD12302B and is the answer not in the manual?
Questions and answers